


环境说明:
Centos 7版本
| 主机名 | IP地址 |
| nginx | 192.168.10.150 |
| nginx-2 | 192.168.10.151 |
| nginx-3 | 192.168.10.152 |
| nginx-4 | 192.168.10.153 |
准备Nginx的页面内容,方便观察
#nginx-2、Nginx-3和Nginx-4的Nginx的页面内容
[root@nginx-2 ~]# vim /usr/local/nginx/html/index.html
This is 192.168.10.151
[root@nginx-3 ~]# vim /usr/local/nginx/html/index.html
This is 192.168.10.152
[root@nginx-4 ~]# vim /usr/local/nginx/html/index.html
This is 192.168.10.153
一、反向代理配置
[root@nginx ~]# vim /usr/local/nginx/conf/nginx.conf
worker_processes  1;
events {
    worker_connections  1024;
}
http {
    include       mime.types;
    default_type  application/octet-stream;
    sendfile        on;
    keepalive_timeout  65;
    server {
        listen       80;
        server_name  localhost;
        location / {
#proxy_pass就会把请求转发
        proxy_pass http://192.168.10.151;
#有proxy_pass,就不会访问下面的root
            #root   html;
            #index  index.html index.htm;
        }
        error_page   500 502 503 504  /50x.html;
        location = /50x.html {
            root   html;
        }
    }
}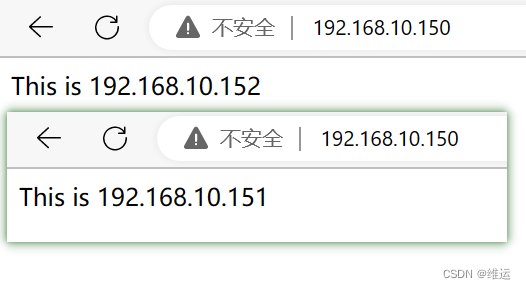
[root@nginx ~]# systemctl restart nginx#验证

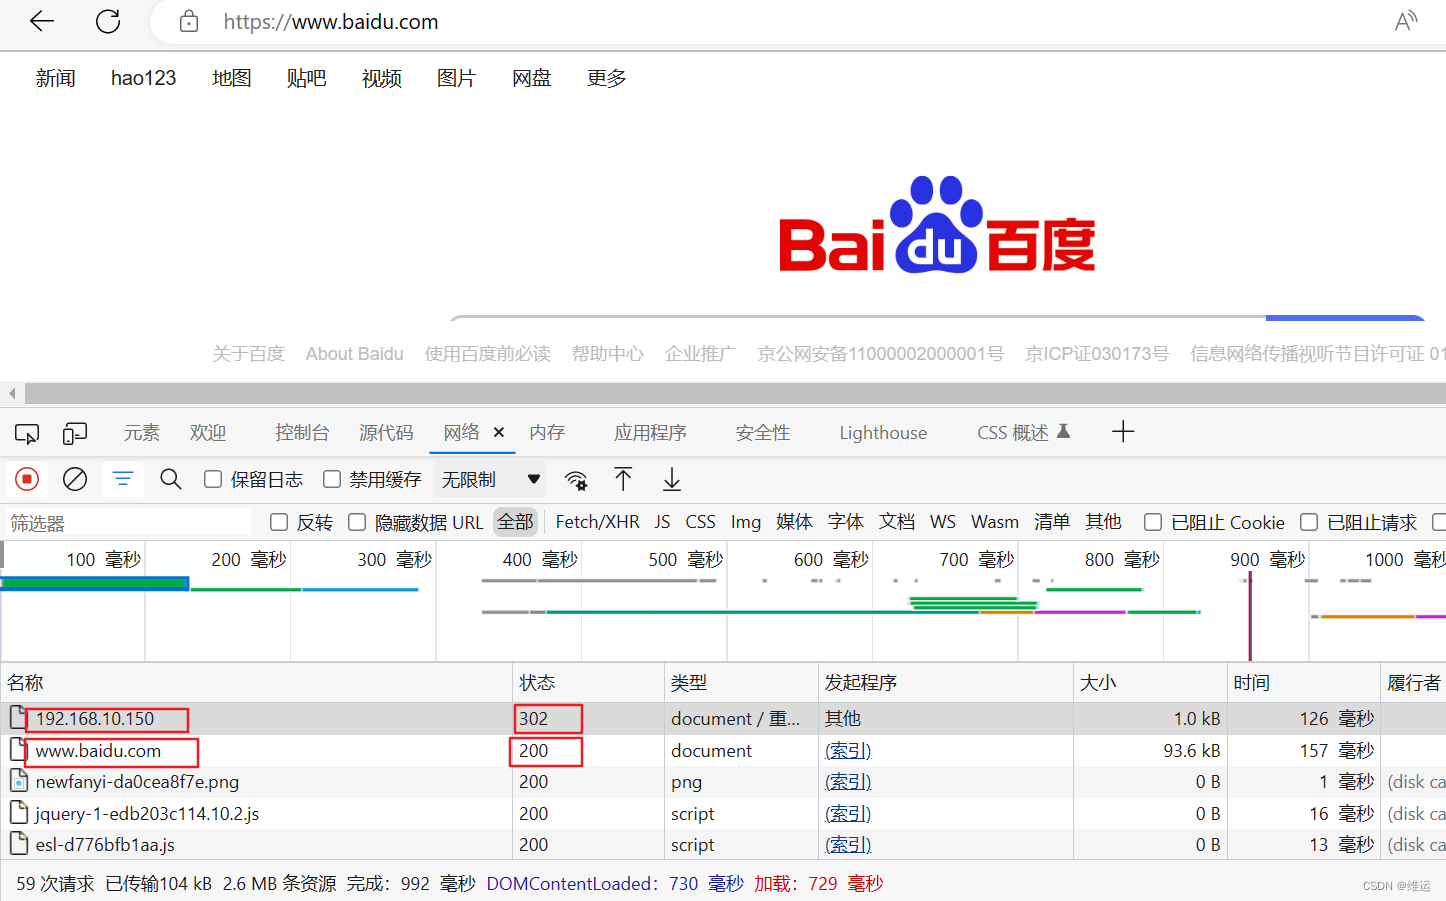
如果改为proxy_pass 百度一下,你就知道;结果如下:
二、负载均衡配置
-
基于轮询
[root@nginx ~]# vim /usr/local/nginx/conf/nginx.conf
worker_processes  1;
events {
    worker_connections  1024;
}
http {
    include       mime.types;
    default_type  application/octet-stream;
    sendfile        on;
    keepalive_timeout  65;
#upstream用于配置负载均衡后端服务器的地址,合成一个组,会有一个名称,proxy_pass就会把请求转发到这个组
    upstream backend {
      server 192.168.10.151:80;
      server 192.168.10.152:80;
}
    server {
        listen       80;
        server_name  localhost;
        location / {
        proxy_pass http://backend;
        }
        error_page   500 502 503 504  /50x.html;
        location = /50x.html {
            root   html;
        }
    }
}
[root@nginx ~]# systemctl restart nginx
#验证
#不断刷新地址
-
基于权重
#在轮询的基础上加上weight设置就行
[root@nginx ~]# vim /usr/local/nginx/conf/nginx.conf
worker_processes  1;
events {
    worker_connections  1024;
}
http {
    include       mime.types;
    default_type  application/octet-stream;
    sendfile        on;
    keepalive_timeout  65;
    upstream backend {
      #max_fails=3代表最大请求失败次数设置为3,fail_timeout=20s代表经历最大失败次数后,暂停服务的时间设置为20s
      server 192.168.10.151:80 weight=8 max_fails=3 fail_timeout=20s;;
      server 192.168.10.152:80 weight=6 max_fails=3 fail_timeout=20s;;
      server 192.168.10.153:80 weight=4 max_fails=3 fail_timeout=20s;;
}
    server {
        listen       80;
        server_name  localhost;
        location / {
        proxy_pass http://backend;
        }
        error_page   500 502 503 504  /50x.html;
        location = /50x.html {
            root   html;
        }
    }
}
[root@nginx ~]# systemctl restart nginx
#验证

down参数
#表示服务器下线,不再参与
[root@nginx ~]# vim /usr/local/nginx/conf/nginx.conf
worker_processes  1;
events {
    worker_connections  1024;
}
http {
    include       mime.types;
    default_type  application/octet-stream;
    sendfile        on;
    keepalive_timeout  65;
    upstream backend {
      server 192.168.10.151:80 weight=8 down;
      server 192.168.10.152:80 weight=6;
      server 192.168.10.153:80 weight=4;
}
    server {
        listen       80;
        server_name  localhost;
        location / {
        proxy_pass http://backend;
        }
        error_page   500 502 503 504  /50x.html;
        location = /50x.html {
            root   html;
        }
    }
}
[root@nginx ~]# systemctl restart nginx
#验证

backup参数
#标记一个服务器为备用服务器,当主服务器不可用时,Nginx会自动将请求到备用服务器上
[root@nginx ~]# vim /usr/local/nginx/conf/nginx.conf
worker_processes  1;
events {
    worker_connections  1024;
}
http {
    include       mime.types;
    default_type  application/octet-stream;
    sendfile        on;
    keepalive_timeout  65;
    upstream backend {
      server 192.168.10.151:80 weight=8 down;
      server 192.168.10.152:80 weight=6;
      server 192.168.10.153:80 weight=4 backup;
}
    server {
        listen       80;
        server_name  localhost;
        location / {
        proxy_pass http://backend;
        }
        error_page   500 502 503 504  /50x.html;
        location = /50x.html {
            root   html;
        }
    }
}
[root@nginx ~]# systemctl restart nginx
#验证

-
ip_hash-->会话保持
#客服端的IP地址hash处理,结果的值一样转发后端同一台服务器,用于保持会话。用法:
upstream backend {
    ip_hash;
    server backend1.example.com;
    server backend2.example.com;
}-
least_conn
#最小连接数,选择后端服务器连接数最少的进行转发。
upstream backend {
    least_conn;
    server backend1.example.com;
    server backend2.example.com;
}-
fair(第三方模块)
#根据后端响应时间分配请求,优先分配响应时间短,需要下载nginx-upstream-fair
upstream backend {
    fair;
    server backend1.example.com;
    server backend2.example.com;
}-
url_hash-->会话保持
#根据uri,也就是域名与IP地址后面部分,如果一样,则转发后端同台服务器;
upstream backend {
    hash $request_uri;
    server backend1.example.com;
    server backend2.example.com;
}-
cookie_jsessionid-->会话保持
#一般后端Tomcat会给客服端一个cookie,名称叫jsessionid,根据cookie是否一致,一致则转发同台服务器,如果后端是Nginx服务器,则需要第三方模块,分发cookie,如sticky模块
upstream backend {
    hash $cookie_jsessionid;
    server backend1.example.com;
    server backend2.example.com;
}-
sticky模块(第三方模块)-->会话保持
#基于cookie的,分发和识别cookie,一样则转发同台服务器,需要下载Nginx-sticky-module模块,下载地址nginx-goodies / nginx-sticky-module-ng / Downloads — Bitbucket,默认标识名为route,有过期时间。
[root@nginx ~]# wget https://bitbucket.org/nginx-goodies/nginx-sticky-module-ng/get/c78b7dd79d0d099e359c5c4394d13c9317b9348f.tar.gz
[root@nginx ~]# tar -xzvf c78b7dd79d0d099e359c5c4394d13c9317b9348f.tar.gz
#重新编译Nginx
[root@nginx ~]# cd nginx-1.22.1
[root@nginx nginx-1.22.1]# ./configure --with-http_ssl_module --with-http_v2_module --with-http_realip_module --with-http_gunzip_module --with-http_gzip_static_module --add-module=/root/nginx-goodies-nginx-sticky-module-ng-c78b7dd79d0d/
[root@nginx nginx-1.22.1]# make
[root@nginx nginx-1.22.1]# make install
[root@nginx ~]# systemctl restart nginx
1、如果编译出现了下面操作:
./configure: error: invalid option "--add-moudle=/root/nginx-goodies-nginx-sticky-module-ng-c78b7dd79d0d/"
解决方案:
[root@nginx nginx-1.22.1]#yum -y install gcc-c++ pcre pcre-devel zlib zlib-devel openssl openssl-devel --setopt=protected_multilib=false
[root@nginx nginx-1.22.1]# ./configure --with-http_ssl_module --with-http_v2_module --with-http_realip_module --with-http_gunzip_module --with-http_gzip_static_module --add-module=/root/nginx-goodies-nginx-sticky-module-ng-c78b7dd79d0d/
2、如果遇到定义问题,是由于版本过老
解决方案:
[root@nginx ~]# vim nginx-goodies-nginx-sticky-module-ng-c78b7dd79d0d/ngx_http_sticky_misc.c
添加头文件
#include <openssl/sha.h>
#include <openssl/md5.h>
#会自动备份以前的版本,如下

#可以看到Nginx编译一些信息,如下

用法:
#可以是sticky name=名称来修该名称;
upstream backend {
    sticky;
    server backend1.example.com;
    server backend2.example.com;
}
[root@nginx ~]# systemctl restart nginx
#验证,结果如下
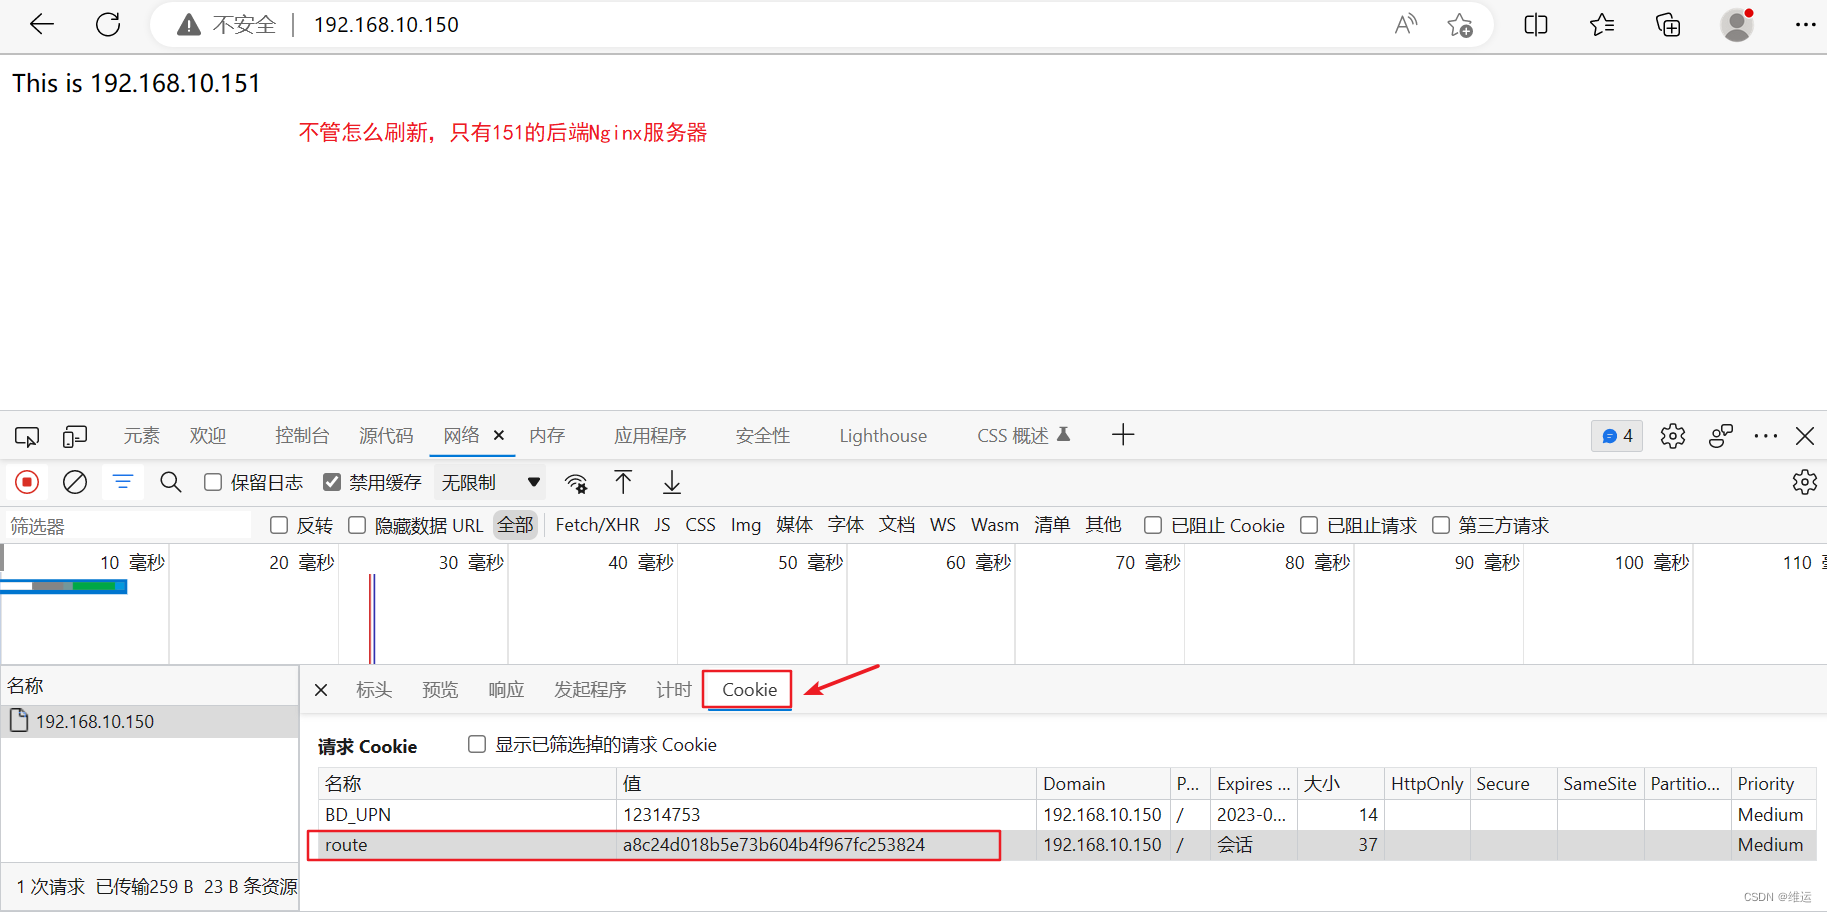
#如果cookie没过期,再打开一个页面,会跟后面的服务器一直保持会话。
三、动静分离
#后端
[root@nginx-2 ~]# vim /usr/local/nginx/html/index.html
<!DOCTYPE html>
<html>
<head>
<meta charset="UTF-8">
<title>My Website</title>
<link rel="stylesheet" href="css/style.css">
</head>
<body>
<h1>Hello World!</h1>
<p>Welcome to my website. This is 192.168.10.151.</p>
<button id="myButton">Click me!</button>
<script src="js/script.js"></script>
</body>
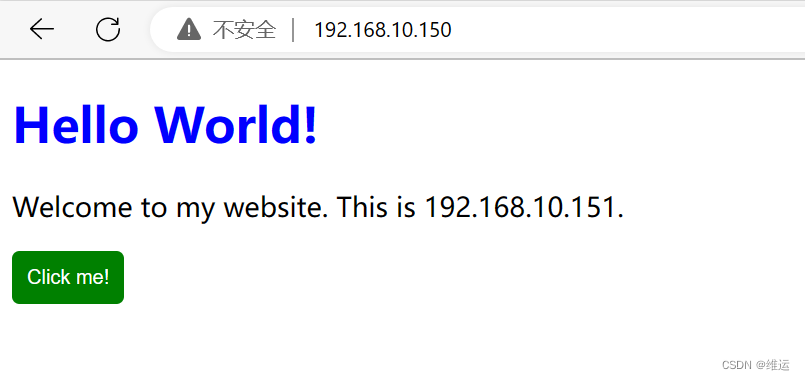
</html>#访问该页面结果如下:

#把css,js文件静态资源写在前端,根据prox_pass把请求转发后端处理
#css文件
[root@nginx ~]# cd /usr/local/nginx/html/
[root@nginx html]# mkdir css
[root@nginx html]# cd css
[root@nginx css]# vim style.css
h1 {
    color: blue;
}
p {
    font-size: 18px;
}
button {
    background-color: green;
    color: white;
    padding: 10px;
    border: none;
    border-radius: 5px;
    cursor: pointer;
}
#js文件
[root@nginx css]# cd ..
[root@nginx html]# mkdir js
[root@nginx html]# cd js
[root@nginx js]# vim script.js
document.getElementById("myButton").addEventListener("click", function() {
    alert("You clicked the button!");
});-
配置nginx.conf文件
[root@nginx html]# vim /usr/local/nginx/conf/nginx.conf
worker_processes  1;
events {
    worker_connections  1024;
}
http {
    include       mime.types;
    default_type  application/octet-stream;
    sendfile        on;
    keepalive_timeout  65;
    server {
        listen       80;
        server_name  localhost;
        location / {
        proxy_pass http://192.168.10.151;
        }
        location /css {
            root   html;
            index  index.html index.htm;
        }
        location /js {
            root   html;
            index  index.html index.htm;
        }
        error_page   500 502 503 504  /50x.html;
        location = /50x.html {
            root   html;
        }
    }
}
[root@nginx html]# systemctl restart nginx
#验证
localtion匹配优先级
-
精确匹配 =
-
前缀匹配 ^~
-
正则匹配:~、~*
-
不带任何修饰符的前缀匹配


 9527
9527


 被折叠的 条评论
为什么被折叠?
被折叠的 条评论
为什么被折叠?
 到【灌水乐园】发言


