


业务随行简介
在企业网络中,为实现用户不同的网络访问需求,可在接入设备上为用户部署不同的网络访问策略。但随着企业网络移动化、BYOD等技术的应用,用户的物理位置以及IP地址变化愈加频繁,这就使得原有基于物理端口、IP地址的网络控制方案很难满足用户网络访问体验一致性的需求(譬如网络访问权限不随用户物理位置变化而变化)。
业务随行是一种能够满足不管用户身处何地、使用哪个IP地址,都可以保证该用户获得相同的网络访问策略的解决方案。
业务随行解决方案需要交换机设备和Agile Controller-Campus配合使用。管理员仅需在Agile Controller-Campus上统一为用户部署网络访问策略,然后将其下发到所有关联的交换机设备即可满足不管用户的物理位置以及IP地址如何变化,都可以使其获得相同的访问策略。
配置注意事项
- 业务随行仅在NAC统一配置模式下支持。
- 适用的产品和版本如下表所示:
表1 适用的产品和版本 交换机版本
Agile Controller-Campus版本
交换机款型
V200R006C00、V200R007C00
V100R001
- S5720-HI
- S7700、S9700的X系列单板
V200R008C00
V100R002C00、V100R002C10
-
控制器下发交换机不支持的UCL组名称(比如中文字符、特殊字符)时,交换机不能解析。交换机支持的UCL组名称与命令ucl-group group-index [ name group-name ]中变量group-name的要求一致,不能为“-”、“--”、“a”、“an”、“any”或者包含以下任一字符“/、\、:、*、?、"、<、>、|、@、'、%”,所以在控制器上配置UCL组名称时,不能使用中文字符和这些特殊字符。
-
如核心交换机曾经与其他Agile Controller-Campus配置过业务随行,请执行如下步骤清除历史数据后再重新配置。
- 在系统视图执行undo group-policy controller命令,去使能业务随行功能,断开与Agile Controller-Campus的联动。
- 执行undo acl all命令清除访问权限控制策略。
- 执行undo ucl-group ip all命令清除安全组绑定的IP地址信息。
- 执行undo ucl-group all命令清除安全组。
- 退出到用户视图执行save命令保存,自动清除之前部署的版本号。
需求分析
如图1所示,认证点为支持敏捷特性的核心交换机coreswitch(带随板AC),接入交换机为普通交换机。
在核心交换机上配置802.1X认证和Portal认证,有线用户和无线用户在核心交换机认证通过后可以接入网络。
通过配置业务随行功能,无论用户在哪里接入都将获得同样的权限和体验,实现权限随行和体验随行。
数据规划
| 项目 | 数据 | 说明 | |
|---|---|---|---|
| VLAN规划 | ID:11 IP地址:192.168.11.254/24 | 与Agile Controller-Campus通信VLAN。 | |
| ID:12 IP地址:192.168.12.254/24 | 与AP之间的业务管理VLAN。 | ||
| ID:13 IP地址:192.168.13.254/24 | 无线接入业务VLAN。 | ||
| ID:14 IP地址:192.168.14.254/24 | 有线接入业务VLAN。 | ||
| 核心交换机(coreswitch) | 接口编号:GE1/0/11 允许通过VLAN ID:11 | 允许已规划的VLAN通过。 | |
| 接口编号:GE1/0/12 允许通过VLAN ID:12、14 | 允许有线接入的业务VLAN和AP的管理VLAN通过。 | ||
| 接入交换机 | 接口编号:GE0/0/1 允许通过VLAN ID:12、14 | 与核心交换机coreswitch的GE1/0/12接口连接。 | |
| 接口编号:GE0/0/3 允许通过VLAN ID:14 | 有线接入接口,允许有线接入的业务VLAN通过。 | ||
| 接口编号:GE0/0/5 允许通过VLAN ID:12 | 无线接入接口,允许AP的管理VLAN通过。 | ||
| 服务器 | Agile Controller-Campus:192.168.11.1 | SM和SC安装在同一台服务器。RADIUS服务器和Portal服务器包含在SC。 | |
| 邮件服务器1:192.168.11.100 邮件服务器2:192.168.11.101 | - | ||
| DNS服务器:192.168.11.200 | – | ||
| 项目 | 数据 | 说明 |
|---|---|---|
| 核心交换机(coreswitch) |
RADIUS认证服务器:
|
|
|
RADIUS计费服务器:
| ||
|
Portal服务器:
| ||
| XMPP密码:YsHsjx_202206 | 与Agile Controller-Campus配置一致。 | |
| Agile Controller-Campus | 核心交换机IP地址:192.168.11.254 | VLANIF 11的IP地址。 |
|
RADIUS参数:
| 与核心交换机上配置的一致。 | |
|
Portal参数:
| ||
| XMPP密码:YsHsjx_202206 | 与核心交换机配置一致。 | |
| 部门: 员工 | 假设ROOT下面已存在“员工”部门,本举例对“员工”部门配置业务随行。 | |
| 安全组: 员工组 邮件服务器:
| 在授权中将员工部门授权给员工组。 | |
| 认证后域 | 邮件服务器 | 员工认证通过后可以访问邮件服务器。 |
| 认证前域 | DNS服务器 | 员工认证通过前能够将域名发往DNS服务器做解析。 |
配置思路
核心交换机配置
- 切换为统一模式。
- 配置接口和VLAN,并启用DHCP服务器功能。
- 配置与RADIUS服务器对接参数。
- 配置与Portal服务器对接参数。
- 配置固定PC的接入认证点。
- 配置免认证规则。
- 配置AC系统参数,实现无线接入。
- 配置与Agile Controller-Campus对接的XMPP参数,使能业务随行功能。
接入交换机配置
- 配置接口和VLAN,实现网络互通。
- 配置802.1X报文透传功能。
-
本举例中,由于核心交换机与用户之间存在透传交换机LAN Switch,为保证用户能够通过802.1X认证,则务必在LAN Switch上配置EAP报文透传功能:
- 在LAN Switch系统视图下执行命令l2protocol-tunnel user-defined-protocol 802.1x protocol-mac 0180-c200-0003 group-mac 0100-0000-0002定义二层透明传输EAP报文。
- 在LAN Switch的下行与用户连接的接口以及上行与Switch连接的接口上执行命令l2protocol-tunnel user-defined-protocol 802.1x enable以使能接口的二层协议透明传输功能。
Agile Controller-Campus配置
- 设置RADIUS参数、Portal参数和XMPP参数,添加核心交换机。
- 配置“员工组”和“邮件服务器”安全组,分别代表用户和资源。
- 通过快速授权将“员工组”授权给员工部门,员工认证通过后被映射到“员工组”。
- 配置访问控制权限策略,允许“员工组”访问“邮件服务器”。
操作步骤
- 核心交换机配置。
- 将配置模式切换为统一模式。
使用业务随行功能的交换机必须切换为统一模式,切换为统一模式后需重启交换机方能生效。
<span style="color:#333333"><span style="background-color:#dddddd"><HUAWEI> <strong>system-view</strong> [HUAWEI] <strong>sysname coreswitch</strong> [coreswitch] <strong>authentication unified-mode</strong></span></span> - 配置接口和VLAN,并启用DHCP服务器功能。
<span style="color:#333333"><span style="background-color:#dddddd">[coreswitch] <strong id="ZH-CN_TASK_0176365384__b14044122180141">vlan batch 11 to 14</strong> [coreswitch] <strong id="ZH-CN_TASK_0176365384__b705998895180141">interface vlanif 11</strong> //作为源接口与Agile Controller-Campus通信 [coreswitch-Vlanif11] <strong id="ZH-CN_TASK_0176365384__b1928697468180141">ip address 192.168.11.254 255.255.255.0</strong> [coreswitch-Vlanif11] <strong id="ZH-CN_TASK_0176365384__b1556678227180141">quit</strong> [coreswitch] <strong id="ZH-CN_TASK_0176365384__b571935180180141">dhcp enable</strong> //使能DHCP服务 [coreswitch] <strong id="ZH-CN_TASK_0176365384__b91618183180141">interface vlanif 12</strong> //AP管理VLAN [coreswitch-Vlanif12] <strong id="ZH-CN_TASK_0176365384__b1723437402180141">ip address 192.168.12.254 255.255.255.0</strong> [coreswitch-Vlanif12] <strong id="ZH-CN_TASK_0176365384__b904479315180141">dhcp select interface</strong> //使能DHCP服务器功能,为AP分配IP地址 [coreswitch-Vlanif12] <strong id="ZH-CN_TASK_0176365384__b532825706180141">quit</strong> [coreswitch] <strong id="ZH-CN_TASK_0176365384__b549597005180141">interface vlanif 13</strong> //无线接入业务VLAN [coreswitch-Vlanif13] <strong id="ZH-CN_TASK_0176365384__b371205460180141">ip address 192.168.13.254 255.255.255.0</strong> [coreswitch-Vlanif13] <strong id="ZH-CN_TASK_0176365384__b437776393180141">dhcp select interface</strong> //使能DHCP服务器功能,为移动终端分配IP地址 [coreswitch-Vlanif13] <strong id="ZH-CN_TASK_0176365384__b851363558180141">dhcp server dns-list 192.168.11.200</strong> [coreswitch-Vlanif13] <strong id="ZH-CN_TASK_0176365384__b1176176489180141">quit</strong> [coreswitch] <strong id="ZH-CN_TASK_0176365384__b1995158239180141">interface vlanif 14</strong> //有线接入业务VLAN [coreswitch-Vlanif14] <strong id="ZH-CN_TASK_0176365384__b1376375925180141">ip address 192.168.14.254 255.255.255.0</strong> [coreswitch-Vlanif14] <strong id="ZH-CN_TASK_0176365384__b582208347180141">dhcp select interface</strong> //使能DHCP服务器功能,为固定PC分配IP地址 [coreswitch-Vlanif14] <strong id="ZH-CN_TASK_0176365384__b518585872180141">dhcp server dns-list 192.168.11.200</strong> [coreswitch-Vlanif14] <strong id="ZH-CN_TASK_0176365384__b1929196788180141">quit</strong> [coreswitch] <strong id="ZH-CN_TASK_0176365384__b1233435604180141">interface gigabitEthernet 1/0/11</strong> [coreswitch-GigabitEthernet1/0/11] <strong id="ZH-CN_TASK_0176365384__b2077143710180141">port link-type trunk</strong> [coreswitch-GigabitEthernet1/0/11] <strong id="ZH-CN_TASK_0176365384__b515260056180141">port trunk allow-pass vlan 11</strong> [coreswitch-GigabitEthernet1/0/11] <strong id="ZH-CN_TASK_0176365384__b1348857808180141">quit</strong> [coreswitch] <strong id="ZH-CN_TASK_0176365384__b1308088698180141">interface gigabitEthernet 1/0/12</strong> [coreswitch-GigabitEthernet1/0/12] <strong id="ZH-CN_TASK_0176365384__b240457000180141">port link-type trunk</strong> [coreswitch-GigabitEthernet1/0/12] <strong id="ZH-CN_TASK_0176365384__b2059546564180141">port trunk allow-pass vlan 12 14</strong> [coreswitch-GigabitEthernet1/0/12] <strong id="ZH-CN_TASK_0176365384__b143652957180141">quit</strong></span></span> - 配置与RADIUS服务器对接参数。
<span style="color:#333333"><span style="background-color:#dddddd">[coreswitch] <strong>radius-server template policy</strong> //创建RADIUS服务器模板“policy” [coreswitch-radius-policy] <strong>radius-server authentication 192.168.11.1 1812</strong> //配置RADIUS认证服务器的IP地址和认证端口1812 [coreswitch-radius-policy] <strong>radius-server accounting 192.168.11.1 1813</strong> //配置计费服务器的IP地址和认证端口1813 [coreswitch-radius-policy] <strong>radius-server shared-key cipher YsHsjx_202206</strong> //配置RADIUS共享密钥 [coreswitch-radius-policy] <strong>quit</strong> [coreswitch] <strong>aaa</strong> [coreswitch-aaa] <strong>authentication-scheme auth</strong> //创建认证方案auth [coreswitch-aaa-authen-auth] <strong>authentication-mode radius</strong> //认证方式RADIUS [coreswitch-aaa-authen-auth] <strong>quit</strong> [coreswitch-aaa] <strong>accounting-scheme acco</strong> //创建计费方案acco [coreswitch-aaa-accounting-acco] <strong>accounting-mode radius</strong> //计费方式RADIUS [coreswitch-aaa-accounting-acco] <strong>accounting realtime 15</strong> //计费周期15分钟 [coreswitch-aaa-accounting-acco] <strong>quit</strong> [coreswitch-aaa] <strong>domain default</strong> //进入default域,绑定RADIUS服务器模板、认证方案和计费方案 [coreswitch-aaa-domain-default] <strong>radius-server policy</strong> [coreswitch-aaa-domain-default] <strong>authentication-scheme auth</strong> [coreswitch-aaa-domain-default] <strong>accounting-scheme acco</strong> [coreswitch-aaa-domain-default] <strong>quit</strong> [coreswitch-aaa] <strong>quit</strong></span></span> - 配置与Portal服务器对接参数。
<span style="color:#333333"><span style="background-color:#dddddd">[coreswitch] <strong id="ZH-CN_TASK_0176365384__b555281976180141">url-template name huawei </strong>//创建URL模板 [coreswitch-url-template-huawei] <strong id="ZH-CN_TASK_0176365384__b970107475180141">url http://192.168.11.1:8080/portal</strong> //指定Portal认证推送的URL [coreswitch-url-template-huawei] <strong id="ZH-CN_TASK_0176365384__b1821450949180141">quit</strong> [coreswitch] <strong id="ZH-CN_TASK_0176365384__b389970220180141">web-auth-server policy</strong> //创建Portal服务器模板“policy” [coreswitch-web-auth-server-policy] <strong id="ZH-CN_TASK_0176365384__b719361327180141">server-ip 192.168.11.1</strong> //指定Portal服务器IP地址 [coreswitch-web-auth-server-policy] <strong id="ZH-CN_TASK_0176365384__b1177376069180141">port 50200</strong> //指定Portal服务器使用的端口号,Agile Controller-Campus作为Portal服务器时使用固定端口50200 [coreswitch-web-auth-server-policy] <strong id="ZH-CN_TASK_0176365384__b2125448530180141">shared-key cipher YsHsjx_202206</strong> //配置Portal共享密钥 [coreswitch-web-auth-server-policy] <strong id="ZH-CN_TASK_0176365384__b810661550180141">url-template huawei</strong> //绑定URL模板 [coreswitch-web-auth-server-policy] <strong id="ZH-CN_TASK_0176365384__b1072862333180141">quit</strong></span></span> - 配置接口GE1/0/12为固定PC的接入认证点。
<span style="color:#333333"><span style="background-color:#dddddd">[coreswitch] <strong>interface gigabitEthernet 1/0/12</strong> [coreswitch-GigabitEthernet1/0/12] <strong>authentication dot1x portal</strong> //配置802.1X和Portal混合认证 [coreswitch-GigabitEthernet1/0/12] <strong>dot1x authentication-method eap</strong> //配置802.1X认证采用EAP方式 [coreswitch-GigabitEthernet1/0/12] <strong>web-auth-server policy direct</strong> //配置采用二层Portal认证 [coreswitch-GigabitEthernet1/0/12] <strong>domain name default force</strong> //配置域default为该接口上线用户的强制认证域 [coreswitch-GigabitEthernet1/0/12] <strong>quit</strong></span></span> - 配置免认证规则,使AP能够上线、客户端能够访问DNS服务器。
<span style="color:#333333"><span style="background-color:#dddddd">[coreswitch] <strong>authentication free-rule 1 destination ip 192.168.11.200 mask 24 source ip any</strong> [coreswitch] <strong>authentication free-rule 2 source vlan 12</strong></span></span> - 配置AC(即本举例中的coreswitch)系统参数,实现无线接入。
- 配置AC的国家码、ID和运营商标识。
<span style="color:#333333"><span style="background-color:#dddddd">[coreswitch] <strong>wlan ac-global country-code cn</strong> [coreswitch] <strong>wlan ac-global ac id 1 carrier id other</strong></span></span> - 配置管理VLAN 12的VLANIF接口作为AC的源接口。
<span style="color:#333333"><span style="background-color:#dddddd">[coreswitch] <strong>capwap source interface vlanif 12</strong></span></span>- V200R006及更低版本,请在wlan视图下执行wlan ac source interface vlanif 12命令。
- V200R007及更高版本,请在系统视图下执行capwap source interface vlanif 12命令。
- 在AC上管理AP,AP7110DN-AGN属于的类型ID,现场获取AP的MAC地址为dcd2-fc04-b4c0。
<span style="color:#333333"><span style="background-color:#dddddd">[coreswitch] <strong>display ap-type all</strong>      //查看支持的AP类型
  All AP types information:
  ------------------------------------------------------------------------------
  ID     Type
  ------------------------------------------------------------------------------
  17     AP6010SN-GN
  19     AP6010DN-AGN
  21     AP6310SN-GN
  23     AP6510DN-AGN
  25     AP6610DN-AGN
  27     AP7110SN-GN
  <strong>28     AP7110DN-AGN</strong>
  29     AP5010SN-GN
  30     AP5010DN-AGN
  31     AP3010DN-AGN
  33     AP6510DN-AGN-US
  34     AP6610DN-AGN-US
  35     AP5030DN
  36     AP5130DN
  37     AP7030DE
  38     AP2010DN
  39     AP8130DN
  40     AP8030DN
  42     AP9330DN
  ------------------------------------------------------------------------------
  Total number: 19</span></span>
<span style="color:#333333"><span style="background-color:#dddddd">[coreswitch] <strong>wlan</strong> [coreswitch-wlan-view] <strong>ap-auth-mode mac-auth</strong> //配置AP以MAC认证方式在AC上认证 [coreswitch-wlan-view] <strong>ap id 1 type-id 28 mac dcd2-fc04-b4c0</strong> //根据AP类型ID和AP MAC地址将AP添加到AC [coreswitch-wlan-ap-1] <strong>quit</strong> [coreswitch-wlan-view] <strong>ap-region id 10</strong> //创建AP域 [coreswitch-wlan-ap-region-10] <strong>quit</strong> [coreswitch-wlan-view] <strong>ap id 1</strong> [coreswitch-wlan-ap-1] <strong>region-id 10</strong> //将AP加入AP域 [coreswitch-wlan-ap-1] <strong>quit</strong></span></span><span style="color:#333333"><span style="background-color:#dddddd">[coreswitch-wlan-view] <strong>display ap all</strong> //AP上电后,可以查看到AP的“AP State”字段为“normal” All AP(s) information: Normal[1],Fault[0],Commit-failed[0],Committing[0],Config[0],Download[0] Config-failed[0],Standby[0],Type-not-match[0],Ver-mismatch[0] ------------------------------------------------------------------------------ AP AP AP Profile AP AP /Region ID Type MAC ID State Sysname ------------------------------------------------------------------------------ 1 AP7110DN-AGN dcd2-fc04-b4c0 0/10 <strong>normal</strong> ap-1 ------------------------------------------------------------------------------ Total number: 1,printed: 1</span></span>如果调整某个AP的信道功率参数,可能会导致另一个AP的参数被调整,形成多米诺骨牌效应。为了尽量减少参数调整的持续时间和影响范围,建议用户在网络规划时把同一AC下的所有AP(暂不考虑跨AC的情况)划分成若干个域,每次调整时骨牌效应只限定在域这个局部范围内,同时也减轻了调整算法的负荷。
- 配置WLAN业务参数。
<span style="color:#333333"><span style="background-color:#dddddd">[coreswitch-wlan-view] <strong>wmm-profile name wmm id 1</strong> //创建WMM模板“wmm” [coreswitch-wlan-wmm-prof-wmm] <strong>quit</strong> [coreswitch-wlan-view] <strong>radio-profile name radio id 31</strong> //创建射频模板“radio” [coreswitch-wlan-radio-prof-radio] <strong>wmm-profile name wmm</strong> //绑定WMM模板 [coreswitch-wlan-radio-prof-radio] <strong>quit</strong> [coreswitch-wlan-view] <strong>quit</strong> [coreswitch] <strong>interface wlan-ess 32</strong> //创建WLAN-ESS接口32,用于Portal认证 [coreswitch-Wlan-Ess32] <strong>port trunk allow-pass vlan 13</strong> [coreswitch-Wlan-Ess32] <strong>quit</strong> [coreswitch] <strong>interface wlan-ess 33</strong> //创建WLAN-ESS接口33,用于802.1X认证 [coreswitch-Wlan-Ess33] <strong>port trunk allow-pass vlan 13</strong> [coreswitch-Wlan-Ess33] <strong>quit</strong> [coreswitch] <strong>wlan</strong> [coreswitch-wlan-view] <strong>security-profile name portal_security id 32</strong> //创建安全模板portal_security [coreswitch-wlan-sec-prof-portal_security] <strong>quit</strong> [coreswitch-wlan-view] <strong>security-profile name dot1x_security id 33</strong> //创建安全模板dot1x_security,并设置安全参数 [coreswitch-wlan-sec-prof-dot1x_security] <strong>security-policy wpa2</strong> [coreswitch-wlan-sec-prof-dot1x_security] <strong>wpa2 authentication-method dot1x encryption-method ccmp</strong> [coreswitch-wlan-sec-prof-dot1x_security] <strong>quit</strong> [coreswitch-wlan-view] <strong>traffic-profile name traffic id 1</strong> //创建流量模板traffic [coreswitch-wlan-traffic-prof-traffic] <strong>quit</strong> [coreswitch-wlan-view] <strong>service-set name portal_test id 32</strong> //创建服务集portal_test,并绑定WLAN-ESS接口、安全模板和流量模板 [coreswitch-wlan-service-set-portal_test] <strong>ssid portal_test</strong> [coreswitch-wlan-service-set-portal_test] <strong>wlan-ess 32</strong> [coreswitch-wlan-service-set-portal_test] <strong>security-profile id 32</strong> [coreswitch-wlan-service-set-portal_test] <strong>traffic-profile name traffic</strong> [coreswitch-wlan-service-set-portal_test] <strong>service-vlan 13</strong> //无线接入业务VLAN [coreswitch-wlan-service-set-portal_test] <strong>forward-mode tunnel</strong> //配置服务器的数据转发模式为隧道转发 [coreswitch-wlan-service-set-portal_test] <strong>quit</strong> [coreswitch-wlan-view] <strong>service-set name dot1x_test id 33</strong> //创建服务集“dot1x_test”,并绑定WLAN-ESS接口、安全模板和流量模板 [coreswitch-wlan-service-set-dot1x_test] <strong>ssid dot1x_test</strong> [coreswitch-wlan-service-set-dot1x_test] <strong>wlan-ess 33</strong> [coreswitch-wlan-service-set-dot1x_test] <strong>security-profile id 33</strong> [coreswitch-wlan-service-set-dot1x_test] <strong>traffic-profile name traffic</strong> [coreswitch-wlan-service-set-dot1x_test] <strong>service-vlan 13</strong> [coreswitch-wlan-service-set-dot1x_test] <strong>forward-mode tunnel</strong> //配置服务器的数据转发模式为隧道转发 [coreswitch-wlan-service-set-dot1x_test] <strong>quit</strong> [coreswitch-wlan-view] <strong>quit</strong></span></span> - 配置WLAN-ESS接口的Portal认证和802.1X认证。
<span style="color:#333333"><span style="background-color:#dddddd">[coreswitch] <strong>interface wlan-ess 32</strong> [coreswitch-Wlan-Ess32] <strong>domain name default force</strong> [coreswitch-Wlan-Ess32] <strong>authentication portal</strong> [coreswitch-Wlan-Ess32] <strong>web-auth-server policy direct</strong> [coreswitch-Wlan-Ess32] <strong>quit</strong> [coreswitch] <strong>interface wlan-ess 33</strong> [coreswitch-Wlan-Ess33] <strong>domain name default force</strong> [coreswitch-Wlan-Ess33] <strong>authentication dot1x</strong> [coreswitch-Wlan-Ess33] <strong>dot1x authentication-method eap</strong> [coreswitch-Wlan-Ess33] <strong>quit</strong></span></span> - 配置VAP,提供Portal和802.1X方式接入认证。
<span style="color:#333333"><span style="background-color:#dddddd">[coreswitch] <strong>wlan</strong>
[coreswitch-wlan-view] <strong>ap 1 radio 0</strong>
[coreswitch-wlan-radio-1/0] <strong>radio-profile id 31</strong>
[coreswitch-wlan-radio-1/0] <strong>service-set id 32</strong>
[coreswitch-wlan-radio-1/0] <strong>service-set id 33</strong>
[coreswitch-wlan-radio-1/0] <strong>quit</strong>
[coreswitch-wlan-view] <strong>commit ap 1</strong>
[coreswitch-wlan-view] <strong>quit</strong></span></span>
- 配置AC的国家码、ID和运营商标识。
- 配置与Agile Controller-Campus对接的XMPP参数,使能业务随行功能。
<span style="color:#333333"><span style="background-color:#dddddd">[coreswitch] <strong id="ZH-CN_TASK_0176365384__b683487429180141">group-policy controller 192.168.11.1 password YsHsjx_202206 src-ip 192.168.11.254</strong> //src-ip为VLANIF 11接口IP地址</span></span>
- 将配置模式切换为统一模式。
- 接入交换机配置。
本举例中,由于认证点核心交换机与用户之间存在透传的接入交换机,为保证用户能够通过802.1X认证,则需要在接入交换机上配置802.1X报文(本举例中采用EAP方式,即EAP报文)透传功能。
<span style="color:#333333"><span style="background-color:#dddddd"><HUAWEI> <strong id="ZH-CN_TASK_0176365384__b788696404180141">system-view</strong> [HUAWEI] <strong id="ZH-CN_TASK_0176365384__b678587932180141">sysname l2switch</strong> [l2switch] <strong id="ZH-CN_TASK_0176365384__b2140013192180141">l2protocol-tunnel user-defined-protocol 802.1x protocol-mac 0180-c200-0003 group-mac 0100-0000-0002</strong> [l2switch] <strong id="ZH-CN_TASK_0176365384__b950866037180141">vlan batch 12 14</strong> [l2switch] <strong id="ZH-CN_TASK_0176365384__b540520315180141">interface gigabitEthernet 0/0/1</strong> [l2switch-GigabitEthernet0/0/1] <strong id="ZH-CN_TASK_0176365384__b1650418173180141">port link-type trunk</strong> [l2switch-GigabitEthernet0/0/1] <strong id="ZH-CN_TASK_0176365384__b786415144180141">port trunk allow-pass vlan 12 14</strong> [l2switch-GigabitEthernet0/0/1] <strong id="ZH-CN_TASK_0176365384__b560865716180141">l2protocol-tunnel user-defined-protocol 802.1x enable</strong> [l2switch-GigabitEthernet0/0/1] <strong id="ZH-CN_TASK_0176365384__b99488628180141">bpdu enable</strong> [l2switch-GigabitEthernet0/0/1] <strong id="ZH-CN_TASK_0176365384__b1749515852180141">quit</strong> [l2switch] <strong id="ZH-CN_TASK_0176365384__b76832813180141">interface gigabitEthernet 0/0/3</strong> //有线接入接口 [l2switch-GigabitEthernet0/0/3] <strong id="ZH-CN_TASK_0176365384__b430064482180141">port link-type access</strong> [l2switch-GigabitEthernet0/0/3] <strong id="ZH-CN_TASK_0176365384__b1044214069180141">port default vlan 14</strong> [l2switch-GigabitEthernet0/0/3] <strong id="ZH-CN_TASK_0176365384__b101643961180141">l2protocol-tunnel user-defined-protocol 802.1x enable</strong> [l2switch-GigabitEthernet0/0/3] <strong id="ZH-CN_TASK_0176365384__b1933990254180141">bpdu enable</strong> [l2switch-GigabitEthernet0/0/3] <strong id="ZH-CN_TASK_0176365384__b2138301326180141">quit</strong> [l2switch] <strong id="ZH-CN_TASK_0176365384__b820976084180141">interface gigabitEthernet 0/0/5</strong> //无线接入接口 [l2switch-GigabitEthernet0/0/5] <strong id="ZH-CN_TASK_0176365384__b1703065608180141">port link-type access</strong> [l2switch-GigabitEthernet0/0/5] <strong id="ZH-CN_TASK_0176365384__b970920645180141">port default vlan 12</strong> [l2switch-GigabitEthernet0/0/5] <strong id="ZH-CN_TASK_0176365384__b1698733603180141">l2protocol-tunnel user-defined-protocol 802.1x enable</strong> [l2switch-GigabitEthernet0/0/5] <strong id="ZH-CN_TASK_0176365384__b898388322180141">bpdu enable</strong> [l2switch-GigabitEthernet0/0/5] <strong id="ZH-CN_TASK_0176365384__b1076029447180141">quit</strong></span></span> - Agile Controller-Campus配置。
- 添加核心交换机。
- 选择“资源 > 设备 > 设备管理”。

- 选择“XMPP页签”。

- 单击“确定”后设备的“通信状态”为,“同步状态”为“同步成功”。
- 在核心交换机查看与Agile Controller-Campus通信状态。
<span style="color:#333333"><span style="background-color:#dddddd"><coreswitch> <strong>display group-policy status</strong>
Controller IP address: 192.168.11.1
Controller port: 5222
Backup controller IP address: -
Backup controller port: -
Source IP address: 192.168.11.254
State: <strong>working</strong>
Connected controller: master
Device protocol version: 1
Controller protocol version: 1  </span></span>
- 选择“资源 > 设备 > 设备管理”。
- 配置“员工组”和“邮件服务器”安全组,分别代表用户和资源。
- 选择“策略 > 准入控制 > 安全组 > 安全组管理”。
- 单击“增加”,创建“员工组”。

- 重复上述步骤创建“邮件服务器”安全组。
- 单击“邮件服务器”对应的绑定邮件服务器IP地址。
 ,
, - 单击“全网部署”,全网部署安全组。
- 通过快速授权将“员工组”授权给员工部门,员工认证通过后被映射到“员工组”。
- 选择“策略 > 准入控制 > 快速授权”。
- 将员工部门映射到“员工组”,单击“确定”。

- 配置访问控制权限策略,允许“员工组”访问“邮件服务器”。
- 选择“策略 > 业务随行 > 访问权限控制”。
- 单击“增加”。
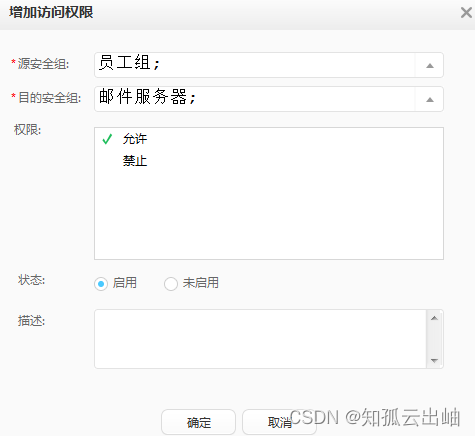
- 单击“确定”后单击“全网部署”。
部署成功后可以在核心交换机上通过以下命令查看部署情况。
- display ucl-group all:查看安全组。
- display acl all:查看访问权限控制策略。
- 添加核心交换机。
- 保存核心交换机的配置。
选择“资源 > 设备 > 设备管理”,单击核心交换机对应的
保存配置。
保存配置相当于在设备执行save命令,保存设备所有配置(含Controller部署的安全组、访问权限控制策略和QoS策略)到配置文件。
保存安全组、访问权限控制策略和QoS策略到设备配置文件,在设备重启后可以直接从配置文件恢复,无需再从Controller请求部署。否则,在设备重启后如果安全组、访问权限控制策略和QoS策略尚未部署到设备会导致用户认证失败。
- 验证配置结果
属于员工部门的帐号无论在何处的终端通过802.1X或者Portal方式认证成功后都可以访问邮件服务器。
配置文件
-
核心交换机的配置文件
<span style="color:#333333"><span style="background-color:#dddddd"># sysname coreswitch # vlan batch 11 to 14 # wlan ac-global carrier id other ac id 1 # group-policy controller 192.168.11.1 password %^%#(K2]5P#C6'97.pR(gFv$K$KbGYN}R1Y76~K^;AP&%^%# src-ip 192.168.11.254 # dhcp enable # radius-server template policy radius-server shared-key cipher %^%#teXm2B&.1O0:cj$OWPq7@!Y\!%}dC3Br>p,}l\L.%^%# radius-server authentication 192.168.11.1 1812 weight 80 radius-server accounting 192.168.11.1 1813 weight 80 # url-template name huawei url http://192.168.11.1:8080/portal # web-auth-server policy server-ip 192.168.11.1 port 50200 shared-key cipher %^%#SQn,Cr"c;M&{#(R^:;P3F_H$3f3sr$C9%*G7R|u3%^%# url-template huawei # aaa authentication-scheme auth authentication-mode radius accounting-scheme acco accounting-mode radius accounting realtime 15 domain default authentication-scheme auth accounting-scheme acco radius-server policy # interface Vlanif11 ip address 192.168.11.254 255.255.255.0 # interface Vlanif12 ip address 192.168.12.254 255.255.255.0 dhcp select interface # interface Vlanif13 ip address 192.168.13.254 255.255.255.0 dhcp select interface dhcp server dns-list 192.168.11.200 # interface Vlanif14 ip address 192.168.14.254 255.255.255.0 dhcp select interface dhcp server dns-list 192.168.11.200 # interface GigabitEthernet1/0/11 port link-type trunk port trunk allow-pass vlan 11 # interface GigabitEthernet1/0/12 port link-type trunk port trunk allow-pass vlan 12 14 domain name default force authentication dot1x portal web-auth-server policy direct dot1x authentication-method eap # interface Wlan-Ess32 port trunk allow-pass vlan 13 domain name default force authentication portal web-auth-server policy direct # interface Wlan-Ess33 port trunk allow-pass vlan 13 domain name default force authentication dot1x dot1x authentication-method eap # authentication free-rule 1 destination ip 192.168.11.200 mask 255.255.255.0 source ip any authentication free-rule 2 source vlan 12 # capwap source interface vlanif12 # wlan ap-region id 10 ap id 1 type-id 28 mac dcd2-fc04-b4c0 region-id 10 wmm-profile name wmm id 1 traffic-profile name traffic id 1 security-profile name portal_security id 32 security-profile name dot1x_security id 33 security-policy wpa2 service-set name portal_test id 32 forward-mode tunnel wlan-ess 32 ssid portal_test traffic-profile id 1 security-profile id 32 service-vlan 13 service-set name dot1x_test id 33 forward-mode tunnel wlan-ess 33 ssid dot1x_test traffic-profile id 1 security-profile id 33 service-vlan 13 radio-profile name radio id 31 wmm-profile id 1 ap 1 radio 0 radio-profile id 31 service-set id 32 wlan 1 service-set id 33 wlan 2 wlan work-group default //框式交换机会显示这条配置,盒式交换机不会显示这条配置 # return</span></span> -
<span style="color:#333333"><span style="background-color:#dddddd">#
sysname l2switch
#
vlan batch 12 14
#
l2protocol-tunnel user-defined-protocol 802.1x protocol-mac 0180-c200-0003 group-mac 0100-0000-0002
#
interface GigabitEthernet0/0/1
 port link-type trunk
 port trunk allow-pass vlan 12 14
 l2protocol-tunnel user-defined-protocol 802.1x enable
#
interface GigabitEthernet0/0/3
 port link-type access
 port default vlan 14
 l2protocol-tunnel user-defined-protocol 802.1x enable
#
interface GigabitEthernet0/0/5
 port link-type access
 port default vlan 12
 l2protocol-tunnel user-defined-protocol 802.1x enable
#
return</span></span>


 1513
1513


 被折叠的 条评论
为什么被折叠?
被折叠的 条评论
为什么被折叠?
 到【灌水乐园】发言


