


目录
3.interrupt() 和isInterrupted()组合使用来中断某个线程演示
静态方法Thread.interrupted() , 如何理解?
1.Object类中的wait和notify方法实现线程等待和唤醒演示
2.Condition接口中的await和signal方法实现线程的等待和唤醒演示
3.LockSupport类中的park等待和unpark唤醒
什么是线程中断机制
- 首先,一个线程不应该由其他线程来强制中断或停止,而是应该由线程自己自行停止,自己来决定自己的命运,所以,Thread.stop,Thread.suspend,Thread.resume都已经被废弃了
- 其次,在Java中没有办法立即停止一条线程,然而停止线程却显得尤为重要,如取消一个耗时操作。因此,Java提供了一种用于停止线程的协商机制----中断,也即中断标识协商机制
- 中断只是一种协作协商机制,Java没有给中断增加任何语法,中断的过程完全需要程序员自行实现。若要中断一个线程,你需要手动调用该线程interrupt方法,该方法也仅仅是将该线程对象的中断标识设置为true,接着你需要自己写代码不断检测当前线程的标识位,如果为true,表示别的线程请求这条线程中断,此时究竟应该做什么需要你自己写代码实现。
- 每个线程对象都有一个中断标识位,用于表示线程是否被中断;该标识位为true表示中断,为false表示未中断;通过调用线程对象的interrupt方法将该线程的标识位设置为true;可以在别的线程中调用,也可以在自己的线程中调用
中断的相关API方法之三大方法说明
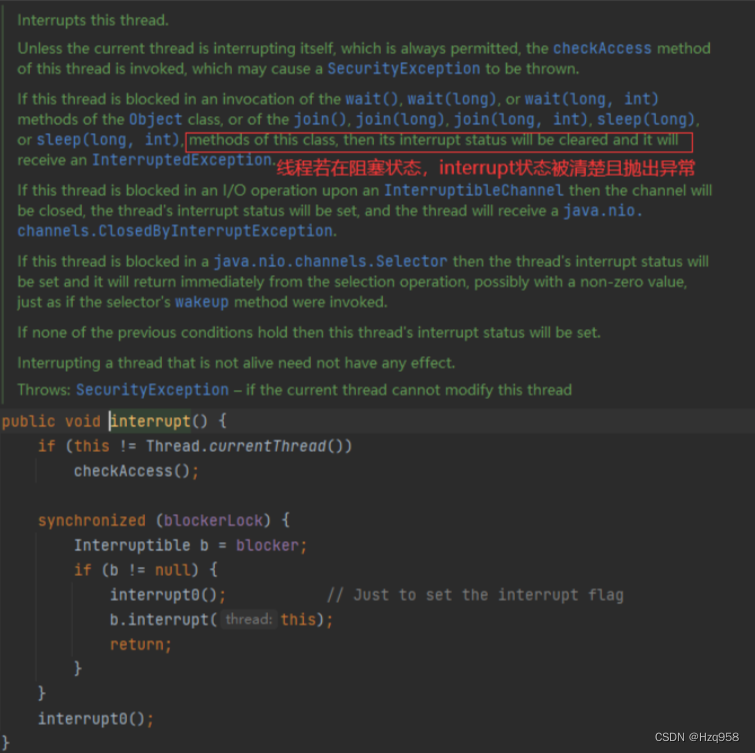
public void interrupt()
实例方法 Just to set the interrupt flag
实例方法仅仅是设置线程的中断状态为true,发起一个协商而不会立刻停止线程
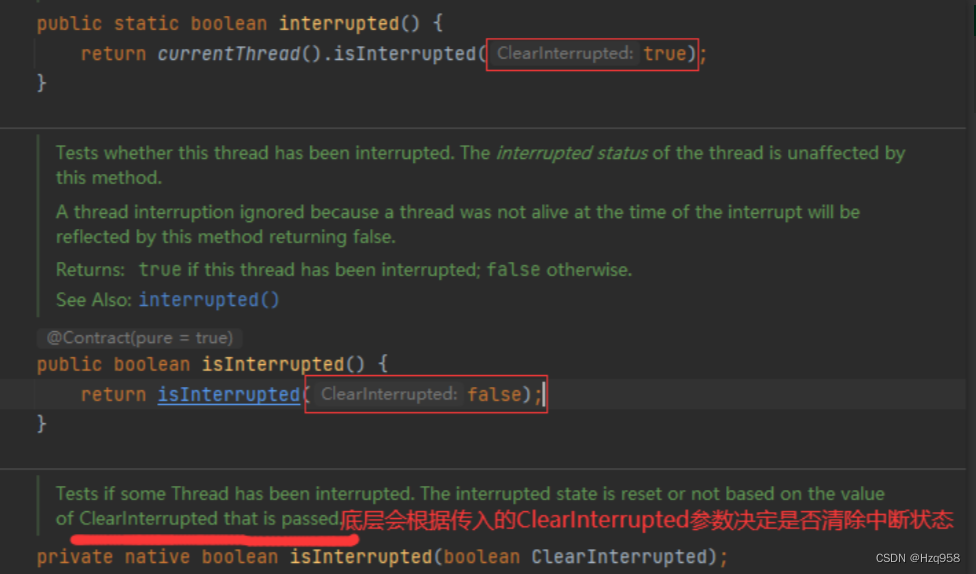
public static boolean interrupted()
静态方法 Thread.interrupted();
判断线程是否被中断并清除当前中断状态(做了两件事情)
1.返回当前线程的中断状态,测试当前线程是否已被中断
2.将当前线程的中断状态清零并重新设置为false,清除线程的中断状态
3.这个方法有点不好理解在于如果连续两次调用此方法,则第二次返回false,因为连续调用两次的结果可能不一样
public boolean isInterrupted()
实例方法
判断当前线程是否被中断(通过检查中断标志位)
三大中断机制
1.volatile中断线程演示
import java.util.concurrent.TimeUnit;

public class InterruptDemo {
    static volatile boolean isStop = false;
    //volatile表示的变量具有可见性volatile关键字用于保证变量的可见性和禁止指令重排序,
    // 即当一个线程修改了volatile变量的值,其他线程能够立即看到这个变量的最新值,而不是使用缓存中的旧值。
    // 但是volatile不能保证原子性,即多个线程同时对同一个volatile变量进行修改时,可能会出现数据不一致的情况。
    public static void main(String[] args) {
        new Thread(() -> {
            while (true) {
                if (isStop) {
                    System.out.println(Thread.currentThread().getName() + " isStop的值被改为true,t1程序停止");
                    break;
                }
                System.out.println("-----------hello volatile");
            }
        }, "t1").start();
        try {
            TimeUnit.MILLISECONDS.sleep(10);
        } catch (InterruptedException e) {
            e.printStackTrace();
        }

        new Thread(() -> {
            isStop = true;
        }, "t2").start();

    }
}
/**
 * -----------hello volatile
 * -----------hello volatile
 * -----------hello volatile
 * -----------hello volatile
 * -----------hello volatile
 * -----------hello volatile
 * t1 isStop的值被改为true,t1程序停止
 */
2.AutomicBoolean中断线程演示
import java.util.concurrent.TimeUnit;
import java.util.concurrent.atomic.AtomicBoolean;

public class InterruptDemo {
    static AtomicBoolean atomicBoolean = new AtomicBoolean(false);
    /*AtomicBoolean是Java提供的原子类型之一,用于在多线程环境下进行原子操作。它提供了一种线程安全的方式*/
    public static void main(String[] args) {
        new Thread(() -> {
            while (true) {
                if (atomicBoolean.get()) {
                    System.out.println(Thread.currentThread().getName() + " isStop的值被改为true,t1程序停止");
                    break;
                }
                System.out.println("-----------hello volatile");
            }
        }, "t1").start();
        try {
            TimeUnit.MILLISECONDS.sleep(10);
        } catch (InterruptedException e) {
            e.printStackTrace();
        }

        new Thread(() -> {
            atomicBoolean.set(true);
        }, "t2").start();

    }
}
/**
 * -----------hello volatile
 * -----------hello volatile
 * -----------hello volatile
 * -----------hello volatile
 * -----------hello volatile
 * -----------hello volatile
 * t1 isStop的值被改为true,t1程序停止
 */
3.interrupt() 和isInterrupted()组合使用来中断某个线程演示
import java.util.concurrent.TimeUnit;
/**
 * 使用interrupt() 和isInterrupted()组合使用来中断某个线程
 */
public class InterruptDemoPro {
    public static void main(String[] args) {
        Thread t1 = new Thread(() -> {
            while (true) {
                if (Thread.currentThread().isInterrupted()) {
                    System.out.println(Thread.currentThread().getName() + " isInterrupted()的值被改为true,t1程序停止");
                    break;
                }
                System.out.println("-----------hello isInterrupted()");
            }
        }, "t1");
        t1.start();

        try {
            TimeUnit.MILLISECONDS.sleep(10);
        } catch (InterruptedException e) {
            e.printStackTrace();
        }

        //t2向t1放出协商,将t1中的中断标识位设为true,希望t1停下来
        new Thread(() -> t1.interrupt(), "t2").start();

        //当然,也可以t1自行设置
        t1.interrupt();

    }
}
/**
 * -----------hello isInterrupted()
 * -----------hello isInterrupted()
 * -----------hello isInterrupted()
 * -----------hello isInterrupted()
 * t1 isInterrupted()的值被改为true,t1程序停止
 */
当前线程的中断标识为true,是不是线程就立刻停止?
答案是不立刻停止,具体来说,当对一个线程,调用interrupt时:
1.如果线程处于正常活动状态,那么会将该线程的中断标志设置为true,仅此而已,被设置中断标志的线程将继续正常运行,不受影响,所以interrupt()并不能真正的中断线程,需要被调用的线程自己进行配合才行,对于不活动的线程没有任何影响。
2.如果线程处于阻塞状态(例如sleep,wait,join状态等),在别的线程中调用当前线程对象的interrupt方法,那么线程将立即退出被阻塞状态(interrupt状态也将被清除),并抛出一个InterruptedException异常。
线程处于阻塞状态演示
import java.util.concurrent.TimeUnit;

public class InterruptDemo3 {
    public static void main(String[] args) {
        Thread t1 = new Thread(() -> {
            while (true) {
                if (Thread.currentThread().isInterrupted()) {
                    System.out.println(Thread.currentThread().getName() + " 中断标志位为:" + Thread.currentThread().isInterrupted() + " 程序停止");
                    break;
                }
                //sleep方法抛出InterruptedException后,中断标识也被清空置为false,如果没有在
                //catch方法中调用interrupt方法再次将中断标识置为true,这将导致无限循环了
                try {
                    Thread.sleep(200);
                } catch (InterruptedException e) {
                    // 只有再  catch 加上 中断标志, 这个中断才能传递
                    //Thread.currentThread().interrupt();
                    e.printStackTrace();
                }
                System.out.println("-------------hello InterruptDemo3");

            }
        }, "t1");
        t1.start();

        try {
            TimeUnit.SECONDS.sleep(1);
        } catch (InterruptedException e) {
            e.printStackTrace();
        }

        new Thread(() -> {
            t1.interrupt();
        }, "t2").start();
    }
}
源码分析其原因
静态方法Thread.interrupted() , 如何理解?

代码演示其效果
public class InterruptDemo4 {
    public static void main(String[] args) {
        /**
         * main	false
         * main	false
         * -----------1
         * -----------2
         * main	true
         * main	false
         */
        System.out.println(Thread.currentThread().getName() + "\t" + Thread.interrupted());//false
        System.out.println(Thread.currentThread().getName() + "\t" + Thread.interrupted());//false
        System.out.println("-----------1");
        Thread.currentThread().interrupt();
        System.out.println("-----------2");
        System.out.println(Thread.currentThread().getName() + "\t" + Thread.interrupted());//true
        System.out.println(Thread.currentThread().getName() + "\t" + Thread.interrupted());//false

    }
}
对于静态方法Thread.interrupted()和实例方法isInterrupted()区别在于:
- 静态方法interrupted将会清除中断状态(传入的参数ClearInterrupted为true)
- 实例方法isInterrupted则不会(传入的参数ClearInterrupted为false)
深入源码:
唤醒方式的演进LockSupport
三角形 到 矩形

1.Object类中的wait和notify方法实现线程等待和唤醒演示
public class LockSupportDemo {

    public static void main(String[] args) {
        Object objectLock = new Object();
        /**
         * t1	 -----------come in
         * t2	 -----------发出通知
         * t1	 -------被唤醒
         */
        new Thread(() -> {
            synchronized (objectLock) {
                System.out.println(Thread.currentThread().getName() + "\t -----------come in");
                try {
                    objectLock.wait();
                } catch (InterruptedException e) {
                    e.printStackTrace();
                }
                System.out.println(Thread.currentThread().getName() + "\t -------被唤醒");
            }
        }, "t1").start();

        try {
            TimeUnit.SECONDS.sleep(1);
        } catch (InterruptedException e) {
            e.printStackTrace();
        }

        new Thread(() -> {
            synchronized (objectLock) {
                objectLock.notify();
                System.out.println(Thread.currentThread().getName() + "\t -----------发出通知");
            }

        }, "t2").start();
    }
}
- wait和notify方法必须要在同步代码块或者方法里面,且成对出现使用
- 先wait再notify才ok
2.Condition接口中的await和signal方法实现线程的等待和唤醒演示
public class LockSupportDemo {

    public static void main(String[] args) {
        Lock lock = new ReentrantLock();
        Condition condition = lock.newCondition();
        /**
         * t1	 -----------come in
         * t2	 -----------发出通知
         * t1	 -----------被唤醒
         */
        new Thread(() -> {
            lock.lock();
            try {
                System.out.println(Thread.currentThread().getName() + "\t -----------come in");
                condition.await();
                System.out.println(Thread.currentThread().getName() + "\t -----------被唤醒");
            } catch (InterruptedException e) {
                e.printStackTrace();
            } finally {
                lock.unlock();
            }
        }, "t1").start();

        try {
            TimeUnit.SECONDS.sleep(1);
        } catch (InterruptedException e) {
            e.printStackTrace();
        }

        new Thread(() -> {
            lock.lock();
            try {
                condition.signal();
                System.out.println(Thread.currentThread().getName() + "\t -----------发出通知");
            } finally {
                lock.unlock();
            }
        }, "t2").start();

    }
}
- Condition中的线程等待和唤醒方法,需要先获取锁
- 一定要先await后signal,不要反
上述两个对象 object和 condition 使用的限制条件
- 线程需要先获得并持有锁,必须在锁块(synchronized或lock)中
- 必须要先等待后唤醒,线程才能够被唤
3.LockSupport类中的park等待和unpark唤醒
- LockSupport 是用于创建锁和其他同步类的基本线程阻塞原语
- LockSupport类使用了一种名为Permit(许可)的概念来做到阻塞和唤醒线程的功能,每个线程都有一个许可(Permit),许可证只能有一个,累加上限是1。
主要方法:
- 阻塞: Peimit许可证默认没有不能放行,所以一开始调用park()方法当前线程会阻塞,直到别的线程给当前线程发放peimit,park方法才会被唤醒。park/park(Object blocker)-------阻塞当前线程/阻塞传入的具体线程
- 唤醒: 调用unpack(thread)方法后 就会将thread线程的许可证peimit发放,会自动唤醒park线程,即之前阻塞中的LockSupport.park()方法会立即返回。unpark(Thread thread)------唤醒处于阻塞状态的指定线程
演示:
public class LockSupportDemo {

    public static void main(String[] args) {
        /**
         * t1	 -----------come in
         * t2	 ----------发出通知
         * t1	 ----------被唤醒
         */
        Thread t1 = new Thread(() -> {
            System.out.println(Thread.currentThread().getName() + "\t -----------come in");
            LockSupport.park();
            System.out.println(Thread.currentThread().getName() + "\t ----------被唤醒");
        }, "t1");
        t1.start();

        try {
            TimeUnit.SECONDS.sleep(1);
        } catch (InterruptedException e) {
            e.printStackTrace();
        }

        new Thread(() -> {
            LockSupport.unpark(t1);
            System.out.println(Thread.currentThread().getName() + "\t ----------发出通知");
        }, "t2").start();

    }
}
重点说明(重要)
- LockSupport是用来创建锁和其他同步类的基本线程阻塞原语,所有的方法都是静态方法,可以让线程再任意位置阻塞,阻塞后也有对应的唤醒方法。归根结底,LockSupport时调用Unsafe中的native代码
- LockSupport提供park()和unpark()方法实现阻塞线程和解除线程阻塞的过程,LockSupport和每个使用它的线程都有一个许可(Peimit)关联,每个线程都有一个相关的permit,peimit最多只有一个,重复调用unpark也不会积累凭证。
- 形象理解:线程阻塞需要消耗凭证(Permit),这个凭证最多只有一个
- 当调用park时,如果有凭证,则会直接消耗掉这个凭证然后正常退出。如果没有凭证,则必须阻塞等待凭证可用;
- 当调用unpark时,它会增加一个凭证,但凭证最多只能有1各,累加无效。


 2055
2055


 被折叠的 条评论
为什么被折叠?
被折叠的 条评论
为什么被折叠?
 到【灌水乐园】发言


