


本文分别从硬件编解码、多屏显示和4K高清摄像头三部分对FETMX8MP-C的多媒体性能进行了测评,由测评及结果可得出结论:FETMX8MP-C具有更高效的视频处理方式,能够为用户带来更好的多媒体体验,可满足用户对复杂多媒体显示的需求,而4K高清摄像头也为用户提供了更加优秀的视频采集效果,为产品设计带来了更多可能。
下面看看详细评测结果:
一、硬件编解码
为了对FETMX8MP-C核心板的硬件编解码性能有更清晰的了解,选择飞凌嵌入式另外两款基于NXP iMX8M系列处理器设计的的FETMX8MM-C核心板和FETMX8MQ-C核心板与其做对比,用硬件解码播放同一个 H264 视频文件(带音频),CPU占用率对比如下:
FETMX8MQ-C核心板:

FETMX8MM-C核心板:
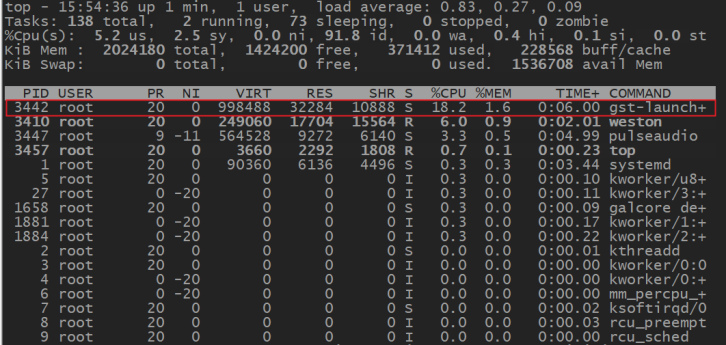
FETMX8MP-C核心板

如图可见,在飞凌嵌入式提供的三款iMX8M系列核心板中,当FETMX8MQ-C核心板用硬解码方式解码并播放测试用的 H264 视频文件时CPU占用率为23.5%,当FETMX8MM-C核心板用硬解码方式解码并播放同一个测试视频时CPU占用率为18.2%,而当FETMX8MP-C核心板用硬解码方式解码并播放同一个测试视频时CPU占用率仅为11.6%。
由此可见,虽然同为硬件解码,但FETMX8MP-C核心板比同系列处理器产品具有更高的硬件解码性能,CPU资源占用率更低。
二、多屏显示
双屏显示功能在飞凌嵌入式iMX6Q/iMX6DL系列核心板上就已经实现,而iMX8MP系列 核心板做到了三屏显示。在正式开始测试前,先简述一下用户使用单屏显示时的注意事项:FETMX8MP-C核心板支持LVDS、HDMI、MIPI-DSI三种显示接口,核心板默认自启为三屏显示状态,此状态下启动后只有MIPI屏显示QT测试程序列表界面。LVDS和HDMI显示为飞凌嵌入式的logo图片。故若用户只需要单屏显示,需要在启动阶段先进行屏幕配置,将其余屏幕关掉,具体操作可参考飞凌嵌入式提供的iMX8MP系列产品使用手册中2.4屏幕切换章节。
接下来,笔者将对多屏显示进行测评。
1、三屏异显
此次iMX8MP核心板测试三屏异显的方式是在主屏(MIPI屏)上播放视频,然后通过鼠标拖动视频在三屏之间移动,具体效果如下:

从视频中我们看到,三屏显示状态下,三个屏幕从左到右排序分别为MIPI-DSI、LVDS、HDMI。此测试过程因三个屏幕的分辨率不同,所以会出现同一个视频在拖动过程中大小有些许变化的情况,若用三个分辨率及尺寸相同的屏幕会有更好的显示效果。
此测评对三屏异显功能进行了简单的演示,工程师用户可根据实际需求在此功能基础上进行实现。
2、三屏同时播放视频
目前FETMX8MP-C核心板可用命令实现在三个屏幕上同时播放相同或不同的视频,如下命令为三屏播放相同视频:
root@OK8MP:~# gst-launch-1.0 playbin uri=file:///media/forlinx/video/1080p_60fps_h264.mp4 video-sink="waylandsink window-x=0 window-y=10" & gst-launch-1.0 playbin uri=file:///media/forlinx/video/1080p_60fps_h264.mp4 video-sink="waylandsink window-x=1152 window-y=120" & gst-launch-1.0 playbin uri=file:///media/forlinx/video/1080p_60fps_h264.mp4 video-sink="waylandsink window-x=2754 window-y=250"
蓝色部分可改成三个不同视频的路径,即可实现同时播放不同视频。
红色部分为视频显示的实际坐标,此处用做移动视频到其他屏(第一个在MIPI上,第二个在LVDS上,第三个在HDMI上,且都是居中显示)
如下图,展示的是三屏同时播放相同的视频,通过对命令的调整可使视频居中显示。

三、4K高清摄像头输入
目前FETMX8MP-C核心板除了支持OV5645 MIPI 摄像头和USB UVC摄像头外,还支持4K高清摄像头,型号为daA3840-30mc。daA3840-30mc 摄像头是NXP官方推荐的能为iMX 8M Plus处理器提供强大视觉系统的4K高清摄像头,可作为基于视觉的智能机器学习应用的解决方案。具体测试方法如下:
首先确认 basler 的设备节点。
root@OK8MP:~# v4l2-ctl --list-devices
():
/dev/v4l-subdev0
/dev/v4l-subdev3
/dev/v4l-subdev4
():
/dev/v4l-subdev1
(csi0):
/dev/v4l-subdev2
VIV (platform:viv0):
/dev/video0
VIV (platform:viv1):
/dev/video1
查看摄像头支持的格式与分辨率:
root@OK8MP:~# v4l2-ctl --list-formats-ext -d /dev/video1
ioctl: VIDIOC_ENUM_FMT
Type: Video Capture
[0]: 'YUYV' (YUYV 4:2:2)
Size: Discrete 3840x2160
Interval: Discrete 0.033s (30.000 fps)
[1]: 'NV12' (Y/CbCr 4:2:0)
Size: Discrete 3840x2160
Interval: Discrete 0.033s (30.000 fps)
[2]: 'NV16' (Y/CbCr 4:2:2)
Size: Discrete 3840x2160
Interval: Discrete 0.033s (30.000 fps)
[3]: 'BA12' (12-bit Bayer GRGR/BGBG)
Size: Discrete 3840x2160
Interval: Discrete 0.033s (30.000 fps)
摄像头预览:
root@OK8MP:~# gst-launch-1.0 v4l2src device=/dev/video1 ! waylandsink
在4K显示屏下,摄像头画质输出也可达到4K,显示清晰度极高。如需测试更多有关摄像头的功能(如摄像头拍照、录像),可参考飞凌嵌入式提供的iMX8MP系列产品使用手册。
综上,


 482
482


 被折叠的 条评论
为什么被折叠?
被折叠的 条评论
为什么被折叠?
 到【灌水乐园】发言


