


目录
自定义starter
统计独立IP访问次数
需求分析:
1、数据记录位置:Map/Redis
2|功能触发位置:每次web请求(拦截器)
- 步骤1:降低难度,主动调用,仅统计单一操作访问次数(例如查询)
- 步骤2:开发拦截器
3、业务参数(配置项)
- 输出频度:默认10秒
- 数据特征:累计数据/阶段数据,默认累计数据
- 输出格式:详细模式(显示ip和次数)/极简模式(只显示ip)
创建一个模块
pom.xml中
<?xml version="1.0" encoding="UTF-8"?>
<project xmlns="http://maven.apache.org/POM/4.0.0" xmlns:xsi="http://www.w3.org/2001/XMLSchema-instance"
    xsi:schemaLocation="http://maven.apache.org/POM/4.0.0 https://maven.apache.org/xsd/maven-4.0.0.xsd">
    <modelVersion>4.0.0</modelVersion>
    <groupId>com.kc</groupId>
    <artifactId>springboot_ipcount_starter</artifactId>
    <version>0.0.1-SNAPSHOT</version>


    <properties>
        <java.version>1.8</java.version>
        <project.build.sourceEncoding>UTF-8</project.build.sourceEncoding>
        <project.reporting.outputEncoding>UTF-8</project.reporting.outputEncoding>
        <spring-boot.version>2.4.1</spring-boot.version>
    </properties>

    <dependencies>

        <dependency>
            <groupId>org.springframework.boot</groupId>
            <artifactId>spring-boot-starter-web</artifactId>
        </dependency>

    </dependencies>

    <dependencyManagement>
        <dependencies>
            <dependency>
                <groupId>org.springframework.boot</groupId>
                <artifactId>spring-boot-dependencies</artifactId>
                <version>${spring-boot.version}</version>
                <type>pom</type>
                <scope>import</scope>
            </dependency>
        </dependencies>
    </dependencyManagement>


</project>
写入主要的类
package com.kc.service;
import com.kc.properties.IpProperties;
import org.springframework.beans.factory.annotation.Autowired;
import org.springframework.scheduling.annotation.Scheduled;
import javax.servlet.http.HttpServletRequest;
import java.util.HashMap;
import java.util.Map;
public class IpCountService {
private HashMap<String,Integer> ipCountMap=new HashMap<>();
//当前的request对象的注入工作由使用当前starter的工程提供自动装配
@Autowired
private HttpServletRequest httpServletRequest;
public void count(){
//每次调用当前操作,就记录当前访问的IP,然后累加访问次数
//1、获取当前操作的ip地址
String ip=httpServletRequest.getRemoteAddr();
//2、根据ip地址从Map取值,并递增
Integer value = ipCountMap.get(ip);
//判断当前ip否存在
if(value==null){
ipCountMap.put(ip, 1);
}else {
ipCountMap.put(ip, value+1);
}
}
//注入配置类
@Autowired
private IpProperties ipProperties;
//打印
@Scheduled(cron = "0/2 * * * * ?") //2秒执行一次
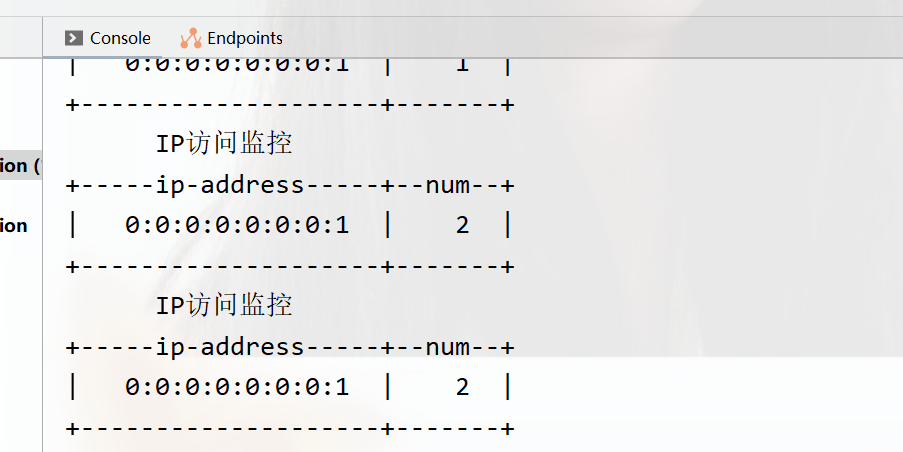
public void show(){
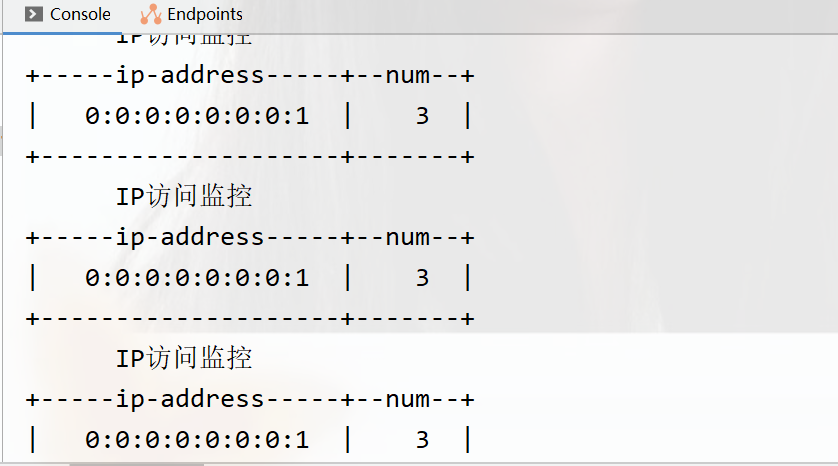
System.out.println(" IP访问监控 ");
if (ipProperties.getModel().equals(IpProperties.LogModel.DETAIL.getValue())) {
System.out.println("+-----ip-address-----+--num--+");
//同时获取key和value
for (Map.Entry<String, Integer> entry : ipCountMap.entrySet()) {
String key = entry.getKey();
Integer value = entry.getValue();
//format格式输出,%18s是给字符串占18位和%5d是给数字占5位符
System.out.println(String.format("|%18s |%5d |", key,value));
}
System.out.println("+--------------------+-------+");
}else if (ipProperties.getModel().equals(IpProperties.LogModel.SIMPLE.getValue())){
System.out.println("+-----ip-address-----+");
//同时获取key和value
for (String key : ipCountMap.keySet()) {
System.out.println(String.format("|%18s |", key));
}
System.out.println("+--------------------+-------+");
}
//是否清除数据
if (ipProperties.getCycleReset()){
ipCountMap.clear();
}
}
}
配置类下
package com.kc.properties;

        import org.springframework.boot.context.properties.ConfigurationProperties;
        import org.springframework.stereotype.Component;

@Component
@ConfigurationProperties(prefix = "ip")
public class IpProperties {

    /**
     * 日志显示周期
     */
    private long cycle=5L;

    /**
     * 是否重置周期数据
     */
    private boolean cycleReset=false;

    /**
     * 日志输出模式 detail :详细模式 simple 极简模式
     */

    private String model=LogModel.DETAIL.value;

    /**
     * 使用枚举来存储
     */

    public enum LogModel{
        DETAIL("detail"),
        SIMPLE("simple");
        private String value;
        LogModel(String value) {
            this.value=value;
        }

        public String getValue() {
            return value;
        }
    }

    public boolean getCycleReset() {
        return cycleReset;
    }

    public void setCycleReset(boolean cycleReset) {
        this.cycleReset = cycleReset;
    }

    public String getModel() {
        return model;
    }

    public void setModel(String model) {
        this.model = model;
    }


}
自动配置信息类
package com.kc.autoConfig;


import com.kc.service.IpCountService;
import org.springframework.context.annotation.Import;
import org.springframework.scheduling.annotation.EnableScheduling;

@EnableScheduling//开启定义任务调度
@Import(IpCountService.class)
public class IpAutoConfiguration {
}
在资源中新建
META-INF下的spring.factories
#要自动配置的类写在这
org.springframework.boot.autoconfigure.EnableAutoConfiguration=\
com.kc.autoConfig.IpAutoConfiguration
这个自定义starter就完成了
使用自定义starter

导入对应的坐标即可
注入和使用对应的方法
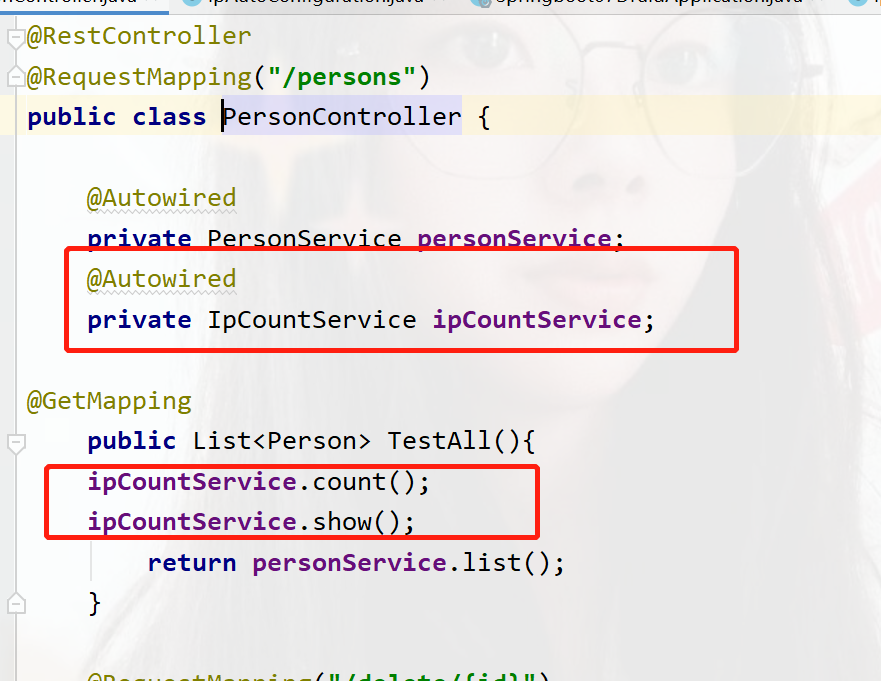
设置拦截器
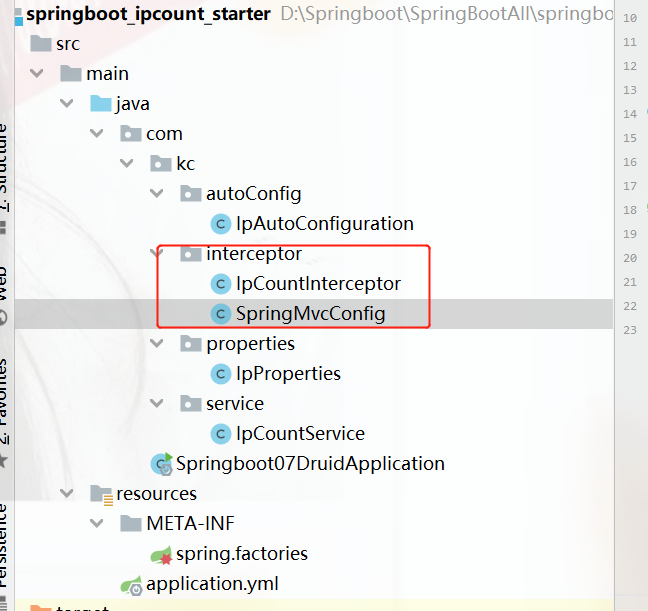
package com.kc.interceptor;

import com.kc.service.IpCountService;
import org.springframework.beans.factory.annotation.Autowired;
import org.springframework.web.servlet.HandlerInterceptor;

import javax.servlet.http.HttpServletRequest;
import javax.servlet.http.HttpServletResponse;

public class IpCountInterceptor implements HandlerInterceptor {
@Autowired
private IpCountService ipCountService;

    @Override
    public boolean preHandle(HttpServletRequest request, HttpServletResponse response, Object handler) throws Exception {
       ipCountService.count();
       ipCountService.show();
        return true;
    }
}
为了能被springmvc识别还得写个配置
package com.kc.interceptor;

import org.springframework.context.annotation.Bean;
import org.springframework.context.annotation.Configuration;
import org.springframework.web.servlet.config.annotation.InterceptorRegistry;
import org.springframework.web.servlet.config.annotation.WebMvcConfigurer;
@Configuration(proxyBeanMethods = true)//保证bean创建的对象唯一
//告诉springMVC拦截器的位置
public class SpringMvcConfig implements WebMvcConfigurer {


    @Override
    //添加一个拦截器
    public void addInterceptors(InterceptorRegistry registry) {
        registry.addInterceptor(ipCountInterceptor()).addPathPatterns("/**");//"/**表示所有请求"
    }

    @Bean
    public IpCountInterceptor ipCountInterceptor(){
        return  new IpCountInterceptor();
    }
}
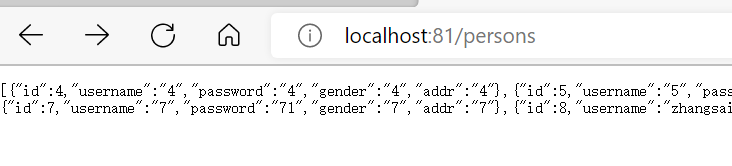
运行之后 ,访问任意的功能都可以计数
开启yml提示功能
在自定义starter中pom.xml中加入,mavenclean和install之后可以删除此坐标
<!--        开启yml提示-->
        <dependency>
            <groupId>org.springframework.boot</groupId>
            <artifactId>spring-boot-configuration-processor</artifactId>
        </dependency>
然后在maven中点击clean和install重新编译
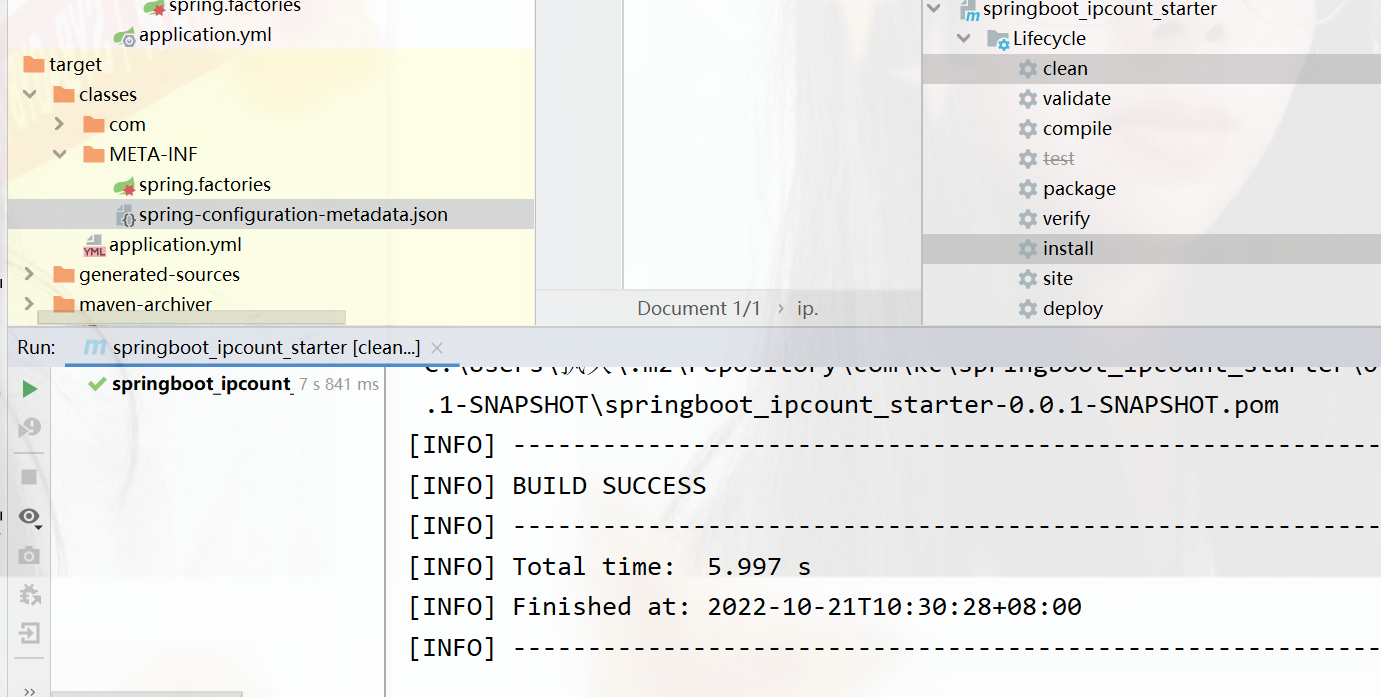
就会多出一个json文件
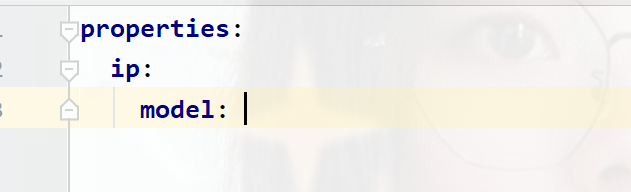
在使用这个starter的yaml配置文件中

就已经可以出现提示了,这些后面的中文都是之前写入的文档注释,所以得多写文档注释
输出之后,没有提示我们要写入的值
在前面生成的json文件中
 "hints": [
    {
      "name": "properties.ip.model",
      "values": [
        {
          "value": "detail",
          "description": "详细模式."
        },
        {
          "value": "simple",
          "description": "简略模式."
        }
      ]
    }
  ]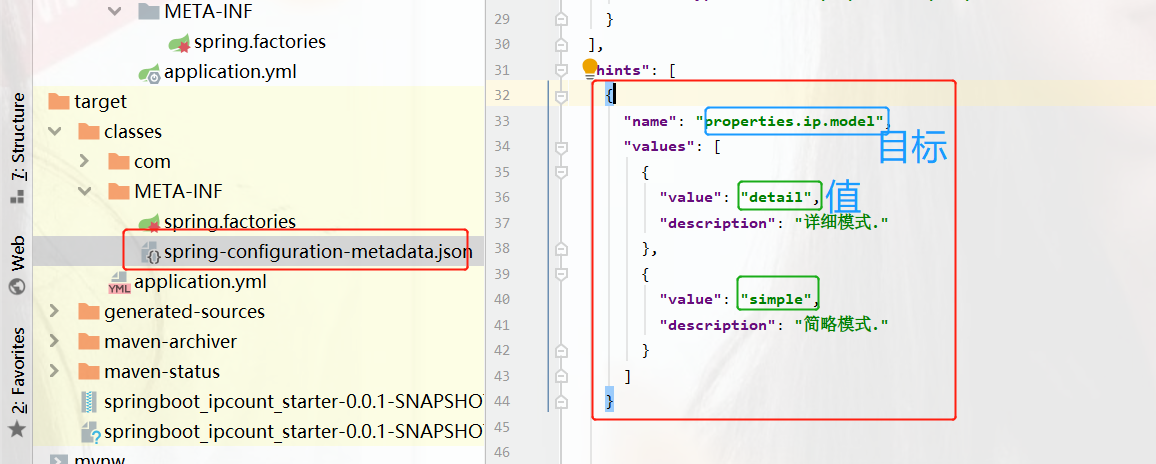
这样就可以得出提示了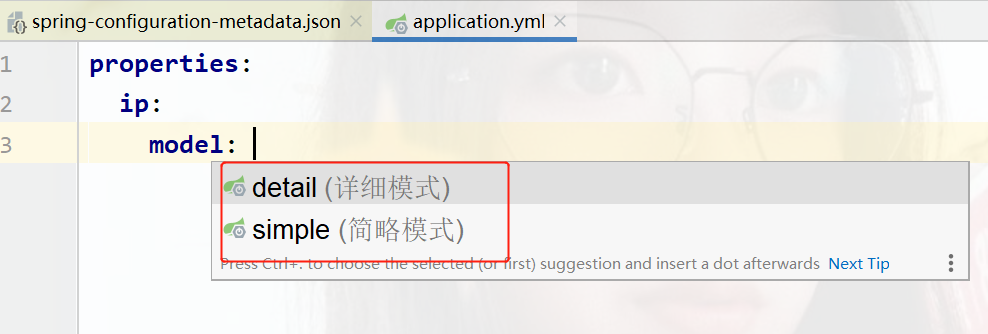


 1454
1454


 被折叠的 条评论
为什么被折叠?
被折叠的 条评论
为什么被折叠?
 到【灌水乐园】发言


