


Mastering EEPROM: Comprehensive Guide
EEPROM (Electrically Erasable Programmable Read-Only Memory) is a type of non-volatile memory that retains data even when power is turned off. It is widely used for storing configuration parameters and small amounts of data. This guide will help you understand the basics of EEPROM, common operations, and practical usage tips, along with instructions on using the EVASH development test board for development and testing.
EEPROM Basics
What is EEPROM?
EEPROM is a type of non-volatile memory that can be electrically erased and reprogrammed. Compared to other memory types, EEPROM has the following characteristics:
- Non-volatile: Retains data even when power is off.
- Erasable: Data can be erased and rewritten.
- Flexible Programming: Can be programmed by byte or page.
Key Parameters of EEPROM
When selecting EEPROM, pay attention to the following parameters:
- Storage Capacity: Usually measured in bits or bytes (e.g., 256Kb, which is 32KB).
- Read/Write Speed: The speed of reading and writing data, typically slower.
- Durability: The limit on the number of erase/write cycles, usually between 100,000 to 1,000,000 cycles.
- Interface Type: Common interfaces include I²C, SPI, and parallel interface.
Using the EVASH Development Test Board
Development Test Board Introduction
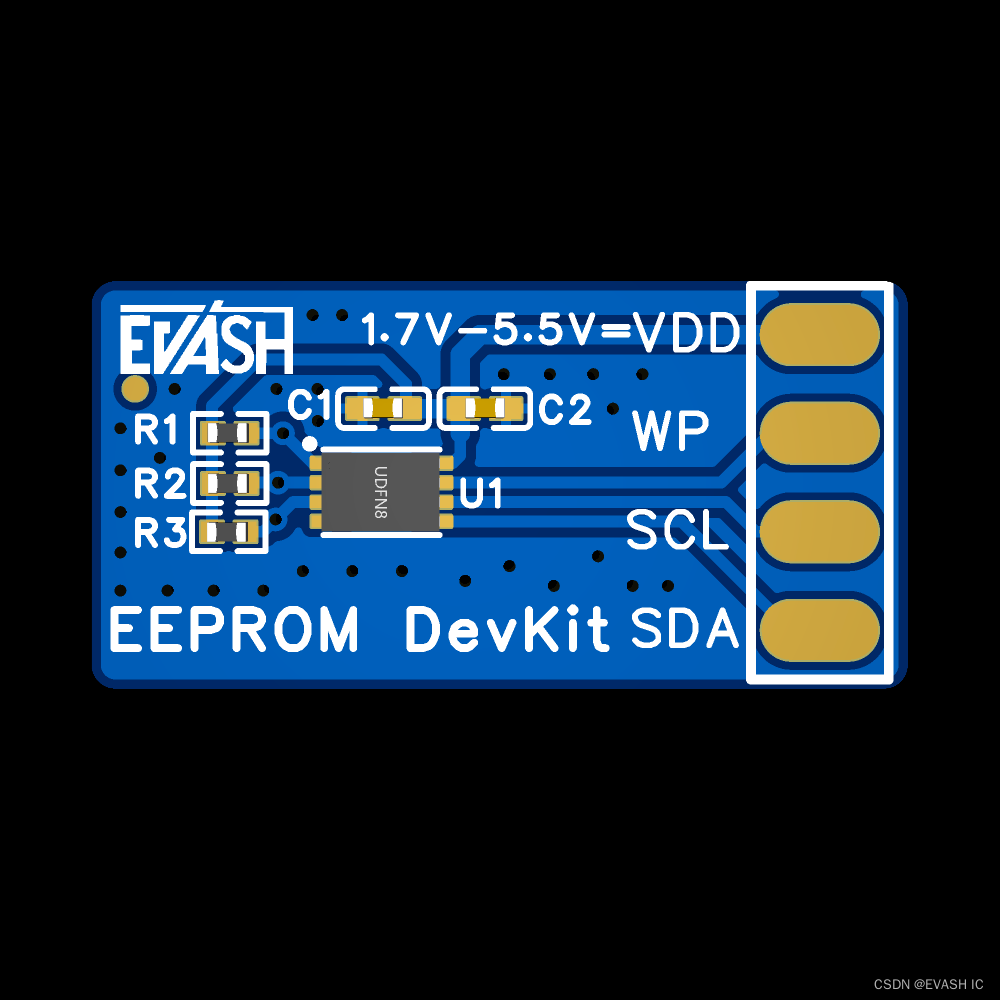
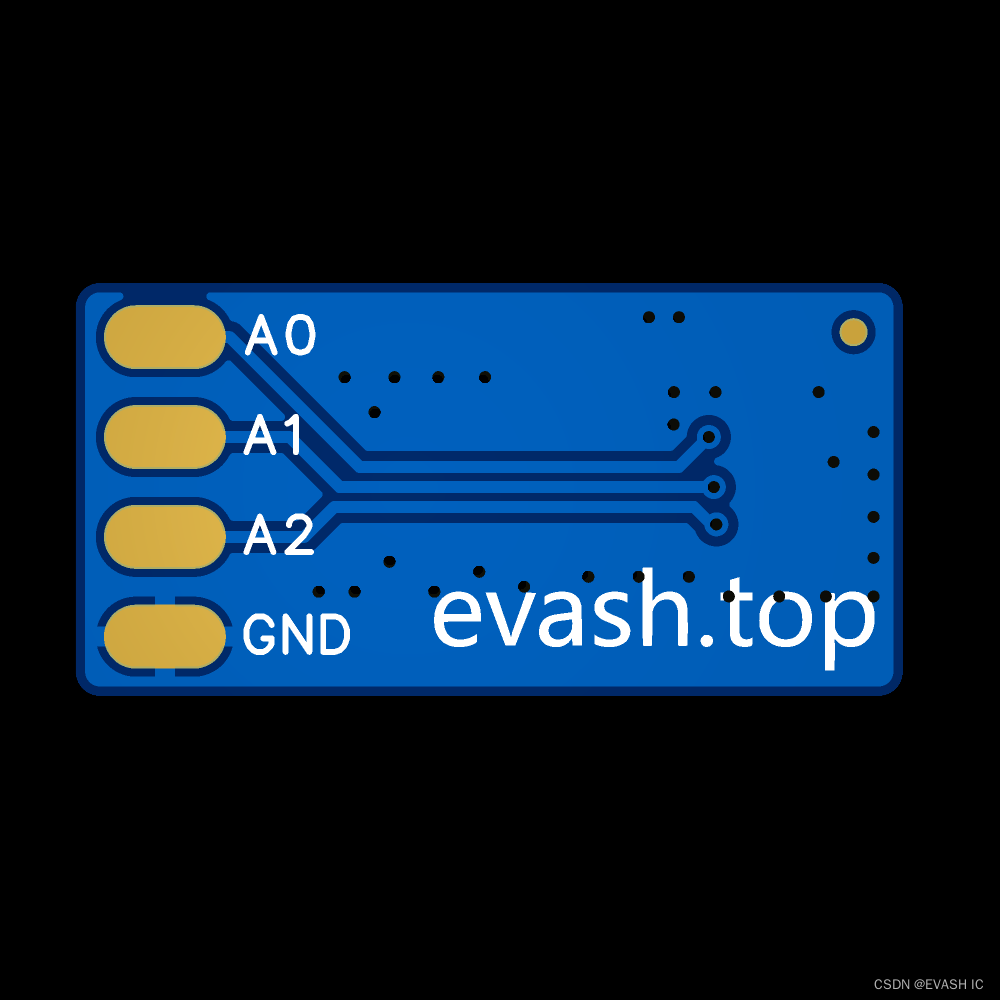
The EVASH EEPROM Development Test Board (as shown in the images) is designed to help users quickly get started and test EEPROM chips. The board integrates the EV24C256A EEPROM chip and supports an operating voltage range of 1.7V to 5.5V.
Development Test Board Features and Connections
- VDD: Power input, range 1.7V to 5.5V.
- GND: Ground.
- WP: Write protect pin, enable write protection when high.
- SCL: I²C clock signal.
- SDA: I²C data signal.
- A0, A1, A2: Address pins, select I²C address by grounding or connecting to power.
Steps to Use the Development Test Board
- Connect Power and Ground: Connect VDD and GND to power and ground respectively.
- Connect I²C Interface: Connect SCL and SDA to the I²C clock and data pins of the controller.
- Configure Address Pins: Configure A0, A1, and A2 pins as needed to select the appropriate I²C address.
Basic Operations
1. Initialization
Before using EEPROM, initialize the I²C interface. Here is an example code using Arduino:
cpp
复制代码
#include <Wire.h> void setup() { Wire.begin(); // Initialize I²C interface Serial.begin(9600); // Initialize serial communication } void loop() { // Main operations go here }
2. Writing Data
Steps to write data to EEPROM:
- Start Transmission: Start I²C communication.
- Send Device Address: Send the EEPROM's I²C address.
- Send Memory Address: Specify the location to write data.
- Send Data: Send the data to be written.
- End Transmission: Terminate I²C communication.
Example code:
cpp
复制代码
#define EEPROM_ADDRESS 0x50 void writeEEPROM(int deviceAddress, unsigned int eepromAddress, byte data) { Wire.beginTransmission(deviceAddress); Wire.write((int)(eepromAddress >> 8)); // High byte address Wire.write((int)(eepromAddress & 0xFF)); // Low byte address Wire.write(data); Wire.endTransmission(); delay(5); // Write delay }
3. Reading Data
Steps to read data from EEPROM:
- Start Transmission: Start I²C communication.
- Send Device Address: Send the EEPROM's I²C address (write mode).
- Send Memory Address: Specify the location to read data.
- Restart Transmission: Restart I²C communication (read mode).
- Request Data: Request data from EEPROM.
- Receive Data: Read and store the data.
- End Transmission: Terminate I²C communication.
Example code:
cpp
复制代码
byte readEEPROM(int deviceAddress, unsigned int eepromAddress) { byte data = 0xFF; Wire.beginTransmission(deviceAddress); Wire.write((int)(eepromAddress >> 8)); // High byte address Wire.write((int)(eepromAddress & 0xFF)); // Low byte address Wire.endTransmission(); Wire.requestFrom(deviceAddress, 1); if (Wire.available()) data = Wire.read(); return data; }
Advanced Techniques
Page Writing
Some EEPROMs support page writing, allowing multiple bytes to be written at once, improving write efficiency. Use page writing when writing large amounts of data. Example code:
cpp
复制代码
void writeEEPROMPage(int deviceAddress, unsigned int eepromAddress, byte* data, int length) { Wire.beginTransmission(deviceAddress); Wire.write((int)(eepromAddress >> 8)); // High byte address Wire.write((int)(eepromAddress & 0xFF)); // Low byte address for (int i = 0; i < length; i++) { Wire.write(data[i]); } Wire.endTransmission(); delay(5); // Write delay }
Extending Lifespan
Since EEPROM has a limited number of erase/write cycles, use it carefully. Minimize unnecessary writes and use wear leveling algorithms to distribute write cycles, extending the lifespan of EEPROM.
Data Verification
To ensure data integrity, use checksum or CRC verification mechanisms to verify the correctness of read data.
Temperature and Voltage Effects
EEPROM performance can be affected by temperature and voltage. Under extreme conditions, additional calibration and protection measures may be required to ensure data accuracy and persistence.
Practical Applications
Configuration Parameter Storage
EEPROM is often used to store device configuration parameters, such as WiFi settings, calibration data, etc. These data need to be retained after power-off and can be updated during operation.
Data Logging
EEPROM can be used to store sensor data, error logs, and other small-scale data that needs to be persistent. For example, recording historical data from a temperature sensor and writing new data to EEPROM after each measurement.
Non-volatile Storage
In some critical applications, it is necessary to save important data even in the event of a power outage. EEPROM is an ideal choice for such applications.
Conclusion
EEPROM is a powerful memory type suitable for a variety of applications. From basic operations to advanced techniques, mastering these skills will help you fully leverage the advantages of EEPROM, providing a stable non-volatile storage solution for your projects. With the EVASH development test board, you can achieve faster EEPROM development and testing. For more information and support, please visit our website at evash.top.


 被折叠的 条评论
为什么被折叠?
被折叠的 条评论
为什么被折叠?
 到【灌水乐园】发言


