


springboot1.x 和2.x相比较:
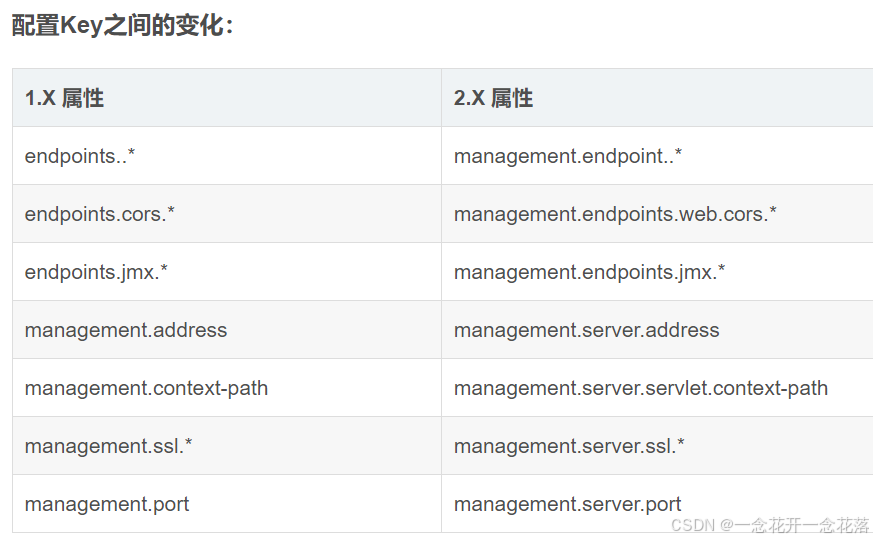
1. 从上图中可以看出以 endpoints开头的都被移到management下面了
2. management.context-path已经被management.server.base-path给替换了
3. management.server.base-path要配合management.server.port才能起作用,单个设置没作用。
management.endpoints.web.base-path为web的根路径,此路径在management.server.port之下。默认为 /actuator
4. 通过web暴漏和排除暴漏的端口分别为: management.endpoints.web.exposure.include和
management.endpoints.web.exposure.exclude. 但是在暴漏之前需要启用具体的endpoint 比如启用bean是: management.endpoint.beans.enabled:true 。 不过默认的endpoint都是启用的,如果想改变默认不启用,需要用到配置:management.endpoints.enabled-by-default:false
5. management.health.default.enabled=false可以禁用健康监测
下面是yml配置文件的内容,路径是我测试随便填的
management:
endpoints:
web:
exposure:
include: '*'
base-path: /ddd
discovery:
enabled: true
enabled-by-default: true
health:
rabbit:
enabled: false
redis:
enabled: false
elasticsearch:
enabled: false
##服务路径
context-path: /abc
security:
enabled: false
server:
# port: 8888
base-path: /ttt
endpoint:
beans:
enabled: true
# servlet:
# context-path: /dfs
endpoints:
actuator:
path: /fff
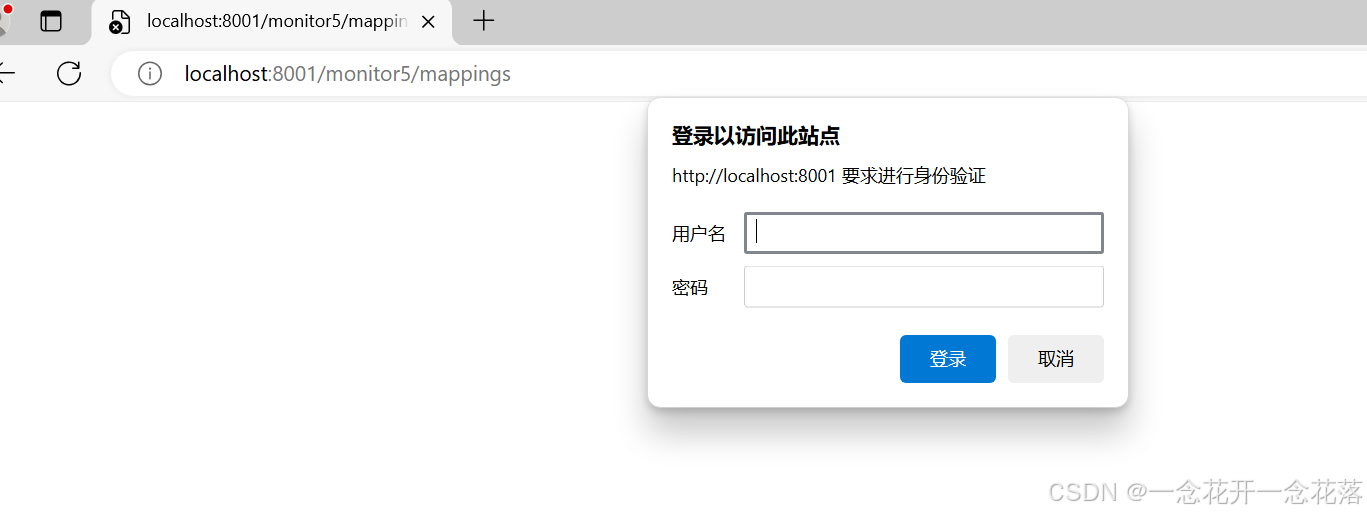
enabled: truemanagement.security.enabled
在springboot2.x中此配置已经废弃了,如果需要用户名和密码访问,是需要自己实现的
另外再springboot1.x中此配置可以根据用户是否授权来访问端点信息,不过若是再浏览器上想以输入账密的形式,则需要结合spring security来做
@Configuration
@EnableWebSecurity
public class ActuatorSecurityConfig extends WebSecurityConfigurerAdapter {
    @Autowired
    private Environment env;

    @Override
    public void configure(HttpSecurity httpSecurity) throws Exception {
        String contextPath = env.getProperty("management.context-path");
        if (StringUtils.isEmpty(contextPath)) {
            contextPath = "";
        }
        httpSecurity.csrf().disable();
        httpSecurity.authorizeRequests()
                .antMatchers("/**" + contextPath + "/**").authenticated()
                .anyRequest().permitAll()
                .and().httpBasic();
    }
}
这样就会实现下图所示效果:
未完待续、、、
参考的文章:Spring Boot 探索 | 服务监控与管理 Actuator_management.server.port-CSDN博客
spring boot 2.x 系列 —— actuator 服务监控与管理_springboot2.x监控端点配置 安全-CSDN博客


 819
819

 被折叠的 条评论
为什么被折叠?
被折叠的 条评论
为什么被折叠?
 到【灌水乐园】发言


