


在Web开发中,经常会遇到需要用户输入车牌号的场景。本文将使用Vue.js和Ant Design Vue组件库,结合拖拽模态框组件,实现一个简单的车牌号输入功能。
实现思路
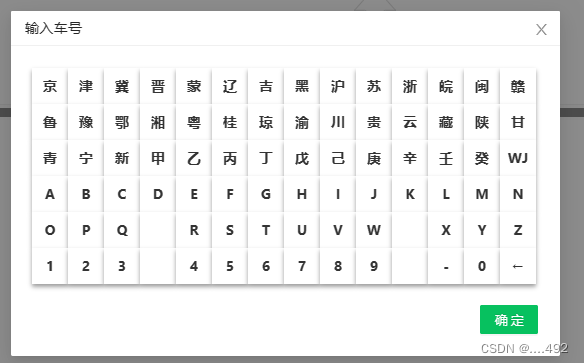
创建一个拖拽模态框组件,其中包含一个显示车牌键盘的区域和一个确定按钮。
使用Ant Design Vue组件库的DragModal组件来实现拖拽功能,并设置相关样式。
在车牌键盘区域内,使用Vue的v-for指令遍历键盘按键,并为每个按键添加点击事件。
在确定按钮上添加点击事件,用于提交输入的车牌号。
使用Vue的响应式数据机制,监听车牌号的变化,并在变化时更新视图。
代码实现
<template>
  <DragModal class="car-keyboard" style="width: 610px;top: calc(100vh - 50%)" title="输入车号" :visible="props.visible" @cancel="$emit('update:visible')" :footer="null">
    <!-- 车牌键盘按键部分 -->
    <div class="keys">
      <div @click="keyClick(item)" v-for="(item,index) in keys" :key="index" class="key">{{item}}</div>
    </div>

    <!-- 确定按钮 -->
    <div @click="complete" style="margin-top: 24px;display: flex;justify-content: flex-end">
      <a-button type="primary">确定</a-button>
    </div>
  </DragModal>
</template>

<script setup>
import { CheckOutlined } from '@ant-design/icons-vue';
import {keys} from "./keys.ts";
import {reactive, watch} from "vue";

// 接收父组件传递的属性和事件
const props = defineProps(['visible','modelValue'])
const emit = defineEmits(['update:visible','complete'])

// 响应式数据
const state = reactive({
  value: ''
})

// 监听visible属性的改变
watch(() => props.visible,(newVal) => {
  if(newVal) {
    state.value = props.modelValue
  } else {
    state.value = ''
  }
})

// 按键点击事件
const keyClick = (item) => {
  // 处理回退键
  if(item==='←') {
    let val = state.value
    if(val) {
      state.value = val.substring(0, val.length-1)
      emit('complete', state.value)
    }
    return;
  }

  // 处理其他按键
  if(item) {
    state.value+=item
    emit('complete', state.value)
  }
}

// 完成按钮点击事件
const complete = () => {
  emit('complete', state.value)
  emit('update:visible')
}
</script>

<style scoped lang="less">
.input-wrap {
  display: flex;
  align-items: center;
  width: 560px;
  .input {
    flex: 1;
    margin: 0 12px;
  }
  .input-label {
    font-size: 15px;
    font-weight: bold;
  }
}

.keys {
  display: flex;
  align-items: center;
  flex-wrap: wrap;
  margin: 0;
  .key {
    cursor: pointer;
    width: 40px;
    height: 40px;
    display: flex;
    justify-content: center;
    align-items: center;
    font-size: 16px;
    font-weight: bold;
    text-align: center;
    text-decoration: none;
    background-color: #fff;
    //border: 1px solid #c0c0c0;
    box-shadow: 0 3px 5px rgba(0,0,0,0.4);
    color: #333;
    box-sizing: border-box;
  }
  .key:hover {
    background-color: #d4d4d4;
  }
  .key:active {
    background-color: #bfbfbf;
    box-shadow: none;
  }
}
</style>
使用方式
在需要使用这个车牌号输入组件的地方,引入并注册该组件,并传递需要的属性和事件即可。
<template>
  <div>
    <button @click="openModal">点击输入车牌号</button>
    <p>输入的车牌号:{{ carNumber }}</p>
    <CarKeyboard v-model:visible="showModal" v-model:modelValue="carNumber" @complete="handleComplete"></CarKeyboard>
  </div>
</template>
// 车键盘
const keyboardState = reactive<any>({
  visible: false,
  carNumber: ''
})

const openCarKeyboard = () => {
  keyboardState.carNumber = formState.carNumber ?? ''
  keyboardState.visible = true
}

const carKeyBoardComplete = (val: string) => {
  formState.carNumber = val
}
效果


 3286
3286


 被折叠的 条评论
为什么被折叠?
被折叠的 条评论
为什么被折叠?
 到【灌水乐园】发言


