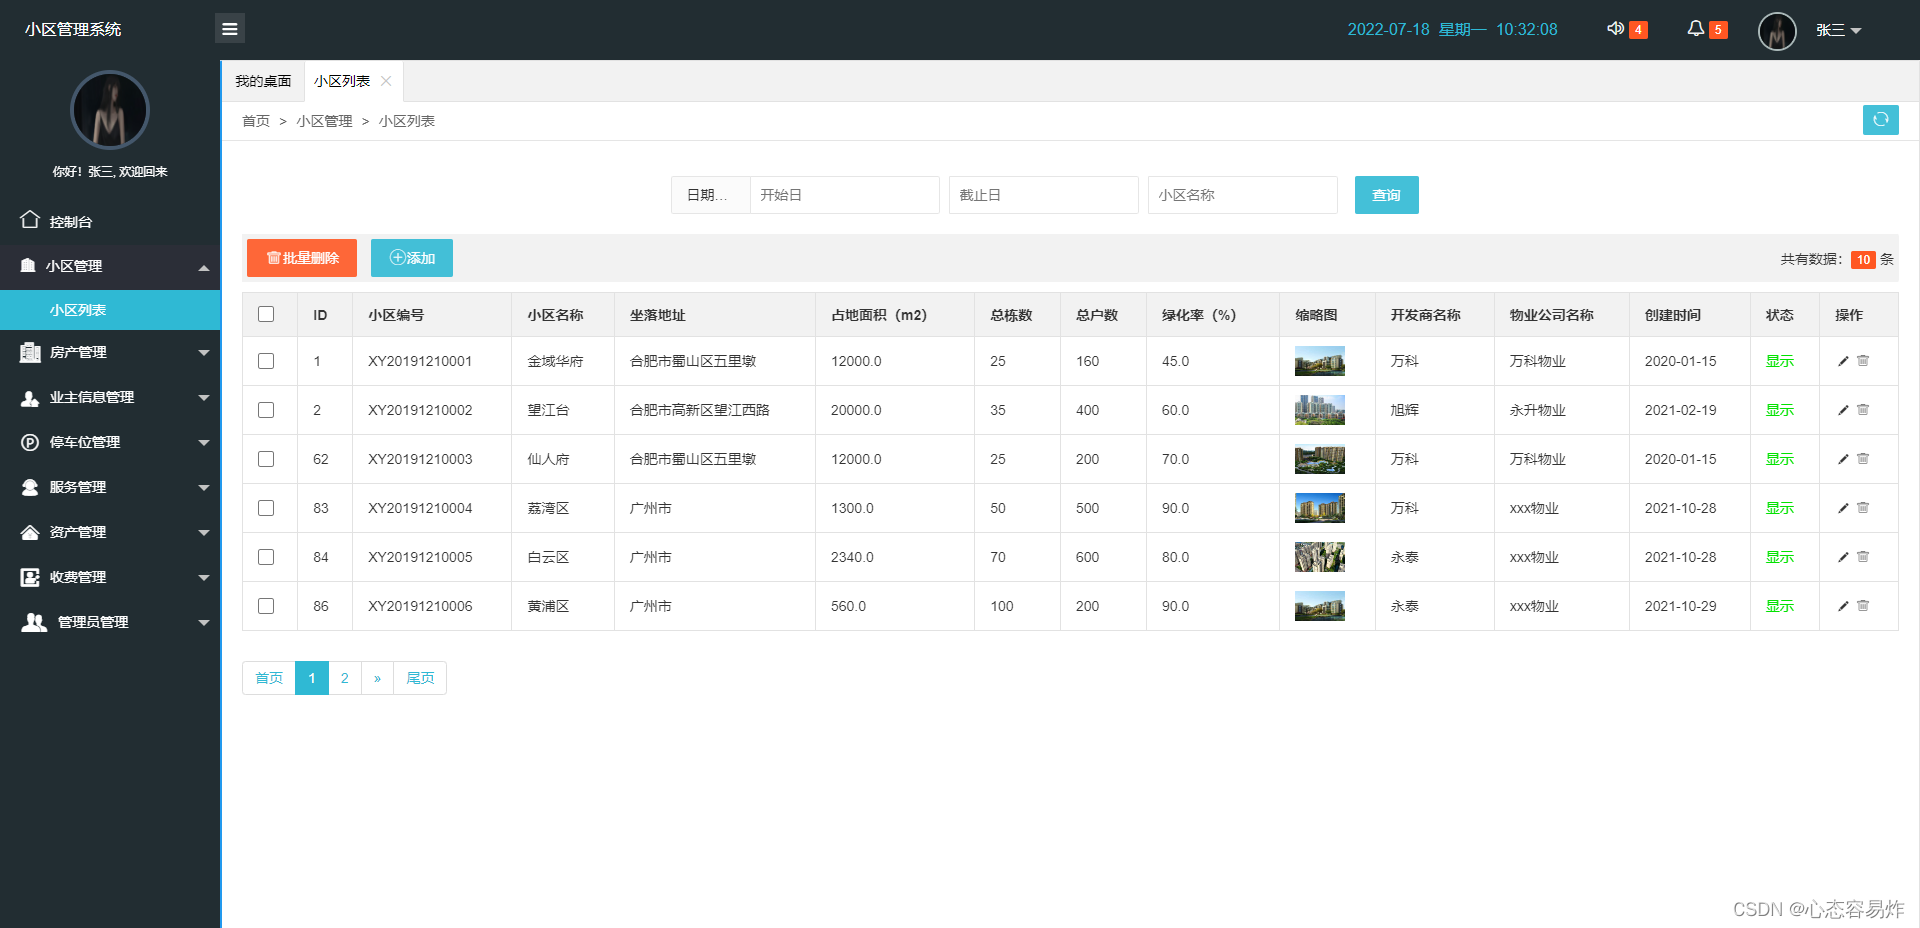
使用springmvc+layui+mybatis设计智慧社区:

前言:实现功能(此处仅仅展示小区管理)


一、进行配置

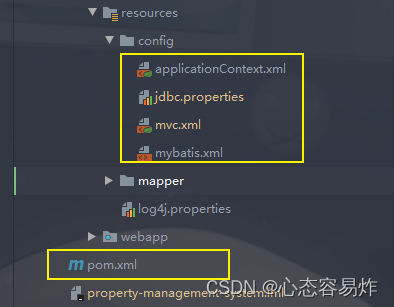
1、applicationContext.xml

<?xml version="1.0" encoding="UTF-8"?>
<beans xmlns="http://www.springframework.org/schema/beans"
       xmlns:xsi="http://www.w3.org/2001/XMLSchema-instance"
       xmlns:context="http://www.springframework.org/schema/context"
       xmlns:tx="http://www.springframework.org/schema/mvc" xmlns:aop="http://www.springframework.org/schema/aop"
       xsi:schemaLocation="http://www.springframework.org/schema/beans http://www.springframework.org/schema/beans/spring-beans.xsd http://www.springframework.org/schema/context https://www.springframework.org/schema/context/spring-context.xsd http://www.springframework.org/schema/mvc https://www.springframework.org/schema/mvc/spring-mvc.xsd http://www.springframework.org/schema/aop https://www.springframework.org/schema/aop/spring-aop.xsd">
       <context:property-placeholder location="classpath:config/jdbc.properties"></context:property-placeholder>
       <bean id="dataSource" class="com.alibaba.druid.pool.DruidDataSource">
           <property name="driverClassName" value="${jdbc.driver}"></property>
           <property name="url" value="${jdbc.url}"></property>
           <property name="username" value="${jdbc.username}"></property>
           <property name="password" value="${jdbc.password}"></property>
        </bean>
        <bean id="sessionFactoryBean" class="org.mybatis.spring.SqlSessionFactoryBean">
            <property name="dataSource" ref="dataSource"></property>
            <property name="mapperLocations" value="classpath:mapper/*.xml"></property>
            <property name="configLocation" value="classpath:config/mybatis.xml"></property>
        </bean>
    <bean class="org.mybatis.spring.mapper.MapperScannerConfigurer">
        <property name="basePackage" value="com.property.management.mapper"></property>
        <property name="sqlSessionFactoryBeanName" value="sessionFactoryBean"></property>
    </bean>
    <bean class="org.springframework.jdbc.datasource.DataSourceTransactionManager">
        <property name="dataSource" ref="dataSource"></property>
    </bean>

    <context:component-scan base-package="com.property.management"></context:component-scan>
    <tx:annotation-driven></tx:annotation-driven>
    <aop:aspectj-autoproxy></aop:aspectj-autoproxy>


</beans>

2、jdbc:

jdbc.driver=com.mysql.jdbc.Driver
jdbc.url=jdbc:mysql:///management?severTimezone=UTC&useSSL=false&characterEncoding=utf-8&zeroDateTimeBehavior=convertToNull&transformedBitIsBoolean=true
jdbc.username=*****
jdbc.password=*****

这里账号密码需要根据自己的数据库进行添加

3、mvc.xml

<?xml version="1.0" encoding="UTF-8"?>
<beans xmlns="http://www.springframework.org/schema/beans"
       xmlns:xsi="http://www.w3.org/2001/XMLSchema-instance" xmlns:mvc="http://www.springframework.org/schema/mvc"
       xsi:schemaLocation="http://www.springframework.org/schema/beans http://www.springframework.org/schema/beans/spring-beans.xsd http://www.springframework.org/schema/mvc https://www.springframework.org/schema/mvc/spring-mvc.xsd">
       <import resource="classpath:config/applicationContext.xml"></import>
       <mvc:annotation-driven></mvc:annotation-driven>
      <bean class="org.springframework.web.servlet.view.InternalResourceViewResolver">
          <property name="prefix" value="/"></property>
          <property name="suffix" value=".jsp"></property>
      </bean>
    <mvc:default-servlet-handler></mvc:default-servlet-handler>


    <mvc:interceptors>
      <mvc:interceptor>
          <mvc:mapping path="/**"/>
          <mvc:exclude-mapping path="/user/login"/>
          <mvc:exclude-mapping path="/user/register"/>
          <mvc:exclude-mapping path="/user/captcha"/>
          <mvc:exclude-mapping path="/asset/**"/>
          <mvc:exclude-mapping path="/css/**"/>
          <mvc:exclude-mapping path="/images/**"/>
          <mvc:exclude-mapping path="/js/**"/>
          <mvc:exclude-mapping path="/lib/**"/>
          <mvc:exclude-mapping path="/ueditor/**"/>
          <bean class="com.property.management.intercept.LoginInterceptor"></bean>
      </mvc:interceptor>
    </mvc:interceptors>


    <!--    文件上传  id是固定的值 不可改变-->
    <bean id="multipartResolver" class="org.springframework.web.multipart.commons.CommonsMultipartResolver">
        <!--        上传大小限制 50M-->
        <property name="maxUploadSize">
            <value>52428800</value>
        </property>
        <property name="defaultEncoding">
            <value>utf-8</value>
        </property>

  • 1
    点赞
  • 1
    收藏
    觉得还不错? 一键收藏
  • 2
    评论
好的,这里是一个基于SpringMVCMyBatisLayui的商品增删改查的示例代码,你可以参考一下: ### 1. 创建商品实体类 ```java public class Product { private Integer id; private String name; private Double price; // getter和setter方法省略 } ``` ### 2. 创建商品DAO接口 ```java public interface ProductDao { List<Product> findAll(); Product findById(Integer id); void save(Product product); void update(Product product); void deleteById(Integer id); } ``` ### 3. 创建商品DAO实现类 ```java @Repository public class ProductDaoImpl implements ProductDao { @Autowired private SqlSession sqlSession; @Override public List<Product> findAll() { return sqlSession.selectList("findAll"); } @Override public Product findById(Integer id) { return sqlSession.selectOne("findById", id); } @Override public void save(Product product) { sqlSession.insert("save", product); } @Override public void update(Product product) { sqlSession.update("update", product); } @Override public void deleteById(Integer id) { sqlSession.delete("deleteById", id); } } ``` ### 4. 创建商品控制器 ```java @Controller @RequestMapping("/product") public class ProductController { @Autowired private ProductDao productDao; @GetMapping("/list") public String list(Model model) { List<Product> productList = productDao.findAll(); model.addAttribute("productList", productList); return "product/list"; } @GetMapping("/add") public String add() { return "product/add"; } @PostMapping("/save") public String save(Product product) { productDao.save(product); return "redirect:/product/list"; } @GetMapping("/edit/{id}") public String edit(@PathVariable("id") Integer id, Model model) { Product product = productDao.findById(id); model.addAttribute("product", product); return "product/edit"; } @PostMapping("/update") public String update(Product product) { productDao.update(product); return "redirect:/product/list"; } @GetMapping("/delete/{id}") public String delete(@PathVariable("id") Integer id) { productDao.deleteById(id); return "redirect:/product/list"; } } ``` ### 5. 创建商品列表页面 ```html <!DOCTYPE html> <html lang="en"> <head> <meta charset="UTF-8"> <title>商品列表</title> <link rel="stylesheet" href="/layui/css/layui.css"> </head> <body> <div class="layui-container"> <div class="layui-row"> <div class="layui-col-md12"> <table class="layui-table"> <thead> <tr> <th>ID</th> <th>名称</th> <th>价格</th> <th>操作</th> </tr> </thead> <tbody> <#list productList as product> <tr> <td>${product.id}</td> <td>${product.name}</td> <td>${product.price}</td> <td> <a href="/product/edit/${product.id}" class="layui-btn layui-btn-sm layui-btn-normal">编辑</a> <a href="/product/delete/${product.id}" class="layui-btn layui-btn-sm layui-btn-danger">删除</a> </td> </tr> </#list> </tbody> </table> <a href="/product/add" class="layui-btn layui-btn-sm layui-btn-normal">添加商品</a> </div> </div> </div> <script src="/layui/layui.js"></script> </body> </html> ``` ### 6. 创建添加商品页面 ```html <!DOCTYPE html> <html lang="en"> <head> <meta charset="UTF-8"> <title>添加商品</title> <link rel="stylesheet" href="/layui/css/layui.css"> </head> <body> <div class="layui-container"> <div class="layui-row"> <div class="layui-col-md12"> <form class="layui-form" action="/product/save" method="post"> <div class="layui-form-item"> <label class="layui-form-label">名称</label> <div class="layui-input-block"> <input type="text" name="name" lay-verify="required" autocomplete="off" placeholder="请输入名称" class="layui-input"> </div> </div> <div class="layui-form-item"> <label class="layui-form-label">价格</label> <div class="layui-input-block"> <input type="text" name="price" lay-verify="required" autocomplete="off" placeholder="请输入价格" class="layui-input"> </div> </div> <div class="layui-form-item"> <div class="layui-input-block"> <button class="layui-btn" lay-submit lay-filter="formDemo">提交</button> <a href="/product/list" class="layui-btn layui-btn-primary">返回</a> </div> </div> </form> </div> </div> </div> <script src="/layui/layui.js"></script> </body> </html> ``` ### 7. 创建编辑商品页面 ```html <!DOCTYPE html> <html lang="en"> <head> <meta charset="UTF-8"> <title>编辑商品</title> <link rel="stylesheet" href="/layui/css/layui.css"> </head> <body> <div class="layui-container"> <div class="layui-row"> <div class="layui-col-md12"> <form class="layui-form" action="/product/update" method="post"> <input type="hidden" name="id" value="${product.id}"> <div class="layui-form-item"> <label class="layui-form-label">名称</label> <div class="layui-input-block"> <input type="text" name="name" lay-verify="required" autocomplete="off" placeholder="请输入名称" class="layui-input" value="${product.name}"> </div> </div> <div class="layui-form-item"> <label class="layui-form-label">价格</label> <div class="layui-input-block"> <input type="text" name="price" lay-verify="required" autocomplete="off" placeholder="请输入价格" class="layui-input" value="${product.price}"> </div> </div> <div class="layui-form-item"> <div class="layui-input-block"> <button class="layui-btn" lay-submit lay-filter="formDemo">提交</button> <a href="/product/list" class="layui-btn layui-btn-primary">返回</a> </div> </div> </form> </div> </div> </div> <script src="/layui/layui.js"></script> </body> </html> ``` ### 8. 配置SpringMVCMyBatisSpringMVC中,需要配置视图解析器、静态资源访问、文件上传等。这里只提供一个简单的配置示例: ```xml <!-- 视图解析器 --> <bean class="org.springframework.web.servlet.view.InternalResourceViewResolver"> <property name="prefix" value="/WEB-INF/views/" /> <property name="suffix" value=".jsp" /> </bean> <!-- 静态资源访问 --> <mvc:resources mapping="/layui/**" location="/layui/" /> <!-- 文件上传 --> <bean id="multipartResolver" class="org.springframework.web.multipart.commons.CommonsMultipartResolver"> <property name="defaultEncoding" value="UTF-8" /> <property name="maxUploadSize" value="10485760" /> </bean> <!-- MyBatis --> <bean id="dataSource" class="org.apache.commons.dbcp.BasicDataSource" destroy-method="close"> <property name="driverClassName" value="${jdbc.driverClassName}" /> <property name="url" value="${jdbc.url}" /> <property name="username" value="${jdbc.username}" /> <property name="password" value="${jdbc.password}" /> </bean> <bean id="sqlSessionFactory" class="org.mybatis.spring.SqlSessionFactoryBean"> <property name="dataSource" ref="dataSource" /> <property name="typeAliasesPackage" value="com.example.model" /> <property name="mapperLocations" value="classpath*:com/example/dao/*.xml" /> </bean> <bean class="org.mybatis.spring.mapper.MapperScannerConfigurer"> <property name="basePackage" value="com.example.dao" /> </bean> ``` ### 9. 启动应用程序 在浏览器中输入http://localhost:8080/product/list访问商品列表页面,即可进行商品的增删改查操作。

“相关推荐”对你有帮助么?

  • 非常没帮助
  • 没帮助
  • 一般
  • 有帮助
  • 非常有帮助
提交
评论 2
添加红包

请填写红包祝福语或标题

红包个数最小为10个

红包金额最低5元

当前余额3.43前往充值 >
需支付:10.00
成就一亿技术人!
领取后你会自动成为博主和红包主的粉丝 规则
hope_wisdom
发出的红包
实付
使用余额支付
点击重新获取
扫码支付
钱包余额 0

抵扣说明:

1.余额是钱包充值的虚拟货币,按照1:1的比例进行支付金额的抵扣。
2.余额无法直接购买下载,可以购买VIP、付费专栏及课程。

余额充值