


主题:链表
链表基础复盘:
刷题:
203.移除链表元素
视频讲解
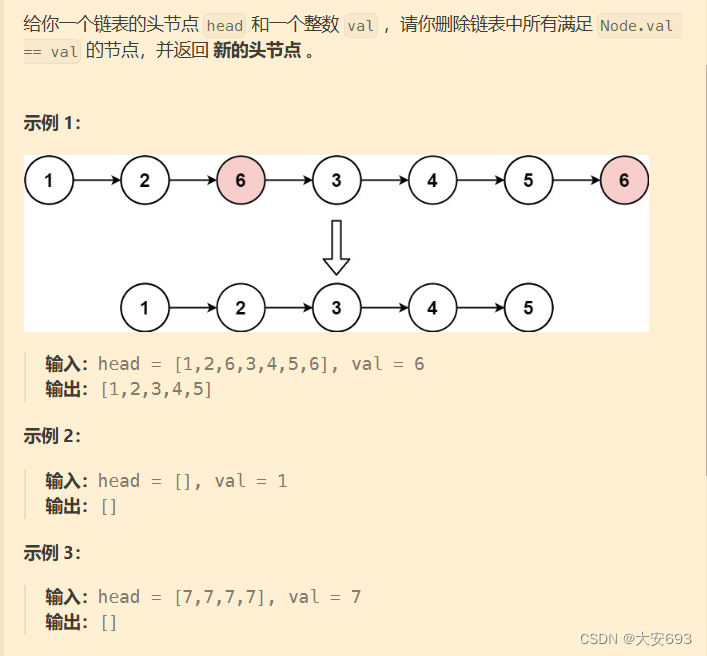
//思路一是采用虚拟头结点,这样做的好处是可以将头结点同其他节点一样共同处理
public ListNode removeElements(ListNode head, int val){
        //采用虚拟头结点 while 循环判断终止条件

        ListNode one = new ListNode();
        one.next=head;
        ListNode first =one;

        while(one.next!=null){
        ListNode tt=one.next;
            if(tt.val==val){
                one.next=tt.next;
            }else{
                one=one.next;
            }
    }


        return first.next;
}


//思路二是单独对头结点处理,其他节点的处理照旧
//个人推荐第一种方法 ,第二种比较简单常规,偷个懒,在这里提一嘴
个人总结
针对链表移除有两种处理方法:
1.直接处理头结点,这种需要为我们单独处理一下头结点 if(headXXXX) XXX
2.虚拟头节点,在头结点前虚拟一个伪头结点,使得头结点可以向其他节点一起处理。
虚拟头结点的使用在链表中会很多,建议掌握。
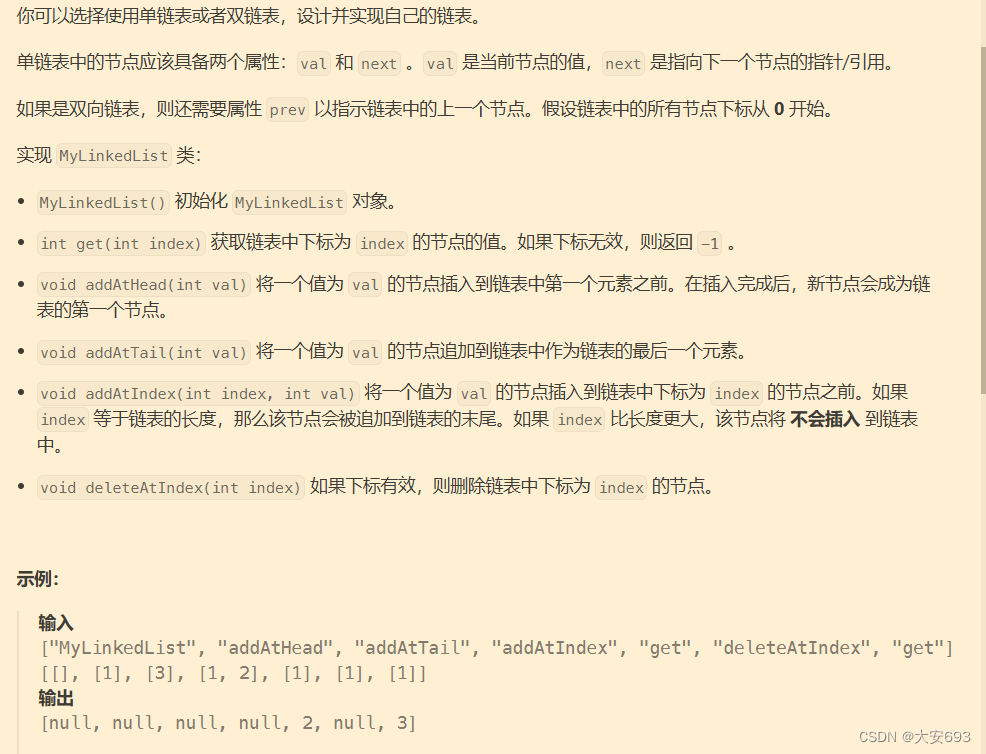
707.设计链表
视频讲解帮你把链表操作学个通透!LeetCode:707.设计链表_哔哩哔哩_bilibili![]() https://www.bilibili.com/video/BV1FU4y1X7WD/题目及个人题解
https://www.bilibili.com/video/BV1FU4y1X7WD/题目及个人题解
//本体内容是单链表,未做双链表,
//做双向链表的时候,需注意的是初始化的地方 head tail
class MyLinkedList {

    int size;
    LinkNode head;

    class LinkNode{
     int val;
     LinkNode next;
     public LinkNode(){

     }
     public LinkNode(int val){
         this.val=val;
         this.next=null;
     }

    }


    public MyLinkedList() {
        this.size=0;
        this.head=null;
    }

    public int get(int index) {
        //不存在
        if(index>this.size-1) return -1;
        //存在
        LinkNode one =new LinkNode();
        one.next=this.head;
        while(index>=0){
            one=one.next;
            index--;
        }
        return  one.val;

    }

    public void addAtHead(int val) {
        LinkNode one =new LinkNode(val);
        LinkNode first=new LinkNode();
        first.next=this.head;
        one.next=this.head;
        first.next=one;
        this.head=first.next;
        this.size++;
    }

    public void addAtTail(int val) {
        LinkNode one =new LinkNode(val);
        LinkNode first=new LinkNode();
        first.next=this.head;
        while (first.next!=null){
            first=first.next;
        }
        first.next=one;
        if(size==0){
            this.head=first.next;
        }
        this.size++;
    }

    public void addAtIndex(int index, int val) {
        if(index>this.size){
            return;
        }else if(index==0){
            addAtHead(val);
        }else if(index==this.size){
            addAtTail(val);
        }else{
            LinkNode one =new LinkNode(val);
            LinkNode first=new LinkNode();
            LinkNode tt=new LinkNode();
            tt.next=this.head;
            first=tt;
            while(index>=1){
                first=first.next;
                index--;
            }
            one.next=first.next;
            first.next=one;
            this.size++;
            this.head=tt.next;
        }
    }

    public void deleteAtIndex(int index) {
        if(index>this.size-1){
            return;
        }else{
            this.size--;
            LinkNode first=new LinkNode();
            first.next=this.head;
            if(index==0){
                first.next=first.next.next;
                this.head=first.next;
            }
            while(index>0){
                first=first.next;
                index--;
            }
           if( first==null||first.next==null){
               return;
           }else{
               first.next=first.next.next;
           }


        }
    }
}
个人总结
上述代码存在优化之处,我们可以将addAtIndex方法写的全面完善一些,addAtHead,Tail方法则可以直接调用该方法。
206.反转链表
视频讲解帮你拿下反转链表 | LeetCode:206.反转链表 | 双指针法 | 递归法_哔哩哔哩_bilibili![]() https://www.bilibili.com/video/BV1nB4y1i7eL/
https://www.bilibili.com/video/BV1nB4y1i7eL/
题目及个人题解
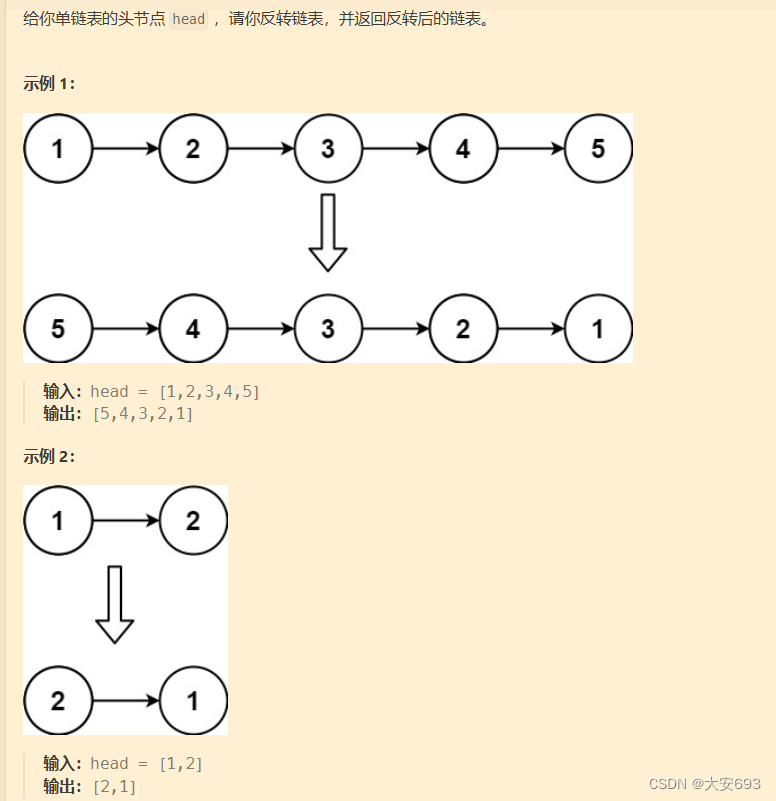
//三种方法 1.虚拟头结点 2.双指针 3.递归
public ListNode reverseList(ListNode head) {
 //思路是 采用虚拟头节点 每次比较是把后一个节点放在前面当首部头结点
        if (head==null) return null;

        ListNode first=new ListNode();

        first.next=head;

        ListNode tt=head;

        while (tt.next!=null){

           ListNode st= tt.next;
           tt.next=st.next;
           st.next=first.next;
           first.next=st;
        }
        return first.next;

}

public ListNode reverseList(ListNode head) {
//思路二 双指针进行转换 per表示前一个节点 cur表示当前节点
//初始情况下 cur为head per为null
//每完成一次转换 往后移动一位(在这里 需要一个中间过渡 temp)

        ListNode cur=head;
        ListNode per=null;

        while(cur!=null){
            ListNode temp=cur.next;
            cur.next=per;
            per=cur;
            cur=temp;
        }
        return per;

}

public ListNode reverseList(ListNode head) {
 // 思路三 递归 参考双指针方法的思路
       return reverse(head,null);
    }

    public ListNode reverse(ListNode cur,ListNode per){
        //递归终止条件
        if(cur==null) return  per;

        ListNode temp =cur.next;
        cur.next=per;
         return reverse(temp,cur);
    }
}
个人总结
反转链表的三种方法的大致思路相同,但在编写的过程中,双指针代码无论是思想还是代码量更具有优势。
个人鸡汤
如果难以抉择,就不要抉择。


 767
767


 被折叠的 条评论
为什么被折叠?
被折叠的 条评论
为什么被折叠?
 到【灌水乐园】发言


