这节我们主要介绍一下springIOC管理第三方bean,采用properties文件的方式
关于使用原始xml文件加载的方法见我的上一篇文章-> 使用原始xml方式
(额外补充一点,其实在正规开发中,这两种方式我们一般也都不用,全部使用注解来简化开发。但是不用我们也得稍作学习,知道其原理)
加载properties文件的方式
前面我们已经写了整合druid和c3p0的案例,存在的问题:
- 这两个数据源中都使用到了一些固定的常量如数据库连接四要素,把这些值写在Spring的配置文件中不利于后期维护
- 需要将这些值提取到一个外部的properties配置文件中
- Spring框架如何从配置文件中读取属性值来配置就是接下来要解决的问题。
思路
将数据库连接四要素提取到properties配置文件,spring来加载配置信息并使用这些信息来完成属性注入。
1、准备properties配置文件
resources下创建一个jdbc.properties文件,并添加对应的属性键值对
jdbc.driver=com.mysql.jdbc.Driver
jdbc.url=jdbc:mysql://127.0.0.1:3306/spring_db
jdbc.username=root
jdbc.password=123
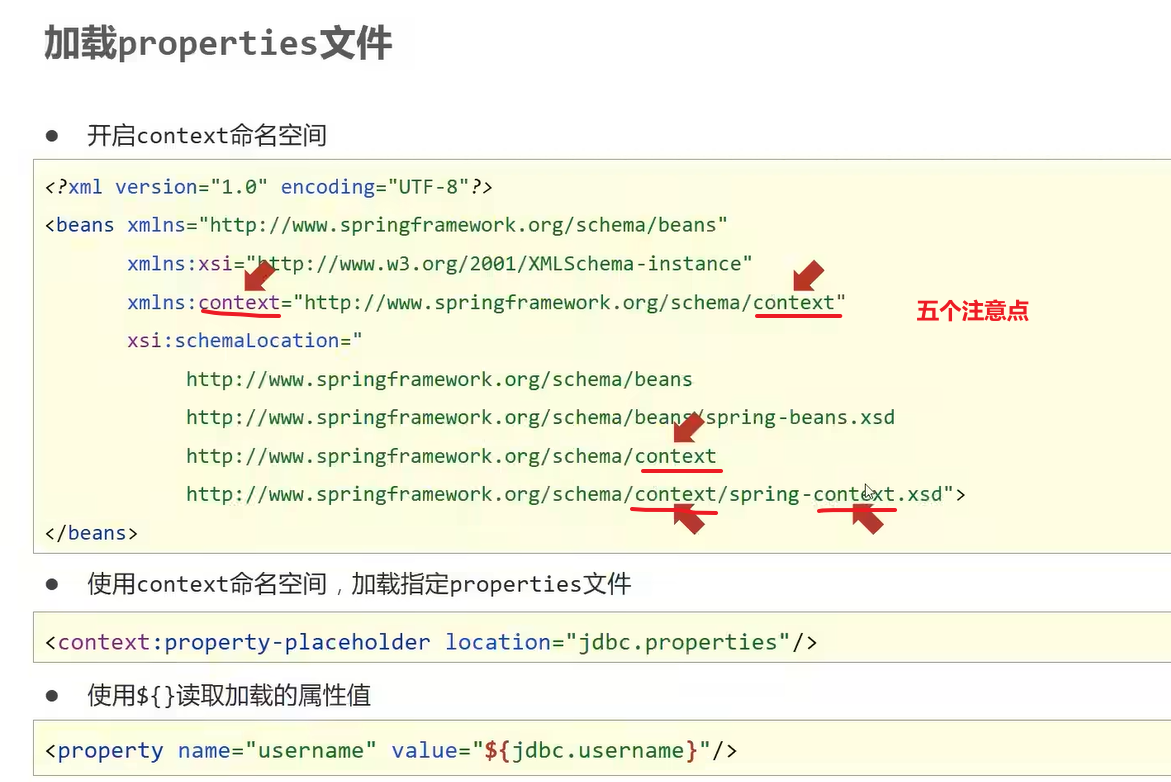
2、开启context命名空间
在applicationContext.xml中开context命名空间
<?xml version="1.0" encoding="UTF-8"?>
<beans xmlns="http://www.springframework.org/schema/beans"
       xmlns:xsi="http://www.w3.org/2001/XMLSchema-instance"
       xmlns:context="http://www.springframework.org/schema/context"
       xsi:schemaLocation="
            http://www.springframework.org/schema/beans
            http://www.springframework.org/schema/beans/spring-beans.xsd
            http://www.springframework.org/schema/context
            http://www.springframework.org/schema/context/spring-context.xsd">
</beans>

注意两种applicationContext.xml的差别
3、加载properties配置文件
在applicationContext.xml配置文件中使用context命名空间下的标签来加载properties配置文件
<context:property-placeholder location="jdbc.properties"/>
4、完成属性注入使用${key}
使用${key}来读取properties配置文件中的内容并完成属性注入
<?xml version="1.0" encoding="UTF-8"?>
<beans xmlns="http://www.springframework.org/schema/beans"
       xmlns:xsi="http://www.w3.org/2001/XMLSchema-instance"
       xmlns:context="http://www.springframework.org/schema/context"
       xsi:schemaLocation="
            http://www.springframework.org/schema/beans
            http://www.springframework.org/schema/beans/spring-beans.xsd
            http://www.springframework.org/schema/context
            http://www.springframework.org/schema/context/spring-context.xsd">
    使用context空间加载properties文件
    <context:property-placeholder location="jdbc.properties"/>
    <bean id="dataSource" class="com.alibaba.druid.pool.DruidDataSource">
        使用属性占位符${}读取properties文件中的属性
        <property name="driverClassName" value="${jdbc.driver}"/>
        <property name="url" value="${jdbc.url}"/>
        <property name="username" value="${jdbc.username}"/>
        <property name="password" value="${jdbc.password}"/>
    </bean>
</beans>
至此,读取外部properties配置文件中的内容就已经完成。
更进一步的案例
从properties配置文件中读取key为name的值,并将其注入到BookDao中并在save方法中进行打印。
1、在项目中添对应的类
BookDao和BookDaoImpl类,并在BookDaoImpl类中添加name属性与setter方法
public interface BookDao {
    public void save();
}

public class BookDaoImpl implements BookDao {
    private String name;

    public void setName(String name) {
        this.name = name;
    }

    public void save() {
        System.out.println("book dao save ..." + name);
    }
}
2、完成配置文件的读取与注入
在applicationContext.xml添加配置,bean的配置管理、读取外部properties、依赖注入:
<?xml version="1.0" encoding="UTF-8"?>
<beans xmlns="http://www.springframework.org/schema/beans"
       xmlns:xsi="http://www.w3.org/2001/XMLSchema-instance"
       xmlns:context="http://www.springframework.org/schema/context"
       xsi:schemaLocation="
            http://www.springframework.org/schema/beans
            http://www.springframework.org/schema/beans/spring-beans.xsd
            http://www.springframework.org/schema/context
            http://www.springframework.org/schema/context/spring-context.xsd">

    <context:property-placeholder location="jdbc.properties"/>

    <bean id="bookDao" class="com.itheima.dao.impl.BookDaoImpl">
        <property name="name" value="${jdbc.driver}"/>
    </bean>
</beans>
3、运行程序
在App类中,从IOC容器中获取bookDao对象,调用方法,查看值是否已经被获取到并打印控制台
public class App {
    public static void main(String[] args) throws Exception{
        ApplicationContext ctx = new ClassPathXmlApplicationContext("applicationContext.xml");
        BookDao bookDao = (BookDao) ctx.getBean("bookDao");
        bookDao.save();

    }
}

注意事项
1、

2、问题一:键值对的key为username引发的问题
在properties中配置键值对的时候,如果key设置为username
username=root666
在applicationContext.xml注入该属性
<?xml version="1.0" encoding="UTF-8"?>
<beans xmlns="http://www.springframework.org/schema/beans"
       xmlns:xsi="http://www.w3.org/2001/XMLSchema-instance"
       xmlns:context="http://www.springframework.org/schema/context"
       xsi:schemaLocation="
            http://www.springframework.org/schema/beans
            http://www.springframework.org/schema/beans/spring-beans.xsd
            http://www.springframework.org/schema/context
            http://www.springframework.org/schema/context/spring-context.xsd">

    <context:property-placeholder location="jdbc.properties"/>

    <bean id="bookDao" class="com.itheima.dao.impl.BookDaoImpl">
        <property name="name" value="${username}"/>
    </bean>
</beans>
运行后,在控制台打印的却不是root666,而是自己电脑的用户名

出现问题的原因是<context:property-placeholder/>标签会加载系统的环境变量,而且环境变量的值会被优先加载,如何查看系统的环境变量?
public static void main(String[] args) throws Exception{
    Map<String, String> env = System.getenv();
    System.out.println(env);
}
大家可以自行运行,在打印出来的结果中会有一个USERNAME=XXX[自己电脑的用户名称]
解决方案
<context:property-placeholder location="jdbc.properties" system-properties-mode="NEVER"/>
system-properties-mode:设置为NEVER,表示不加载系统属性,就可以解决上述问题。
当然还有一个解决方案就是避免使用username作为属性的key。
问题二:当有多个properties配置文件需要被加载,该如何配置?
1.调整下配置文件的内容,在resources下添加jdbc.properties,jdbc2.properties,内容如下:
jdbc.properties
jdbc.driver=com.mysql.jdbc.Driver
jdbc.url=jdbc:mysql://127.0.0.1:3306/spring_db
jdbc.username=root
jdbc.password=root
jdbc2.properties
username=root666
2.修改applicationContext.xml
<?xml version="1.0" encoding="UTF-8"?>
<beans xmlns="http://www.springframework.org/schema/beans"
       xmlns:xsi="http://www.w3.org/2001/XMLSchema-instance"
       xmlns:context="http://www.springframework.org/schema/context"
       xsi:schemaLocation="
            http://www.springframework.org/schema/beans
            http://www.springframework.org/schema/beans/spring-beans.xsd
            http://www.springframework.org/schema/context
            http://www.springframework.org/schema/context/spring-context.xsd">
    <!--方式一 -->
    <context:property-placeholder location="jdbc.properties,jdbc2.properties" system-properties-mode="NEVER"/>
    <!--方式二-->
    <context:property-placeholder location="*.properties" system-properties-mode="NEVER"/>
    <!--方式三 -->
    <context:property-placeholder location="classpath:*.properties" system-properties-mode="NEVER"/>
    <!--方式四-->
    <context:property-placeholder location="classpath*:*.properties" system-properties-mode="NEVER"/>
</beans>
说明:
- 方式一:可以实现,如果配置文件多的话,每个都需要配置
- 方式二:
*.properties代表所有以properties结尾的文件都会被加载,可以解决方式一的问题,但是不标准 - 方式三:标准的写法,
classpath:代表的是从根路径下开始查找,但是只能查询当前项目的根路径 - 方式四:不仅可以加载当前项目还可以加载当前项目所依赖的所有项目的根路径下的properties配置文件
–>
<context:property-placeholder location=“classpath:.properties" system-properties-mode=“NEVER”/>
<context:property-placeholder location="classpath😗.properties” system-properties-mode=“NEVER”/>
**说明:**

* 方式一:可以实现,如果配置文件多的话,每个都需要配置
* 方式二:`*.properties`代表所有以properties结尾的文件都会被加载,可以解决方式一的问题,但是不标准
* 方式三:标准的写法,`classpath:`代表的是从根路径下开始查找,但是只能查询当前项目的根路径
* 方式四:不仅可以加载当前项目还可以加载当前项目所依赖的所有项目的根路径下的properties配置文件


 909
909


 被折叠的 条评论
为什么被折叠?


