


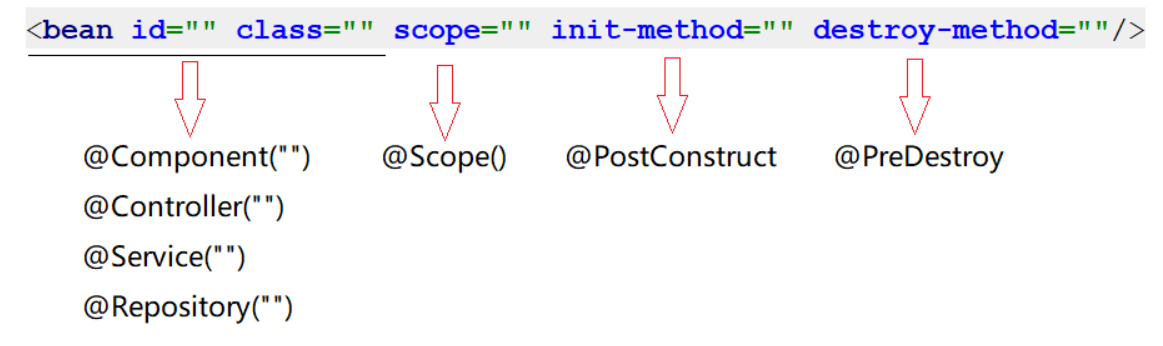
前面我们已经介绍了@Configuration、@ComponentScan,@Component、@Controller、@Service、@Repository的使用(见我主页文章),这里我们继续完成 通过配置实现的内容都换成对应的注解实现,包含两部分内容:bean作用范围(bean是单例的还是非单例的)和bean生命周期。
@Repository
//@Scope设置bean的作用范围
@Scope("prototype")//变成非单例的
public class BookDaoImpl implements BookDao {

    public void save() {
        System.out.println("book dao save ...");
    }
}
| 名称 | @Scope |
|---|---|
| 类型 | 类注解 |
| 位置 | 类定义上方 |
| 作用 | 设置该类创建对象的作用范围 可用于设置创建出的bean是否为单例对象 |
| 属性 | value(默认):定义bean作用范围, 默认值singleton(单例),可选值prototype(非单例) |
在BookDaoImpl中添加两个方法,init和destroy,方法名可以任意
@Repository
public class BookDaoImpl implements BookDao {
    public void save() {
        System.out.println("book dao save ...");
    }
    public void init() {
        System.out.println("init ...");
    }
    public void destroy() {
        System.out.println("destroy ...");
    }
}
如何对方法进行标识,哪个是初始化方法,哪个是销毁方法?
只需要在对应的方法上添加@PostConstruct和@PreDestroy注解即可。
@Repository
public class BookDaoImpl implements BookDao {
    public void save() {
        System.out.println("book dao save ...");
    }
    @PostConstruct //在构造方法之后执行,替换 init-method
    public void init() {
        System.out.println("init ...");
    }
    @PreDestroy //在销毁方法之前执行,替换 destroy-method
    public void destroy() {
        System.out.println("destroy ...");
    }
}
//测试类
public class App {
    public static void main(String[] args) {
        AnnotationConfigApplicationContext ctx = new AnnotationConfigApplicationContext(SpringConfig.class);
        BookDao bookDao1 = ctx.getBean(BookDao.class);
        BookDao bookDao2 = ctx.getBean(BookDao.class);
        System.out.println(bookDao1);
        System.out.println(bookDao2);
        ctx.close(); //关闭容器
    }
}
注意:@PostConstruct和@PreDestroy注解如果找不到,需要导入下面的jar包
<dependency>
  <groupId>javax.annotation</groupId>
  <artifactId>javax.annotation-api</artifactId>
  <version>1.3.2</version>
</dependency>
找不到的原因是,从JDK9以后jdk中的javax.annotation包被移除了,这两个注解刚好就在这个包中。
知识点1:@PostConstruct
| 名称 | @PostConstruct |
|---|---|
| 类型 | 方法注解 |
| 位置 | 方法上 |
| 作用 | 设置该方法为初始化方法 |
| 属性 | 无 |
知识点2:@PreDestroy
| 名称 | @PreDestroy |
|---|---|
| 类型 | 方法注解 |
| 位置 | 方法上 |
| 作用 | 设置该方法为销毁方法 |
| 属性 | 无 |
小结:


 1176
1176


 被折叠的 条评论
为什么被折叠?
被折叠的 条评论
为什么被折叠?
 到【灌水乐园】发言


