


目录
SpringBean管理注解: 为了语义化。
一、用于创建对象注解
@Component:除三层以外的其它层:实体层;
@Controller:控制层/action/servlet;
@Service:业务逻辑层service 的实现类;
@Repository:数据访问层/持久层 dao/mapper。
案例:
1.加入注解@Component
Student.java
package com.zking.entity;

import lombok.Data;
import org.springframework.context.annotation.Bean;
import org.springframework.objenesis.instantiator.perc.PercInstantiator;
import org.springframework.stereotype.Component;

@Data
@Component
public class Student {
    private String name;
    private String sex;
    private Integer sage;

}
2.加入扫描包
spring.xml
<?xml version="1.0" encoding="UTF-8"?>
<beans xmlns="http://www.springframework.org/schema/beans"
       xmlns:xsi="http://www.w3.org/2001/XMLSchema-instance"
       xmlns:context="http://www.springframework.org/schema/context"
       xsi:schemaLocation="http://www.springframework.org/schema/beans http://www.springframework.org/schema/beans/spring-beans.xsd http://www.springframework.org/schema/context https://www.springframework.org/schema/context/spring-context.xsd">
        <!--
            扫描包:扫描包及子子孙孙表里面添加了
            @Component、
            @Controller、
            @Service、
            @Repository
            注解的java类
        -->
        <context:component-scan base-package="com.zking"/>
</beans>
3.测试
Test.java
package com.zking.test;

import com.sun.xml.internal.fastinfoset.util.DuplicateAttributeVerifier;
import com.zking.entity.Student;
import com.zking.entity.Teacher;
import org.springframework.context.ApplicationContext;
import org.springframework.context.support.ClassPathXmlApplicationContext;

import javax.rmi.CORBA.Stub;

public class Test {
    public static void main(String[] args) {
        // 1.启动spring容器
        ApplicationContext applicationcontext = new ClassPathXmlApplicationContext("spring_03.xml");
        // 2.得到bean对象
        Student student = (Student)applicationcontext.getBean("student");
        System.out.println("student = " + student);
    }
}
控制台打印: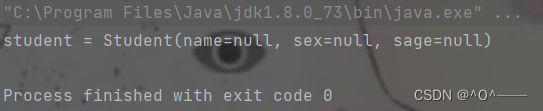
注:可以手动指定注解对象名bean里面的名字;
@Component(value = "s")
注:给注解属性赋值,如果只有一个属性,且属性名是value,则可以省略value不写。
例:
@Component("s")
1.1.@Bean注解
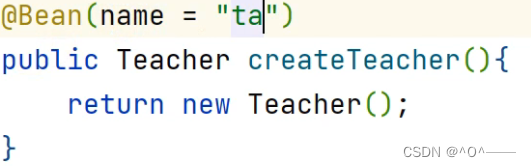
@Bean:加在方法上面,告诉该方法把返回的对象交给spring容器管理。
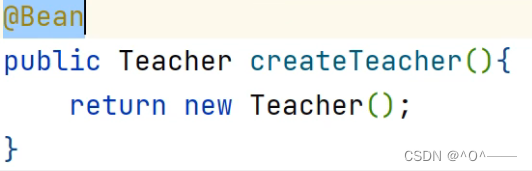
bean对象名默认是当前方法名;例:createTeacher。
也可以指定bean里面的名字,name="" ;
案例:
Student.java
package com.zking.entity;
import lombok.Data;
import org.springframework.context.annotation.Bean;
import org.springframework.objenesis.instantiator.perc.PercInstantiator;
import org.springframework.stereotype.Component;
import org.springframework.stereotype.Controller;
import org.springframework.stereotype.Repository;
import org.springframework.stereotype.Service;
@Data
@Component
public class Student {
private String name;
private String sex;
private Integer sage;
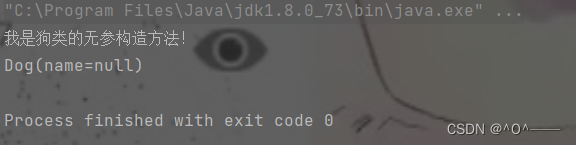
@Bean// 加在方法上面,告诉该方法把返回的对象交给spring容器管理
public Dog createDog(){
return new Dog();
}
}Dog.java
package com.zking.entity;

import lombok.Data;

@Data
public class Dog {
    private String name;

    public Dog(){
        System.out.println("我是狗类的无参构造方法!");
    }
}
spring.xml
<?xml version="1.0" encoding="UTF-8"?>
<beans xmlns="http://www.springframework.org/schema/beans"
       xmlns:xsi="http://www.w3.org/2001/XMLSchema-instance"
       xmlns:context="http://www.springframework.org/schema/context"
       xsi:schemaLocation="http://www.springframework.org/schema/beans http://www.springframework.org/schema/beans/spring-beans.xsd http://www.springframework.org/schema/context https://www.springframework.org/schema/context/spring-context.xsd">
        <!--
            扫描包:扫描包及子子孙孙表里面添加了
            @Component、
            @Controller、
            @Service、
            @Repository
            注解的java类
        -->
        <context:component-scan base-package="com.zking"/>
</beans>
测试
package com.zking.test;

import com.sun.xml.internal.fastinfoset.util.DuplicateAttributeVerifier;
import com.zking.entity.Student;
import com.zking.entity.Teacher;
import org.springframework.context.ApplicationContext;
import org.springframework.context.support.ClassPathXmlApplicationContext;

import javax.rmi.CORBA.Stub;

public class Test {
    public static void main(String[] args) {
        // 1.启动spring容器
        ApplicationContext applicationcontext = new ClassPathXmlApplicationContext("spring_03.xml");

        System.out.println(applicationcontext.getBean("createDog"));
    }
}
控制台打印:
二、注入数据的注解
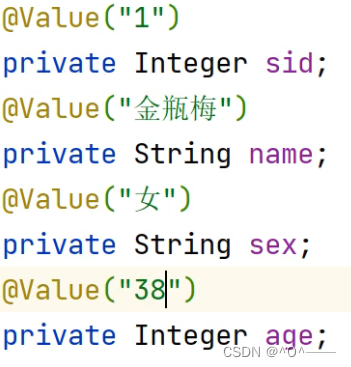
2.1.@Value:给基本数据类型注入数据(八大基本数据类型+String);
给Bean类型注入数据:
2.2.@Autowired:通过类型从IOC容器里面找bean对象(同类型的只能有一个Bean对象);
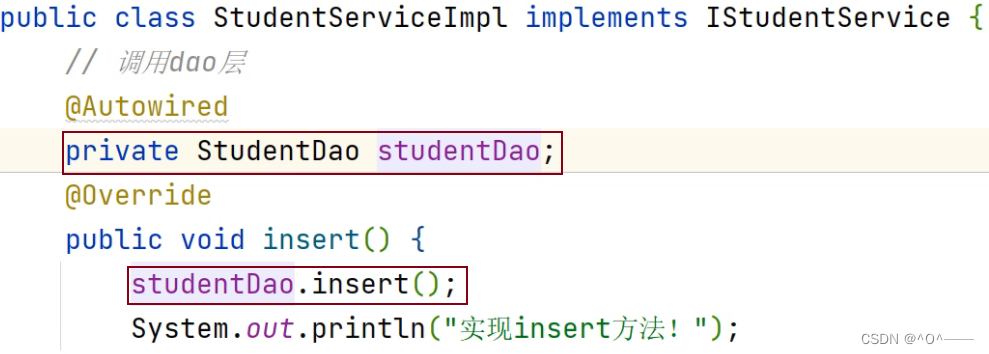
相当于new了对象。
2.3.@Qualifier:当Spring容器同类型的Bean对象存在多个使用;
@Autowired和@Qualifier结合起来使用:
例:如果IOC容器里面有两个Dog类型的Bean,名字分别为dog1、dog2,此时IOC容器不知道实例化哪个对象,就要通过@Qualifier指定对象名。
@Autowired
@Qualifier("studentDao")
private StudentDog studentDao;
private StudentDog studentDao2;
2.4.@Resource:先通过name注入,找不到再通过类型。
2.4.1.通过name注入;
@Resource(name = "studentDao")
private StudentDao studentDao;
2.4.2.再通过类型注入;
@Reource
private StudentDog studentDao;
@Autowired和@Resource的不同:
1.查找Bean的方式不同;
2.如果使用的是spring框架用:@Autowired;
如果使用的是javax:@Resource。
2.5.用于改变作用的范围@Scope;
![]()
2.6.用于定义生命周期@PostConstruct(bean被创建的时候执行)&@PreDestroy(bean被销毁的时候执行);
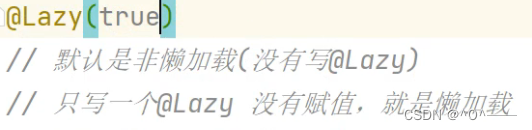
2.7.懒加载注解@Lazy;
2.8.注解@ComponentScan;
@ComponentScan 相当于扫描包 <context:component-scan base-package="com.zking"/>
单个值:

多个值:
![]()
案例: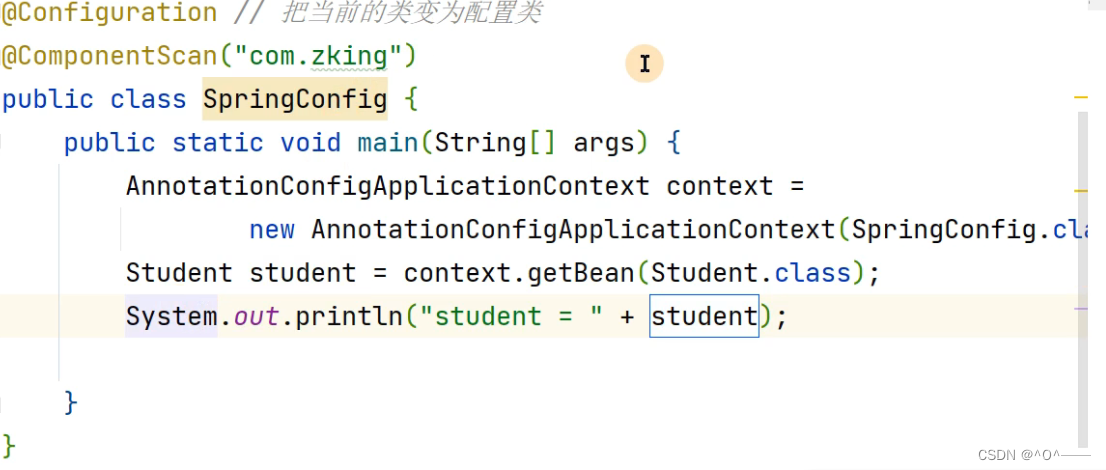
完。


 3556
3556


 被折叠的 条评论
为什么被折叠?
被折叠的 条评论
为什么被折叠?
 到【灌水乐园】发言


