


1. IoC详解
前面提到过IoC就是将对象的控制权交由Spring的IoC容器进行管理,由Spring的IoC容器创建和销毁bean,那么既然涉及到容器,就一定包含以下两方面功能:
- bean的存储
- bean的获取
1.1 类注解
Spring框架为了更好地服务应用程序,提供了非常丰富的注解用于存储bean,大致可以分为如下两类:
- 类注解:例如
@Controller、@Service、@Repository、@Configuration、@Component - 方法注解:例如:
@Bean
接下来我们分别来看各类注解的使用:
1.1.1 @Controller(控制器存储)
1.1.1.1 bean的存储
使用@Controller存储bean的测试代码如下:
@Controller // 将bean存储到Spring容器中
public class TestController {
    public void testController() {
        System.out.println("test controller");
    }
}
那么我们如何才能够获取到Spring容器中的bean呢?
1.1.1.2 **bean的获取 **
我们可以在使用@SpringBootApplication的启动类中获取到ApplicationContext对象,该上下文对象就保存着程序启动时的一些信息,可以看做是IoC容器实例
@SpringBootApplication
public class IocDiDemoApplication {

    public static void main(String[] args) {
        // 1. 获取IoC容器
        ApplicationContext context = SpringApplication.run(IocDiDemoApplication.class, args);
        // 2. 获取bean
        TestController controllerBean = context.getBean(TestController.class);
        // 3. 测试bean的testController方法
        controllerBean.testController();
    }
}
此时运行结果如下:

如果再把@Controller注解去掉,观察结果:

此时就会抛出这样一个异常:No qualifying bean of type 'com.example.ioc_di_demo.controller.TestController' available表明没有找到类型为TestController的bean实例
1.1.1.3 获取bean对象的其他方式
上述方式我们使用了通过类型的方式获取Bean,但是如果Spring容器中有多个同一类型的bean呢,我们应该如何进行获取?ApplicationContext也提供了其他的方式获取bean,这些方式都是其父接口BeanFactory提供的
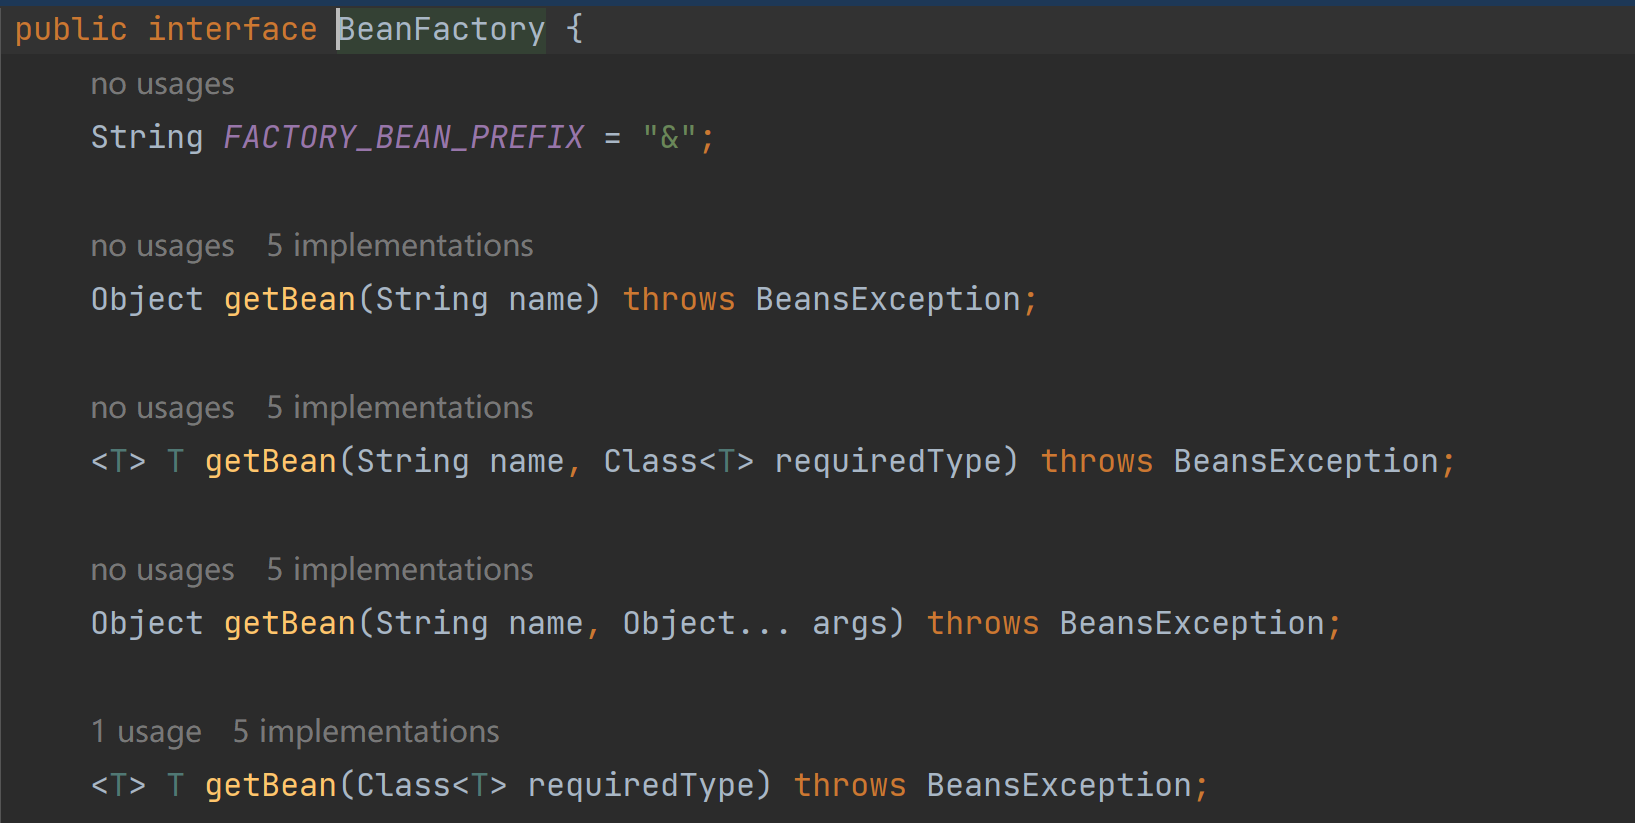
其中第一种、第二种、第四种方式是比较常用的!其中1、2两种方式都涉及到name即根据名称来获取,那么bean的名称是什么呢?实质上,Spring容器在管理bean的时候会为每一个bean分配不同的唯一的名称来标识该bean实例,bean的命令规则如下(可观察源码java.beans.Introspector的decapitalize方法求证):
一般来说,如果程序员没有手动指定bean的名称,那么就会自动按照类名首字母小写,小驼峰形式,例如UserController => userController、AccountService => accountService
但是也会有特殊情况,当有多个字符,并且第一个和第二个字符都是大写字符是就保留原始的类名称
例如IService的bean名称就是IService
示例代码:
@SpringBootApplication
public class IocDiDemoApplication {

    public static void main(String[] args) {
        // 1. 获取IoC容器
        ApplicationContext context = SpringApplication.run(IocDiDemoApplication.class, args);
        // 2.1 获取bean(通过类型)
        TestController controllerBean1 = context.getBean(TestController.class);
        // 2.2 获取bean(通过名称)
        TestController controllerBean2 = (TestController) context.getBean("testController");
        // 2.3 获取bean(通过名称 + 类型)
        TestController controllerBean3 = context.getBean("testController", TestController.class);
        // 3.1 测试controllerBean1的testController方法
        controllerBean1.testController();
        // 3.2 测试controllerBean2的testController方法
        controllerBean2.testController();
        // 3.3 测试controllerBean3的testController方法
        controllerBean3.testController();
    }
}
1.1.2 @Service(业务逻辑存储)
1.1.2.1 bean的存储
我们也可以使用@Service注解将bean交由Spring容器进行管理
@Service // 将TestService作为bean交由Spring容器管理
public class TestService {
    public void testService() {
        System.out.println("test service");
    }
}
1.1.2.2 bean的获取
示例代码如下:
@SpringBootApplication
public class IocDiDemoApplication {

    public static void main(String[] args) {
        // 1. 获取IoC容器
        ApplicationContext context = SpringApplication.run(IocDiDemoApplication.class, args);
        // 2. 获取TestService的bean对象
        TestService beanService = (TestService) context.getBean("testService");
        // 3. 调用bean对象的testService方法
        beanService.testService();
    }
}
运行结果:

1.1.3 @Repository(仓库存储)
1.1.3.1 bean的存储
@Repository // 将bean存储到Spring容器
public class TestMapper {
    public void testRepository() {
        System.out.println("test repository");
    }
}
1.1.3.2 bean的获取
@SpringBootApplication
public class IocDiDemoApplication {

    public static void main(String[] args) {
        // 1. 获取IoC容器
        ApplicationContext context = SpringApplication.run(IocDiDemoApplication.class, args);
        // 2. 获取TestMapper的bean对象
        TestMapper beanRepository = (TestMapper) context.getBean("testMapper");
        // 3. 调用bean对象的testRepository方法
        beanRepository.testRepository();
    }
}
1.1.4 @Component(组件存储)
1.1.4.1 bean的存储
@Component
public class TestComponent {
    public void testComponent() {
        System.out.println("test component");
    }
}
1.1.4.2 bean的获取
@SpringBootApplication
public class IocDiDemoApplication {

    public static void main(String[] args) {
        // 1. 获取IoC容器
        ApplicationContext context = SpringApplication.run(IocDiDemoApplication.class, args);
        // 2. 获取TestComponent的bean对象
        TestComponent beanComponent = (TestComponent) context.getBean("testComponent");
        // 3. 调用bean对象的testComponent方法
        beanComponent.testComponent();
    }
}
1.1.5 @Configuration(配置存储)
1.1.5.1 存储bean
@Configuration
public class TestConfiguration {
    public void testConfiguration() {
        System.out.println("test configuration");
    }
}
1.1.5.2 获取bean
@SpringBootApplication
public class IocDiDemoApplication {

    public static void main(String[] args) {
        // 1. 获取IoC容器
        ApplicationContext context = SpringApplication.run(IocDiDemoApplication.class, args);
        // 2. 获取TestConfiguration的bean对象
        TestConfiguration beanConfiguration = (TestConfiguration) context.getBean("testConfiguration");
        // 3. 调用bean对象的testConfiguration方法
        beanConfiguration.testConfiguration();
    }
}
1.1.6 为什么要使用那么多注解?
Spring为我们提供了各式各样的注解,其实与三层架构这样的应用分层思想不谋而合,可以让程序员方便的看到类的注解就明白该类的含义与作用:
- @Controller:用户标识控制层(表现层),用于接收请求,返回处理完毕的响应结果
- @Service:用于标识业务逻辑层,用于处理具体的业务逻辑
- @Repository:用于标识数据层(持久层),负责数据访问操作即与数据库交互
- @Configuration:用于标识配置层,管理程序中一些配置信息
各个注解之间的关系:
观察五大注解的详细信息如下:
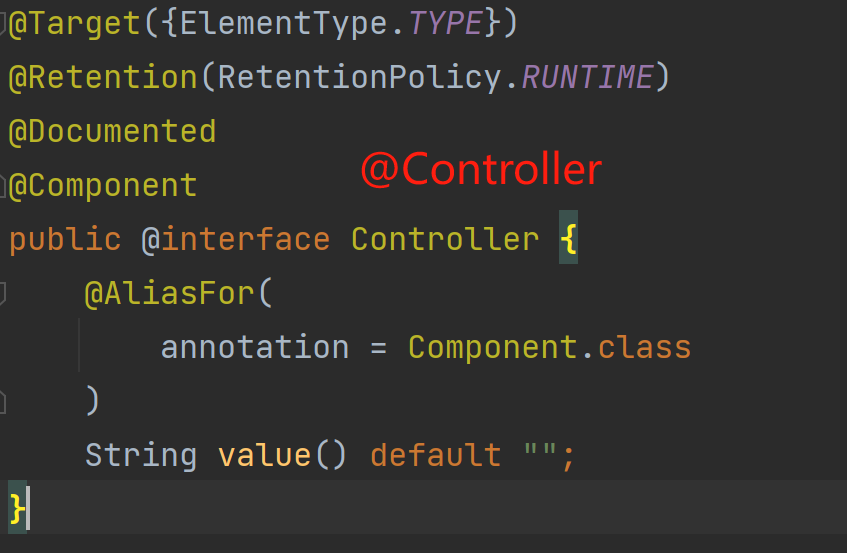
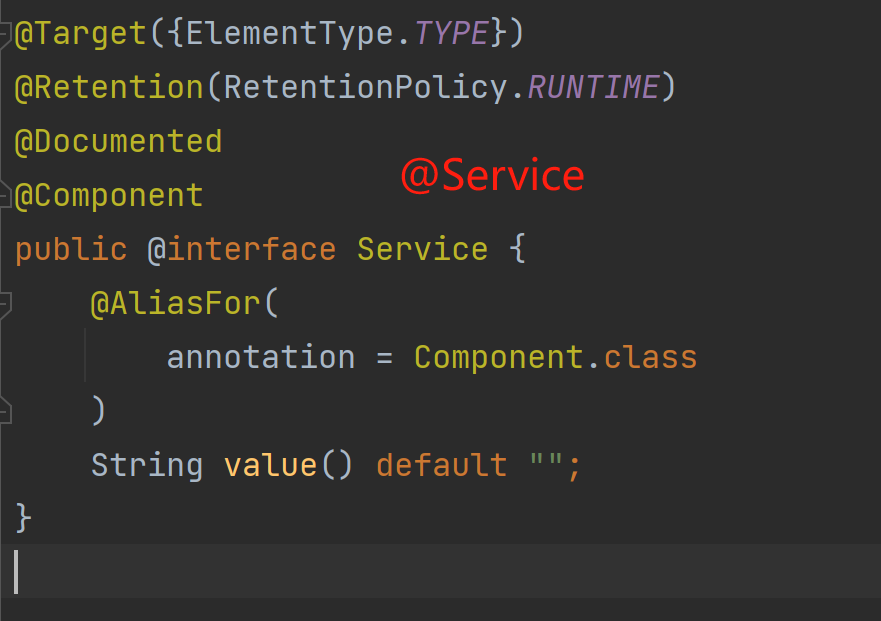
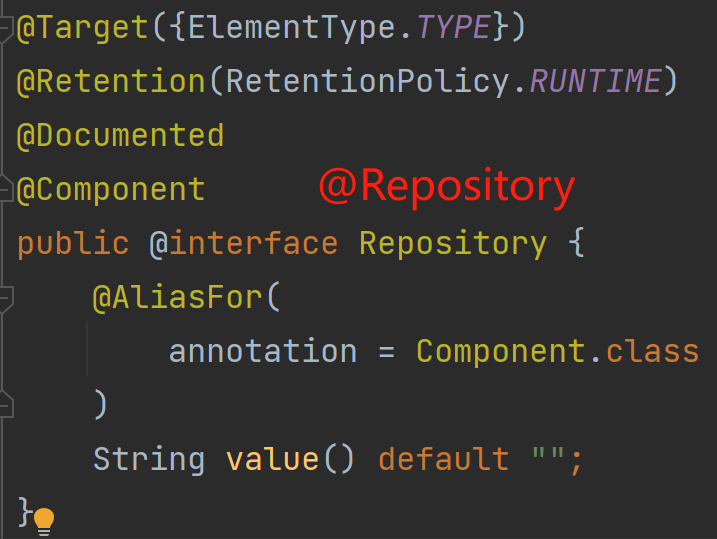
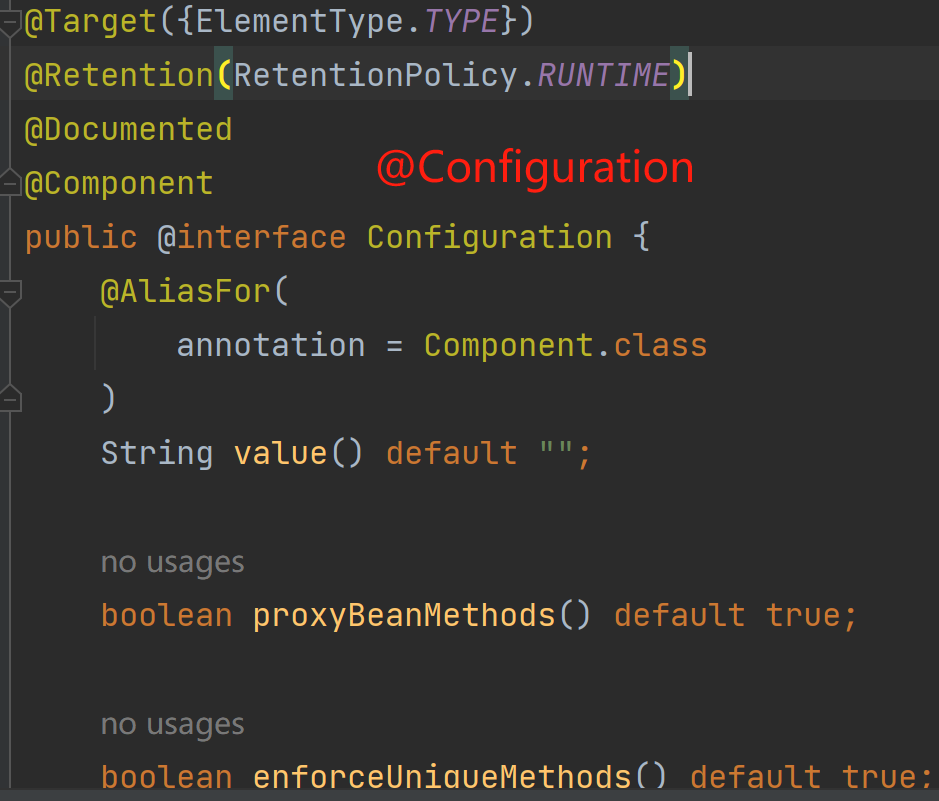
可以发现他们都是@Component的衍生注解,而@Component是一个元注解,可以被其他注解所使用
常见面试题:五大注解是否可以相互替换?
- 从功能上来说,大部分注解可以相互替换,但是唯独@Controller注解不可以使用别的注解替换,因为该注解用于表现层进行路由映射,使用其他注解代替有极小概率发生意想不到的错误
- 从语义性来说,不可以相互替换,@Controller用于标识控制层,@Service注解用于标识业务逻辑层,@Repository用于标识这是一个持久层
1.2 方法注解
上述我们介绍了五大类注解的使用,但是如果面对以下情况就无法使用类注解:
- 使用第JDK原生类/第三方包中的类,无法在类上使用注解
- 一个类需要多个对象,比如需要多个数据源对象
1.2.1 方法注解的使用
1.2.1.1 bean的配置
public class BeanConfig {

    @Bean
    public LocalDateTime localDateTime() {
        return LocalDateTime.now();
    }
}
1.2.1.2 bean的获取
上述代码我们使用@Bean方法注解配置了一个对象,交由Spring容器进行管理,下面我们尝试获取该实例
@SpringBootApplication
public class IocDiDemoApplication {

    public static void main(String[] args) {
        // 1. 获取IoC容器
        ApplicationContext context = SpringApplication.run(IocDiDemoApplication.class, args);
        // 2. 获取LocalDateTime的bean对象
        LocalDateTime bean = context.getBean(LocalDateTime.class);
        // 3. 打印获取到的bean
        System.out.println(bean.format(DateTimeFormatter.ofPattern("yyyy-MM-dd HH:mm:ss")));
    }
}

但是此时却抛出了异常!这是因为 方法注解需要配合类注解使用!
1.2.1.3 方法注解需要配合类注解使用
将上述配置bean代码更改如下:
@Configuration
public class BeanConfig {

    @Bean
    public LocalDateTime localDateTime() {
        return LocalDateTime.now();
    }
}
此时程序正常运行:

1.2.1.4 定义多个对象
比如在多数据源的场景下,我们需要使用多个@Bean注解,如果依旧按照之前通过类型的方式获取,会出现什么问题呢?
@Configuration
public class BeanConfig {

    @Bean
    public LocalDateTime localDateTime() {
        return LocalDateTime.now();
    }

    @Bean LocalDateTime localDateTime2() {
        return LocalDateTime.of(2024, 4, 1, 12, 0, 0);
    }

    @Bean LocalDateTime localDateTime3() {
        return LocalDateTime.of(2024, 5, 1, 8, 0, 0);
    }
}

此时出现该异常,表示如果按照类型匹配,期望只得到一个实例,但是却匹配到了三个!这个时候我们就需要使用名称来获取bean了!
使用@Bean方法注解声明的bean的名称默认就是方法名称!
@SpringBootApplication
public class IocDiDemoApplication {

    public static void main(String[] args) {
        // 1. 获取IoC容器
        ApplicationContext context = SpringApplication.run(IocDiDemoApplication.class, args);
        // 2. 获取TestConfiguration的bean对象
        LocalDateTime bean = (LocalDateTime) context.getBean("localDateTime");
        LocalDateTime bean2 = (LocalDateTime) context.getBean("localDateTime2");
        LocalDateTime bean3 = (LocalDateTime) context.getBean("localDateTime3");
        // 3. 打印获取到的bean
        System.out.println(bean.format(DateTimeFormatter.ofPattern("yyyy-MM-dd HH:mm:ss")));
        System.out.println(bean2.format(DateTimeFormatter.ofPattern("yyyy-MM-dd HH:mm:ss")));
        System.out.println(bean3.format(DateTimeFormatter.ofPattern("yyyy-MM-dd HH:mm:ss")));
    }
}
此时就可以正确获取结果!

1.3 配置扫描路径
Q:假设我们按照规则正确地使用注解配置bean,那么一定会被Spring容器进行管理吗?
A:不一定,我们还需要配置bean的扫描路径
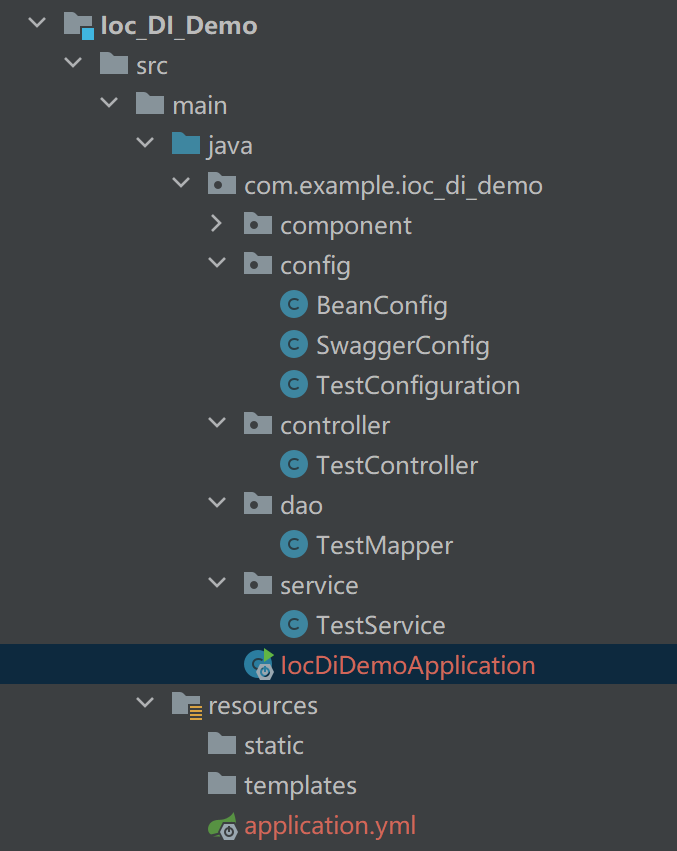
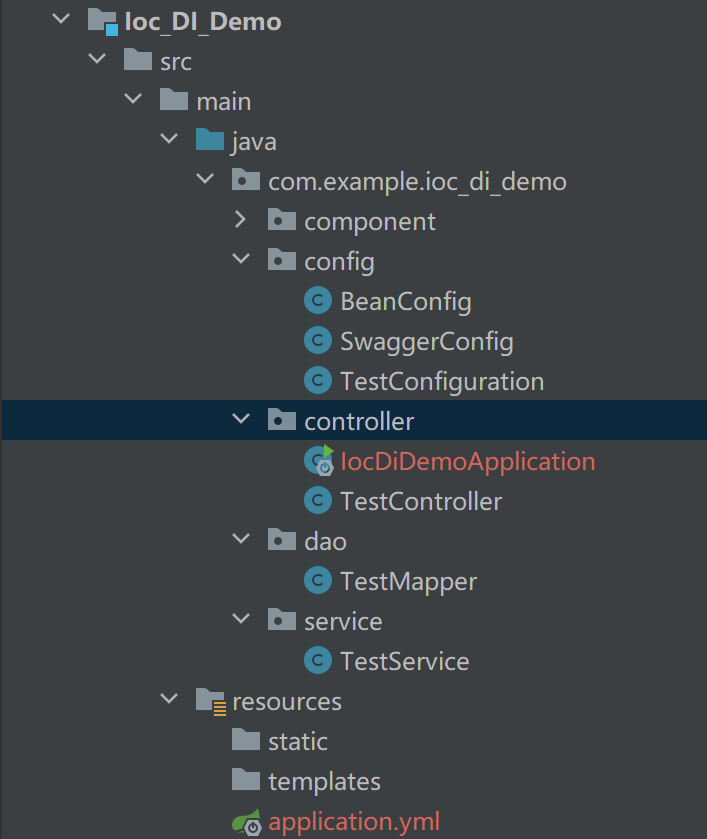
我们修改启动类的路径,再次运行程序!

此时程序运行错误了!其实原因就在于启动类中包含了注解@ComponentScan默认会扫描启动类所在的包及其子包,只有在指定路径下的bean才会被Spring容器管理,解决方式就是使用注解@ComponentScan配置扫描路径!
@ComponentScan(basePackages = {"com.example.ioc_di_demo"})
@SpringBootApplication
public class IocDiDemoApplication {

    public static void main(String[] args) {
        // 1. 获取IoC容器
        ApplicationContext context = SpringApplication.run(IocDiDemoApplication.class, args);
        // 2. 获取TestConfiguration的bean对象
        LocalDateTime bean = (LocalDateTime) context.getBean("localDateTime");
        LocalDateTime bean2 = (LocalDateTime) context.getBean("localDateTime2");
        LocalDateTime bean3 = (LocalDateTime) context.getBean("localDateTime3");
        // 3. 打印获取到的bean
        System.out.println(bean.format(DateTimeFormatter.ofPattern("yyyy-MM-dd HH:mm:ss")));
        System.out.println(bean2.format(DateTimeFormatter.ofPattern("yyyy-MM-dd HH:mm:ss")));
        System.out.println(bean3.format(DateTimeFormatter.ofPattern("yyyy-MM-dd HH:mm:ss")));
    }
}
2. DI详解
下面我们就来详细介绍下DI(Dependency Injection),中文翻译就是依赖注入,它是一种设计模式,用来实现IoC编程思想,它的核心思想就是将对象之间的依赖关系进行解耦合。通过依赖注入,可以为类的属性、构造方法、setter方法中提供所依赖的对象和值,是一种可重用、低耦合的思想
关于依赖注入,Spring提供了三种方式:
- 属性注入(Field Injection)
- 构造方法注入(Constructor Injection)
- setter注入(Setter Injection)
2.1 属性注入
Controller层代码如下:
@Controller // 将bean存储到Spring容器中
public class TestController {

    @Autowired
    private TestService testService; // 属性注入

    public void testDI() {
        // 调用属性方法
        testService.testService();
    }
}
此时在启动类中获取bean实例并调用testDI方法
@SpringBootApplication
public class IocDiDemoApplication {

    public static void main(String[] args) {
        // 1. 获取IoC容器
        ApplicationContext context = SpringApplication.run(IocDiDemoApplication.class, args);
        // 2. 获取TestController的bean对象
        TestController bean = (TestController) context.getBean("testController");
        // 3. 调用testDI方法
        bean.testDI();
    }
}

此时程序正常运行!说明Spring容器通过@Autowired注解已经自动使用 属性注入 的方式给TestService进行赋值了
2.2 构造方法注入
2.2.1 构造注入示例
此时如果我们不使用属性注入的方式,而是使用构造方法进行注入!代码示例如下:
@Controller // 将bean存储到Spring容器中
public class TestController {
    private TestService testService;

    public TestController(TestService testService) {
        this.testService = testService;
    }

    public void testDI() {
        // 调用属性方法
        testService.testService();
    }


    public void testController() {
        System.out.println("test controller");
    }
}
再次执行启动类代码,发现程序正常运行!
2.2.2 多个构造方法
此时我们将代码进行修改,提供多个构造方法:
@Controller // 将bean存储到Spring容器中
public class TestController {

    private TestService testService;

    private TestMapper testMapper;

    public TestController(TestService testService) {
        this.testService = testService;
    }

    public TestController(TestService testService, TestMapper testMapper) {
        this.testService = testService;
    }

    public void testDI() {
        // 调用属性方法
        testService.testService();
    }
}

此时就会发现程序报错了!
这是因为如果提供了多个构造器,那么Spring容器无法确定使用哪个构造器,因此默认会注入到无参构造器中,如果想要自己指定构造器,可以在构造方法上加上@Autowired注解
解决方式如下:
@Controller // 将bean存储到Spring容器中
public class TestController {

    private TestService testService;

    private TestMapper testMapper;

    @Autowired
    public TestController(TestService testService) {
        this.testService = testService;
    }

    public TestController(TestService testService, TestMapper testMapper) {
        this.testService = testService;
    }

    public void testDI() {
        // 调用属性方法
        testService.testService();
    }
}
2.3 setter注入
我们还可以提供setter方法注入类所需要的依赖对象
@Controller // 将bean存储到Spring容器中
public class TestController {

    private TestService testService;

    @Autowired
    public void setTestService(TestService testService) {
        this.testService = testService;
    }

    public void testDI() {
        // 调用属性方法
        testService.testService();
    }
}
启动程序后,正常打印结果,说明setter方法同样可以进行依赖注入
2.4 三种注入方式优缺点分析
- 属性注入:
- 优点:比较简单,使用方便
- 缺点:只能在IoC容器中进行使用;有可能出现NPE(空指针异常);而且不能注入Final修饰的属性
- 构造注入:
- 优点:可以注入Final修饰的属性;注入的对象不会被改变较为安全;依赖对象在使用之前一定会被完全初始化;通用性好(是JDK支持的)
- 缺点:如果需要注入多个对象,代码比较冗长
- setter注入:
- 优点:方便在类实例创建完后,重新赋值或者注入
- 缺点:不能注入Final修饰的属性;对象有可能被外部类访问调用,不安全
2.5 @Autowired存在的问题
下面来演示@Autowired注解存在的问题!
Config/BeanConfig.java
@Configuration
public class BeanConfig {

    @Bean
    public LocalDateTime localDateTime() {
        return LocalDateTime.now();
    }

    @Bean
    LocalDateTime localDateTime2() {
        return LocalDateTime.of(2024, 4, 1, 12, 0, 0);
    }

    @Bean
    LocalDateTime localDateTime3() {
        return LocalDateTime.of(2024, 5, 1, 8, 0, 0);
    }
}
我们将三个相同类型的LocalDateTime对象交由Spring容器进行管理!此时在TestConrtoller中尝试使用@Autowired注解就会发现编译失败!

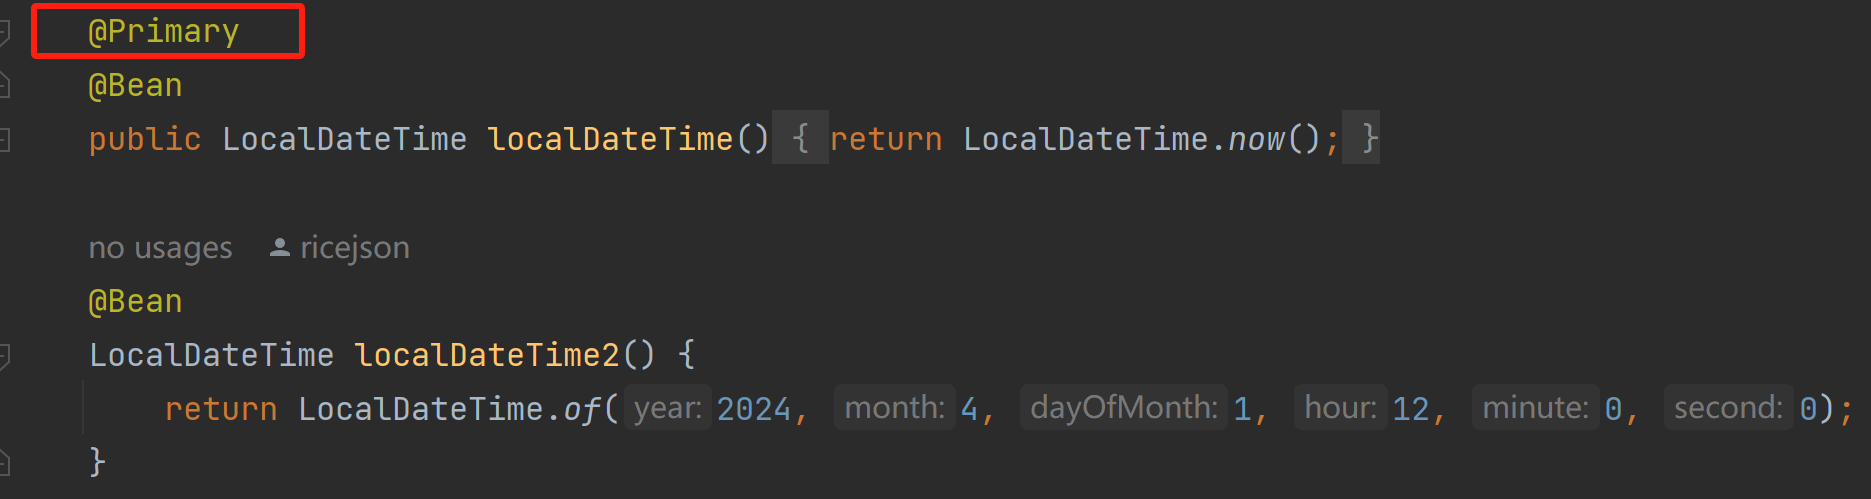
这是因为@Autowired注解按照bean的类型进行自动装配,此时Spring容器内部有三个同一类型的bean,因此无法进行注入,解决方式有如下三种:
- 使用
@Primary注解,告知Spring容器在获取该类型bean时优先选择该对象
- 使用
@Autowired + @Qualifier搭配使用,配置value属性为bean的名称

- 使用
@Resource注解声明bean的名称

常见面试题:@Autowired和@Resource注解的区别
- @Autowired是Spring框架提供的注解,而@Resource是JDK提供的注解
- @Autowired默认按照类型进行依赖注入,而@Resource是按照名称进行注入,相比较于@Autowired,@Resource提供了更多的注解参数设置


 338
338


 被折叠的 条评论
为什么被折叠?
被折叠的 条评论
为什么被折叠?
 到【灌水乐园】发言


