


22.08.30 关于hutool简单使用
maven依赖:
<dependency>
			<groupId>cn.hutool</groupId>
			<artifactId>hutool-core</artifactId>
			<version>5.7.16</version>
</dependency>
1.用hutool批量复制数据
使用到的工具类cn.hutool.core.bean.BeanUtil,方法:copyProperties(oldObject, newObject);
个人使用案例:
 //获取所有内容信息
    ArrayList<Content> contentlist=listByIndexno(dbObj.getCon(),indexno);
        if (contentlist==null||contentlist.isEmpty()){
            return true;
        }

        for (Content content:contentlist ) {
            //复制内容
            Content newContent = new Content();
            BeanUtil.copyProperties(content, newContent);
            String indexno = creatIndexno();
            newContent.setIndexno(indexno);
            //新增数据
            if (add(dbObj,newContent)<=0){
                return false;//遇错就终止
            }
        }
简单来说就是用copyProperties()方法将原有对象数据复制到新对象,然后执行新增操作!
2.用hutool生成treedata
使用到的工具类cn.hutool.core.lang.tree.TreeNodeConfig,cn.hutool.core.lang.tree.TreeUtil
个人使用案例:
List<Tree<String>> tree = BuTpProgramTempContentCtl.creatTree(contentList, false, deep, showContent);//默认不展开

public static List<Tree<String>> creatTree(List<BuTpProgramTempContent> contentList, boolean expand, Integer deep, boolean showContent) {
		//配置
		TreeNodeConfig treeNodeConfig = new TreeNodeConfig();
		// 自定义属性名 都要默认值的
		treeNodeConfig.setWeightKey("ods");//用于数据排序
		treeNodeConfig.setIdKey("indexno");
		treeNodeConfig.setNameKey("title");
		// 最大递归深度
		if (deep!=null&&deep!=0) {
			treeNodeConfig.setDeep(deep);
		}
		//转换器
		List<Tree<String>> treeNodes = TreeUtil.build(contentList, "", treeNodeConfig,
				(treeNode, tree) -> {
					tree.setId(treeNode.getIndexno());
					tree.setParentId(treeNode.getPno());//通过父·id是否属于当前层级
					tree.setWeight(treeNode.getOds());
					tree.setName(treeNode.getTitle());
					// 扩展属性 ...
					tree.putExtra("title", treeNode.getTitle());
					tree.putExtra("programIndexno", treeNode.getTempIndexno());
					tree.putExtra("level", treeNode.getLevel());
					tree.putExtra("isPublic",  treeNode.getIsPublic());
					tree.putExtra("commentAble",  treeNode.getCommentAble());
					tree.putExtra("isFixed",  treeNode.getIsFixed());
					tree.putExtra("fixedItemId",  treeNode.getFixedItemId());
					tree.putExtra("nodeType",  treeNode.getNodeType());
					tree.putExtra("indexno", treeNode.getIndexno());
					tree.putExtra("expand", expand);
					if (showContent){
						tree.put("content", treeNode.getContent());
					}
					tree.put("_showChildren", expand);
				});
		return treeNodes;
	}
前端用iview框架用的table标签接数据
<Table border ref="listTable" size="small" :columns="columns" :data="dataList"
				:max-height="contentHeight - 32 - 20 - 57 - 35" :loading="loading">
				<template slot-scope="{ row, index }" slot="action">
					<Icon type="ios-eye" size="20" style="cursor: pointer" title="查看" @click="contentDetail(row)">
					</Icon>
				</template>
</Table>
前端展示效果
22.09.05
3.手动添加jar包,出现maven不加载当前jar包,并报类找不到

解决办法在pom.xml文件中maven编译中添加:
     <plugin>
        <artifactId>maven-compiler-plugin</artifactId>
        <version>2.3.2</version>
        <configuration>
          <source>1.8</source>
          <target>1.8</target>
			<compilerArguments>
				<extdirs>src/lib</extdirs>
			</compilerArguments>
        </configuration>
      </plugin>
2023.04.09
4.idea 项目文件生成jar包
1. 打开idea,点击左上角file,选择projectStructure 选择Artifacts,点击添加选择jar,再选择empty。 
2.点击确定后,修改jar包名

3.jar包命名,选择jar类型,点击+号,在点击moudleOutput添加编译文件来源,在点击ok,再点击+号再选择要打包的文件目录 directoryContent 选择自己需要的目录,(如需源文件java文件方便阅读,点击+号,选择moduleSources,点击ok即可) ,点击确定。
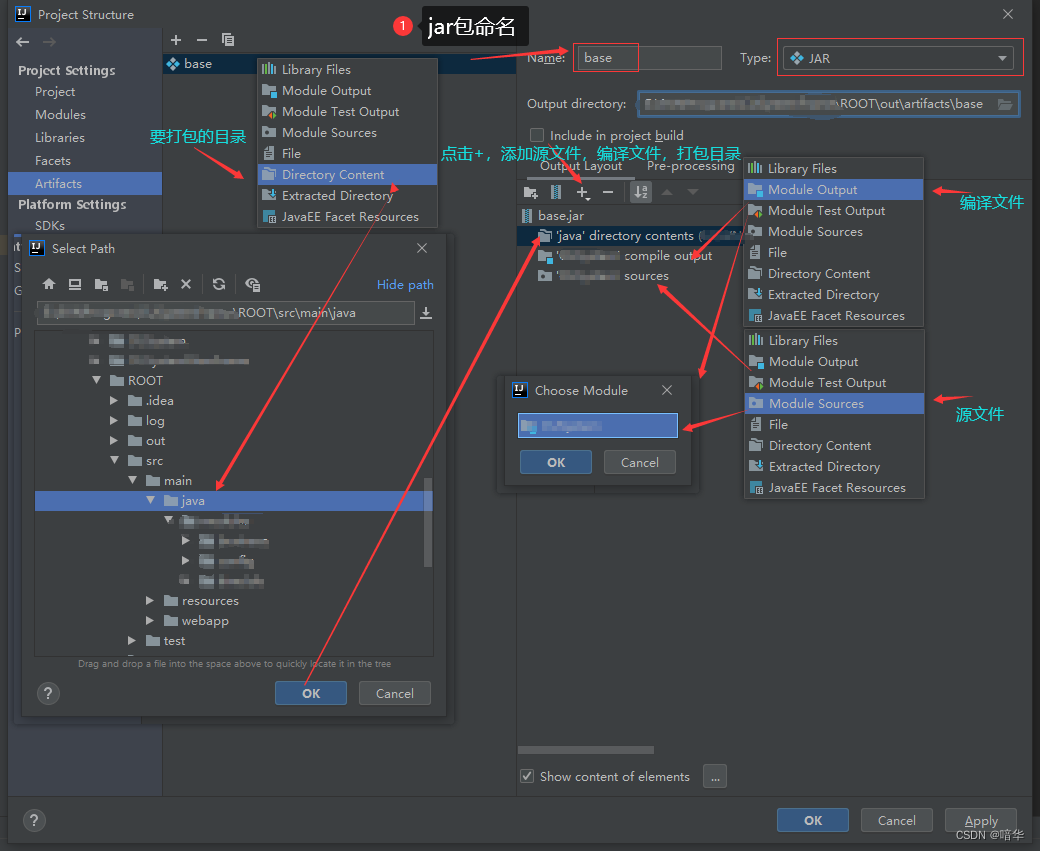 4.点击build 选择build Artifacts,选择你刚新增的jar包名,点击build生成属于你的jar包

5.搞定收工

5.idea 闪退导致tomcat进程未关闭
打开Windows命令行执行
netstat -ano | findstr “1099”
查询储对应进程后执行
taskkill /pid 6424 -f
进程id为自己所查询到的
结束


 被折叠的 条评论
为什么被折叠?
被折叠的 条评论
为什么被折叠?
 到【灌水乐园】发言


