


一、组件的使用
1、创建组件(结构HTML 交互JS 样式CSS)
Vue.extend({该配置项和new Vue的配置项几乎相同,略有差别})
区别:①创建vue组件的时候,配置项中不能使用el配置项。(但是需要使用template配置项来配置模板语句)
②配置项中的data不能使用直接对象的形式,必须使用function。
2、注册组件
局部注册:在配置项当中使用components,即
components:{
    组件的名字:组件对象
}
全局注册:Vue.component("组件的名字","组件对象");
3、使用组件
    <div class="vues">
        <h1>{{msg}}</h1>
        <userList></userList>
        <!-- Property or method "users" is not defined on the instance but referenced
         during render. Make sure that this property is reactive,
         either in the data option, or for class-based components, by initializing the
         property. -->
        <!-- <ul>
            <li v-for="(user,index) in users" :key="user.id">
                {{index}} : {{user.name}}
            </li>
        </ul> -->
    </div>
    <script>
        //1、注册组件
        const myComponent = Vue.extend({
            //option "el" can only be used during instance creation with the `new`
            keyword.
            // el: '.vues',
            template: `<ul>
                            <li v-for="(user,index) of users" :key="user.id">
                                {{index}} : {{user.name}}
                            </li>
                        </ul>`,
            //The "data" option should be a function that returns a per-instance value in
             component definitions.
            // data: {
            //     users: [
            //         { id: 1, name: 'p', age: 20 },
            //         { id: 2, name: 'h', age: 21 },
            //         { id: 3, name: 'b', age: 22 }
            //     ]
            // }
            data() {
                return {
                    users: [
                        { id: 1, name: 'p', age: 20 },
                        { id: 2, name: 'h', age: 21 },
                        { id: 3, name: 'b', age: 22 }
                    ]
                }
            }
        })
        new Vue({
            el: '.vues',
            data: {
                msg: '第一个组件',
                // users: [
                //     { id: 1, name: 'p', age: 20 },
                //     { id: 2, name: 'h', age: 21 },
                //     { id: 3, name: 'b', age: 22 }
                // ]
            },
            components: {
                userlist: myComponent,
            }
        })
    </script>
4、注意点:
①在Vue当中是可以使用自闭合标签,前提是必须在脚手架环境中使用。
②在创建组件的时候Vue.entend()可以省略,但是底层实际上还是会调用的,在注册组件时调用
③组件名字:可以全部小写、首字母大写,后面小写、kebab-case命名法(串式命名法)CamelCa
名法(驼峰命名法),只允许在脚手架环境使用,不要使用HTML内置的标签作为组件名字,在创组
件时,通过配置项配置一个name,这个name不是组建的名字,是设置Vue工具显示
5、组件的嵌套
    <div class="vues">
        <apps></apps>
    </div>
    <script>
        const x = {
            template: `<div><h3>组件化开发</h3></div>`
        }
        const apps = Vue.extend({
            template: `
                <div>
                    <h1>组件化开发</h1>
                    <x></x>
                </div>
            `,
            components: {
                x: x
            }
        })
        new Vue({
            el: '.vues',
            data: {
                msg: '组件嵌套'
            },
            components: {
                apps: apps
            }
        })
    </script>
6、const VueComponent = Vue.extend()和const vm = new Vue({})的区别
①:new Vue({})配置项中的 this 就是:Vue 实例(vm)。
Vue.extend({})配置项中的 this 就是:VueComponent 实例(vc)。
②:Vue.extend 每一次的 extend 调用返回的都是一个全新的 VueComonent 函数。
7、单文件组件
定义:一个文件对应一个组件,命名格式:名字.vue。
结构:<template>HTML 代码</template>、
交互<script>JS 代码</script> 、样式<style>CSS 代码</style>。
export和import:
使用 export 导出(暴露)组件,在需要使用组件的 名称.vue 文件中使用 import 导入组件。
①默认导入和导出 export default {} --- import 任意名称 from ‘模块标识符’;
②按需导入和导出 export {a, b} --- import {a, b} from ‘模块标识符’;
③分别导出 export var name = ‘phb’ --- export function sayHi(){}。
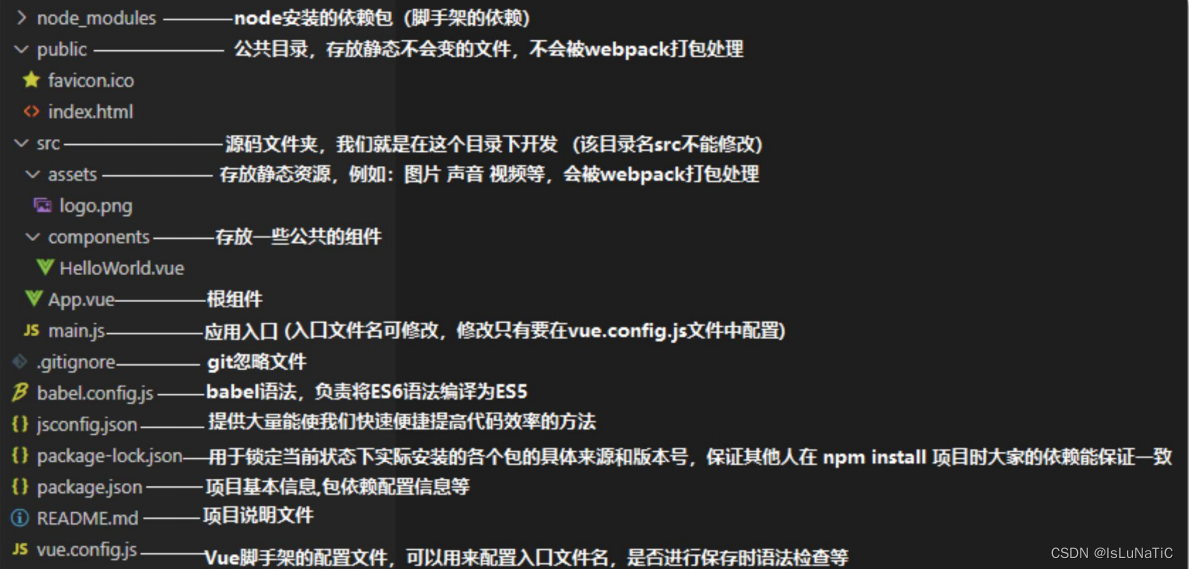
8、脚手架
9、render函数
new Vue({
  render: h => h(App),
  // render(createElement) {
  //   return createElement('h1', "phb")
  // }
}).$mount('#app')
10、prop配置
props : [‘name’,’age’,’sex’]props : {
name : String
age : Number
sex : String
}props : {
name : {
type : Number,
required : true
},
age : {
type : Number,
default : 10
},
sex : {
type : String,
default : ‘男’
}
}11、从父组件获取子组件
在组件上使用 ref 属性进行标识: <User ref=”userJack”></User>
在程序中使用$refs 来获取子组件: this.$refs.userJack。
访问子组件的属性:this.$refs.userJack.name
访问子组件的子组件属性: this.$refs.userJack.$refs.name
ref 也可以使用在普通的 HTML 标签上,这样获取的就是这个 DOM 元素:
12、mixins配置
如果冲突了,会执行组件自身的,不会执行混入的。(这是原则:混入的意思就是不破坏)
对于生命周期周期钩子函数来说,混入时,都有的话,采用叠加,先执行混入的,再执行自己的。
13、局部样式scoped
使用这个元素,可以解决样式名一致,会导致冲突问题
<style scoped></style>


 1万+
1万+


 被折叠的 条评论
为什么被折叠?
被折叠的 条评论
为什么被折叠?
 到【灌水乐园】发言


