


文章目录
存储Bean对象
配置扫描路径
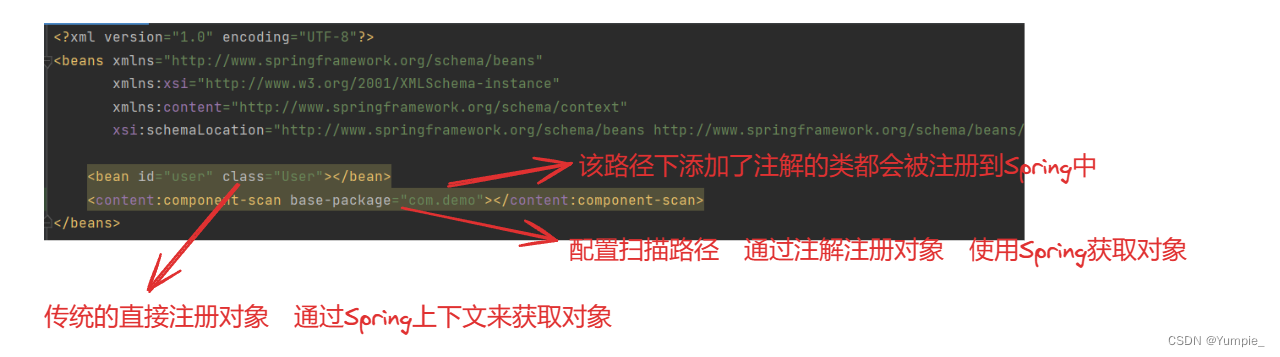
注:
- 只有在扫描路径下的所有类,添加了注解才能被正确的识别并保存到 Spring 中
- 即使添加了注解,但是该类不在扫描路径下也是不能被保存到 Spring 中的
添加注解存储Bean对象
使用注解把 Bean 对象存储到 Spring 中,有两种注解类型可以选择:类注解 和 方法注解,我们下面分别来介绍:
使用类注解
//一共有五种类注解可以进行对象的注册:

@Controller
public class ArticleController {
    public String sayHello(){
        return "hello,controller";
    }
}

@Service
public class UserService {
    public String sayHello(){
        return "hello,service";
    }
}

@Repository
public class UserRepository {
    public String sayHello(){
        return "hello,repository";
    }
}

@Configuration
public class UserConfiguration {
    public String sayHello(){
        return "hello,configuration";
    }
}

@org.springframework.stereotype.Component
public class Component {
    public String sayHello(){
        return "hello,component";
    }
}
//先使用上下文的方式来获取对象,下面介绍更简单的获取对象的方式:

//当使用5大类注解获取bean时,默认 只需要将类名首字母小写即可,  如果bean对象的首字母和第二个字母都是大写时,需要使用原类名才能正确获取到bean对象
        ApplicationContext context = new ClassPathXmlApplicationContext("spring-config.xml");

        ArticleController articleController = context.getBean("articleController",ArticleController.class);
        System.out.println(articleController.sayHello());

        UserService userService = context.getBean("userService",UserService.class);
        System.out.println(userService.sayHello());

        UserRepository userRepository = context.getBean("userRepository",UserRepository.class);
        System.out.println(userRepository.sayHello());

        Component component = context.getBean("component",Component.class);
        System.out.println(component.sayHello());

        UserConfiguration userConfiguration = context.getBean("userConfiguration",UserConfiguration.class);
        System.out.println(userConfiguration.sayHello());
为什么需要五个类注解呢?
在这里使用五个类注解,是为了让程序员看到类注解之后就能直接了解到当前类的用途,不同的类注解的用途是不同的:
- @Controller:表示业务逻辑层
- @Service:表示服务层
- @Repository:表示持久层
- @Configuration:表示配置层
- @Component:表示组件

注:@Component注解是其他四个注解的父类
Bean命名规则
我们配置扫描路径来注册 Bean 对象时并没有设置对象的 id ,那我们通过上下文的方式来获取对象时该使用什么 id 呢?
//我们查看Spring的源码来获取答案:

public static String decapitalize(String name) {
 if (name == null || name.length() == 0) {
 return name;
 }
 // 如果第⼀个字⺟和第⼆个字⺟都为⼤写的情况,是把 bean 的⾸字⺟也⼤写存储了
 if (name.length() > 1 && Character.isUpperCase(name.charAt(1)) &&
 Character.isUpperCase(name.charAt(0))){
 return name;
 }
 // 否则就将⾸字⺟⼩写
 char chars[] = name.toCharArray();
 chars[0] = Character.toLowerCase(chars[0]);
 return new String(chars);
}
注:通过源码我们可以知道:
- 我们通过上下文获取对象的时候,直接使用类名作为 id 即可
- 默认情况下,直接将类名的首字母小写作为 id 使用即可;如果类名的首字母和第二个字母都是大写时,需要使用原类名作为 id 使用。
使用方法注解
@Component
public class StudentBeans {
    @Bean
    public Student student(){
        Student student = new Student();
        student.setId(1);
        student.setName("张三");
        student.setAge(18);
        return student;
    }
}
注:
- 类注解是添加到某个类上的;方法注解是添加到某个方法上的。
- 方法注解要搭配五大类注解一起使用
- 方法注解是为了解决不能多次注册同一个类的问题
重命名Bean
@Component
public class StudentBeans {
    @Bean(name = {"s1","s2"})
    public Student student(){
        Student student = new Student();
        student.setId(1);
        student.setName("张三");
        student.setAge(18);
        return student;
    }
}
注:
- 重命名Bean后,使用Spring上下文来获取对象时,必须把重命名后的名字作为 id 来使用
- 方法注解重命名Bean后解决了不能多次注册同一个类的问题
读取Bean对象
我们通过 Spring 注入的方式来更加简单的获取 Bean 对象,一共有三种注入方式:
属性注入
    @Autowired
    private StudentService studentService;
优点:使用简单
缺点:
- 不能注入不可变对象(final对象),因为final类型的变量在调用class的构造函数的这个过程当中就得初始化完成,基于字段的注入是使用set形式注入的
- 只适用于Ioc容器
- 更容易违背单一设计原则:针对类级
Setter注入
    private StudentService studentService;
    @Autowired
    public void setStudentService(StudentService studentService){
        this.studentService = studentService;
    }
优点:更符合单一设计原则:针对方法级别
缺点:
- 不能注入不可变对象(final对象),因为final类型的变量在调用class的构造函数的这个过程当中就得初始化完成,基于字段的注入是使用set形式注入的
- 注入对象可被修改
构造方法注入
	private StudentService studentService;
    //当类中只有一个构造方法时   @Autowired可以省略
    //如果类中有多个构造方法(重载)时,需要加上@Autowired来明确使用哪个构造方法来注入对象
    @Autowired
    public StudentController(StudentService studentService){
        this.studentService = studentService;
    }
优点:
- 可以注入一个不可变对象(final对象)
- 注入的对象可以被修改(可以被final修饰、构造方法只执行一次)
- 注入的对象会被完全初始化
- 通用性更好
缺点:没有属性注入简单
注入多个相同类型的Bean
注入多个相同类型的 Bean 对象,有两种解决方案:
- 使用@Resource(name=“ ”)
	@Resource(name="student1")
    private Student student1;

	@Resource(name="student2")
	private Student student2;
- 使用@Autowired + @Qualifier(value=“ ”)
	@Autowired
	@Qualifier(value="student1")
    private Student student1;

	@Autowired
	@Qualifier(value="student2")
	private Student student2;
@Autowired vs @Resource
相同点:都是用来实现依赖注入的
不同点:
- 功能支持不同。@Autowired支持属性注入、setter注入、构造方法注入;而@Resource支持属性注入、setter注入却不支持构造方法注入
- 出身不同:@Autowired来自于Spring框架;@Resource来自于JDK
- 参数支持不同:@Autowired只支持required参数;@Resource支持更多的参数设置
- 依赖识别方式不同:@Autowired默认是以 byType 的方式。也可以使用 @Qualifier 指定 Bean的名称转用 byName 的方式;@Resource默认是以 byName 的方式,当 byName方式无法匹配时,会使用 byType方式


 被折叠的 条评论
为什么被折叠?
被折叠的 条评论
为什么被折叠?
 到【灌水乐园】发言


