


前言
通过自动化繁琐的设置和配置工作,帮助开发者快速启动新项目。常见的Node脚手架工具包括Yeoman、Express Generator、Create React App等。
一、什么是脚手架
1、什么是脚手架?
脚手架在软件开发中指的是一种自动化工具或脚本,用于快速创建和配置项目的基本结构和配置文件。脚手架工具可以帮助开发者快速启动新项目,减少手动配置和重复工作,提高开发效率。
- 全局命令行工具
- 创建项目初始化代码文件及目录
2、脚手架的基本能力
- 项目模板生成
根据预定义的模板生成项目的目录结构和初始文件
- 依赖管理
自动生成和更新项目的依赖文件(如package.json),并安装必要的依赖包
- 配置文件生成
创建项目所需的各种配置文件(如.eslintrc, .gitignore, webpack.config.js等)。
- 代码生成
自动生成常见的代码模块和样板代码,如路由、控制器、模型等。
- 交互式问答
通过交互式问答方式询问用户的偏好和需求,从而生成定制化的项目配置。
- 自动化脚本
提供一些预定义的NPM脚本或其他自动化脚本,用于常见的开发任务(如构建、测试、启动服务器等)。
二、搭建脚手架
1、如何实现一个自己的脚手架工具
- 初始化一个vite项目
npm init vite@latest
- 选择vue
? Select a framework: » - Use arrow-keys. Return to submit.
    Vanilla
>   Vue
    React
    Preact
    Lit
    Svelte
    Solid
    Qwik
    Others
- 选择JavaScript
? Select a variant: » - Use arrow-keys. Return to submit.
    TypeScript
>   JavaScript
    Customize with create-vue ↗
    Nuxt ↗
- 通过以下命令运行项目
Done. Now run:
  cd vite-project
  npm install
  npm run dev
2、创建自定义全局指令
-
新建一个
nojs文件,然后创建bin/cli.js -
在
nojs文件下初始化一个项目,然后一路回车
npm init
- 在package.json中添加一个name
"name": "bincli",
bin/cli.js中写入,
#! /usr/bin/env node的作用:告诉操作系统用什么解释器来执行文件。
#!是 shebang 的标志,/usr/bin/env是一个 Unix 程序,它可以找到并运行指定的程序,node指定要使用 Node.js 解释器来执行脚本。
当在文件顶部加上这一行并使文件可执行,可以直接运行该文件,而无需在命令行中显式调用 node 命令。
#! /usr/bin/env node

console.log("bincli");
- 创建自定义全局指令
npm link
bincli

- 修改cli.js文件
#! /usr/bin/env node
// console.log("bincli");
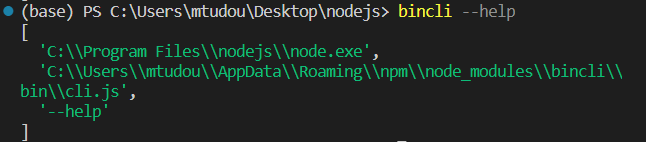
console.log(process.argv);
获取
bincli后面的参数--help
bincli --help
- 获取到cli.js中的命令参数
#! /usr/bin/env node

if(process.argv[2]=='--help'){
  console.log("获取命令参数");
}
三、commander命令参数处理工具
1、安装commander包
- 安装commander
npm i commander
- cli.js文件内容修改
#! /usr/bin/env node

const { program } = require("commander");
program.parse(process.argv);
bincli --help

2、自定义命令参数处理
- 修改cli.js内容
#! /usr/bin/env node
const { program } = require("commander");
/*
使用 .option 方法定义一个命令行选项。
-f 是短选项,--framework 是长选项,<framework> 表示这个选项需要一个参数。
"设置框架" 是对这个选项的描述,用于帮助信息中显示。
*/
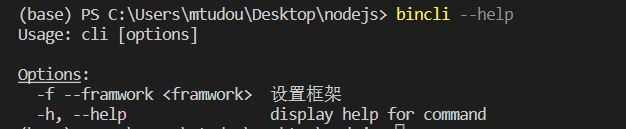
program.option("-f --framwork <framwork>", "设置框架");
// 解析传递给脚本的命令行参数
program.parse(process.argv);
console.log(`选定的框架是: ${program.framework}`);
- 执行
bincli --help命令
3. create创建一个内容命令
- 修改
cli.js
#! /usr/bin/env node
const { program } = require("commander");
program.option("-f --framwork <framwork>", "设置框架");
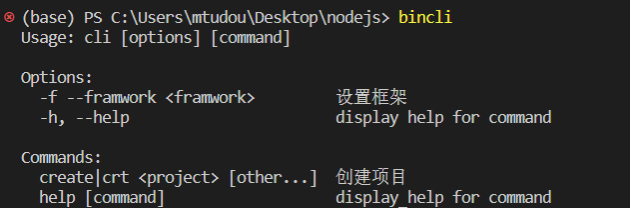
program
.command("create <project> [other...]")
.alias("crt")
.description("创建项目")
.action((project, args) => {
console.log(project);
console.log(args);
});
program.parse(process.argv);
- 执行
bincli create xxx k gf l命令

- 执行
bincli --help命令

四、模块化拆分
1、代码封装
lib/core/help.js
const myhelp = function (program) {
  program.option("-f --framwork <framwork>", "设置框架");
};
module.exports = myhelp;
lib/core/mycommander.js
const myAction = require("./action");
const mycommander = function (program) {
  program
    .command("create <project> [other...]")
    .alias("crt")
    .description("创建项目")
    .action(myAction);
};
module.exports = mycommander;
lib/core/action.js
const myAction = (project, args) => {
  console.log(project);
  console.log(args);
};
module.exports = myAction;
bin/cli.js
#! /usr/bin/env node

const { program } = require("commander");
const myhelp = require("../lib/core/help");
myhelp(program);

const mycommander = require("../lib/core/mycommander");
mycommander(program);
program.parse(process.argv);
- 执行
bincli命令
bincli
2、命令行问答交互
- 安装
inquirer包
npm install inquirer
- 新建
test/inquirer.js文件
var inquirer = require("inquirer");
// console.log(inquirer.default.prompt, "inquirer.prompt");
inquirer.default
  .prompt([
    {
      type: "input", // 可以输入的类型
      name: "username",
      message: "你的名字",
    },
  ])
  .then((answer) => {
    console.log(answer);
  });
- 执行
node test/inquirer.js命令
node test/inquirer.js

3、命令行自定义选择框架
- 修改
lib/core/action.js文件
var inquirer = require("inquirer");
const myAction = (project, args) => {
// console.log(project);
// console.log(args);
inquirer.default
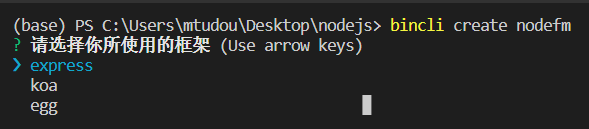
.prompt([
{
type: "list",
name: "framwork",
choices: ["express", "koa", "egg"],
message: "请选择你所使用的框架",
},
])
.then((answer) => {
console.log(answer, "answer");
});
};
module.exports = myAction;
- 执行
bincli create nodefm命令
bincli create nodefm
- 通过
上下箭头选择,空格进行确认

4、使用config.js来定义框架配置类型
使用config.js来定义框架配置类型,可以通过直接在config.js里修改来控制变量
- 新建
config.js文件
module.exports = {
  framwork: ["express", "koa", "egg"],
};
- 修改
lib/core/action.js文件引入config文件
var inquirer = require("inquirer");
var config = require("../../config");

const myAction = (project, args) => {
  // console.log(project);
  // console.log(args);
  inquirer.default
    .prompt([
      {
        type: "list",
        name: "framwork",
        choices: config.framwork,
        message: "请选择你所使用的框架",
      },
    ])
    .then((answer) => {
      console.log(answer, "answer");
    });
};
module.exports = myAction;
五、下载远程仓库代码
1、download-git-repo包使用
download-git-repo 是一个 Node.js 模块,用于从 Git 仓库中下载代码。通过命令行或者在 Node.js 代码中进行下载操作。
- 安装模块
npm install download-git-repo
- Node.js 脚本中引入 download-git-repo 模块,新建
test/download.js
const download = require("download-git-repo");
download(
  "direct:git@github.com:Muying-Zhao/MuYing-docs.git",
  "./xxx",
  { clone: true },
  function (err) {
    if (err) {
      console.error("下载失败", err);
    } else {
      console.log("下载成功");
    }
  }
);
- 执行
node test/download.js命令
node test/download.js


 1083
1083

 被折叠的 条评论
为什么被折叠?
被折叠的 条评论
为什么被折叠?
 到【灌水乐园】发言


