


如何使用java脚手架调用合约接口(以HelloWorld为例提供示范)
前提条件
部署好fisco-bcos区块链网络,此处是通过webase依赖包一键部署区块链网络
在虚拟机或者云服务器部署区块链网络并开放相应的端口,使用windows端导入java项目时,请使用内网IP或公网IP导出项目
1.编写合约HelloWorld.sol
pragma solidity ^0.4.25;
contract HelloWorld{
    string str;

    constructor(){
        str = "Hello World";
    }

    function setStr(string memory _str)public {
        str = _str;
    }

    function getStr()public view returns(string memory){
        return str;
    }
}
2.部署编译合约

3.导出java项目
第一步点击到处java项目

第二步,选择节点,选择用户,选择已编译HelloWorld合约


第三步,把下载好的Java项目导入IDEA
打开IDEA,点击左上角文件,点击打开,然后找到下载好的项目导入,构建项目需要一定的时间下载gradel包管理器和依赖
导入后成功构建,如下所示:

4.分析项目源码目录中的raw包和service包下的java文件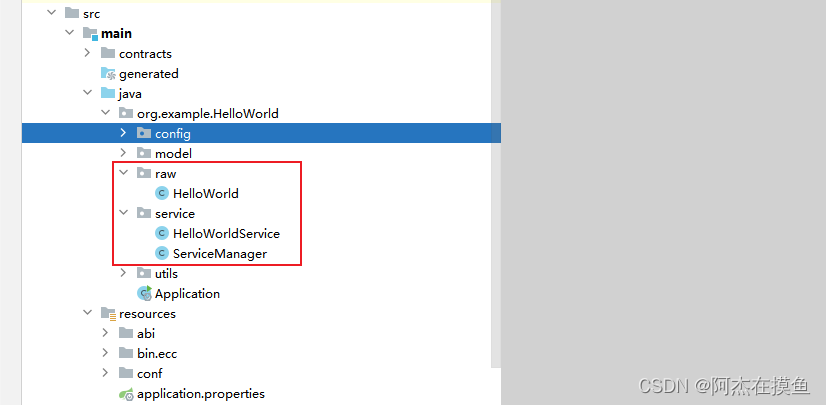
HelloWorld.java
HelloWorld.java是一个合约的Java封装类,用于与HelloWorl.sol进行交互。
该类的主要功能包括:
- 定义合约的二进制表示:通过
BINARY_ARRAY定义合约的字节码表示,BINARY定义非SM模式的合约二进制代码,SM_BINARY定义SM模式的合约二进制代码。 - 定义合约的
ABI (Application Binary Interface):通过ABI_ARRAY定义合约的ABI,即合约的函数和参数的描述。 - 定义合约的函数名称:
FUNC_SETSTR表示设置字符串变量的函数名,FUNC_GETSTR表示获取字符串变量的函数名。 - 实现合约的部署和加载方法:
deploy方法用于部署HelloWorld合约到区块链,并返回一个HelloWorld的实例。load方法用于加载已部署的HelloWorld合约。需要提供合约地址、区块链客户端和密钥对。
- 实现合约函数的具体操作方法:
setStr方法用于设置HelloWorld合约中字符串变量的值。getStr方法用于获取HelloWorld合约中字符串变量的值。
- 在构造函数中初始化合约:
- 通过传入合约地址、区块链客户端和密钥对,在构造函数中调用父类
Contract的构造方法进行初始化。
- 通过传入合约地址、区块链客户端和密钥对,在构造函数中调用父类
总的来说,HelloWorld.java定义了一个与HelloWorld合约进行交互的封装类,提供了部署和加载合约的方法,以及具体操作合约函数的方法。它管理了与合约的交互逻辑,并提供了简化的接口,供应用程序进行与合约的交互和操作。
代码如下所示:
package org.example.HelloWorld.raw;
import java.util.Arrays;
import java.util.Collections;
import java.util.List;
import org.fisco.bcos.sdk.abi.FunctionReturnDecoder;
import org.fisco.bcos.sdk.abi.TypeReference;
import org.fisco.bcos.sdk.abi.datatypes.Function;
import org.fisco.bcos.sdk.abi.datatypes.Type;
import org.fisco.bcos.sdk.abi.datatypes.Utf8String;
import org.fisco.bcos.sdk.abi.datatypes.generated.tuples.generated.Tuple1;
import org.fisco.bcos.sdk.client.Client;
import org.fisco.bcos.sdk.contract.Contract;
import org.fisco.bcos.sdk.crypto.CryptoSuite;
import org.fisco.bcos.sdk.crypto.keypair.CryptoKeyPair;
import org.fisco.bcos.sdk.model.CryptoType;
import org.fisco.bcos.sdk.model.TransactionReceipt;
import org.fisco.bcos.sdk.model.callback.TransactionCallback;
import org.fisco.bcos.sdk.transaction.model.exception.ContractException;
@SuppressWarnings("unchecked")
public class HelloWorld extends Contract {
    // 合约的二进制代码表示
    public static final String[] BINARY_ARRAY = {
            // 合约的字节码...
    };
    public static final String BINARY = org.fisco.bcos.sdk.utils.StringUtils.joinAll("", BINARY_ARRAY);
    public static final String[] SM_BINARY_ARRAY = {};
    public static final String SM_BINARY = org.fisco.bcos.sdk.utils.StringUtils.joinAll("", SM_BINARY_ARRAY);
    // 合约的ABI(应用程序二进制接口)
    public static final String[] ABI_ARRAY = [
            // 合约的ABI...
    ];
    public static final String ABI = org.fisco.bcos.sdk.utils.StringUtils.joinAll("", ABI_ARRAY);
    // 函数名称
    public static final String FUNC_SETSTR = "setStr";
    public static final String FUNC_GETSTR = "getStr";
    // 合约的构造函数
    protected HelloWorld(String contractAddress, Client client, CryptoKeyPair credential) {
        super(getBinary(client.getCryptoSuite()), contractAddress, client, credential);
    }
    // 根据CryptoSuite选择正确的二进制表示
    public static String getBinary(CryptoSuite cryptoSuite) {
        return (cryptoSuite.getCryptoTypeConfig() == CryptoType.ECDSA_TYPE ? BINARY : SM_BINARY);
    }
    // 设置合约中字符串变量的值
    public TransactionReceipt setStr(String _str) {
        final Function function = new Function(
                FUNC_SETSTR,
                Arrays.<Type>asList(new org.fisco.bcos.sdk.abi.datatypes.Utf8String(_str)),
                Collections.<TypeReference<?>>emptyList());
        return executeTransaction(function);
    }
    // 异步方式设置合约中字符串变量的值,并附带回调函数
    public void setStr(String _str, TransactionCallback callback) {
        final Function function = new Function(
                FUNC_SETSTR,
                Arrays.<Type>asList(new org.fisco.bcos.sdk.abi.datatypes.Utf8String(_str)),
                Collections.<TypeReference<?>>emptyList());
        asyncExecuteTransaction(function, callback);
    }
    // 获取设置合约中字符串变量的签名交易
    public String getSignedTransactionForSetStr(String _str) {
        final Function function = new Function(
                FUNC_SETSTR,
                Arrays.<Type>asList(new org.fisco.bcos.sdk.abi.datatypes.Utf8String(_str)),
                Collections.<TypeReference<?>>emptyList());
        return createSignedTransaction(function);
    }
    // 从交易回执中获取setStr函数的输入值
    public Tuple1<String> getSetStrInput(TransactionReceipt transactionReceipt) {
        String data = transactionReceipt.getInput().substring(10);
        final Function function = new Function(FUNC_SETSTR,
                Arrays.<Type>asList(),
                Arrays.<TypeReference<?>>asList(new TypeReference<Utf8String>() {}));
        List<Type> results = FunctionReturnDecoder.decode(data, function.getOutputParameters());
        return new Tuple1<String>((String) results.get(0).getValue());
    }
    // 获取合约中字符串变量的值
    public String getStr() throws ContractException {
        final Function function = new Function(FUNC_GETSTR,
                Arrays.<Type>asList(),
                Arrays.<TypeReference<?>>asList(new TypeReference<Utf8String>() {}));
        return executeCallWithSingleValueReturn(function, String.class);
    }
    // 根据现有的地址、客户端和凭证加载合约
    public static HelloWorld load(String contractAddress, Client client, CryptoKeyPair credential) {
        return new HelloWorld(contractAddress, client, credential);
    }
    // 部署合约到区块链
    public static HelloWorld deploy(Client client, CryptoKeyPair credential) throws ContractException {
        return deploy(HelloWorld.class, client, credential, getBinary(client.getCryptoSuite()), "");
    }
}
HelloWorldService.java
HelloWorldService类的作用是提供对HelloWorld合约的操作和服务。
具体来说,该类的主要功能包括:
- 设置合约字符串变量的值:通过调用
setStr方法,可以向HelloWorld合约中的字符串变量设置新的值。 - 获取合约字符串变量的值:通过调用
getStr方法,可以从HelloWorld合约中获取当前的字符串变量值。 - 初始化
AssembleTransactionProcessor:在初始化方法init中,创建AssembleTransactionProcessor实例,用于发送交易和调用合约方法。 - 配置合约地址和区块链客户端:通过注入
SystemConfig和Client实例,可以设置合约地址和区块链客户端。
总体来说,HelloWorldService类封装了对HelloWorld合约的操作和服务,提供了设置和获取合约字符串变量的方法,并负责初始化和管理与合约交互的事务处理器TransactionProcessor。它作为应用程序的一部分,可以用于与区块链进行交互并访问HelloWorld合约的状态和功能
代码如下所示:
package org.example.HelloWorld.service;
import java.lang.Exception;
import java.lang.String;
import java.util.Arrays;
import javax.annotation.PostConstruct;
import lombok.Data;
import lombok.NoArgsConstructor;
import org.example.HelloWorld.model.bo.HelloWorldSetStrInputBO;
import org.fisco.bcos.sdk.client.Client;
import org.fisco.bcos.sdk.transaction.manager.AssembleTransactionProcessor;
import org.fisco.bcos.sdk.transaction.manager.TransactionProcessorFactory;
import org.fisco.bcos.sdk.transaction.model.dto.CallResponse;
import org.fisco.bcos.sdk.transaction.model.dto.TransactionResponse;
import org.springframework.beans.factory.annotation.Autowired;
import org.springframework.beans.factory.annotation.Value;
import org.springframework.stereotype.Service;
@Service
@NoArgsConstructor
@Data
public class HelloWorldService {
  // 合约的ABI定义
  public static final String ABI = org.example.HelloWorld.utils.IOUtil.readResourceAsString("abi/HelloWorld.abi");
  // 合约的二进制代码定义
  public static final String BINARY = org.example.HelloWorld.utils.IOUtil.readResourceAsString("bin/ecc/HelloWorld.bin");
  public static final String SM_BINARY = org.example.HelloWorld.utils.IOUtil.readResourceAsString("bin/sm/HelloWorld.bin");
  // 合约的地址
  @Value("${system.contract.helloWorldAddress}")
  private String address;
  // 客户端实例
  @Autowired
  private Client client;
  // 交易处理器
  AssembleTransactionProcessor txProcessor;
  // 在初始化后执行的方法
  @PostConstruct
  public void init() throws Exception {
    // 创建交易处理器
    this.txProcessor = TransactionProcessorFactory.createAssembleTransactionProcessor(this.client, this.client.getCryptoSuite().getCryptoKeyPair());
  }
  // 设置合约中字符串变量的值并发送交易
  public TransactionResponse setStr(HelloWorldSetStrInputBO input) throws Exception {
    return this.txProcessor.sendTransactionAndGetResponse(this.address, ABI, "setStr", input.toArgs());
  }
  // 调用合约中的getStr函数获取字符串变量的值
  public CallResponse getStr() throws Exception {
    return this.txProcessor.sendCall(this.client.getCryptoSuite().getCryptoKeyPair().getAddress(), this.address, ABI, "getStr", Arrays.asList());
  }
}
ServiceManager.java
这个类ServiceManager的作用是管理HelloWorldService的多个实例,并根据私钥列表动态创建并配置这些实例。
具体来说,该类的主要功能包括:
-
读取系统配置和私钥列表:在初始化方法
init中,从系统配置SystemConfig中获取私钥列表,并将其保存到私钥列表(hexPrivateKeyList)中。 -
创建
HelloWorldService实例:在@Bean注解的方法initHelloWorldServiceManager中,根据私钥列表的大小,循环遍历私钥列表。对于每个私钥,创建一个密码套件CryptoSuite和密钥对CryptoKeyPair。然后,根据系统配置中的HelloWorld合约地址、区块链客户端实例和交易处理器TransactionProcessor,创建一个HelloWorldService实例,并将地址、客户端和交易处理器分别设置为相应的值。最后,将HelloWorldService实例添加到ConcurrentHashMap中,以用户地址为键。 -
管理
HelloWorldService实例:通过@Bean注解将HelloWorldService实例注入到Spring容器中,可以使用@Qualifier("HelloWorldService")结合@Autowired注解来获取该实例。- 这样做的好处是可以根据用户的私钥动态地创建和配置多个
HelloWorldService实例,每个实例都有单独的用户地址和交易处理器。 - 通过
ServiceManager管理的HelloWorldService实例可以在应用程序中被其他组件使用,方便进行合约操作和数据访问。
- 这样做的好处是可以根据用户的私钥动态地创建和配置多个
总的来说,ServiceManager类充当了HelloWorldService实例的管理者,根据私钥列表动态创建并配置多个HelloWorldService实例,使得每个实例都可以对应不同的用户地址和交易处理器,方便进行区块链交互操作。
代码如下所示:
package org.example.HelloWorld.service;
import java.lang.Exception;
import java.lang.String;
import java.util.Arrays;
import java.util.List;
import java.util.Map;
import java.util.concurrent.ConcurrentHashMap;
import javax.annotation.PostConstruct;
import lombok.Data;
import lombok.extern.slf4j.Slf4j;
import org.example.HelloWorld.config.SystemConfig;
import org.fisco.bcos.sdk.client.Client;
import org.springframework.beans.factory.annotation.Autowired;
import org.springframework.context.annotation.Bean;
import org.springframework.context.annotation.Configuration;
@Configuration
@Data
@Slf4j
public class ServiceManager {
  // 系统配置
  @Autowired
  private SystemConfig config;
  // 区块链客户端实例
  @Autowired
  private Client client;
  // 私钥列表
  List<String> hexPrivateKeyList;
  // 初始化方法,在构造后执行
  @PostConstruct
  public void init() {
    hexPrivateKeyList = Arrays.asList(this.config.getHexPrivateKey().split(","));
  }
  /**
   * @notice: 必须使用 @Qualifier("HelloWorldService") 结合 @Autowired 才能获取到该 Bean
   */
  @Bean("HelloWorldService")
  public Map<String, HelloWorldService> initHelloWorldServiceManager() throws Exception {
    Map<String, HelloWorldService> serviceMap = new ConcurrentHashMap<>(this.hexPrivateKeyList.size());
    for (int i = 0; i < this.hexPrivateKeyList.size(); i++) {
      String privateKey = this.hexPrivateKeyList.get(i);
      if (privateKey.startsWith("0x") || privateKey.startsWith("0X")) {
        privateKey = privateKey.substring(2);
      }
      if (privateKey.isEmpty()) {
        continue;
      }
      // 创建密码套件和密钥对
      org.fisco.bcos.sdk.crypto.CryptoSuite cryptoSuite = new org.fisco.bcos.sdk.crypto.CryptoSuite(this.client.getCryptoType());
      org.fisco.bcos.sdk.crypto.keypair.CryptoKeyPair cryptoKeyPair = cryptoSuite.createKeyPair(privateKey);
      // 获取用户地址
      String userAddress = cryptoKeyPair.getAddress();
      log.info("++++++++hexPrivateKeyList[{}]:{},userAddress:{}", i, privateKey, userAddress);
      // 创建HelloWorldService实例,并设置地址、客户端和交易处理器
      HelloWorldService helloWorldService = new HelloWorldService();
      helloWorldService.setAddress(this.config.getContract().getHelloWorldAddress());
      helloWorldService.setClient(this.client);
      org.fisco.bcos.sdk.transaction.manager.AssembleTransactionProcessor txProcessor =
        org.fisco.bcos.sdk.transaction.manager.TransactionProcessorFactory.createAssembleTransactionProcessor(this.client, cryptoKeyPair);
      helloWorldService.setTxProcessor(txProcessor);
      // 将Service添加到Map中,以用户地址为键
      serviceMap.put(userAddress, helloWorldService);
    }
    log.info("++++++++HelloWorldService map:{}", serviceMap);
    return serviceMap;
  }
}
5.通过测试类调用合约接口
HelloWordTest,它是一个测试类,主要用于测试 HelloWorldService 中的方法。
类中的注解解释如下:
@RunWith(SpringRunner.class):指定使用 SpringRunner 来运行测试,这是一个JUnit运行器,用于运行 Spring Boot 的集成测试。@SpringBootTest(classes = Application.class):表示这是一个Spring Boot的集成测试类,并指定了Application类作为启动类来加载Spring Boot上下文。@WebAppConfiguration:标记这是一个Web应用程序的配置类,并为测试类提供Web上下文。
该类中包含了一个测试方法testHello(),该方法用于测试HelloWorldService中的一些方法的执行结果。具体测试的逻辑如下:
- 通过
@Autowired和@Qualifier注解,注入了一个Map<String, HelloWorldService>,用于获取指定用户地址对应的HelloWorldService实例。 - 创建一个
HelloWorldSetStrInputBO对象,并设置_str字段的值为"333"。 - 调用
helloWorldService的setStr()方法,将设置好的输入参数传递进去,用于执行合约中的setStr方法。 - 调用
helloWorldService的getStr()方法,获取合约中的getStr方法的返回结果。 - 打印测试结果,输出
helloWorldService的值和callResponse.getValues()的值。
通过这个测试类,验证 HelloWorldService 中的方法在调用合约接口时的正确性,并检查返回的结果是否符合预期。
测试类代码如下所示:
package org.example.HelloWorld;
import org.example.HelloWorld.model.bo.HelloWorldSetStrInputBO;
import org.example.HelloWorld.service.HelloWorldService;
import org.fisco.bcos.sdk.transaction.model.dto.CallResponse;
import org.junit.Test;
import org.junit.runner.RunWith;
import org.springframework.beans.factory.annotation.Autowired;
import org.springframework.beans.factory.annotation.Qualifier;
import org.springframework.boot.test.context.SpringBootTest;
import org.springframework.test.context.junit4.SpringRunner;
import org.springframework.test.context.web.WebAppConfiguration;
import java.util.Map;
@RunWith(SpringRunner.class)
@SpringBootTest(classes = Application.class)
@WebAppConfiguration
public class HelloWordTest {
    @Autowired
    @Qualifier("HelloWorldService")
    private Map<String, HelloWorldService> testServiceMap;
    @Test
    public void testHello() throws Exception {
        // 用户地址
        String user = "0xf6d9791f45c124ad528793aaa559b7bb2c93e190";
        // 根据用户地址获取对应的HelloWorldService实例
        HelloWorldService helloWorldService = testServiceMap.get(user);
        // 创建HelloWorldSetStrInputBO对象并设置值
        HelloWorldSetStrInputBO helloWorldSetStrInputBO = new HelloWorldSetStrInputBO();
        helloWorldSetStrInputBO.set_str("333");
        // 调用合约的setStr方法
        helloWorldService.setStr(helloWorldSetStrInputBO);
        // 调用合约的getStr方法
        CallResponse callResponse = helloWorldService.getStr();
        // 打印调用结果
        System.out.println("使用java——sdk脚手架通过channel_port:20200方式调用合约接口");
        System.out.println("helloWorldService = " + helloWorldService);
        System.out.println("callResponse.getValues() = " + callResponse.getValues());
    }
}
测试结果如下所示:

在webase平台验证是否已经成功调用


 4498
4498


 被折叠的 条评论
为什么被折叠?
被折叠的 条评论
为什么被折叠?
 到【灌水乐园】发言


