


阿里声音项目Qwen2-Audio的部署安装,在服务器Ubuntu22.04系统——点动科技
一、ubuntu22.04基本环境配置
1.1 更换清华Ubuntu镜像源
- 删除原来的文件
rm /etc/apt/sources.list
- 开始编辑新文件
vim /etc/apt/sources.list
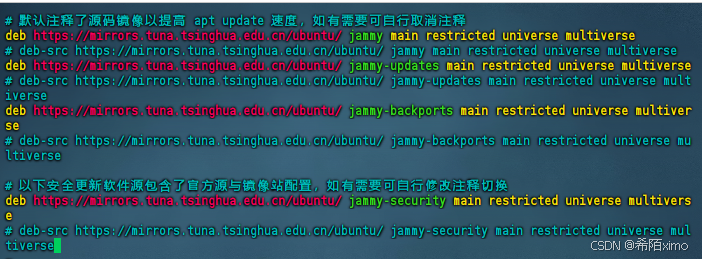
- 先按i键,粘贴以下内容
# 默认注释了源码镜像以提高 apt update 速度,如有需要可自行取消注释
deb https://mirrors.tuna.tsinghua.edu.cn/ubuntu/ jammy main restricted universe multiverse
# deb-src https://mirrors.tuna.tsinghua.edu.cn/ubuntu/ jammy main restricted universe multiverse
deb https://mirrors.tuna.tsinghua.edu.cn/ubuntu/ jammy-updates main restricted universe multiverse
# deb-src https://mirrors.tuna.tsinghua.edu.cn/ubuntu/ jammy-updates main restricted universe multiverse
deb https://mirrors.tuna.tsinghua.edu.cn/ubuntu/ jammy-backports main restricted universe multiverse
# deb-src https://mirrors.tuna.tsinghua.edu.cn/ubuntu/ jammy-backports main restricted universe multiverse
# 以下安全更新软件源包含了官方源与镜像站配置,如有需要可自行修改注释切换
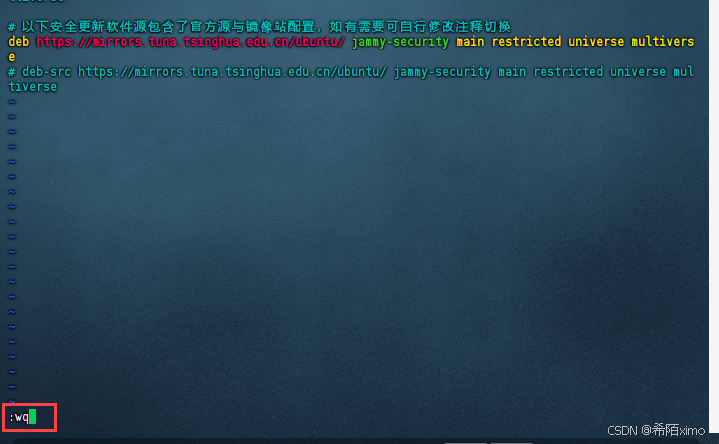
deb https://mirrors.tuna.tsinghua.edu.cn/ubuntu/ jammy-security main restricted universe multiverse
# deb-src https://mirrors.tuna.tsinghua.edu.cn/ubuntu/ jammy-security main restricted universe multiverse
-
确保内容跟上述图片一致
-
按esc键,再输入冒号+wq保存

1.2 更新包列表:
- 打开终端,输入以下命令:
sudo apt-get update
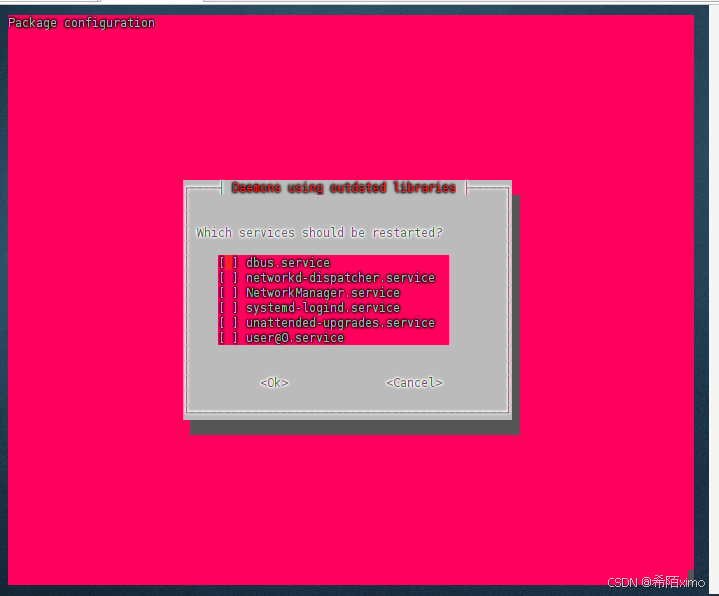
sudo apt upgrade
- 更新时间较长,请耐心等待
2. 安装英伟达显卡驱动
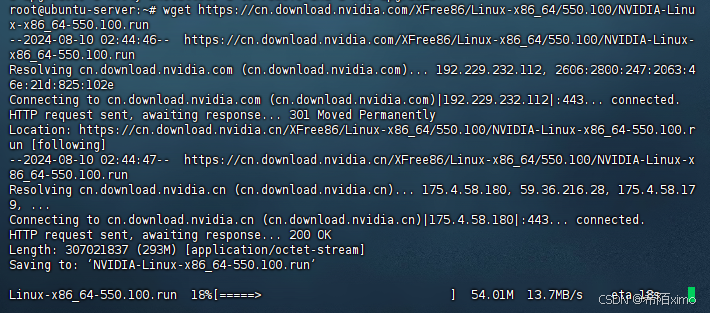
2.1 使用wget在命令行下载驱动包
wget https://cn.download.nvidia.com/XFree86/Linux-x86_64/550.100/NVIDIA-Linux-x86_64-550.100.run
2.2 更新软件列表和安装必要软件、依赖
sudo apt-get install g++

点击回车enter即可

sudo apt-get install gcc
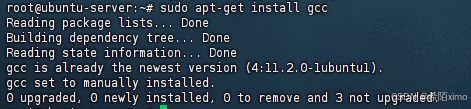
sudo apt-get install make


点击回车enter即可
成功安装
2.2 卸载原有驱动
sudo apt-get remove --purge nvidia*
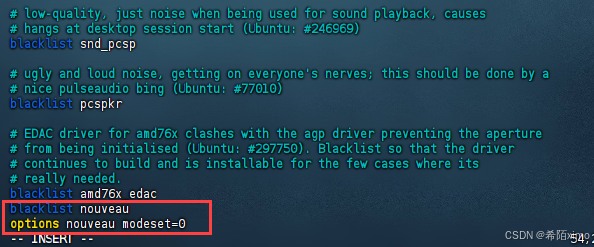
- 1.使用vim修改配置文件
sudo vim /etc/modprobe.d/blacklist.conf
- 2.按i键进入编辑模式,在文件尾增加两行:
blacklist nouveau
options nouveau modeset=0
-
3.按esc键退出编辑模式,输入:wq保存并退出
-
4.更新文件
sudo update-initramfs -u
这里等待时间较久

- 5.重启电脑:
sudo reboot
这里需要等一会才能连上
2.3 安装驱动
- 1.授予执行权限
sudo chmod 777 NVIDIA-Linux-x86_64-550.100.run
- 2.执行安装命令
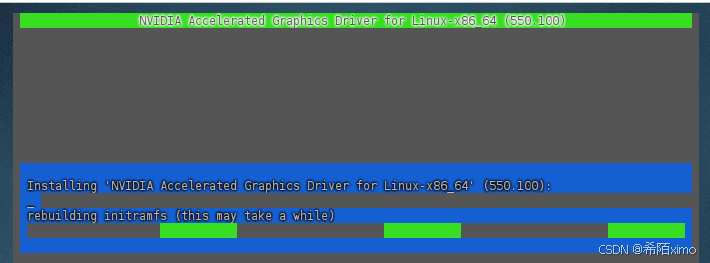
sudo ./NVIDIA-Linux-x86_64-550.100.run
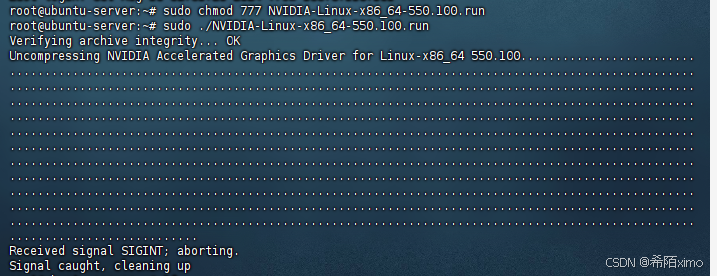
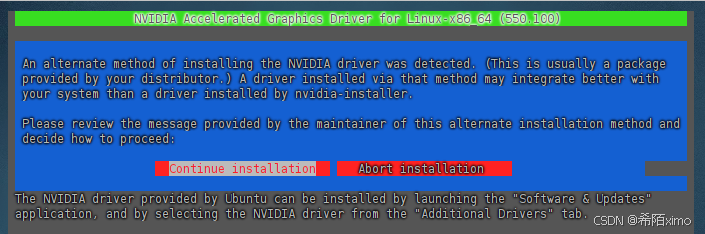
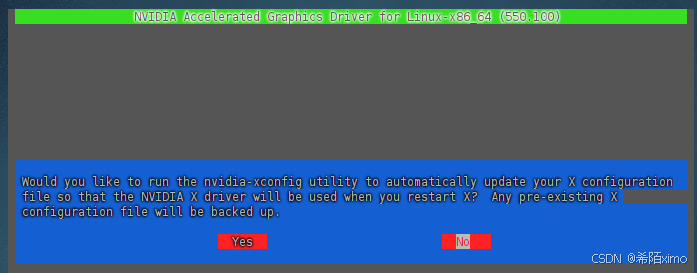
这里一直按回车就行,默认选择
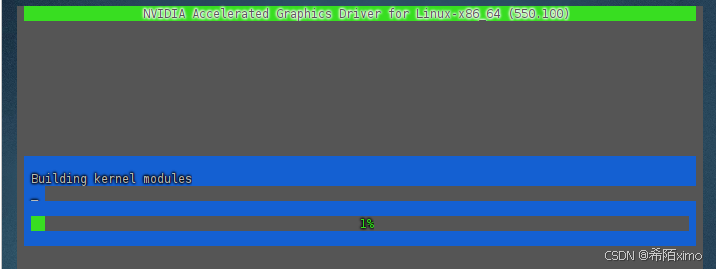
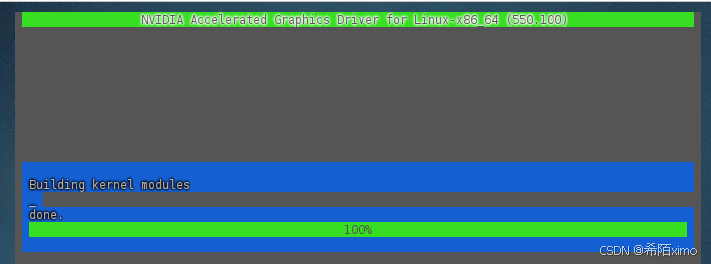
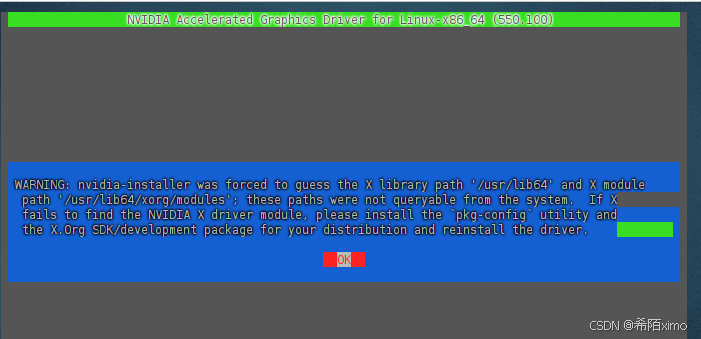
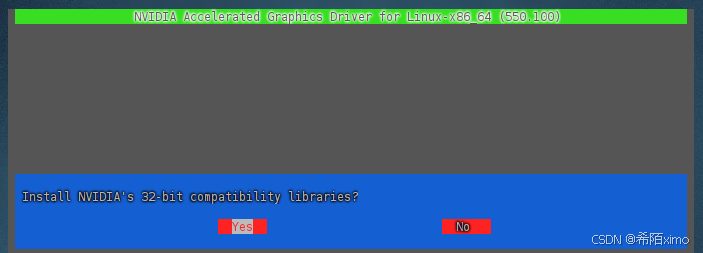
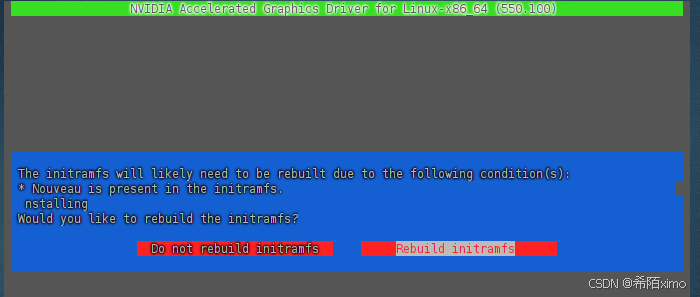
一直按回车enter键,直到安装成功
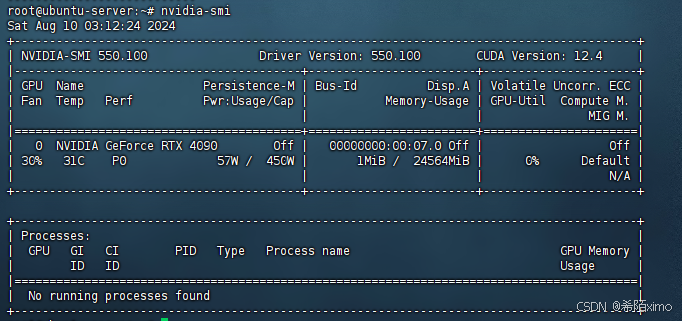
- 3.检测显卡驱动是否安装成功
nvidia-smi
2.4 安装CUDA
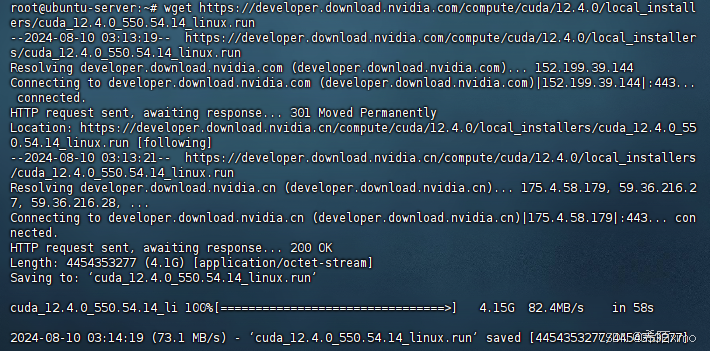
wget https://developer.download.nvidia.com/compute/cuda/12.4.0/local_installers/cuda_12.4.0_550.54.14_linux.run
执行安装命令
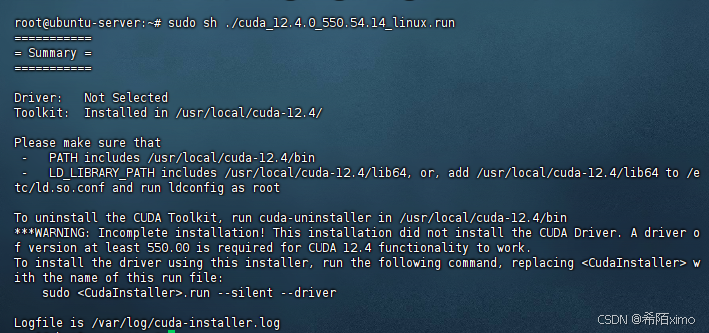
sudo sh ./cuda_12.4.0_550.54.14_linux.run
- 1.输出accept开始安装

- 2.然后注意这里要按enter取消勾选第一个选项,因为之前已经安装了驱动
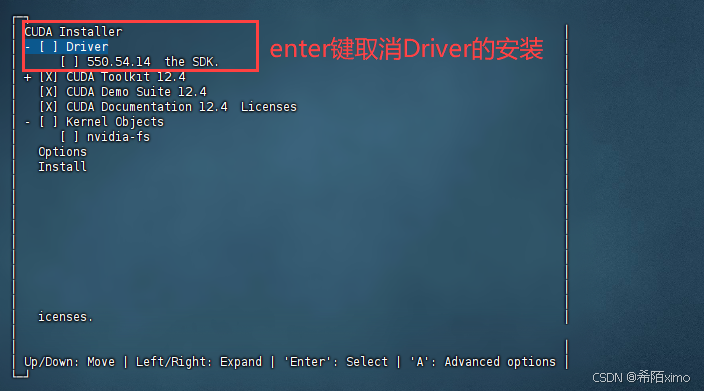
- 3.接着选择Install开始安装
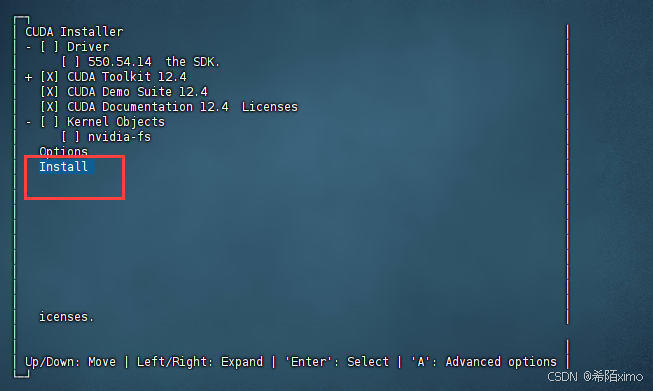
- 4.安装完成
2.5 环境变量配置
- 1.以vim方式打开配置文件
sudo vim ~/.bashrc
- 2.按i键进入编辑模式,在文件尾增加下面内容:
export PATH="/usr/local/cuda-12.4/bin:$PATH"
export LD_LIBRARY_PATH="/usr/local/cuda-12.4/lib64:$LD_LIBRARY_PATH"
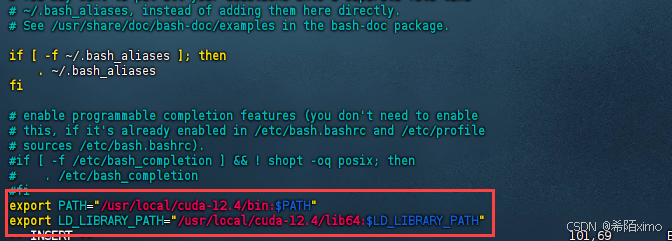
-
按esc键退出编辑模式,输入:wq保存并退出
-
3.更新环境变量
source ~/.bashrc
- 4.检测CUDA是否安装成功
nvcc -V

二、安装miniconda环境
1. 下载miniconda3
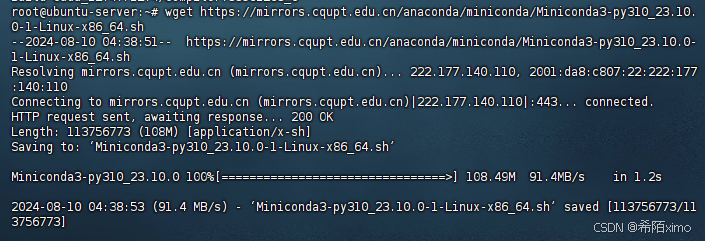
wget https://mirrors.cqupt.edu.cn/anaconda/miniconda/Miniconda3-py310_23.10.0-1-Linux-x86_64.sh
2. 安装miniconda3
bash Miniconda3-py310_23.10.0-1-Linux-x86_64.sh -u
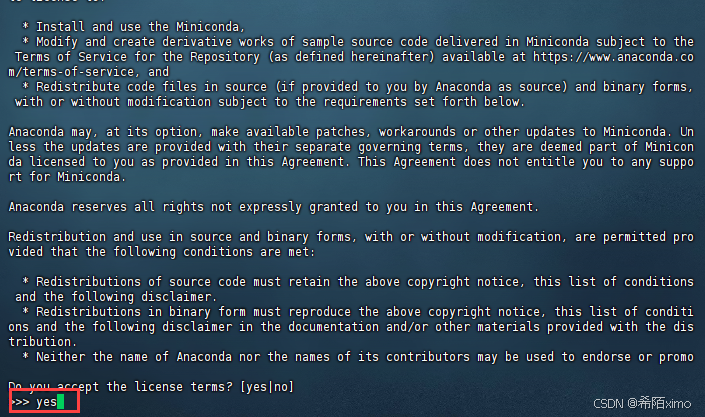
直接一直enter键,到输入路径和yes
这边建议路径为:miniconda3
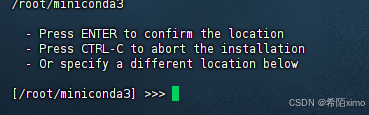
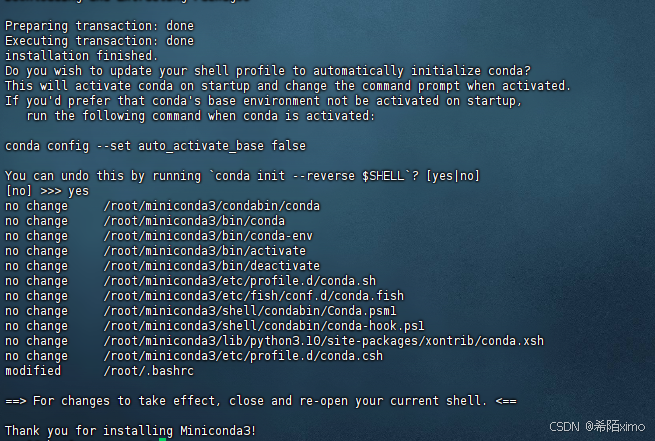
直接回车enter即可,再次输入yes
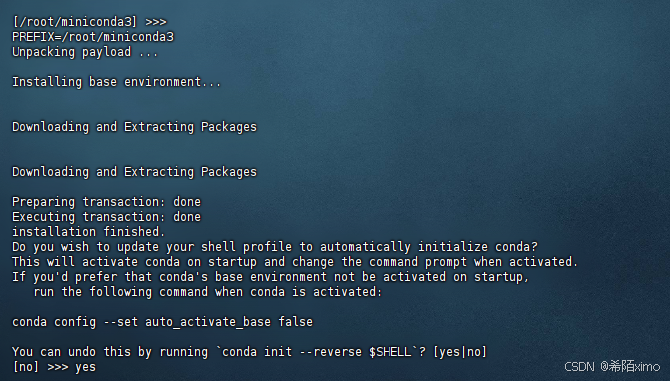
成功安装
3. 切换到bin文件夹
cd miniconda3/bin/
4. 输入pwd获取路径
pwd
复制这里的路径
5. 打开用户环境编辑页面
vim ~/.bashrc
- 点击键盘I键进入编辑模式,在最下方输入以下代码
export PATH="/root/miniconda3/bin:$PATH"
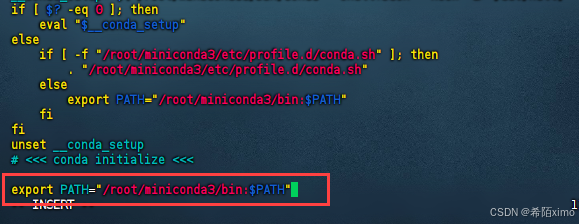
按esc键退出编辑模式,输入:wq保存并退出
6. 重新加载用户环境变量
source ~/.bashrc

7. 初始化conda
conda init bash
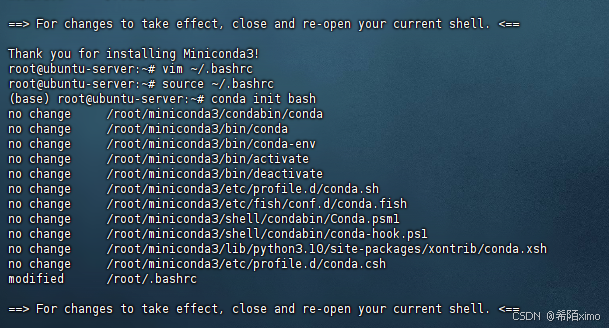
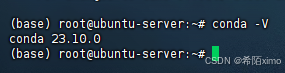
8.验证是否安装成功
conda -V
9.conda配置
-
1.配置清华镜像源
代码如下:
conda config --add channels https://mirrors.tuna.tsinghua.edu.cn/anaconda/pkgs/free/
conda config --add channels https://mirrors.tuna.tsinghua.edu.cn/anaconda/pkgs/main/
conda config --add channels https://mirrors.tuna.tsinghua.edu.cn/anaconda/cloud/conda-forge/

- 2.设置搜索时显示通道地址
conda config --set show_channel_urls yes

- 3.配置pip 镜像源
pip config set global.index-url https://pypi.tuna.tsinghua.edu.cn/simple

三、安装Qwen2-Audio
1.克隆仓库
1.1 github克隆
git clone https://github.com/QwenLM/Qwen2-Audio.git
1.2 国内github镜像克隆
git clone https://mirror.ghproxy.com/https://github.com/QwenLM/Qwen2-Audio.git
1.3. 进入目录
cd Qwen2-Audio/
2.创建虚拟环境
conda create -n qwen2 python=3.10
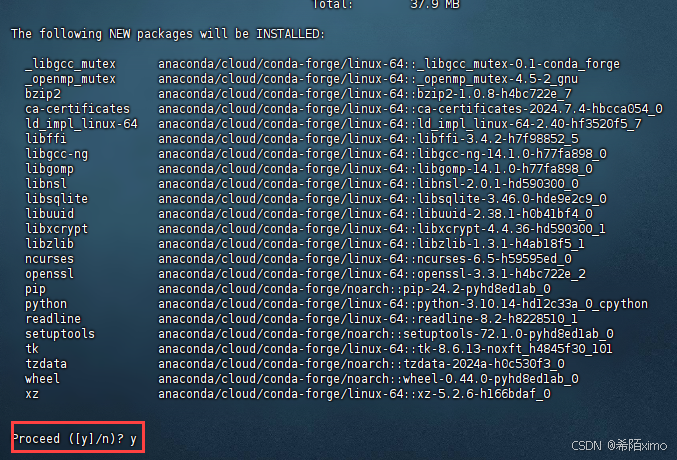
- 输入y回车即可
2.1 进入虚拟环境
conda activate qwen2

3. 安装依赖
3.1设置清华源、更新pip
pip config set global.index-url https://pypi.tuna.tsinghua.edu.cn/simple

python -m pip install --upgrade pip
3.2安装torch 12.4cuda版本
pip3 install torch torchvision torchaudio --index-url https://download.pytorch.org/whl/cu124
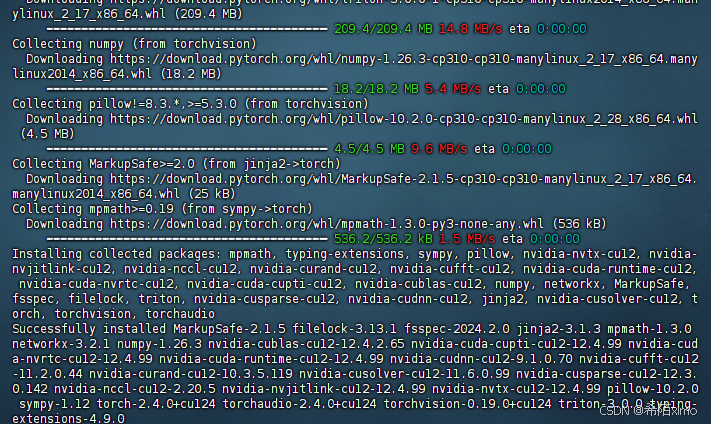
3.3安装依赖文件
cd demo
pip install -r requirements_web_demo.txt
3.4安装webui界面及其他未安装依赖
pip install librosa
pip install --upgrade "accelerate>=0.21.0"
pip install django
pip install git+https://mirror.ghproxy.com/https://github.com/huggingface/transformers
3.5安装魔搭库准备下载模型文件:
pip install modelscope
3.6下载相关模型
cd ..
modelscope download --model qwen/qwen2-audio-7b-instruct --local_dir './Qwen/Qwen2-Audio-7B-Instruct'
3.7执行代码,启动webui界面
- 改端口
vim demo/web_demo_audio.py
按i进行编辑,完成后再按esc,冒号,wq退出
- 成功进入
3.8加入声音驱动,实现真正的语音聊天
cd demo
- 创建一个新的webui界面的文件
touch test_audio.py
vim test_audio.py
输入以下内容
import gradio as gr
import modelscope_studio as mgr
import librosa
from transformers import AutoProcessor, Qwen2AudioForConditionalGeneration
from argparse import ArgumentParser
import requests
import os
from django.http import HttpResponse
# 默认的模型检查点路径
DEFAULT_CKPT_PATH = 'Qwen/Qwen2-Audio-7B-Instruct'
def text_to_speech(text2):
data = {
"text": text2,
"text_language": "zh",
}
# 注意 URL 中的单引号应该是 URL 的一部分,需要正确转义
response = requests.post('http://服务器IP:端口', json=data)
if response.status_code == 200:
audio_file_path = "/root/project/Qwen2-Audio/demo/output.mp3"
with open(audio_file_path, "wb") as f:
f.write(response.content)
return audio_file_path
else:
print(f"错误:请求失败,状态码为 {response.status_code}")
return None
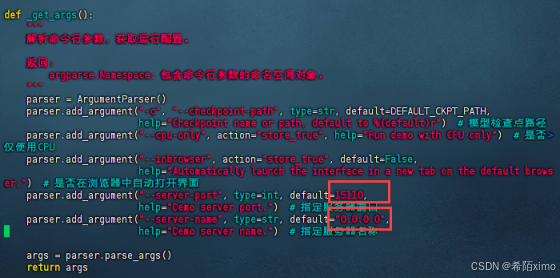
def _get_args():
"""
解析命令行参数,获取运行配置。
返回:
argparse.Namespace: 包含命令行参数的命名空间对象。
"""
parser = ArgumentParser()
parser.add_argument("-c", "--checkpoint-path", type=str, default=DEFAULT_CKPT_PATH,
help="Checkpoint name or path, default to %(default)r") # 模型检查点路径
parser.add_argument("--cpu-only", action="store_true", help="Run demo with CPU only") # 是否仅使用CPU
parser.add_argument("--inbrowser", action="store_true", default=False,
help="Automatically launch the interface in a new tab on the default browser.") # 是否在浏览器中自动打开界面
parser.add_argument("--server-port", type=int, default=15110,
help="Demo server port.") # 指定服务器端口
parser.add_argument("--server-name", type=str, default="0.0.0.0",
help="Demo server name.") # 指定服务器名称
args = parser.parse_args()
return args
def add_text(chatbot, task_history, input):
"""
将用户输入的文本内容添加到聊天记录中,并更新聊天机器人界面。
参数:
chatbot (gr.components.Chatbot): 聊天机器人组件。
task_history (list): 任务历史记录。
input (gr.inputs): 用户输入内容。
返回:
tuple: 更新后的聊天机器人界面和任务历史记录,以及重置后的用户输入框。
"""
text_content = input.text # 获取文本输入内容
content = []
if len(input.files) > 0: # 如果用户上传了音频文件
for i in input.files:
content.append({'type': 'audio', 'audio_url': i.path}) # 将音频文件添加到内容列表中
if text_content: # 如果用户输入了文本
content.append({'type': 'text', 'text': text_content}) # 将文本内容添加到内容列表中
task_history.append({"role": "user", "content": content}) # 更新任务历史记录
# 更新聊天机器人界面,添加用户输入
chatbot.append([{
"text": input.text,
"files": input.files,
}, None])
return chatbot, task_history, None
'''
def add_file(chatbot, task_history, audio_file_path):
"""
将音频文件添加到聊天记录中。
参数:
chatbot (gr.components.Chatbot): 聊天机器人组件。
task_history (list): 任务历史记录。
audio_file_path (str): 音频文件的路径。
返回:
tuple: 更新后的聊天机器人界面和任务历史记录。
"""
# 确保任务历史记录中的音频条目是正确的格式
task_history.append({"role": "user", "content": [{"type": "audio", "audio_url": audio_file_path}]})
# 更新聊天记录,直接使用 audio_file_path 而不是 gr.Audio 组件
chatbot.append((None, {"type": "audio", "audio_url": audio_file_path}))
return chatbot, task_history
'''
import os
def add_file(chatbot, task_history, audio_path):
if not os.path.isfile(audio_path):
print(f"Error: The file {audio_path} does not exist.")
return chatbot, task_history
# 将音频文件信息添加到任务历史
task_history.append({
"role": "user",
"content": [{"type": "audio", "audio_url": audio_path}]
})
# 假设 chatbot 组件可以接受字典格式的输入
chatbot_state = [{
"text": f"[Audio file: {os.path.basename(audio_path)}]",
"files": [audio_path] # 直接使用文件路径而不是 gr.File
}, None]
chatbot.append(chatbot_state) # 更新 chatbot 状态
return chatbot, task_history
def reset_user_input():
"""
重置用户输入字段。
返回:
gr.update: 将文本框的值重置为空。
"""
return gr.Textbox.update(value='')
def reset_state(task_history):
"""
重置聊天记录和任务历史。
参数:
task_history (list): 当前的任务历史记录。
返回:
tuple: 清空的聊天记录和任务历史。
"""
return [], []
def regenerate(chatbot, task_history):
"""
重新生成最后的机器人响应。
参数:
chatbot (gr.components.Chatbot): 聊天机器人组件。
task_history (list): 任务历史记录。
返回:
tuple: 更新后的聊天机器人界面和任务历史记录。
"""
# 如果最后一条消息是助手生成的,则移除它
if task_history and task_history[-1]['role'] == 'assistant':
task_history.pop()
chatbot.pop()
# 如果任务历史记录不为空,重新生成响应
if task_history:
chatbot, task_history = predict(chatbot, task_history)
return chatbot, task_history
def predict(chatbot, task_history):
"""
根据当前任务历史记录生成模型响应,并将响应转换为音频文件添加到聊天记录中。
参数:
chatbot (gr.components.Chatbot): 聊天机器人组件。
task_history (list): 任务历史记录。
返回:
tuple: 更新后的聊天机器人界面和任务历史记录。
"""
print(f"{task_history=}")
print(f"{chatbot=}")
# 使用处理器将任务历史记录格式化为模型输入
text = processor.apply_chat_template(task_history, add_generation_prompt=True, tokenize=False)
audios = []
# 遍历任务历史,查找音频内容并加载
for message in task_history:
if isinstance(message["content"], list):
for ele in message["content"]:
if ele["type"] == "audio":
audios.append(
librosa.load(ele['audio_url'], sr=processor.feature_extractor.sampling_rate)[0]
)
if len(audios) == 0: # 如果没有音频,则设置为 None
audios = None
print(f"{text=}")
print(f"{audios=}")
# 使用处理器生成模型输入
inputs = processor(text=text, audios=audios, return_tensors="pt", padding=True)
if not _get_args().cpu_only: # 如果支持 GPU,则将输入数据移动到 CUDA 设备
inputs["input_ids"] = inputs.input_ids.to("cuda")
# 生成响应
generate_ids = model.generate(**inputs, max_length=256)
generate_ids = generate_ids[:, inputs.input_ids.size(1):]
# 解码生成的文本响应
# 假设其他参数已经正确设置
response = processor.batch_decode(generate_ids, skip_special_tokens=True)[0]
task_history.append({'role': 'assistant', 'content': response})
chatbot.append((None, response)) # 添加文本响应
# 将文本响应转换为语音
audio_file_path = text_to_speech(response)
if audio_file_path:
chatbot, task_history = add_file(chatbot, task_history, audio_file_path)
return chatbot, task_history
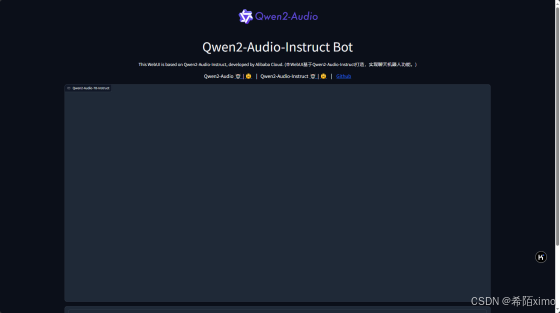
def _launch_demo(args):
"""
启动Gradio的Web用户界面,展示Qwen2-Audio-Instruct模型的聊天功能。
参数:
args (argparse.Namespace): 从命令行解析的参数。
"""
with gr.Blocks() as demo:
# 添加页面标题和描述
gr.Markdown(
"""<p align="center"><img src="https://qianwen-res.oss-cn-beijing.aliyuncs.com/assets/blog/qwenaudio/qwen2audio_logo.png" style="height: 80px"/><p>""")
gr.Markdown("""<center><font size=8>Qwen2-Audio-Instruct Bot</center>""")
gr.Markdown(
"""\
<center><font size=3>This WebUI is based on Qwen2-Audio-Instruct, developed by Alibaba Cloud. \
(本WebUI基于Qwen2-Audio-Instruct打造,实现聊天机器人功能。)</center>""")
gr.Markdown("""\
<center><font size=4>Qwen2-Audio <a href="https://modelscope.cn/models/qwen/Qwen2-Audio-7B">🤖 </a>
| <a href="https://huggingface.co/Qwen/Qwen2-Audio-7B">🤗</a>  |
Qwen2-Audio-Instruct <a href="https://modelscope.cn/models/qwen/Qwen2-Audio-7B-Instruct">🤖 </a> |
<a href="https://huggingface.co/Qwen/Qwen2-Audio-7B-Instruct">🤗</a>  |
 <a href="https://github.com/QwenLM/Qwen2-Audio">Github</a></center>""")
# 创建聊天机器人组件
chatbot = mgr.Chatbot(label='Qwen2-Audio-7B-Instruct', elem_classes="control-height", height=750)
# 创建用户输入组件,支持文本、麦克风和文件上传
user_input = mgr.MultimodalInput(
interactive=True,
sources=['microphone', 'upload'],
submit_button_props=dict(value="🚀 Submit (发送)"),
upload_button_props=dict(value="📁 Upload (上传文件)", show_progress=True),
)
task_history = gr.State([]) # 初始化任务历史状态
with gr.Row(): # 创建清除历史和重试按钮
empty_bin = gr.Button("🧹 Clear History (清除历史)")
regen_btn = gr.Button("🤔️ Regenerate (重试)")
# 当用户提交输入时,调用add_text函数,然后调用predict函数生成响应
user_input.submit(fn=add_text,
inputs=[chatbot, task_history, user_input],
outputs=[chatbot, task_history, user_input]).then(
predict, [chatbot, task_history], [chatbot, task_history], show_progress=True
)
# 清除历史按钮的点击事件处理,重置聊天记录和任务历史
empty_bin.click(reset_state, outputs=[chatbot, task_history], show_progress=True)
# 重试按钮的点击事件处理,重新生成最后的响应
regen_btn.click(regenerate, [chatbot, task_history], [chatbot, task_history], show_progress=True)
# 启动Gradio界面
demo.queue().launch(
        share=False,  # 不共享URL
        inbrowser=args.inbrowser,  # 是否自动在浏览器中打开
        server_port=args.server_port,  # 指定服务器端口
        server_name=args.server_name,  # 指定服务器名称
        ssl_certfile="/root/project/cert.pem",
        ssl_keyfile="/root/project/key.pem",
        ssl_verify=False
    )
if __name__ == "__main__":
args = _get_args() # 获取命令行参数
if args.cpu_only:
device_map = "cpu" # 如果指定了仅使用CPU,设置设备映射为CPU
else:
device_map = "auto" # 否则自动选择设备
# 加载模型
model = Qwen2AudioForConditionalGeneration.from_pretrained(
args.checkpoint_path,
torch_dtype="auto", # 自动选择数据类型
device_map=device_map, # 设置设备映射
resume_download=True, # 断点续传
).eval()
model.generation_config.max_new_tokens = 2048 # 设置最大生成token数,用于长对话
print("generation_config", model.generation_config)
processor = AutoProcessor.from_pretrained(args.checkpoint_path, resume_download=True) # 加载处理器
_launch_demo(args) # 启动演示界面
- 运行上面代码之前先到4.1配置ssl
四、成功实现语音交互

4.1 找不到录音机问题
- 创建ssl
openssl req -x509 -newkey rsa:4096 -keyout key.pem -out cert.pem -sha256 -days 365 -nodes
一直按enter键默认选择即可
- 修改launch
vim demo/web_demo_audio.py
加入ssl参数,注意替换路径
demo.queue().launch(
share=False, # 不共享URL
inbrowser=args.inbrowser, # 是否自动在浏览器中打开
server_port=args.server_port, # 指定服务器端口
server_name=args.server_name, # 指定服务器名称
ssl_certfile="/root/project/cert.pem",
ssl_keyfile="/root/project/key.pem",
ssl_verify=False
)
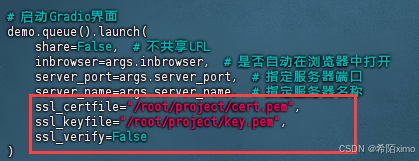
- 注意用https访问
https://服务器ip:端口


 838
838

 被折叠的 条评论
为什么被折叠?
被折叠的 条评论
为什么被折叠?
 到【灌水乐园】发言


