


目录
前置工作
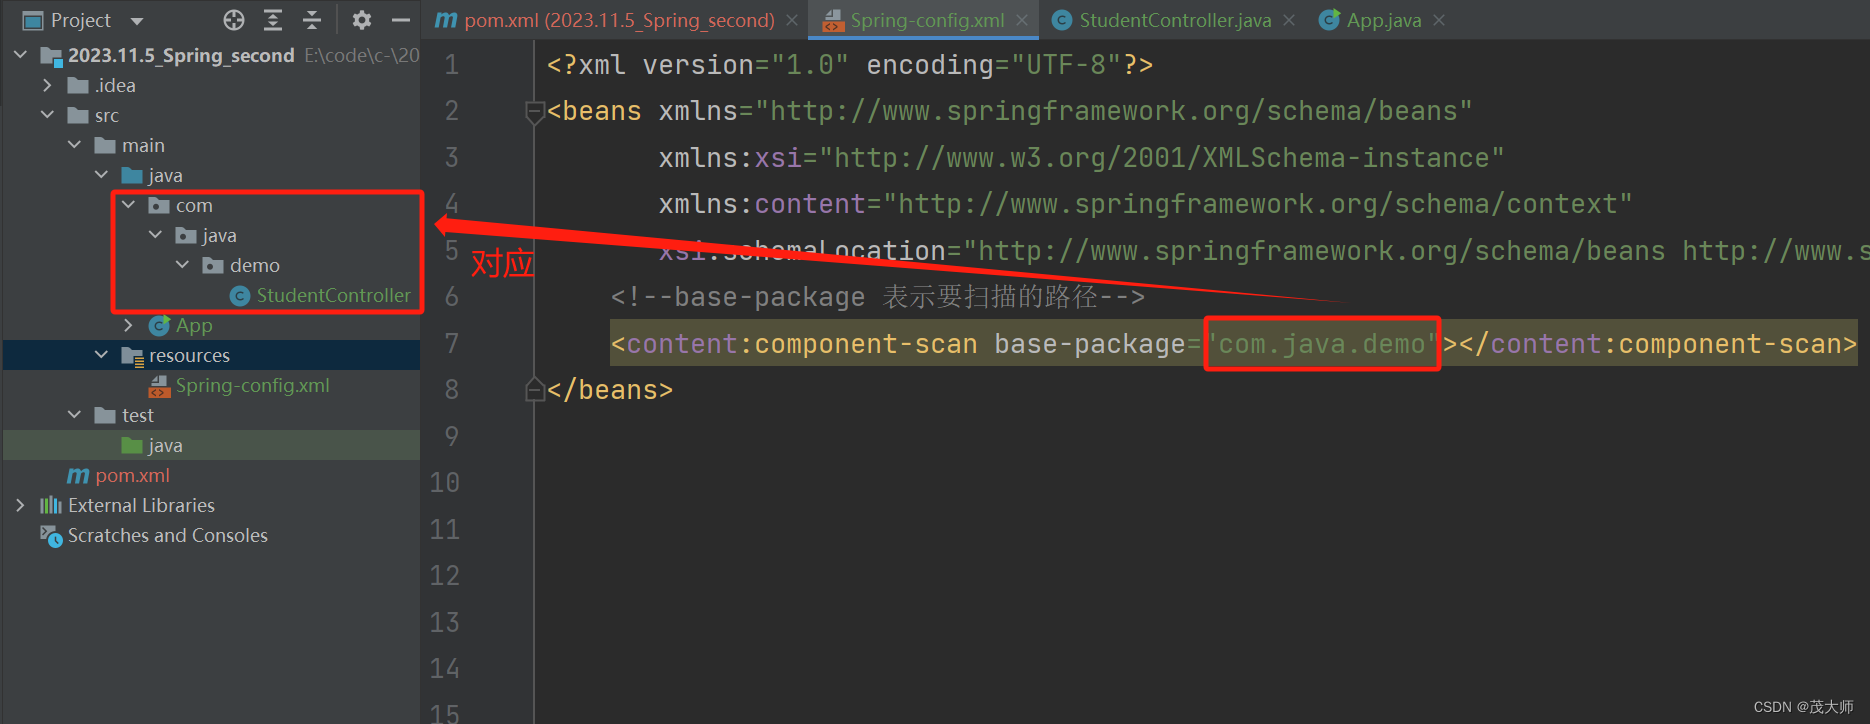
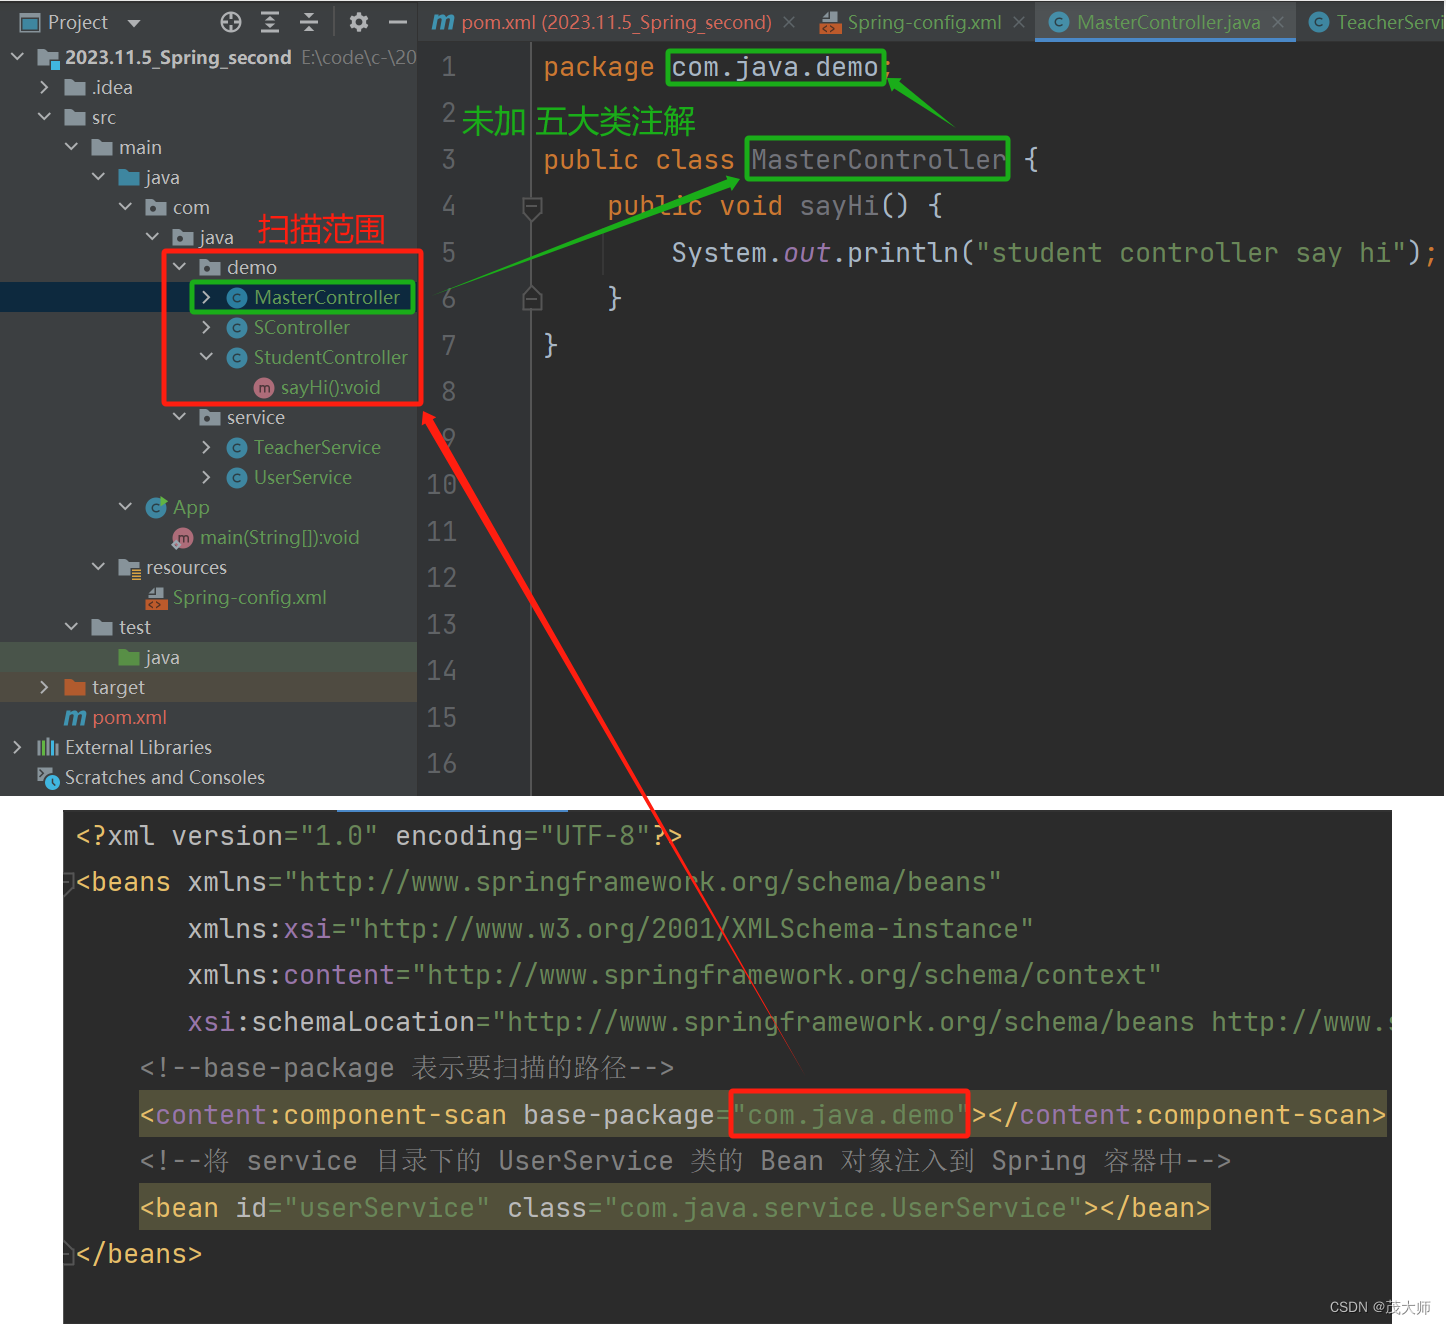
- 在配置文件中配置好扫描路径
<?xml version="1.0" encoding="UTF-8"?>
<beans xmlns="http://www.springframework.org/schema/beans"
       xmlns:xsi="http://www.w3.org/2001/XMLSchema-instance"
       xmlns:content="http://www.springframework.org/schema/context"
       xsi:schemaLocation="http://www.springframework.org/schema/beans http://www.springframework.org/schema/beans/spring-beans.xsd http://www.springframework.org/schema/context https://www.springframework.org/schema/context/spring-context.xsd">
    <!--base-package 表示要扫描的路径-->
    <content:component-scan base-package="com.java.demo"></content:component-scan>
</beans>
使用类注解
五大类注解
@Controller(控制器)
- 归属业务逻辑层
- 验证用户请求的数据正确性(安保系统)
@Service(服务)
- 归属服务层
- 编排和调度具体的执行方法(客服中心)
@Repository(仓库)
- 归属持久层
- 和数据库交互(执行者)
@Component(组件)
- 归属于公共工具类
- 提供某些公共方法
@Configuration(配置)
- 归属于配置层
- 用来配置当前项目的一些信息(对项目的全局配置负责)
实例理解
- 创建一个 StudentController 类,并使用 @Controller 注解将其注入到 Spring 容器中
- 将该实例的 @Controller 注解换成 @Service、@Repository、@Component、@Configuration 均可实现将当前类注入到 Spring 容器中
package com.java.demo;

import org.springframework.stereotype.Controller;

// 使用 @Controller 注解将当前类存储到 spring 容器中
@Controller
public class StudentController {
    public void sayHi() {
        System.out.println("student controller say hi");
    }
}
- 在启动类中获取 Bean 对象,并使用 Bean 对象
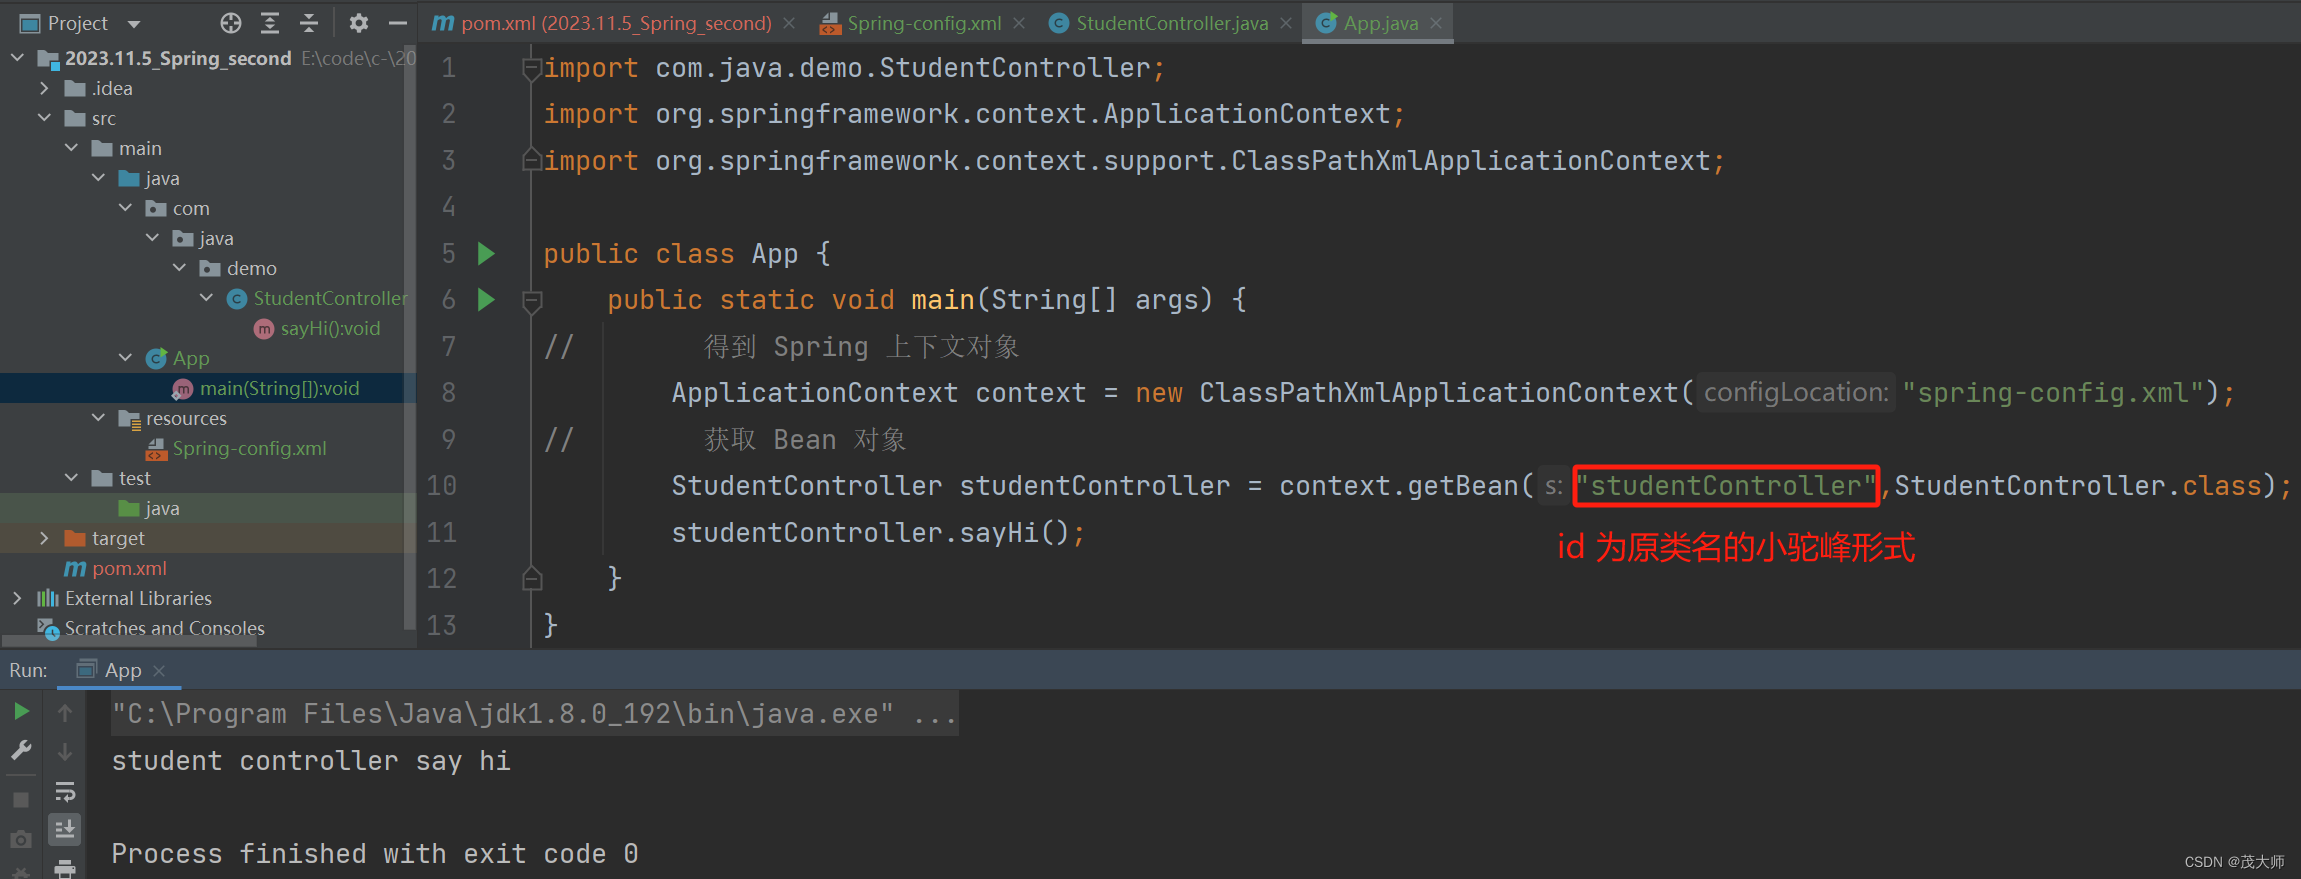
import com.java.demo.StudentController;
import org.springframework.context.ApplicationContext;
import org.springframework.context.support.ClassPathXmlApplicationContext;

public class App {
    public static void main(String[] args) {
//        得到 Spring 上下文对象
        ApplicationContext context = new ClassPathXmlApplicationContext("spring-config.xml");
//        获取 Bean 对象
        StudentController studentController = context.getBean("studentController",StudentController.class);
        studentController.sayHi();
    }
}
- 此处我们并未在配置文件中使用 Bean 标签将 StudentController 对象注入到 Spring 容器中
- 而是直接使用 @Controller 注解将其注入到 Spring 容器
- 所以当我们要使用 getBean 方法获取该 Bean 对象的时候,其默认 id 为原类名的小驼峰形式
运行结果:
注意:
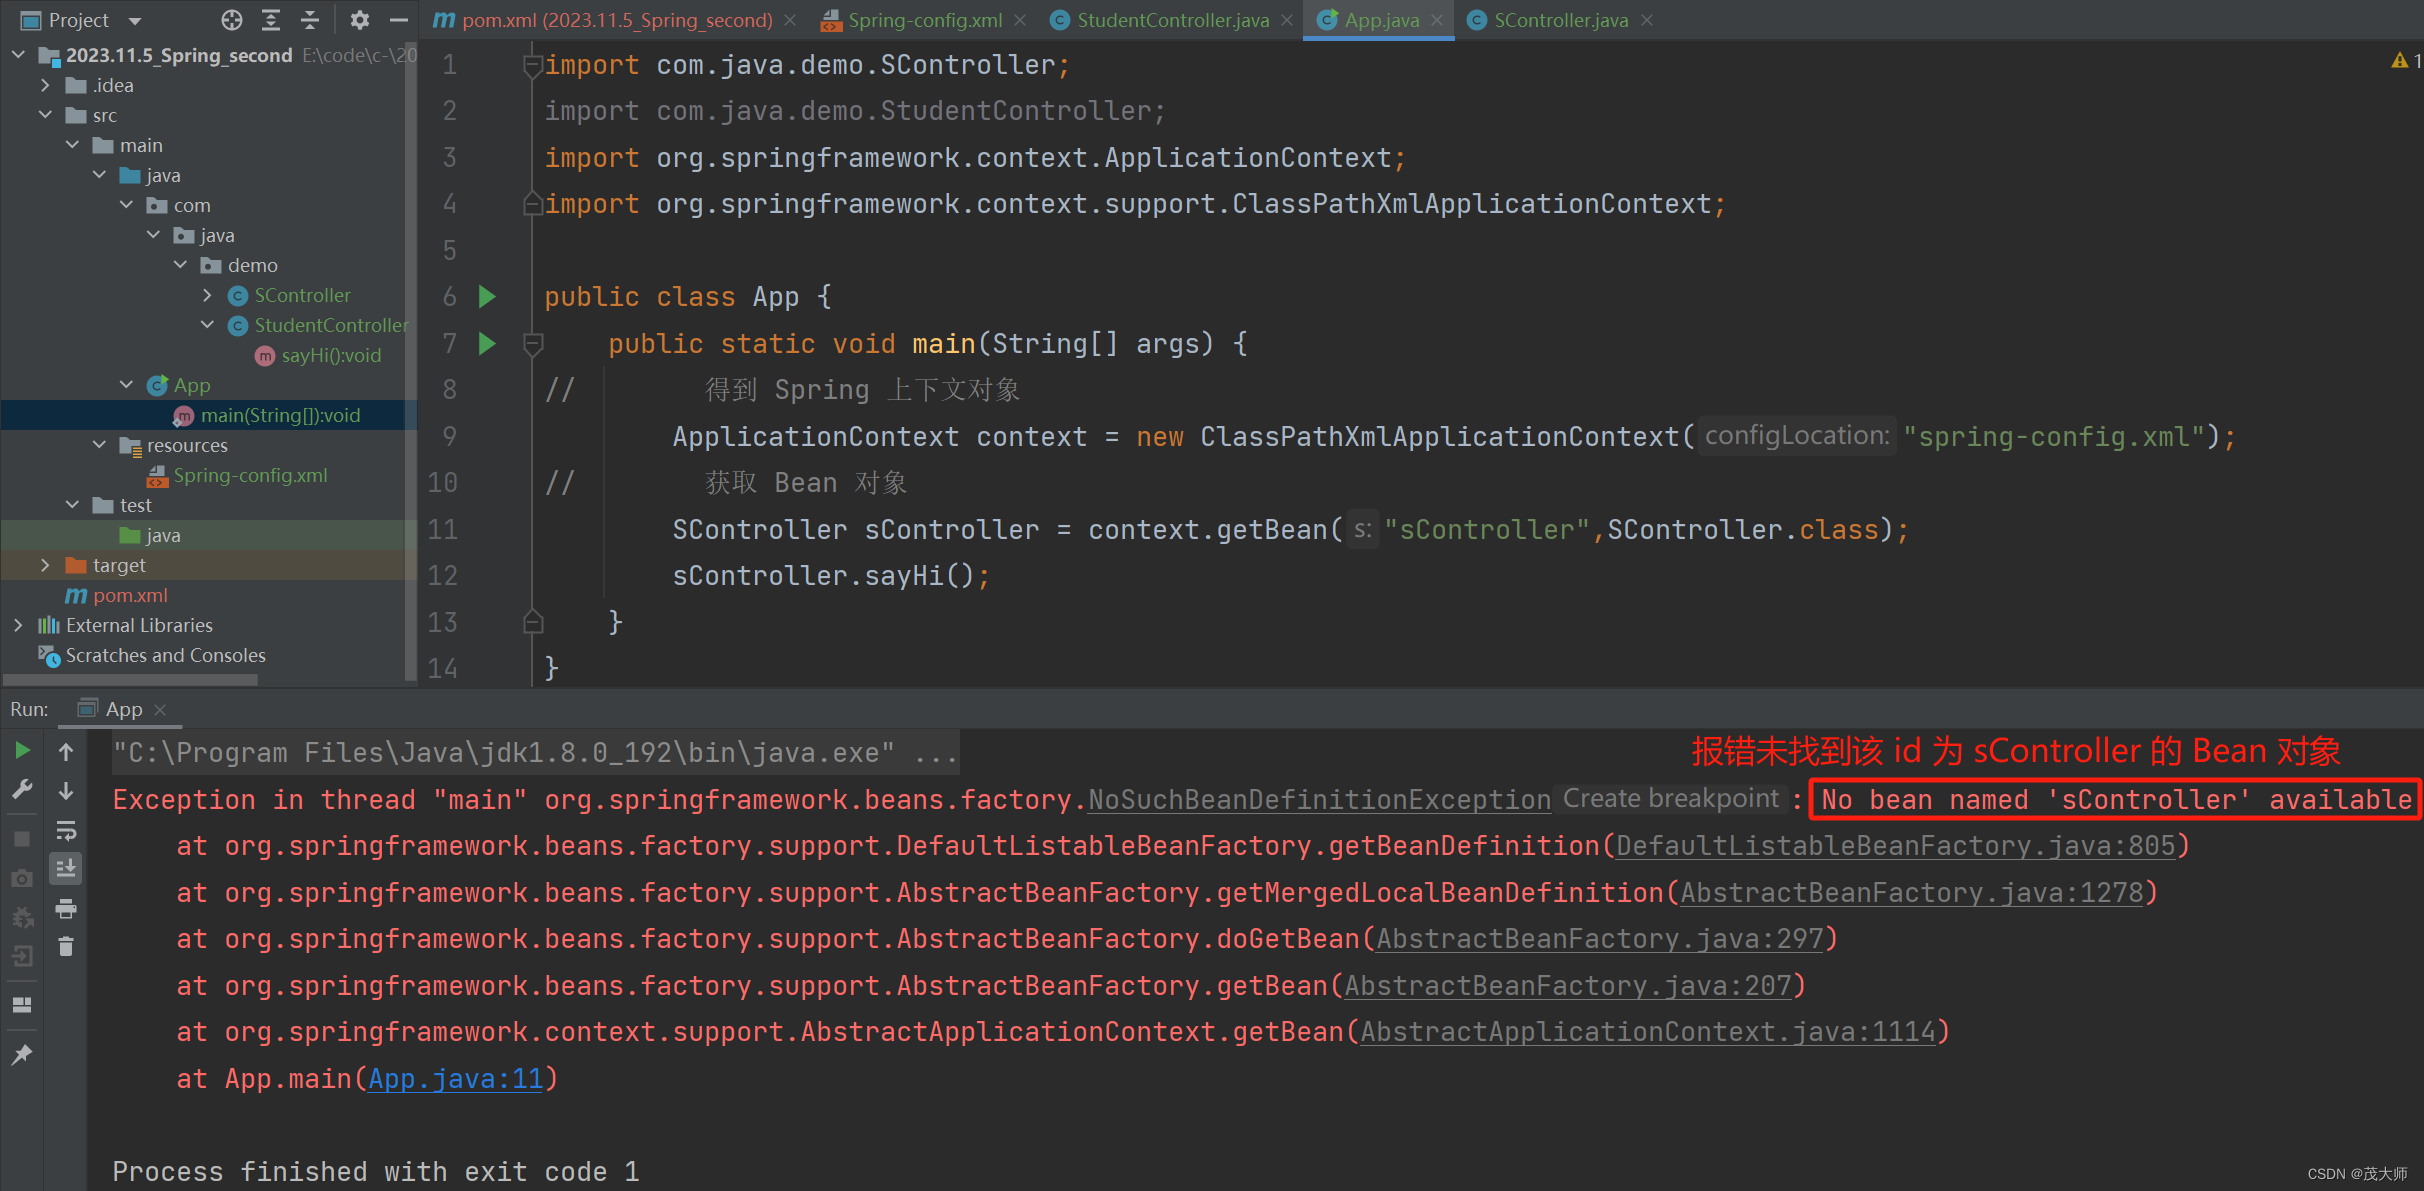
- 此处的 Bean 对象的 id 命名还存在特殊情况
- 创建一个 SController 类
import org.springframework.stereotype.Controller;

@Controller
public class SController {
    public void sayHi() {
        System.out.println("s controller say hi");
    }
}
- 在启动类中获取 Bean 对象,并使用 Bean 对象
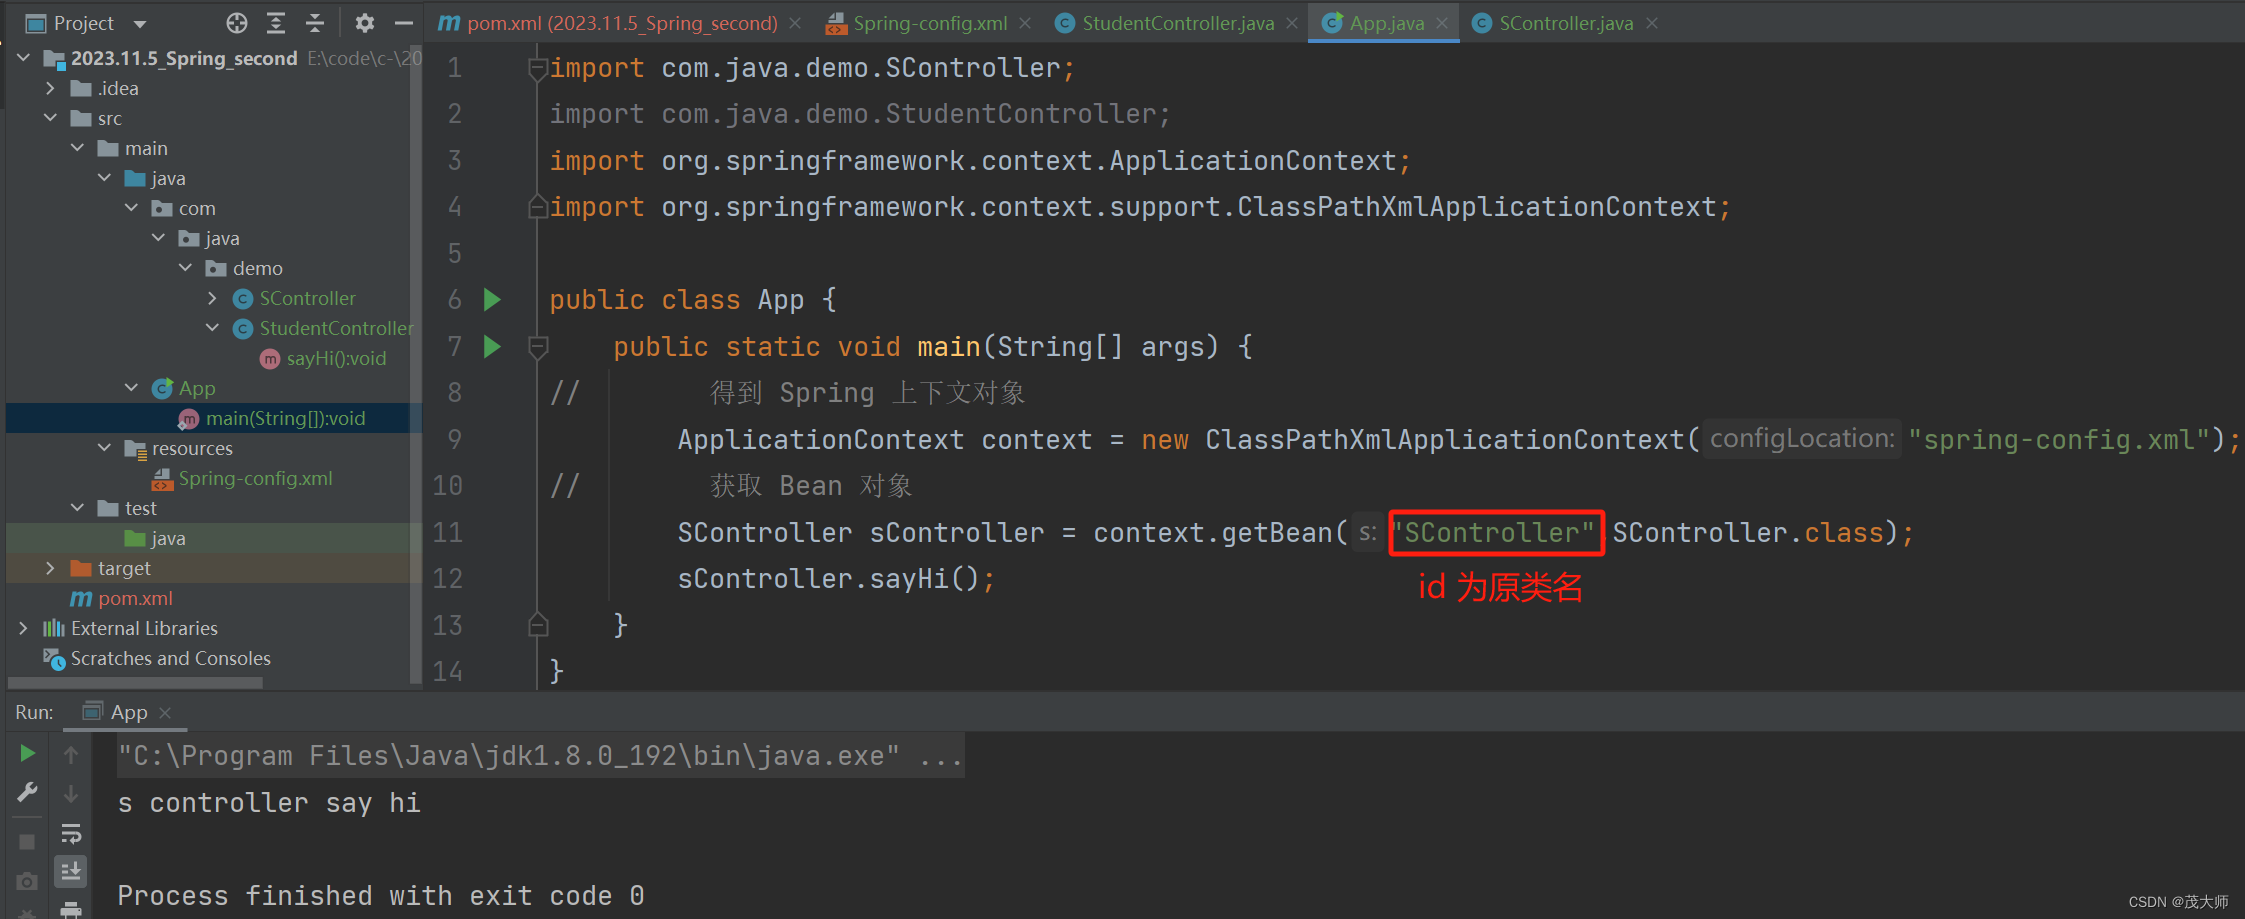
import com.java.demo.SController;
import org.springframework.context.ApplicationContext;
import org.springframework.context.support.ClassPathXmlApplicationContext;

public class App {
    public static void main(String[] args) {
//        得到 Spring 上下文对象
        ApplicationContext context = new ClassPathXmlApplicationContext("spring-config.xml");
//        获取 Bean 对象
        SController sController = context.getBean("sController",SController.class);
        sController.sayHi();
    }
}
运行结果:
结论1:
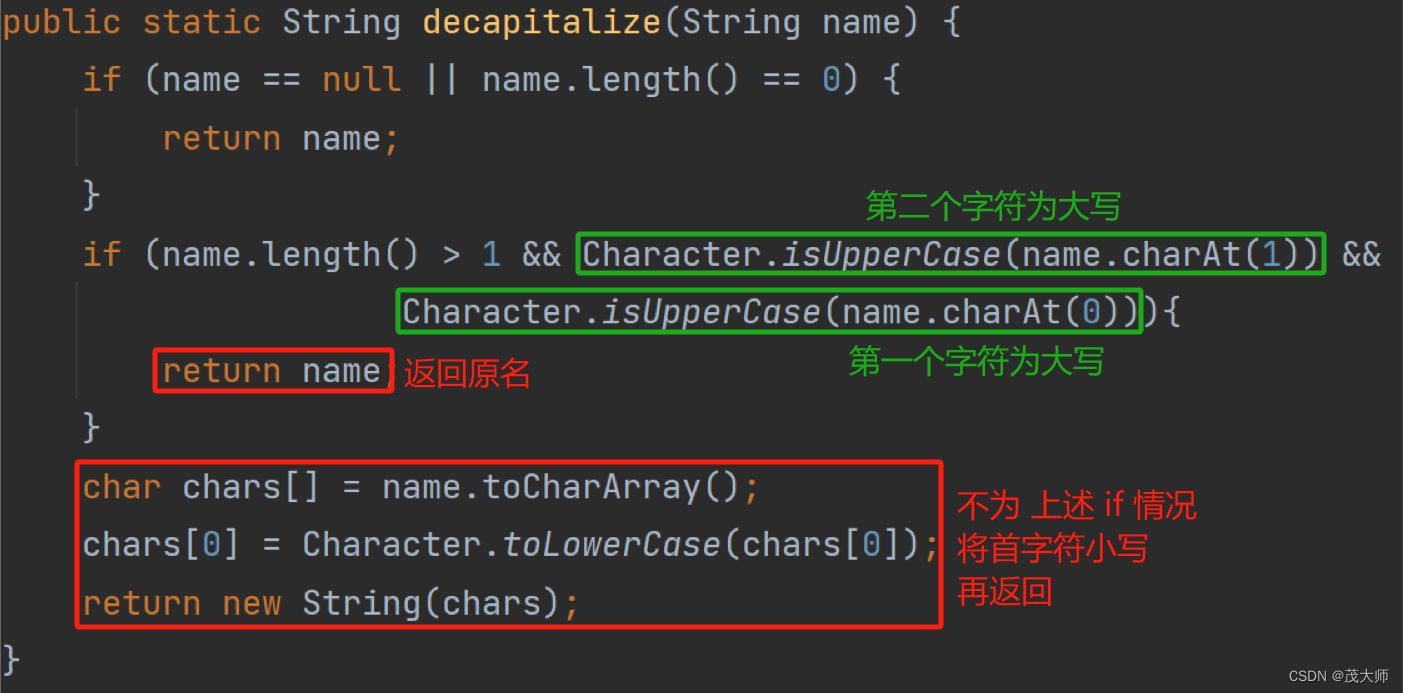
- 默认情况 Bean 对象 id 为原类名的小驼峰形式
- 但如果类名的第一个字母和第二个字母都是大写,则其 Bean 对象 id 应为 原类名
五大类注解 Bean 对象 id 命名规则原码
结论2:
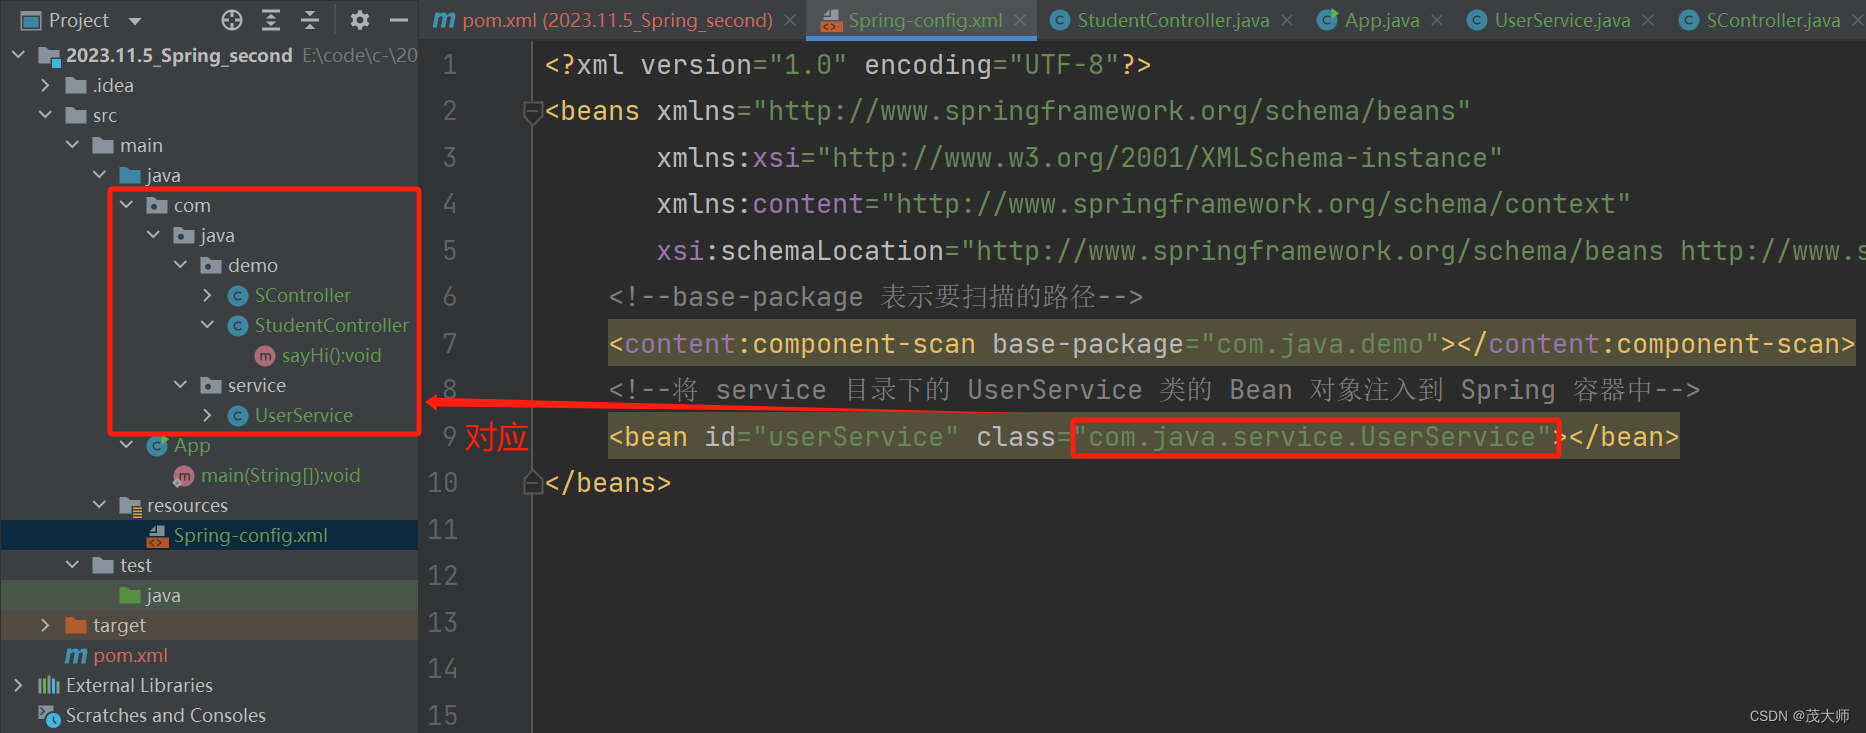
- 在配置文件中,<content:component-scan> 标签和 <bean> 标签可以同时使用
- <bean> 标签可补充注入 不在扫描路径中的 Bean 对象
实例理解
- 创建一个 UserService 类
public class UserService {
    public void sayHi() {
        System.out.println("user service say hi");
    }
}
- 使用 <bean> 标签将 UserService 类的 Bean 对象注入到 Spring容器中
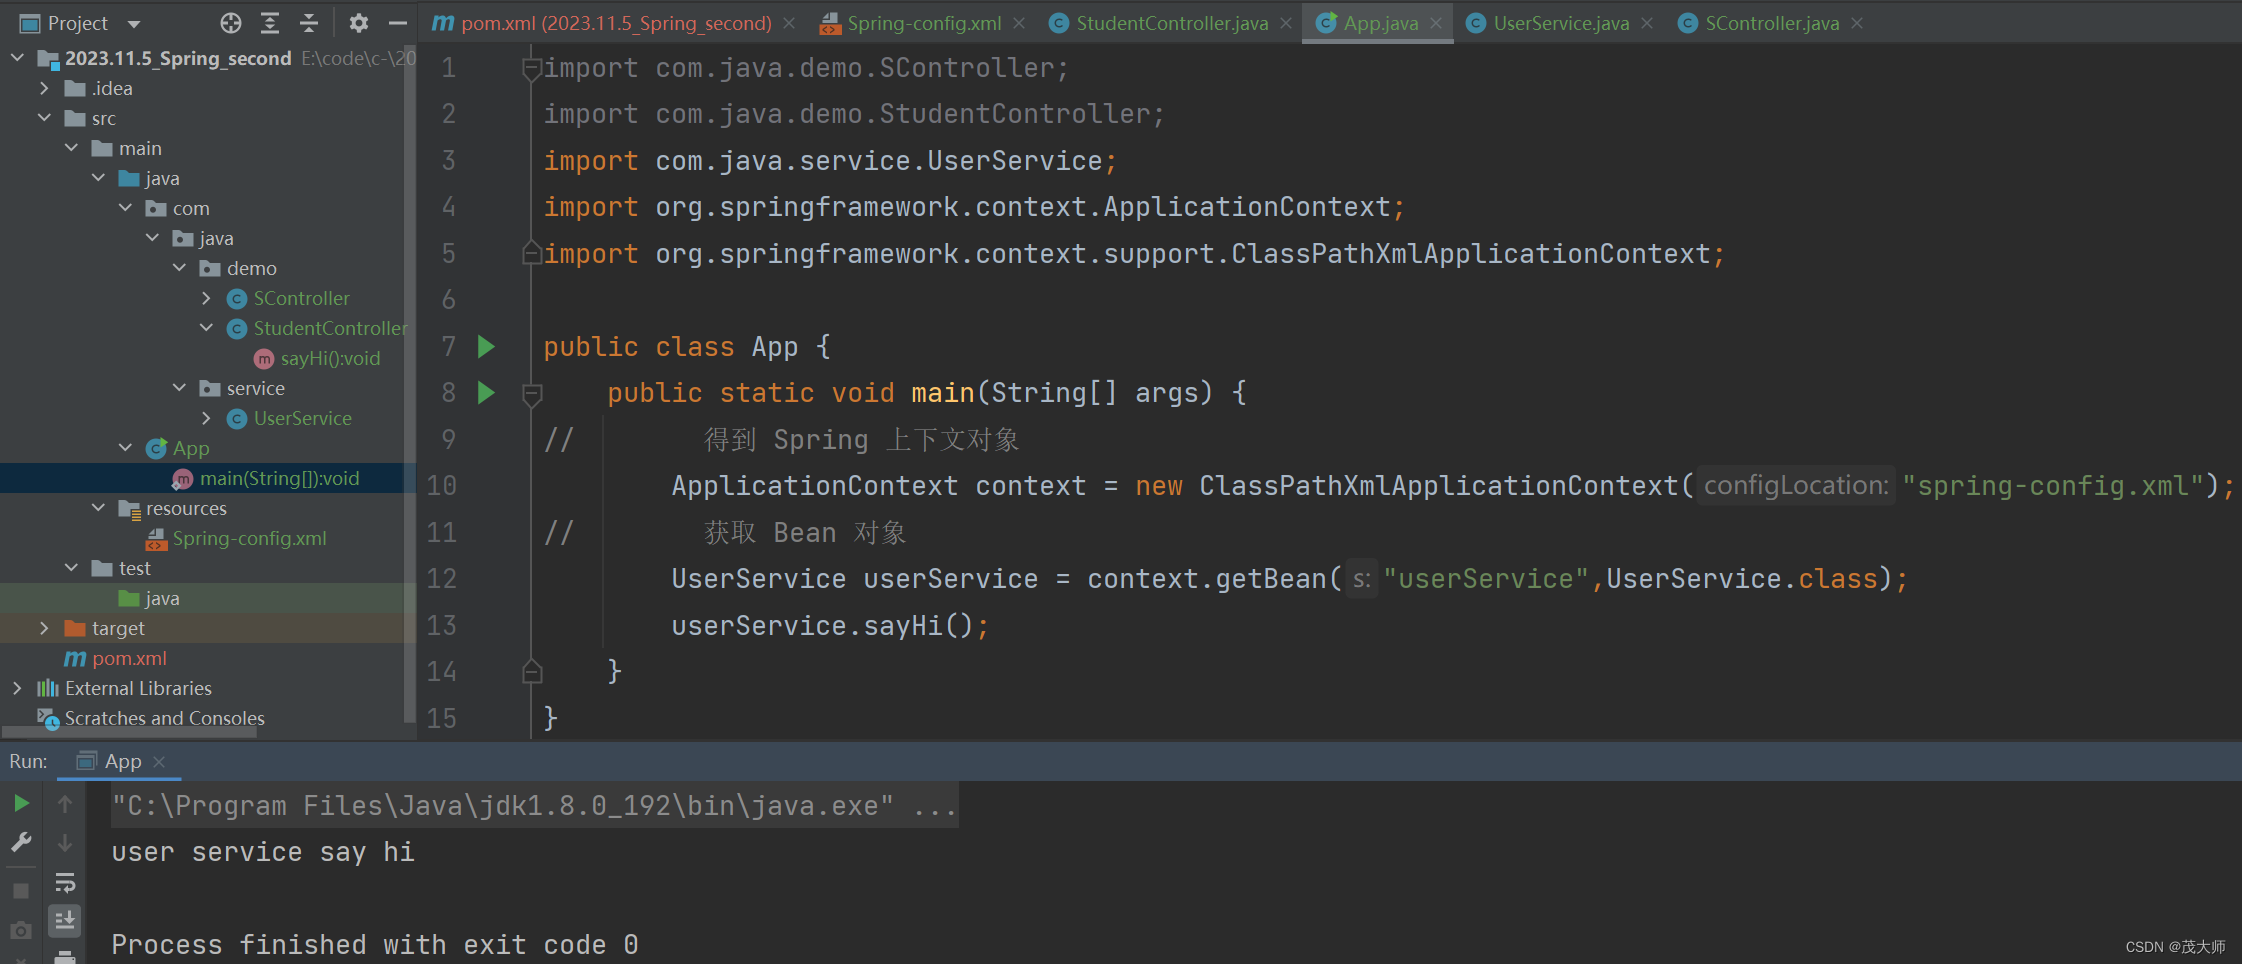
- 在启动类中获取 Bean 对象并使用
import com.java.service.UserService;
import org.springframework.context.ApplicationContext;
import org.springframework.context.support.ClassPathXmlApplicationContext;

public class App {
    public static void main(String[] args) {
//        得到 Spring 上下文对象
        ApplicationContext context = new ClassPathXmlApplicationContext("spring-config.xml");
//        获取 Bean 对象
        UserService userService = context.getBean("userService",UserService.class);
        userService.sayHi();
    }
}
运行结果:
结论3:
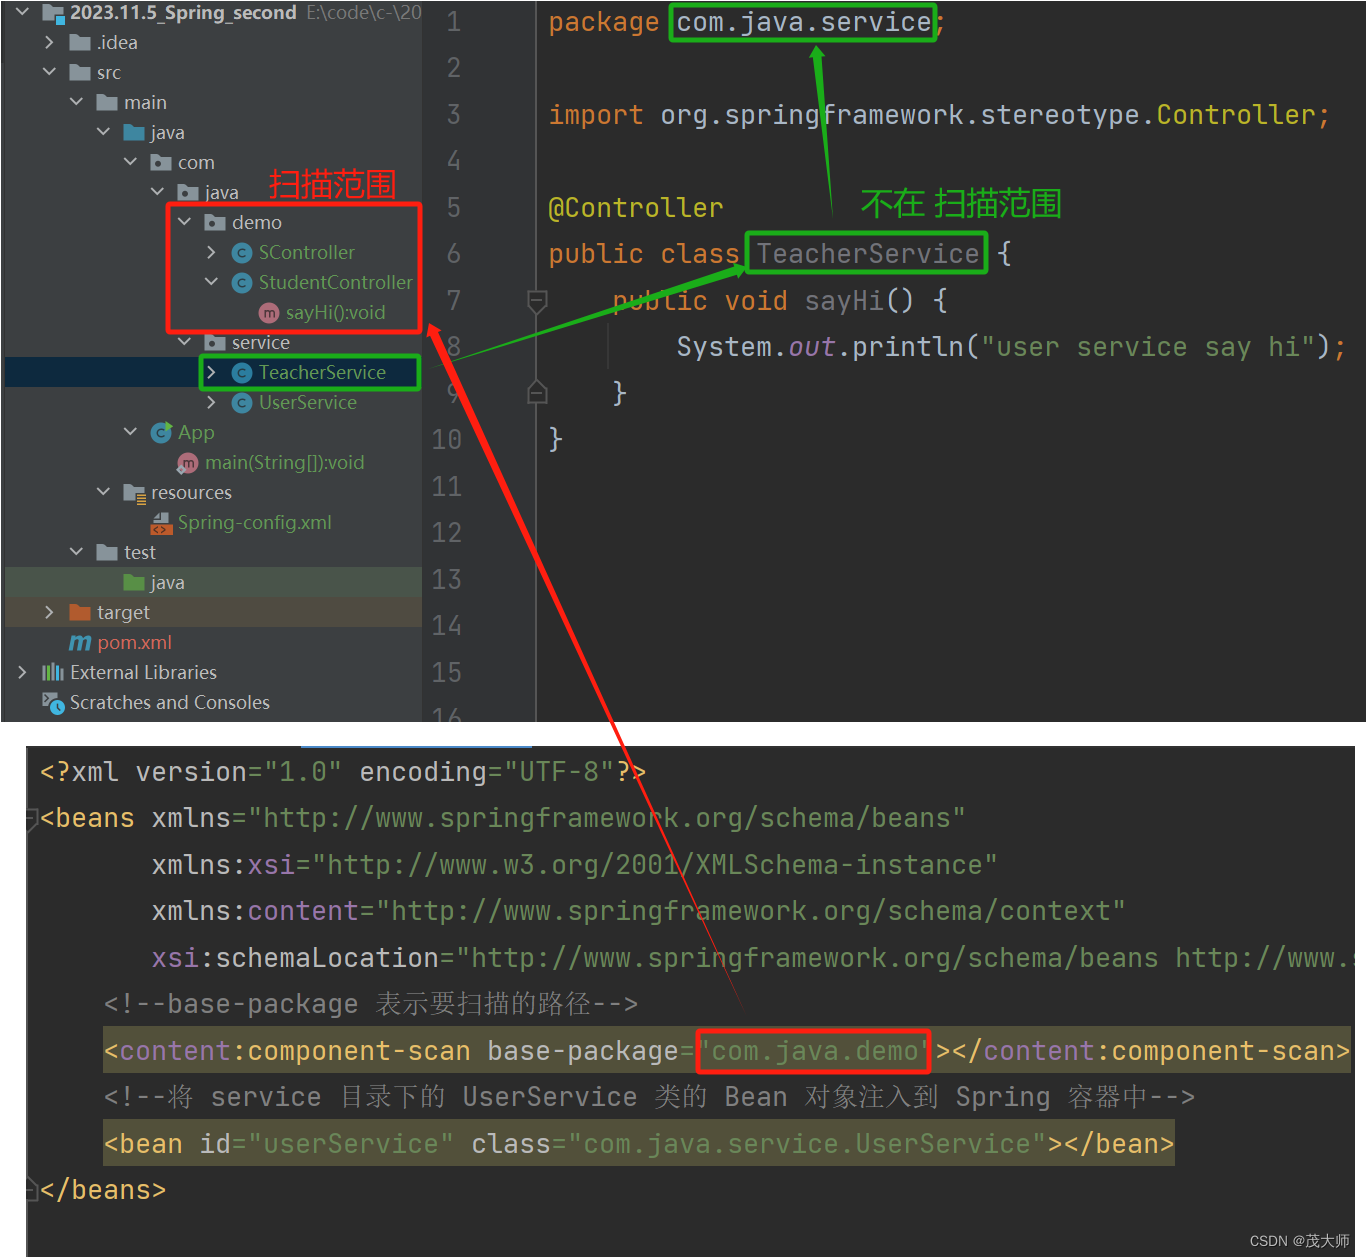
- 不在 <component-scan> 中所设置的扫描路径下 且被五大类注解标识的类,不会注入到 Spring 容器中
结论4:
- 在 <component-scan> 中所设置的扫描路径下 但未被五大类注解标识的类,不会注入到 Spring 容器中
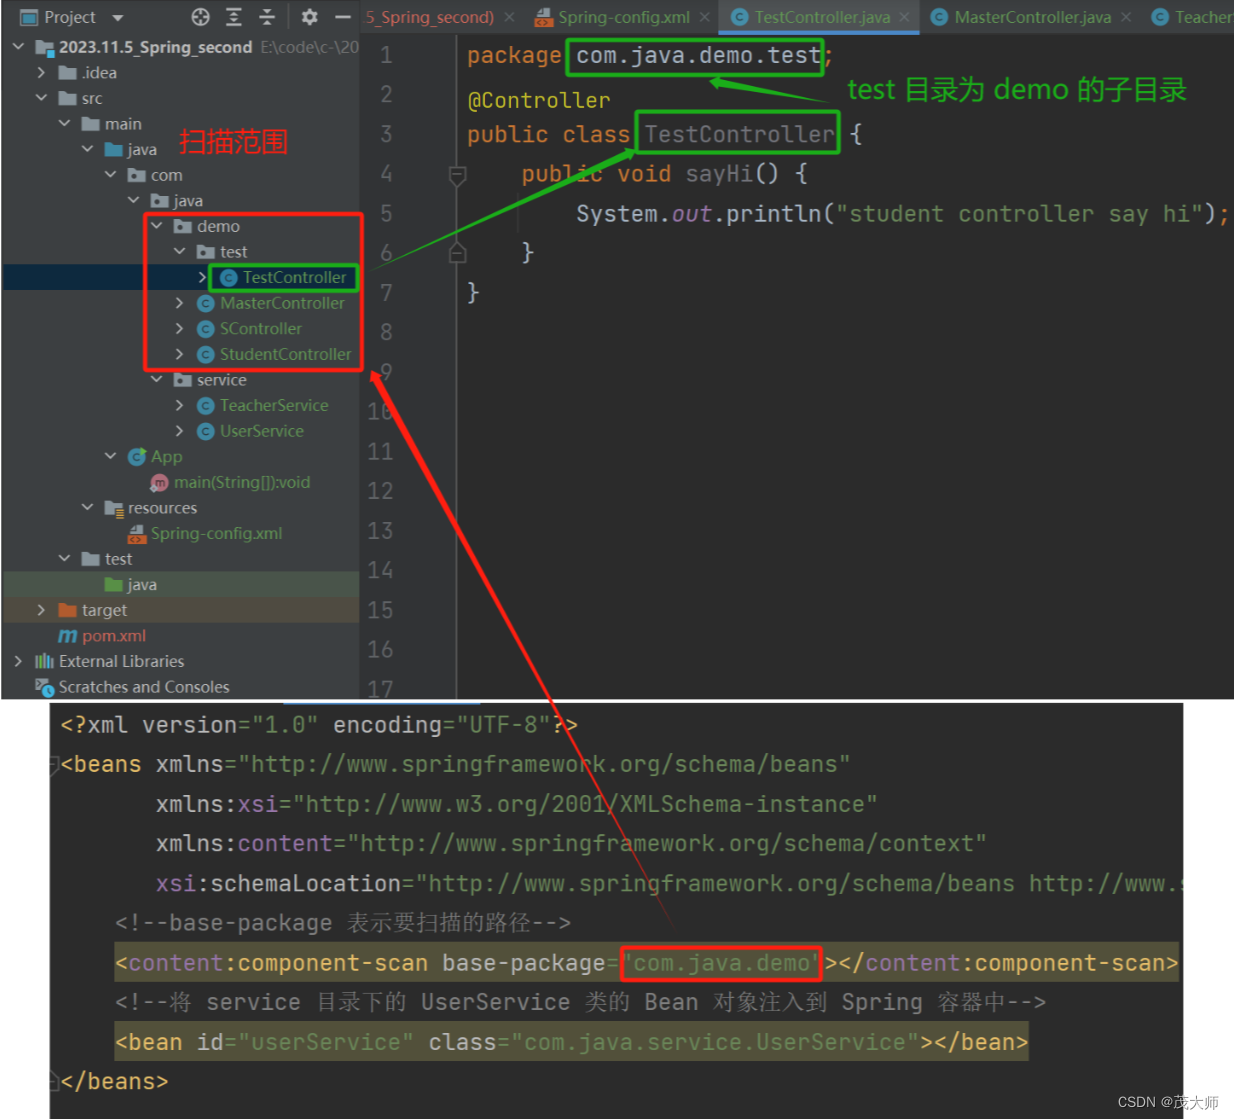
结论5:
- 在 <component-scan> 中所设置的扫描路径下的所有子包的类,只要加了五大类注解的类,会注入到 Spring 容器中
使用方法注解 @Bean
- 相比较于五大类注解 添加到某个类上
- 方法注解 @Bean ,顾名思义就是将其添加到方法上的
注意:
@Bean 注解 必须要配合 五大类注解一起使用
- 只有加了 五大类注解的类,Spring 才会 扫描该类
- 进而才会扫描当前类中的方法是否有加了 @Bean 注解的
- 这是出于 Spring 性能设计所规定的策略
@Bean 注解 Bean 对象命名规则:
- 默认情况下,@Bean 存储的 Bean 对象的 id 就是方法名
实例理解
- 我们创建一个 实例类 User
// 普通的用户实体类
public class User {
    public Integer uid;
    public String username;
    public String password;
    public Integer age;

    public Integer getUid() {
        return uid;
    }

    public void setUid(Integer uid) {
        this.uid = uid;
    }

    public String getUsername() {
        return username;
    }

    public void setUsername(String username) {
        this.username = username;
    }

    public String getPassword() {
        return password;
    }

    public void setPassword(String password) {
        this.password = password;
    }

    public Integer getAge() {
        return age;
    }

    public void setAge(Integer age) {
        this.age = age;
    }
}
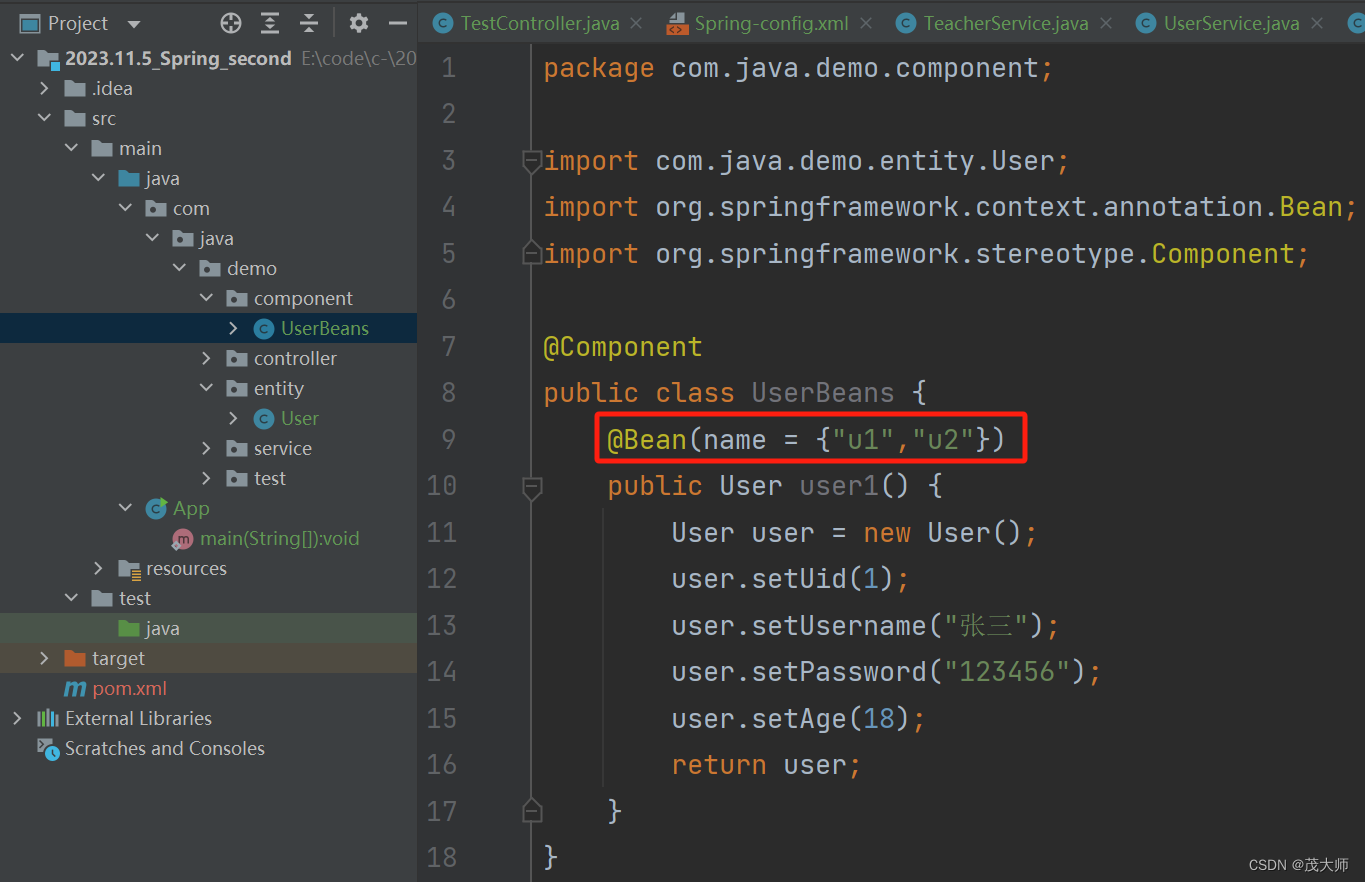
- 我们再创建一个 UserBeans 类
- 在该类中写一个方法,来创建 实例类 User 的对象
- 并使用 @Bean 注解将 User 的 Bean对象 注入到 Spring 容器中
- 注意此处搭配了五大类注解中的 @Component 注解
import com.java.demo.entity.User;
import org.springframework.context.annotation.Bean;
import org.springframework.stereotype.Component;

@Component
public class UserBeans {
    @Bean
    public User user1() {
        User user = new User();
        user.setUid(1);
        user.setUsername("张三");
        user.setPassword("123456");
        user.setAge(18);
        return user;
    }
}
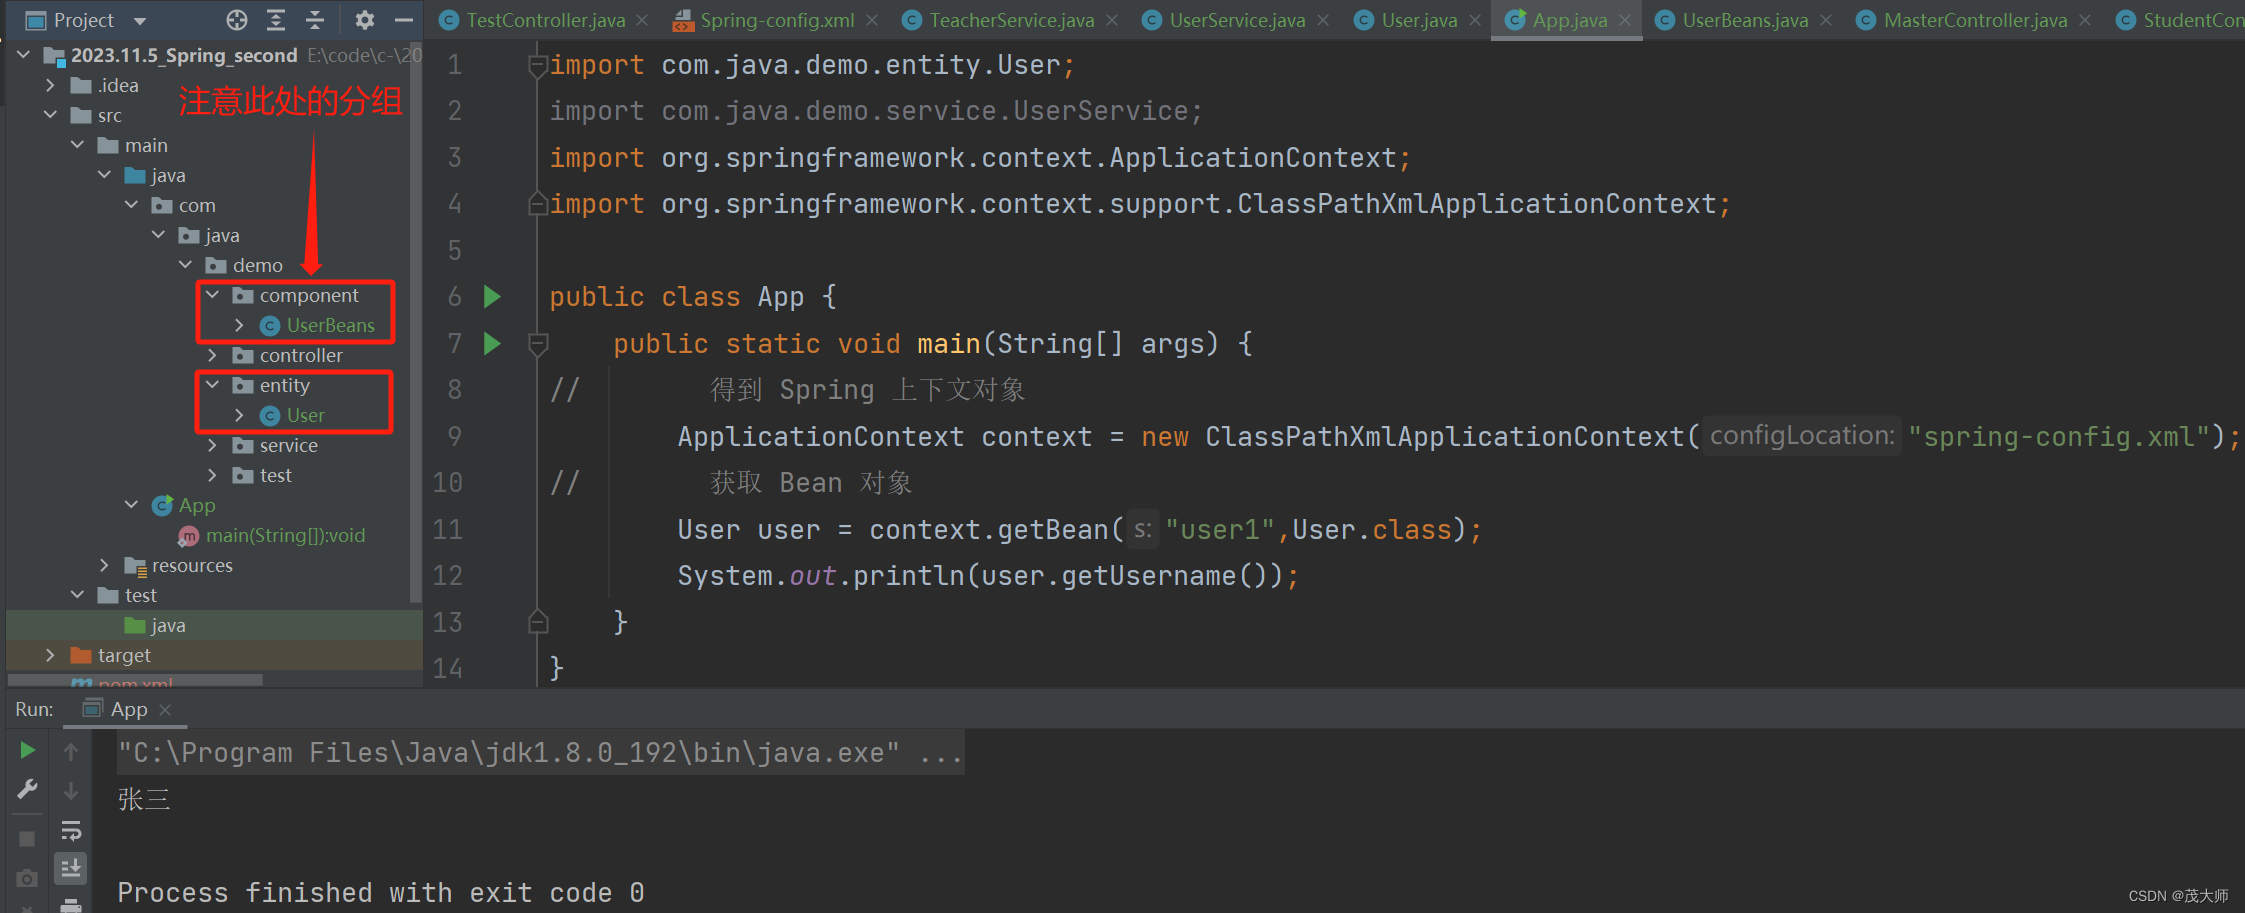
- 在启动类中获取该 Bean 对象
- 注意此处获取 Bean 对象时的 id 为 user1,即被 @Bean 注解所修饰方法的方法名
import com.java.demo.entity.User;
import org.springframework.context.ApplicationContext;
import org.springframework.context.support.ClassPathXmlApplicationContext;

public class App {
    public static void main(String[] args) {
//        得到 Spring 上下文对象
        ApplicationContext context = new ClassPathXmlApplicationContext("spring-config.xml");
//        获取 Bean 对象
        User user = context.getBean("user1",User.class);
        System.out.println(user.getUsername());
    }
}
运行结果:
重命名 Bean
- 默认情况下,@Bean 存储的 Bean 对象的 id 就是方法名
- 但是我们还是可以自己手动设置 Bean 对象的 id
实例理解
- 我们可以通过下图方式给 Bean 对象设置多个 id
- 在启动类中获取该 Bean 对象
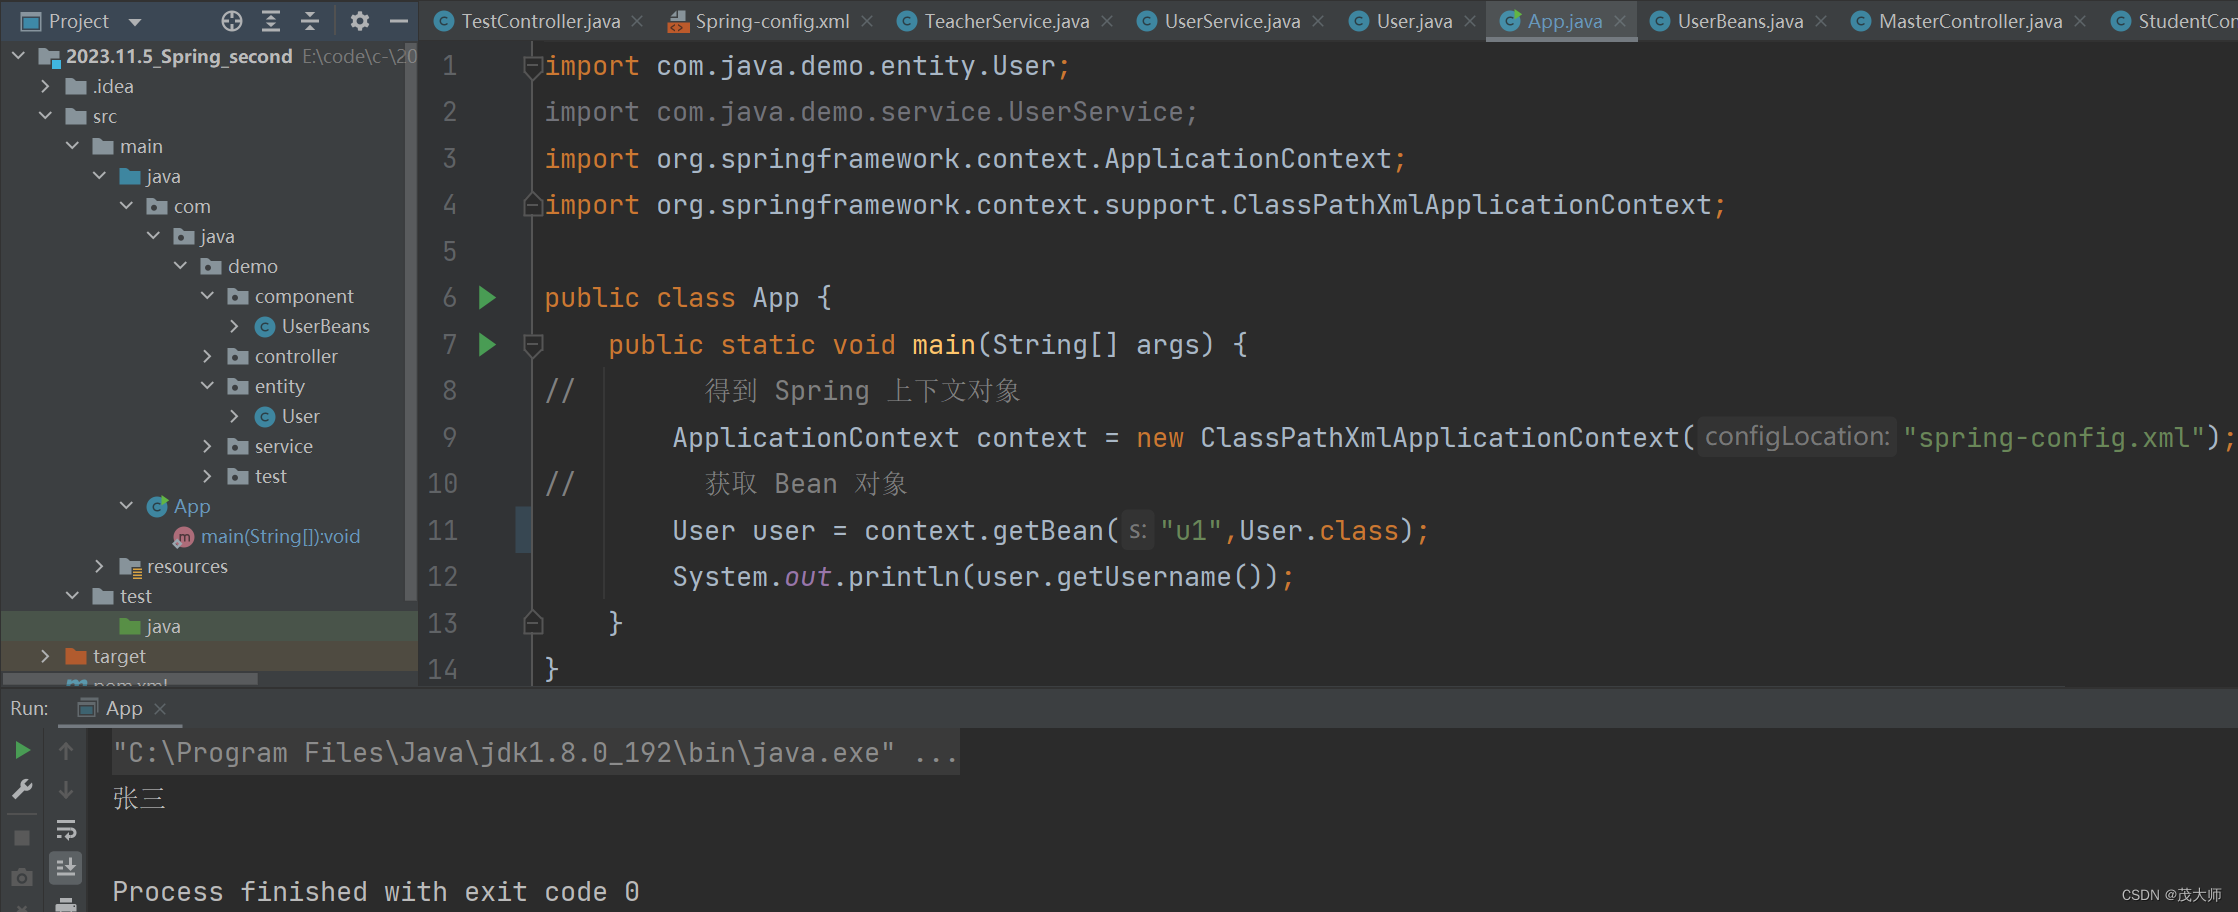
- 此时我们任选一个 id 即可获取该 Bean 对象,此处选择 id 为 u1
import com.java.demo.entity.User;
import org.springframework.context.ApplicationContext;
import org.springframework.context.support.ClassPathXmlApplicationContext;

public class App {
    public static void main(String[] args) {
//        得到 Spring 上下文对象
        ApplicationContext context = new ClassPathXmlApplicationContext("spring-config.xml");
//        获取 Bean 对象
        User user = context.getBean("u1",User.class);
        System.out.println(user.getUsername());
    }
}
运行结果:
注意:
- 当给 Bean 对象重命名之后,默认的使用方法名获取对象的方式就不能再使用了
补充问题
- 我们创建一个 UserBeans 类,且未重命名 Bean 对象
import com.java.demo.entity.User;
import org.springframework.context.annotation.Bean;
import org.springframework.stereotype.Component;

@Component
public class UserBeans {
    @Bean
    public User getUser() {
        User user = new User();
        user.setUid(1);
        user.setUsername("张三");
        user.setPassword("123456");
        user.setAge(18);
        return user;
    }
}
- 我们再创建一个 UserBeans2 类,且未重命名 Bean 对象
import com.java.demo.entity.User;
import org.springframework.context.annotation.Bean;
import org.springframework.stereotype.Component;

@Component
public class UserBeans2 {
    @Bean
    public User getUser() {
        User user = new User();
        user.setUid(2);
        user.setUsername("李四");
        user.setPassword("123456");
        user.setAge(20);
        return user;
    }
}
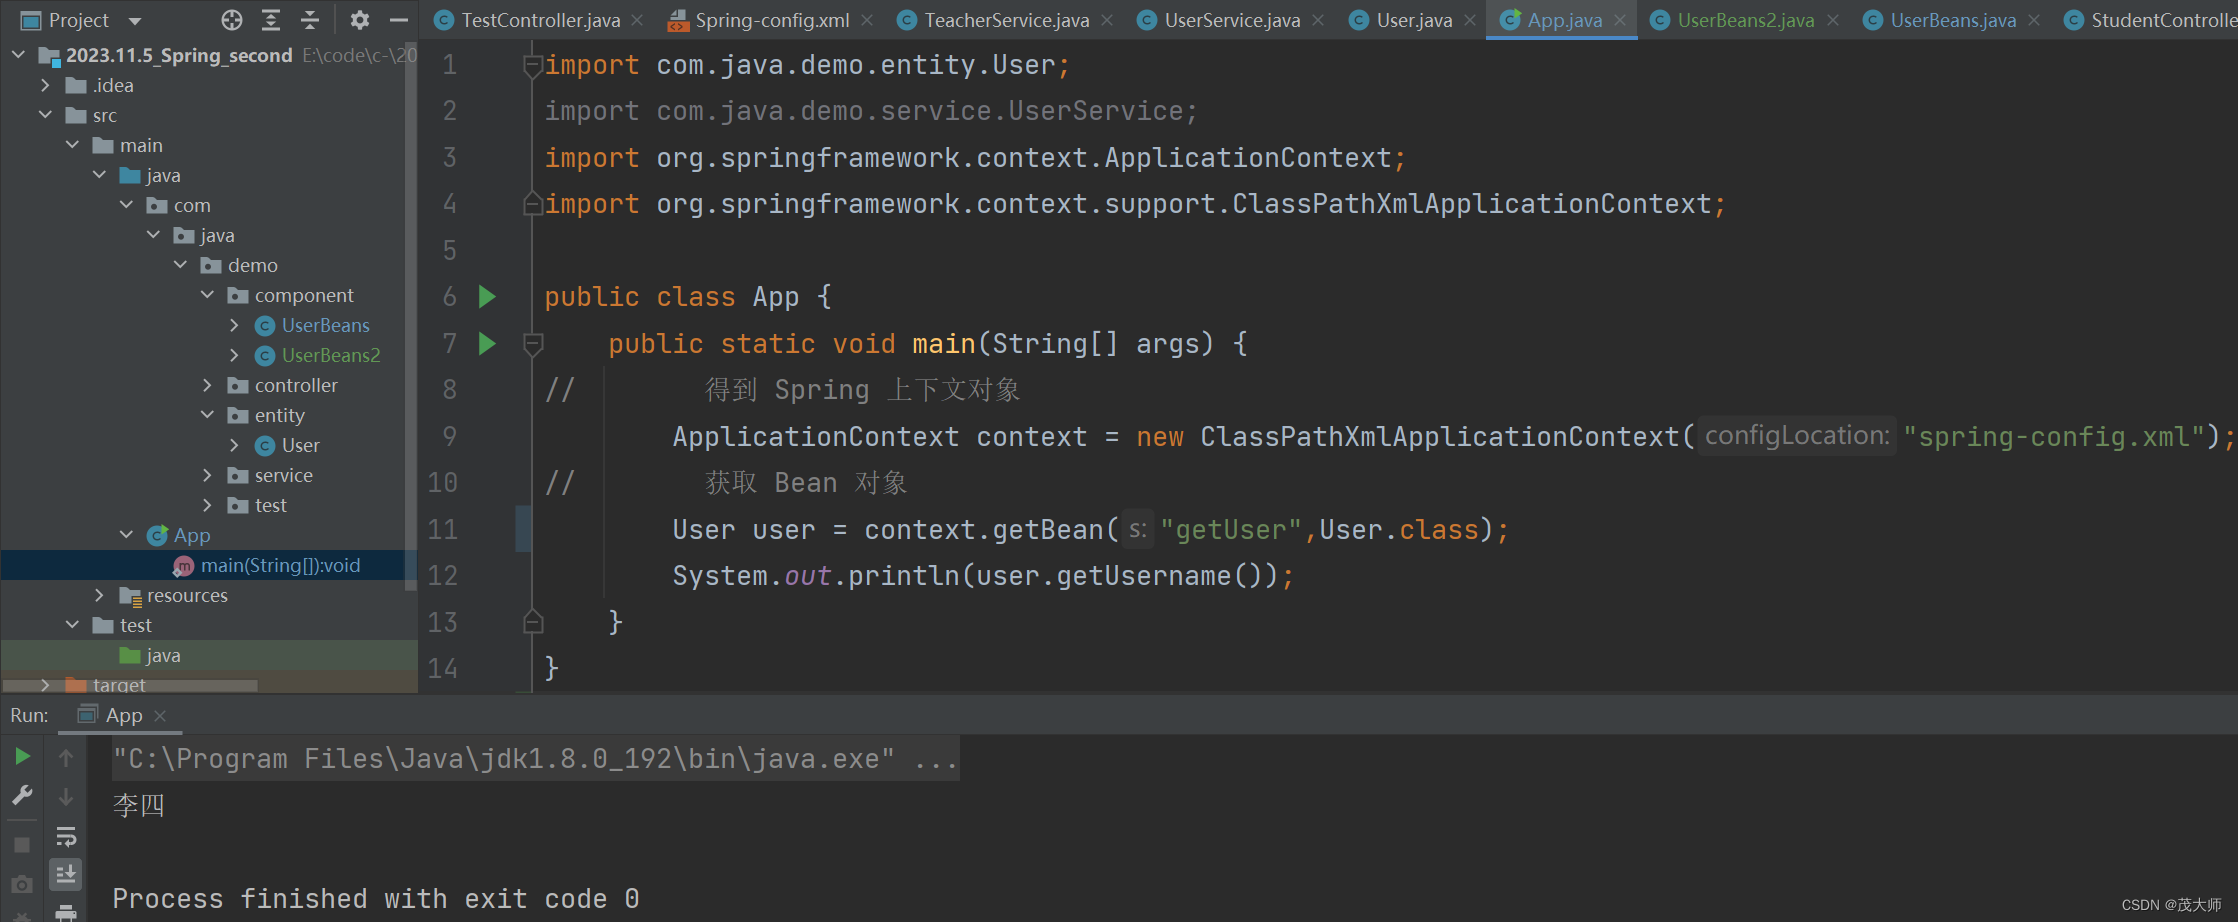
- 在启动类中获取该 Bean 对象
import com.java.demo.entity.User;
import org.springframework.context.ApplicationContext;
import org.springframework.context.support.ClassPathXmlApplicationContext;

public class App {
    public static void main(String[] args) {
//        得到 Spring 上下文对象
        ApplicationContext context = new ClassPathXmlApplicationContext("spring-config.xml");
//        获取 Bean 对象
        User user = context.getBean("getUser",User.class);
        System.out.println(user.getUsername());
    }
}
运行结果:
- 我们多次运行启动类,发现所获取到始终是 Username 为李四的 Bean 对象
- 但是 Username 为张三的 Bean 对象,其 id 也为 getUser,但是为什么获取的不是它呢?
- 此处涉及到数据覆盖
- 因为 Username 为张三 且 id 为 getUser 的 Bean 对象,先被注入到 Spring 容器中
- 此时 Username 为李四 且 id 为 getUser 的 Bean 对象,再被注入到 Spring 容器中
- 正因为 Spring 容器中已经又了 id 为 getUser 的 Bean 对象,所以后注入到的 Username 为李四 的 Bean 对象 便将 Username 为张三 的 Bean 对象 给覆盖了
- 所以此处启动类获取到的 Bean 对象其 Username 输出为 李四
我们可以通过 @Oder 注解来更清晰的观察该情况
- @Oder 注解 是用来控制 Bean 对象注入顺序
- 其参数值越小,其权重就越大,也就越先被注入到 Spring 容器中

类注解之间的关系
注意:
- @Controller、@Service、@Repository、@Configuration 均是针对 @Component 的一个扩展
- 这几个注解均能将当前类注入到 Spring 容器中,其功能基本一致
- 之所以分这么多类注解,其原因就是:
- 能让程序员看到注解之后便知道当前类的作用
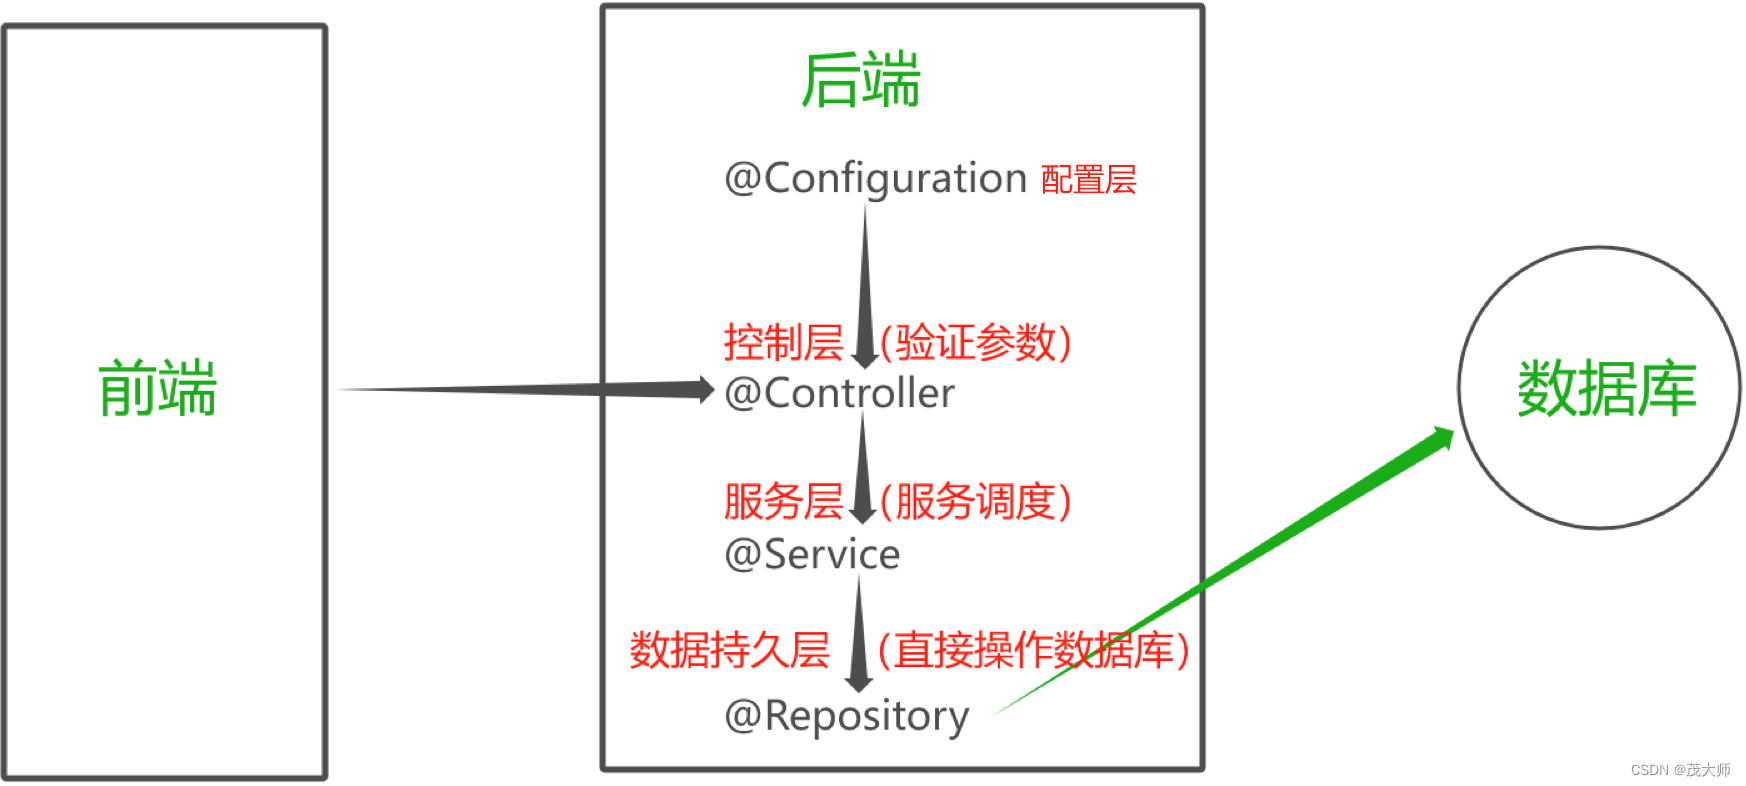
上述类注解对应着 JavaEE 标准分层(至少三层)
- 控制层
- 服务层
- 数据持久层
- 当一个类不合适放在上面三层中的任意一个时,可用 @Component 注解进行分层的扩展和补充


 197
197


 被折叠的 条评论
为什么被折叠?
被折叠的 条评论
为什么被折叠?
 到【灌水乐园】发言


