


java 创建线程
java的线程创建有三种方式:
- 继承thread类(重点)
- 实现Runnable接口(重点)
- 实现Callable接口(了解)
继承Thread类
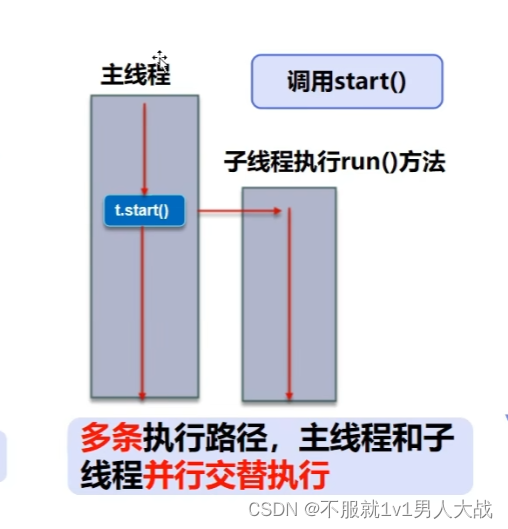
方法:继承Thread类,重写run()方法, 调用start()开启线程
代码:
//创建方式一: 继承Thread类,重写run()方法, 调用start()开启线程

//开启自己写的线程后 就跟main线程一样 是两个线程 在cpu中交替执行 啥时候执行归cpu调度 cpu说啥时候执行就啥时候执行
public class MyThread extends Thread
{
    @Override
    public void run() {
        //run方法 线程体
        for (int i = 0; i < 20; i ++)
        {
            System.out.println("run 方法");
        }
    }

    public static void main(String[] args) {

        //创建一个线程对象 调用start方法开启线程
        Thread thread = new MyThread();
        thread.start();

        //主方法 main线程(主线程)
        for (int i = 0; i < 20; i++) {
            System.out.println("main 方法");
        }
    }
}
结果:
main 方法
main 方法
main 方法
run 方法
run 方法
main 方法
main 方法
main 方法
main 方法
main 方法
main 方法
main 方法
main 方法
main 方法
main 方法
main 方法
main 方法
main 方法
main 方法
main 方法
main 方法
main 方法
run 方法
run 方法
run 方法
run 方法
run 方法
run 方法
run 方法
run 方法
run 方法
run 方法
run 方法
run 方法
run 方法
run 方法
run 方法
run 方法
run 方法
run 方法
解析:开了两个线程交替执行 开启自己写的线程后 就跟main线程一样 是两个线程 在cpu中交替执行 啥时候执行归cpu调度 cpu说啥时候执行就啥时候执行
再看下列代码:
public class MyThread extends Thread
{
    @Override
    public void run() {
        //run方法 线程体
        for (int i = 0; i < 20; i ++)
        {
            System.out.println("run 方法");
        }
    }

    public static void main(String[] args) {

        //创建一个线程对象 调用start方法开启线程
        Thread thread = new MyThread();
        thread.run();

        //主方法 main线程(主线程)
        for (int i = 0; i < 20; i++) {
            System.out.println("main 方法");
        }
    }
}
结果:
run 方法
run 方法
run 方法
run 方法
run 方法
run 方法
run 方法
run 方法
run 方法
run 方法
run 方法
run 方法
run 方法
run 方法
run 方法
run 方法
run 方法
run 方法
run 方法
run 方法
main 方法
main 方法
main 方法
main 方法
main 方法
main 方法
main 方法
main 方法
main 方法
main 方法
main 方法
main 方法
main 方法
main 方法
main 方法
main 方法
main 方法
main 方法
main 方法
main 方法
解析:在这段代码中 main方法调用的是thread.run()方法 没有调用start方法 所以没有开启主线程
那么就是这样子执行的:

实现Runnable接口方式:
方法:实现Runnable接口 重写run方法 执行线程需要丢入runnable接口实现类 调用start方法
代码:
public class MyThread3 implements Runnable {

    @Override
    public void run() {
        //run方法 线程体
        for (int i = 0; i < 200; i ++)
        {
            System.out.println("run 方法");
        }
    }

    public static void main(String[] args) {

        //创建Runnable接口的实现对象
        MyThread3 myThread3 = new MyThread3();
        //创建线程对象 通过线程对象 创建线程  代理
        Thread thread = new Thread(myThread3);
        thread.start();


        //主方法 main线程(主线程)
        for (int i = 0; i < 2000; i++) {
            System.out.println("main 方法");
        }
    }
}
结果:和方法一的第一个代码结果一样
实现Callable接口(了解)
步骤:
- 1.实现Callable接口 重写call方法
- 2.创建执行服务
- 3.提交执行
- 4.获取结果
- 5.关闭服务
代码:
public class MyThread4 implements Callable
{

    //票数
    private int ticketNums = 10;

    static Object lock = new Thread4();

    @Override
    public Boolean call() throws Exception {
        while (true)
        {
            synchronized (lock)
            {
                if (ticketNums <= 0) break;
                //模拟延迟
                try {
                    Thread.sleep(200);
                } catch (InterruptedException e) {
                    throw new RuntimeException(e);
                }
                System.out.println(Thread.currentThread().getName() + "拿到了第" + ticketNums --+ "票");
            }
        }

        return true;
    }

    public static void main(String[] args) throws ExecutionException, InterruptedException {
        Callable ticket1 = new MyThread4();
        Callable ticket2 = new MyThread4();

        //创建执行服务
        ExecutorService executorService = Executors.newFixedThreadPool(2);
        //提交执行
        Future submit1 = executorService.submit(ticket1);
        Future submit2 = executorService.submit(ticket2);

        //获取结果
        boolean res1 = (boolean)submit1.get();
        boolean res2 = (boolean)submit2.get();

        //关闭服务
        executorService.shutdown();
    }

}


 3万+
3万+


 被折叠的 条评论
为什么被折叠?
被折叠的 条评论
为什么被折叠?
 到【灌水乐园】发言


