


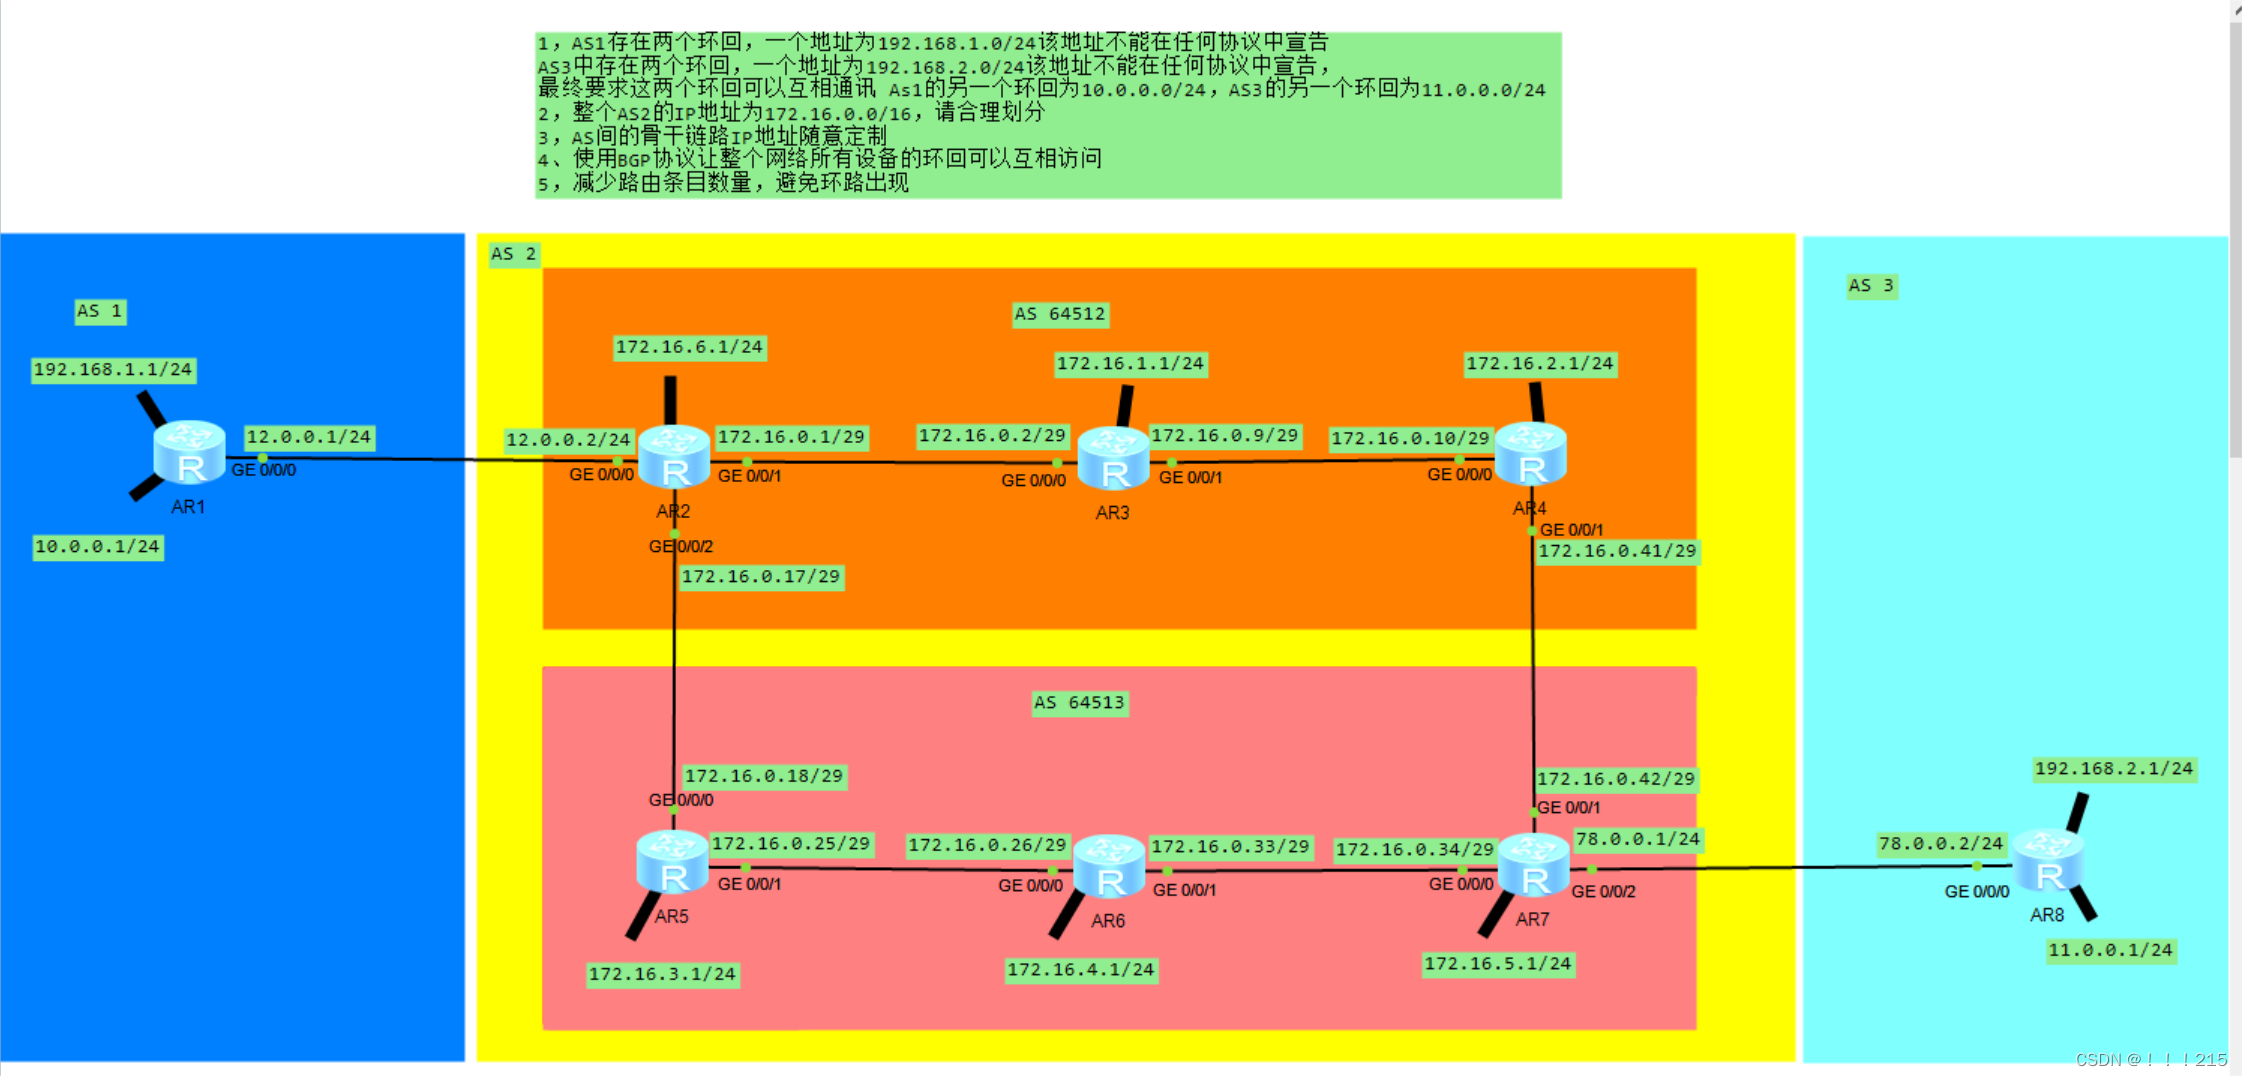
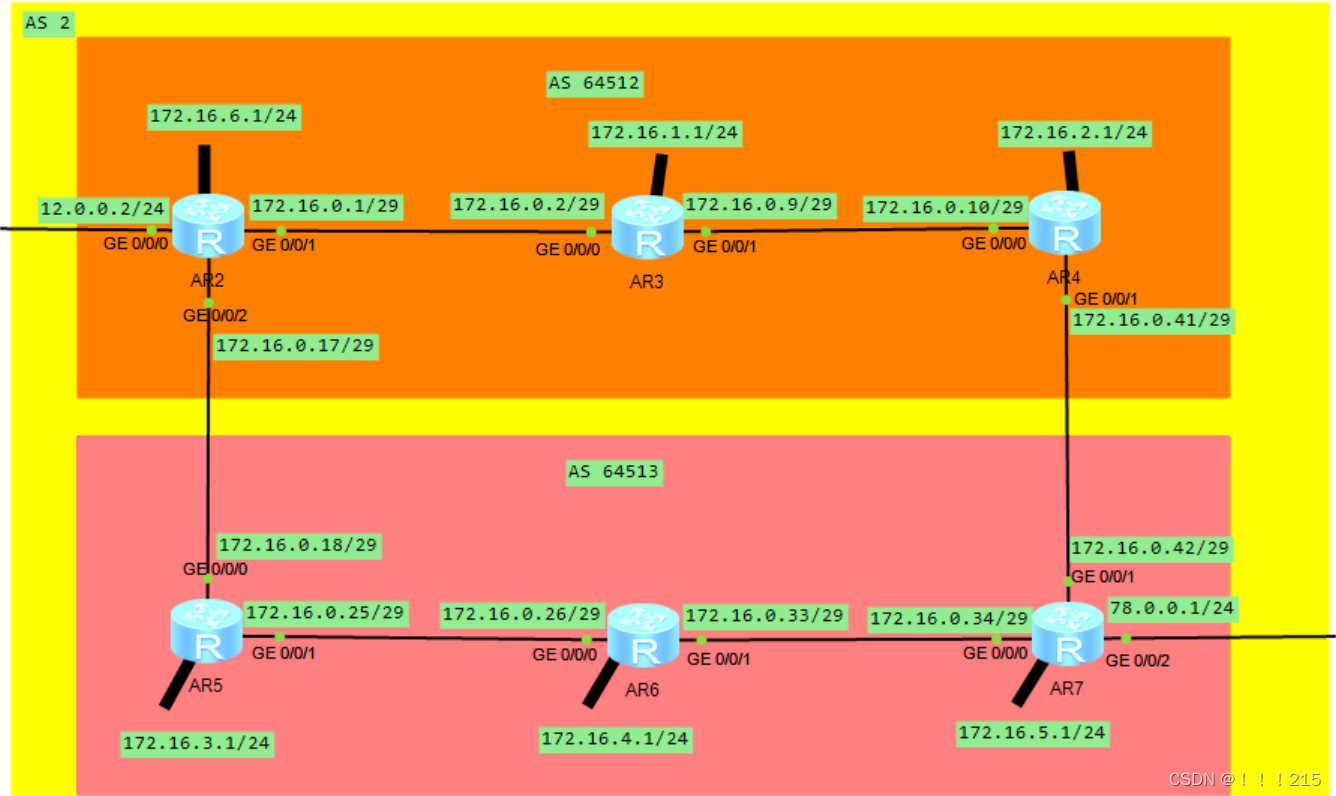
1.整个AS2的IP地址为172.16.0.0/16,请合理划分(AS间的骨干链路IP地址随意定制)
2.AS1存在两个环回,一个地址为192.168.1.0/24该地址不能在任何协议中宣告;AS3中存在两个环回,一个地址为192.168.2.0/24该地址不能在任何协议中宣告,最终要求这两个环回可以互相通讯 As1的另一个环回为10.0.0.0/24,AS3的另一个环回为11.0.0.0/24
1.首先使用ospf建立通讯连接
[r2]ospf 1 router-id 2.2.2.2
[r2-ospf-1]a 0
[r2-ospf-1-area-0.0.0.0]network 172.16.0.0 0.0.255.255
------------------------------------------------------------------
[r3]ospf 1 router-id 3.3.3.3
[r3-ospf-1]a 0
[r3-ospf-1-area-0.0.0.0]network 172.16.0.0 0.0.255.255
------------------------------------------------------------------
[r4]ospf 1 router-id 4.4.4.4
[r4-ospf-1]a 0
[r4-ospf-1-area-0.0.0.0]network 172.16.0.0 0.0.255.255
------------------------------------------------------------------
[r5]ospf 1 router-id 5.5.5.5
[r5-ospf-1]a 0
[r5-ospf-1-area-0.0.0.0]network 172.16.0.0 0.0.255.255
------------------------------------------------------------------
[r6]ospf 1 router-id 6.6.6.6
[r6-ospf-1]a 0
[r6-ospf-1-area-0.0.0.0]network 172.16.0.0 0.0.255.255
------------------------------------------------------------------
[r7]ospf 1 router-id 7.7.7.7
[r7-ospf-1]a 0
[r7-ospf-1-area-0.0.0.0]network 172.16.0.0 0.0.255.255
2. 可以看到通过ospf获取到汇总后的网段
[r2]display ip routing-table protocol ospf
Route Flags: R - relay, D - download to fib
------------------------------------------------------------------------------
Public routing table : OSPF
         Destinations : 9        Routes : 10

OSPF routing table status : <Active>
         Destinations : 9        Routes : 10

Destination/Mask    Proto   Pre  Cost      Flags NextHop         Interface

     172.16.0.8/29  OSPF    10   2           D   172.16.0.2      GigabitEthernet
0/0/1
    172.16.0.24/29  OSPF    10   2           D   172.16.0.18     GigabitEthernet
0/0/2
    172.16.0.32/29  OSPF    10   3           D   172.16.0.18     GigabitEthernet
0/0/2
    172.16.0.40/29  OSPF    10   3           D   172.16.0.2      GigabitEthernet
0/0/1
     172.16.1.1/32  OSPF    10   1           D   172.16.0.2      GigabitEthernet
0/0/1
     172.16.2.1/32  OSPF    10   2           D   172.16.0.2      GigabitEthernet
0/0/1
     172.16.3.1/32  OSPF    10   1           D   172.16.0.18     GigabitEthernet
0/0/2
     172.16.4.1/32  OSPF    10   2           D   172.16.0.18     GigabitEthernet
0/0/2
     172.16.5.1/32  OSPF    10   3           D   172.16.0.2      GigabitEthernet
0/0/1
                    OSPF    10   3           D   172.16.0.18     GigabitEthernet
0/0/2

OSPF routing table status : <Inactive>
         Destinations : 0        Routes : 0
3.建立联邦的IBGP对等体关系
[r2]bgp 64512
[r2-bgp]confederation id 2
[r2-bgp]peer 12.0.0.1 as-number 1
[r2-bgp]peer 172.16.1.1 as-number 64512
[r2-bgp]peer 172.16.1.1 connect-interface LoopBack 0
-------------------------------------------------------------
[r3]bgp 64512
[r3-bgp]confederation id 2
[r3-bgp]peer 172.16.6.1 as-number 64512
[r3-bgp]peer 172.16.6.1 connect-interface LoopBack 0
[r3-bgp]peer 172.16.2.1 as-number 64512
[r3-bgp]peer 172.16.2.1 connect-interface LoopBack 0

//------//[r3-bgp]peer 172.16.6.1 reflect-client将r3设成RR
          [r3-bgp]peer 172.16.2.1 reflect-client
-------------------------------------------------------------
[r4]bgp 64512
[r4-bgp]confederation id 2
[r4-bgp]peer 172.16.1.1 as-number 64512
[r4-bgp]peer 172.16.1.1 connect-interface LoopBack 0
-------------------------------------------------------------
[r5]bgp 64513
[r5-bgp]confederation id 2
[r5-bgp]peer 172.16.4.1 as-number 64513
[r5-bgp]peer 172.16.4.1 connect-interface LoopBack 0
[r5-bgp]peer 172.16.4.1 next-hop-local
-------------------------------------------------------------
[r6]bgp 64513
[r6-bgp]confederation id 2
[r6-bgp]peer 172.16.3.1 as-number 64513
[r6-bgp]peer 172.16.3.1 connect-interface LoopBack 0
[r6-bgp]peer 172.16.5.1 as-number 64513
[r6-bgp]peer 172.16.5.1 connect-interface LoopBack 0
[r6-bgp]peer 172.16.3.1 next-hop-local
[r6-bgp]peer 172.16.5.1 next-hop-local
>>>>>>>>>>将r6作为RR
[r6-bgp]peer 172.16.3.1 reflect-client
[r6-bgp]peer 172.16.5.1 reflect-client
-------------------------------------------------------------
[r7]bgp 64513
[r7-bgp]confederation id 2
[r7-bgp]peer 172.16.4.1 as-number 64513
[r7-bgp]peer 172.16.4.1 connect-interface LoopBack 0
[r7-bgp]peer 172.16.4.1 next-hop-local
4.建立联邦的EBGP对等体关系
[r1]bgp 1
[r1-bgp]peer 12.0.0.2 as-number 2
------------------------------------------------------------
[r2-bgp]peer 12.0.0.1 as-number 1
[r2]bgp 64512
[r2-bgp]confederation peer-as 64513
[r2-bgp]peer 172.16.0.18 as-number 64513
[r2-bgp]peer 172.16.0.18 ebgp-max-hop
------------------------------------------------------------
[r4]bgp 64512
[r4-bgp]confederation peer-as 64513
[r4-bgp]peer 172.16.0.42 as-number 64513
[r4-bgp]peer 172.16.0.42 ebgp-max-hop
------------------------------------------------------------
[r5]bgp 64513
[r5-bgp]confederation peer-as 64512
[r5-bgp]peer 172.16.0.17 as-number 64512
[r5-bgp]peer 172.16.0.17 ebgp-max-hop
------------------------------------------------------------
[r7]bgp 64513
[r7-bgp]peer 78.0.0.2 as
[r7-bgp]peer 78.0.0.2 as-number 3
---------
[r7]bgp 64513
[r7-bgp]confederation peer-as 64512
[r7-bgp]peer 172.16.0.41 as-number 64512
[r7-bgp]peer 172.16.0.41 ebgp-max-hop
------------------------------------------------------------
[r8]bgp 3
[r8-bgp]network 11.0.0.1 24
[r8-bgp]peer 78.0.0.1 as-number 2
5. 将下一跳的属性修改为自身
[r2-bgp]peer 172.16.1.1 next-hop-local
-----------------------------------------------------------
[r3-bgp]peer 172.16.6.1 next-hop-local
[r3-bgp]peer 172.16.2.1 next-hop-local
-----------------------------------------------------------
[r4-bgp]peer 172.16.1.1 next-hop-local
6.r2设置空接口防止环路并宣告AS 2内的环回(r7同样的配置)
[r2]ip route-static 172.16.0.0 16 NULL 0
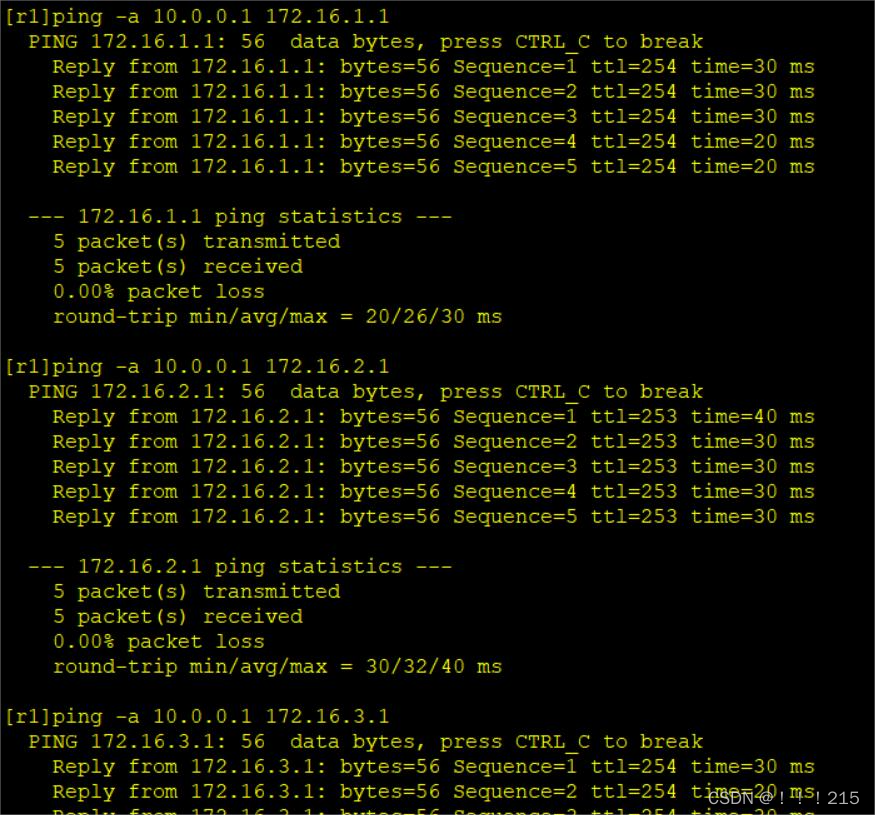
[r2-bgp]network 172.16.0.0 167.检查是否环回之间可以互相访问
8.给两个固定环回搭建虚拟隧道
[r1-Tunnel0/0/0]display this
[V200R003C00]
#
interface Tunnel0/0/0
 ip address 192.168.3.1 255.255.255.0
 tunnel-protocol gre
 source 10.0.0.1
 destination 11.0.0.1
#
return

--------------------------------------------------------------
[r8-Tunnel0/0/0]display this
[V200R003C00]
#
interface Tunnel0/0/0
 ip address 192.168.3.2 255.255.255.0
 tunnel-protocol gre
 source 11.0.0.1
 destination 10.0.0.1
#
return
9.在r1和r8上写个静态控制流量方向
[r1]ip route-static 192.168.2.0 24 192.168.3.2
[r8]ip route-static 192.168.1.0 24 192.168.3.1


 1528
1528


 被折叠的 条评论
为什么被折叠?
被折叠的 条评论
为什么被折叠?
 到【灌水乐园】发言


