


目录
1.了解Spring家族
Spring不单单只能帮助我们做一些简单的开发,它是一个家族,里面包含了多个项目, 完全可以只依靠Spring的情况下,开发任意项目,所以Spring发展到现在已经形成了一种开发的生态圈,提供了若干个项目,每个项目用于完成特定的功能,这些功能通常被称为Spring全家桶。
家族成员

Spring常用项目介绍
1.Spring Framework ——Spring项目的根基(底层框架),所有成员都基于该框架实现
2.Spring Boot—— 提高spring开发速度
3.Spring Cloud——分布式开发
4.Spring Data——提供一致的数据访问方法(平时开发一般使用Myabtis进行数据库连接)
想具体了解其他家族成员的具体功能请参考Spring官网 : Spring | Projects
2.Spring Framework体系结构
概述
Spring FrameWork 是Spring 生态圈中最基础的项目,其他项目都基于它的底层去实现,该项目为依赖关系注入、事务管理、Web应用、数据访问、消息传递等提供核心支持。
体系图
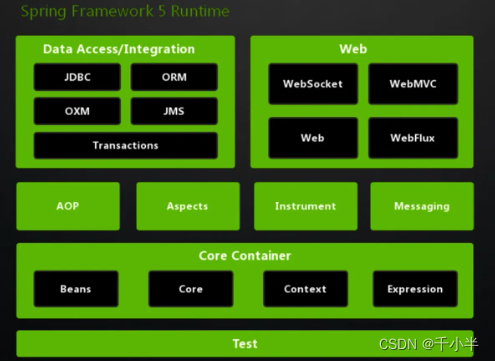
俺会将以上的体系图按顺序分为五个模块:
(1) Core Container 核心容器
-- 用于spring管理中的bean对象
(2) Aop Aspects
-- AOP: 面向切面编程
-- 对设计性概念做了一个落地实现,基于Aspects框架的制作开发了Aop
(3) Data Access/Intergration
-- 数据访问/数据集成(如:Mybatis与Spring的整合)
-- Transcations 事务 重点
(4) Web : 用于Web开发
(5) Test 单元测试与集成测试
3.Spring框架提供的核心技术
-- Spring框架两大核心技术: IoC,AOP
IOC控制反转
-- 问题: 接口直接依赖实现: 不易修改,开发成本高耦合度高
UserDao userdao=new UserDaoImpl();解决: IOC(Inversion of Control) 控制反转: 使用对象时,由主动new 产生对象转换为由外部提供对象,此过程中对象创建控制权由程序转移到外部,此思想称为控制反转。
1.IOC与Spring的关系
Spring技术对IOC思想进行了实现
-- Spring提供了一个容器,称为IOC容器,用来充当IOC思想中的外部
2.什么是Bean
-- IOC容器负责对象的创建、初始化等一系列工作,被创建或管理的对象在IoC容器中统称为Bean.
DI 依赖注入
问题: 在使用IOC创建对象以后,如果一个对象中依赖了另一个对象,就必须把依赖的对象所实现。
public class UserServiceImpl
{
   //依赖
   private UserDao userdao;
  .......
}
解决: DI (Dependency Injection)依赖注入是为了便于理解在IOC之上提供的一个新概念,这两者是一个技术.
DI:在容器中建立bean与bean之间的依赖关系的整个过程,称为依赖注入。
注入方式:
1.通过set 方法进行注入
2.通过构造方法进行注入
IoC最终实现目标
-- 目标: 解耦
-- 最终效果: 使用对象时不仅可以直接从Ioc容器中获取,并且获取到的bean已经绑定了所有的依赖关系。
IoC/DI技术实现
1.基于XML的实现
-- xml文件作为了一个第三方创建bean的方式。
XML配置文件模板获取:核心技术 (spring.io)
以角色类为例实现:
Role角色类
/**
 * 角色类
 */

public class Role {


   //姓名
   private String name;
   //内容
   private String content;

    public Role() {

    }

    public Role(String name, String content) {
        this.name = name;
        this.content = content;
    }

    public String getName() {
        return name;
    }

    public void setName(String name) {
        this.name = name;
    }

    public String getContent() {
        return content;
    }

    public void setContent(String content) {
        this.content = content;
    }

    public String say()
   {
       return  name+":"+content;
   }

}
XML配置类
<?xml version="1.0" encoding="UTF-8"?>
<beans xmlns="http://www.springframework.org/schema/beans"
       xmlns:xsi="http://www.w3.org/2001/XMLSchema-instance"
       xmlns:context="http://www.springframework.org/schema/context"
       xsi:schemaLocation="http://www.springframework.org/schema/beans
        https://www.springframework.org/schema/beans/spring-beans.xsd http://www.springframework.org/schema/context https://www.springframework.org/schema/context/spring-context.xsd">
<!--id:bean 的唯一标识符、class:bean的完全限定名-->
<bean id="role" class="cn.Role">
     <!--使用set注入方式设置属性-->
     <property name="name" value="诸葛亮"/>
     <property name="content" value="从未见过如此厚颜无耻之人!"/>
     <!--使用带参构造方法设置属性 name: 根据名称来查找、index: 根据索引顺序查找 -->
     <constructor-arg name="name" value="诸葛亮"/>
     <constructor-arg index="1" value="从未见过如此厚颜无耻之人!"></constructor-arg>
</bean>
</beans>
测试Test
-- BeanFactoey 创建Bean的工厂(称为Bean工厂)。
-- ApplicationContext 接口对BeanFactory的一个封装,功能更加强大(间接继承BeanFactory),该接口扩展了许多丰富的功能,称为Spring容器(又称IOC容器)。
-- ClassPathXmlApplicationContext: 读取xml配置文件的类
public void Test{


  public static void main(String[] args){

   ApplicationContext context=new ClassPathXmlApplicationContext("applicationContext.xml");
   //根据id获取bean对象
   Role role = (Role) context.getBean("role");
   System.out.println(role.say());


  }

}
2.基于注解的实现
-- 使用注解配置,开发人员不需要使用 XML 来描述 Bean 连接,而是移动配置 通过使用相关类、方法或 字段声明。
自动注册bean的注解:将此注解声明在相关类中,就会将类自动定义成为bean,它的id以首字母小写表示(也可通过value更改id)。
1. @Component
2.@Service 标记业务类
3.@Repository 标记dao类
4.@Controller 标记是一个控制器类
实现自动注入的注解
1.@Resource(根据方法名称注入)
2.@Autowired(根据类型注入)
3.@Qualifier(value)指定注入bean的id (与@Autowired配合使用)
(1)单个类的声明和set注入
@Component
public class Role
{
    private String name;
    private String content;

    @Value("诸葛亮")
    public void setName(String name) {
        this.name = name;
    }

    @Value("从未见过如此厚颜无耻之人!")
    public void setContent(String content) {
        this.content = content;
    }
}
单个类的声明和构造注入
@Component
public class Role
{
    private String name;
    private String content;

   public Role(@Value("诸葛亮") String name, @Value("从未见过如此厚颜无耻之人!") String
   content) {
        this.name = name;
        this.content = content;
    }
}
单个类Test测试
与XML配置文件测试相同!!!!!
(2)依赖类的自动注入
-- 实现StudentSercviceImpl 和StudentDao的自动依赖注入。
StudentServiceImpl类
@Component
public class StudentServiceImpl
{


  private StudentDao studentdao;

  //使用@Resource将dao层实现类自动注入
   @Resource(name="studentdao1")
   private StudentDao studentDao;

   public StudentServiceImpl() {

    }

   .....

}
StudentDaoImpl类
//当出现多个dao层实现类时,可以使用value来区分
@Component(value = "studentdao1")
public class StudentDaoImpl implements  StudentDao{
    @Override
    public void getStudents() {
        System.out.println("查询学生");
    }
}
xml文件扫描声明注解的类
<?xml version="1.0" encoding="UTF-8"?>
<beans xmlns="http://www.springframework.org/schema/beans"
       xmlns:xsi="http://www.w3.org/2001/XMLSchema-instance"
       xmlns:context="http://www.springframework.org/schema/context"
       xsi:schemaLocation="http://www.springframework.org/schema/beans
        https://www.springframework.org/schema/beans/spring-beans.xsd http://www.springframework.org/schema/context https://www.springframework.org/schema/context/spring-context.xsd">
   <!--扫描被声明的注解类-->
   <context:component-scan base-package="service"/>
</beans>
依赖类测试
-- 当StudentServiceImpl实例化时,容器会将这个bean的id变为首字母小写。
public class Test {

    public static void main(String[] args) {

   ApplicationContext context=new ClassPathXmlApplicationContext("applicationContext.xml");

   StudentServiceImpl studentService = (StudentServiceImpl)context.getBean("studentServiceImpl");
   studentService.getStudents();

    }
}
3.基于java的实现
-- Spring中用java类配置来代替XML配置文件的复杂性,可以声明一个java配置类对bean进行配置,主要用到两个注解@Configuration和@bean。
涉及注解说明
-- @Configuration : 标记当前类是java Config配置类,完全代替XML文件(描述类)。
-- @Bean:返回对象 将被IOC容器管理注册为bean(描述方法)。
-- @ComponentScan(basePackages={"路径"}): 在java配置文件中扫描指定包路径下的bean
话不多说上代码!!!
-- AnnotationConfigApplicationContext类 用于读取java类的配置.
(1).ApplicationConfig——java配置类
@Configuration
@ComponentScan(basePackages = {"cn"})
public class ApplicationConfig {

    @Bean()
    public Role role(){
        Role role=new Role();
        role.setName("诸葛亮");
        role.setContent("我从未如此厚颜无耻之人!");
        return role;
    }

}
Test测试单个类
   //使用Java配置文件
   ApplicationContext context = new AnnotationConfigApplicationContext(ApplicationConfig.class);
   StudentServiceImpl studentService = (StudentServiceImpl) context.getBean("studentServiceImpl");
   studentService.getStudents();
(2).依赖类的java配置
@Configuration
@ComponentScan(basePackages = {"cn"})
public class ApplicationConfig {
    @Bean
    public StudentDao studentDaoOne()
    {
        StudentDao studentDao=new StudentDaoOneImpl();
        return  studentDao;
    }

    @Bean
    public StudentDao studentDaoTwo()
    {
        StudentDao studentDao=new StudentDaoTwoImpl();
        return  studentDao;
    }

    //出现多个dao的实现类时,使用@Qualifier标识所注入的实现类
    @Bean
    public StudentService studentService(@Qualifier("studentDaoTwoImpl") StudentDao studentDao)
    {
        StudentServiceImpl studentService=new StudentServiceImpl();
        studentService.setStudentDao(studentDao);
        return  studentService;
    }
}
(3)依赖类实现自动注入
-- 通过@Resource或@Autowired注解可以实现一个自动注入,不需手动注入
业务类被依赖的StudentDao声明一个@Resource注解:
//声明bean
@Component(value = "studentService")
public class StudentServiceImpl implements StudentService {


    //studentDaoOne是此实现类的一个别名,可以通过@Conmopent自己设置
    @Resource(name="studentDaoOne")
    private StudentDao studentDao;

    public StudentServiceImpl() {
    }

    .....省略get set

}
java配置类可以省略set注入方法:
@Configuration
//扫描bean
@ComponentScan(basePackages = {"cn"})
public class ApplicationConfig {


    @Bean
    public StudentDao studentDaoOne()
    {
        StudentDao studentDao=new studentDaoOneImpl();
        return  studentDao;
    }

    @Bean
    public StudentDao studentDaoTwo()
    {
        StudentDao studentDao=new studentDaoTwoImpl();
        return  studentDao;
    }


    /**
     *
     * 省略手动注入的此方法
     */
//    @Bean
//    public StudentService studentService(@Qualifier("studentDaoOne") StudentDao studentDao)
//    {
//        StudentServiceImpl studentService=new StudentServiceImpl();
//        studentService.setStudentDao(studentDao);
//        return  studentService;
//    }
}
依赖类测试跟上述单个类一样!!!!
AOP 面向切面编程
1.概述
AOP全称Aspect Oriented Programming (面向切面/方面编程),是对oop编程的一种补充,基于IOC容器实现。
1.1没AOP技术时出现的问题:
当多个方法中都需要开关闭事务/或同样的代码调用,需要重复调用,在原位置上可能会有影响,重复调用,工作量加重。
1.2作用:
在不惊动原始设计的基础上为其功能增强,自动根据指定的方法位置插入共用代码。
1.3执行原理:
将共用的代码进行封装,利用动态代理AOP去自动调用, 便于减少系统的重复代码,降低模块间的耦合度。
1.4 核心概念:
-
代理(Proxy) : SpringAOP的核心本质是采用代理模式实现的。
-
连接点(JoinPoint):在SpringAOP中,理解为任意方法的执行
-
切入点(Ponitcut): 匹配连接点的公式,也是具有共性功能的方法描述
-
通知/增强(Advice): 若干个方法的共性功能,在切入点处执行,最终体现为一个方法
-
切面(Aspect) 描述增强与切入点的对应关系。
-
目标对象(Target): 被代理的原始对象成为目标对象
-
AOP proxy(AOP动态代理): 把切面织入到一个目标对象然后动态产生出一个代理类。
-
Weaving(织入) : 将增强处理连接到程序中的类型或目标对象上的过程。
2.切入点表达式
-- 切入点:要进行增强的方法
-- 切入点表达式: 要进行增强的方法的描述方式。
-- 切入点表达式标准格式 :切入点描述符(访问修饰符 返回值 包名.类/接口名.方法名(参数) 异常名)
3.AOP的五种增强概念及实现
-- 这里使用java代码注解来实现AOP处理!!!!
-- 想了解XML是如何实现AOP的请参考官网:Core Technologies
定义切面的前置操作:
1.@Aspect声明注解——表示此类用于AOP实现
2.@Commopent声明注解——由Spring容器来管理此bean
3.@Order——出现多个切面类时,定义增强执行的优先级(属性值越小优先级越高)
4.定义一个公共切入点:
@Aspect
@Component
@Order(1)
public class StudentAdvice  {

  //配置公共切入点,使用execution切入描述符
   @Pointcut("execution(* service.StudentService.findAllStudents(..))")
   public void pointcut() {}
  //忽略增强操作....

}
java 配置类增加注解:
1.@EnableAspectJAutoProxy——表示此配置类的AOP是由注解实现的
//标记该类是一个配置类
@Configuration
//扫描指定包下的bean/扫描切面类
@ComponentScan(basePackages = {"service","acvide"})
//声明该类的AOP是由注解实现的
@EnableAspectJAutoProxy
public class ApplicationConfig {
   ......
}增强示例:通过findAllStudent()查询所有学生目标方法来对它进行一系列的增强操作!!!!!!
该示例的目标方法:
/**
 * 业务实现类
 /
@Service
public class StudentService {

    private static List<Student> studentList=new ArrayList<>();
    static
    {
        studentList.add(new Student(1,"张三",18,"男"));
        studentList.add(new Student(2,"李四",20,"男"));
        studentList.add(new Student(3,"马五",18,"女"));
    }

    /**
     * 查找所有学生
     * @return
     */
    public List<Student> findAllStudents()
    {
        System.out.println("学生信息......");
        return  studentList;
    }

   .......
}
3.1 @Before前置增强
-- 设置当前通知方法(增强逻辑)与切入点之间的绑定关系,当前通知方法在原始切入点方法前运行。
示例
 //引入切入点
 @Before("pointcut()")
  public void before()
  {
     System.out.println("开始查询所有学生...");
  }
测试
 ApplicationContext context = new
 AnnotationConfigApplicationContext(ApplicationConfig.class);
 StudentService service = (StudentService) context.getBean("studentService");
 List<Student> allStudents = service.findAllStudents();
结果
开始查询所有学生...
学生信息......
3.2 @AfterReturning 后置增强
-- 设置当前通知方法与切入点之间的绑定关系,当前通知方法在原始切入点方法正常执行完毕后运行。
示例
 @AfterReturning("pointcut()")
  public void afterReturning()
  {
     System.out.println("查询所有学生结束....");
  }
结果
学生信息......
查询所有学生结束....
3.3 @Around 环绕增强(重点)
-- 设置当前通知方法与切入点之间的绑定关系,当前通知方法在原始切入点方法前后运行。
错误示例
   @Around("pointcut()")
   public void Around()
    {
        System.out.println("开始查询学生...");
        System.out.println("查询所有学生结束...");
    }
错误示例执行结果
开始查询学生...
查询所有学生结束...
原因:通知中如果未使用ProceedingJoinPoint对原始方法进行调用,将跳过原始方法的执行。
正确示例
    @Around("pointcut()")
    public Object around(ProceedingJoinPoint pjp) throws Throwable {
        System.out.println("开始查询学生...");
        //指定目标方法里原始代码的位置
        Object proceed = pjp.proceed();
        System.out.println("查询所有学生结束...");
        return  proceed;
    }
正确结果
开始查询学生...
学生信息......
查询所有学生结束...
@Around注意事项!!!!
1.环绕增强必须依赖形参ProceedingJoinPoint才能实现对原始方法的调用,进而实现方法调用前后同时添加增强
2.对原始方法的调用可以不接收返回值,通知方法设置成void即可,如果接收返回值,必须设定为Object类型
3.由于无法预知原始方法运行后是否会抛出异常,因此环绕方法必须抛出Throwable对象。
3.4 @After 最终增强
-- 当前通知方法在原始切入点方法中不论是否出现异常都会执行。
示例
  @After("pointcut()")
    public void after()
    {
        System.out.println("查询学生结束....");
    }
业务类查询方法增加异常
 public List<Student> findAllStudents()
    {
        System.out.println("学生信息......");
        int i=1/0;
        return  studentList;
    }
最终结果
学生信息......
查询学生结束....
Exception in thread "main" java.lang.ArithmeticException: / by zero..............
3.5 AfterThrowing 异常增强
-- 当前通知方法在原始切入点方法运行抛出异常后执行。
示例
@AfterThrowing("pointcut()")
    public void afterThrowing()
    {
        System.out.println("发生异常啦!!");
    }
执行结果
学生信息......
发生异常啦!!
Exception in thread "main" java.lang.ArithmeticException: / by zero
注意:该增强出现异常后才会被执行!!!
4.Spring事务
1.概述
-- 事务 :指一般是指要做的或所做的事情,分为自动事务或手动事务。
-- Spring事务作用: 在数据层或业务层保障一系列的数据库操作同成功同失败。
2.不开启事务的问题
-- 如转账操作: A 加钱 B 减钱,如果加钱的业务操作语句出错,B的减钱操作依旧会执行,前提是A和B在同一个事务中。
3.开启事务后
-- 同一个事务的sql语句,同成功同失败。
4.开启事务的步骤
1.DataSourceTranscationManager(JDBC提供的事务) : 定义事务管理器(在Spring配置文件中或java类中)
基于xml的配置
 <bean id="transactionManager" class="org.springframework.jdbc.datasource.DataSourceTransactionManager">
        <!--依赖数据源-->
        <property name="dataSource" ref="dataSource"/>
 </bean>
基于java的配置
  @Bean
  public DataSourceTransactionManager  transactionManager(DataSource dataSource) {
        DataSourceTransactionManager transactionManager = new DataSourceTransactionManager();
        transactionManager.setDataSource(dataSource);
        return  transactionManager;
    }
2.@EnableTranscationManager 告诉事务是注解形式
/**
 * java配置类
 */
@Configuration
//告诉事务是注解形式,将事务通过aop织入到目标方法上
@EnableTransactionManagement
@Component
@ComponentScan(basePackages = {"service"})
public class ApplicationConfig {
  .....
}
3.@Transcational 开启指定方法的事务
  @Transactional
  @Override
   public int addStudent(Student student) {
        return studentDao.addStudent(student);
   }


 被折叠的 条评论
为什么被折叠?
被折叠的 条评论
为什么被折叠?
 到【灌水乐园】发言


