


目录
2.1 BeanFactory与ApplicationContexet
1、初识Spring
1.1 Spring简介
Spring是一个为简化企业级开发而生的开源框架。
Spring是一个IOC(DI)和AOP容器框架。
IOC全称:Inversion of Control【控制反转】
将对象【万物皆对象】控制权交个Spring
DI全称:(Dependency Injection):依赖注入
AOP全称:Aspect-Oriented Programming,面向切面编程
1.2 搭建Spring框架步骤
导入jar包
  <!--导入spring-context-->

  <dependency>

      <groupId>org.springframework</groupId>

      <artifactId>spring-context</artifactId>

      <version>5.3.1</version>

  </dependency>

  <!--导入junit4.12-->

  <dependency>

      <groupId>junit</groupId>

      <artifactId>junit</artifactId>

      <version>4.12</version>

      <scope>test</scope>

  </dependency>
编写核心配置文件
配置文件名称:applicationContext.xml【beans.xml或spring.xml】
配置文件路径:src/main/resources
示例代码
 <?xml version="1.0" encoding="UTF-8"?>

    <beans xmlns="http://www.springframework.org/schema/beans"

           xmlns:xsi="http://www.w3.org/2001/XMLSchema-instance"

           xsi:schemaLocation="http://www.springframework.org/schema/beans http://www.springframework.org/schema/beans/spring-beans.xsd">


        <!-- 将对象装配到IOC容器中-->

        <bean id="stuZhenzhong" class="com.atguigu.spring.pojo.Student">

            <property name="stuId" value="101"></property>

            <property name="stuName" value="zhenzhong"></property>

        </bean>


    </beans>
使用核心类库
@Test

  public void testSpring(){

          //使用Spring之前

  //        Student student = new Student();


          //使用Spring之后

          //创建容器对象

          ApplicationContext iocObj =

                  new ClassPathXmlApplicationContext("applicationContext.xml");

          //通过容器对象,获取需要对象

          Student stuZhenzhong = (Student)iocObj.getBean("stuZhenzhong");

          System.out.println("stuZhenzhong = " + stuZhenzhong);


      }
1.3 Spring特性
非侵入式:基于Spring开发的应用中的对象可以不依赖于Spring的API。
容器:Spring是一个容器,因为它包含并且管理应用对象的生命周期。
组件化:Spring实现了使用简单的组件配置组合成一个复杂的应用。在 Spring 中可以使用XML和Java注解组合这些对象。
一站式:在IOC和AOP的基础上可以整合各种企业应用的开源框架和优秀的第三方类库(实际上Spring 自身也提供了表述层的SpringMVC和持久层的JDBCTemplate)。
1.4 Spring中getBean()三种方式
getBean(String beanId):通过beanId获取对象
不足:需要强制类型转换,不灵活
getBean(Class clazz):通过Class方式获取对象
不足:容器中有多个相同类型bean的时候,会报如下错误:
expected single matching bean but found 2: stuZhenzhong,stuZhouxu
getBean(String beanId,Clazz clazz):通过beanId和Class获取对象
推荐使用
注意:框架默认都是通过无参构造器,帮助我们创建对象。
所以:如提供对象的构造器时,一定添加无参构造器
1.5 bean标签详解
属性
id:bean的唯一标识
class:定义bean的类型【class全类名】
子标签
property:为对象中属性赋值【set注入】
name属性:设置属性名称
value属性:设置属性数值
2、SpringIOC底层实现
IOC:将对象的控制器反转给Spring
2.1 BeanFactory与ApplicationContexet
BeanFactory:IOC容器的基本实现,是Spring内部的使用接口,是面向Spring本身的,不是提供给开发人员使用的。
ApplicationContext:BeanFactory的子接口,提供了更多高级特性。面向Spring的使用者,几乎所有场合都使用ApplicationContext而不是底层的BeanFactory。
2.2 图解IOC类的结构
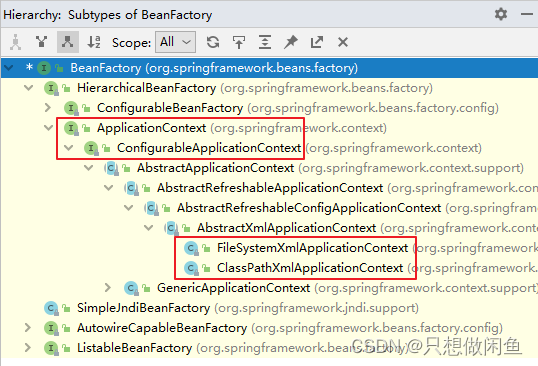
BeanFactory:Spring底层IOC实现【面向Spring框架】
ApplicationContext:面向程序员
ConfigurableApplicationContext:提供关闭或刷新容器对象方法
ClassPathXmlApplicationContext:基于类路径检索xml文件
AnnotationConfigApplicationContext:基于注解创建容器对象
FileSystemXmlApplicationContext:基于文件系统检索xml文件
3、Spring依赖注入数值问题【重点】
3.1 字面量数值
数据类型:基本数据类型及包装类、String
语法:value属性或value标签
3.2 CDATA区
语法:\<![CDATA[]]>
作用:在xml中定义特殊字符时,使用CDATA区
3.3 外部已声明bean及级联属性赋值
语法:ref
注意:级联属性更改数值会影响外部声明bean【ref赋值的是引用】
示例代码
 <bean id="dept1" class="com.atguigu.pojo.Dept">

      <property name="deptId" value="1"></property>

      <property name="deptName" value="研发部门"></property>

  </bean>


  <bean id="empChai" class="com.atguigu.pojo.Employee">

      <property name="id" value="101"></property>

      <property name="lastName" value="chai"></property>

      <property name="email" value="chai@163.com"></property>

      <property name="salary" value="50.5"></property>

      <property name="dept" ref="dept1"></property>

      <property name="dept.deptName" value="财务部门"></property>

  </bean>
3.4 内部bean
概述
内部类:在一个类中完整定义另一个类,当前类称之为内部类
内部bean:在一个bean中完整定义另一个bean,当前bean称之为内部bean
注意:内部bean不会直接装配到IOC容器中
示例代码
  <!--    测试内部bean-->

  <bean id="empXin" class="com.atguigu.pojo.Employee">

      <property name="id" value="102"></property>

      <property name="lastName" value="xx"></property>

      <property name="email" value="xx@163.com"></property>

      <property name="salary" value="51.5"></property>

      <property name="dept">

          <bean class="com.atguigu.pojo.Dept">

              <property name="deptId" value="2"></property>

              <property name="deptName" value="人事部门"></property>

          </bean>

      </property>

  </bean>
3.5 集合
List
  <!--    测试集合-->

      <bean id="dept3" class="com.atguigu.pojo.Dept">

          <property name="deptId" value="3"></property>

          <property name="deptName" value="程序员鼓励师"></property>

          <property name="empList">

              <list>

                  <ref bean="empChai"></ref>

                  <ref bean="empXin"></ref>

  <!--                <bean></bean>-->

              </list>

          </property>

      </bean>


      <!--    测试提取List-->

      <util:list id="empList">

          <ref bean="empChai"></ref>

          <ref bean="empXin"></ref>

      </util:list>

      <bean id="dept4" class="com.atguigu.pojo.Dept">

          <property name="deptId" value="4"></property>

          <property name="deptName" value="运营部门"></property>

          <property name="empList" ref="empList"></property>

      </bean>
Map
 <!--    测试Map-->

  <bean id="dept5" class="com.atguigu.pojo.Dept">

      <property name="deptId" value="5"></property>

      <property name="deptName" value="采购部门"></property>

      <property name="empMap">

          <map>

              <entry key="101" value-ref="empChai"></entry>

              <entry>

                  <key><value>103</value></key>

                  <ref bean="empChai"></ref>

              </entry>

              <entry>

                  <key><value>102</value></key>

                  <ref bean="empXin"></ref>

              </entry>

          </map>

      </property>

  </bean>


  <util:map id="empMap">

      <entry key="101" value-ref="empChai"></entry>

      <entry>

          <key><value>103</value></key>

          <ref bean="empChai"></ref>

      </entry>

      <entry>

          <key><value>102</value></key>

          <ref bean="empXin"></ref>

      </entry>

  </util:map>

  <bean id="dept6" class="com.atguigu.pojo.Dept">

      <property name="deptId" value="106"></property>

      <property name="deptName" value="后勤部门"></property>

      <property name="empMap" ref="empMap"></property>

  </bean>
4、Spring依赖注入方式【基于XML】
为属性赋值方式:
-
通过xxxset()方法:这是一种常见的方式,在类中提供了一系列的set方法,用于设置类的属性值。例如,如果有一个属性名为
name,那么可能会有一个名为setName()的方法用于设置name属性的值。 -
通过构造器:另一种常见的方式是通过类的构造器来传递属性值。在构造对象时,通过构造器的参数列表将属性值传递给对象。这种方式可以在对象被创建时一次性地设置属性值,使得对象的状态在创建后就被确定下来。
-
反射:反射是一种高级的Java特性,允许在运行时检查类、获取类的信息以及动态调用类的方法和操作类的属性。通过反射,可以通过类的
Field对象来设置对象的属性值,无论这些属性的可见性如何。
4.1 set注入
通过在XML配置文件中使用<property>标签来进行属性注入。在这种方式中,你可以指定属性的名称,并通过value属性或ref属性为属性赋值。如果是基本数据类型或字符串等简单类型,可以使用value属性直接赋值;如果是引用其他bean,可以使用ref属性指定引用的bean的id。
语法:\<property>
4.2 构造器注入
通过在XML配置文件中使用<constructor-arg>标签来进行构造器注入。与set注入类似,你可以在构造对象时指定构造器的参数,并通过value属性或ref属性为构造器参数赋值。这种方式适用于在创建对象时将属性值通过构造器传递给对象。
语法:\<constructor-arg>
4.3 p名称空间注入
导入名称空间:xmlns:p="http://www.springframework.org/schema/p"
语法:<bean p:xxx>
示例代码
  <bean id="stuZhouxu" class="com.atguigu.spring.pojo.Student">

      <property name="stuId" value="102"></property>

      <property name="stuName">

          <value><![CDATA[<<zhouxu>>]]></value>

      </property>

  </bean>


  <bean id="stuZhiFeng" class="com.atguigu.spring.pojo.Student">

      <constructor-arg name="stuId" value="103"></constructor-arg>

      <constructor-arg name="stuName" value="zhifeng"></constructor-arg>

  </bean>


  <bean id="stuXiaoxi"

        class="com.atguigu.spring.pojo.Student"

        p:stuId="104"

        p:stuName="xiaoxi"></bean>
5、Spring管理第三方bean
5.1 Spring管理druid步骤
导入jar包
  <!--导入druid的jar包-->

          <dependency>

              <groupId>com.alibaba</groupId>

              <artifactId>druid</artifactId>

              <version>1.1.10</version>

          </dependency>

          <!--导入mysql的jar包-->

          <dependency>

              <groupId>mysql</groupId>

              <artifactId>mysql-connector-java</artifactId>

              <version>5.1.37</version>

  <!--            <version>8.0.26</version>-->

          </dependency>
编写db.properties配置文件
properties
  #key=value

  db.driverClassName=com.mysql.jdbc.Driver

  db.url=jdbc:mysql://localhost:3306/db220106

  db.username=root

  db.password=root
编写applicationContext.xml相关代码
  <!--    加载外部属性文件db.properties-->

  <context:property-placeholder location="classpath:db.properties"></context:property-placeholder>


  <!--    装配数据源-->

  <bean id="dataSource" class="com.alibaba.druid.pool.DruidDataSource">

      <property name="driverClassName" value="${db.driverClassName}"></property>

      <property name="url" value="${db.url}"></property>

      <property name="username" value="${db.username}"></property>

      <property name="password" value="${db.password}"></property>

  </bean>
测试
  @Test

  public void testDruidDataSource() throws Exception{

      //获取容器对象

      ApplicationContext ioc =

              new ClassPathXmlApplicationContext("applicationContext_druid.xml");


      DruidDataSource dataSource = ioc.getBean("dataSource", DruidDataSource.class);

      System.out.println("dataSource = " + dataSource);


      DruidPooledConnection connection = dataSource.getConnection();

      System.out.println("connection = " + connection);


  }
6、Spring中FactoryBean
6.1 Spring中两种bean
一种是普通bean:
普通bean是指在Spring容器中以普通的方式配置和管理的bean。这些bean通常是通过在XML配置文件或Java配置类中定义并注册的,它们的创建和初始化由Spring容器负责。
另一种是工厂bean【FactoryBean】:
工厂bean是一种特殊的bean,它实现了org.springframework.beans.factory.FactoryBean接口。与普通bean不同,工厂bean负责创建其他bean实例,允许程序员在bean的创建过程中进行参数化或自定义。使用工厂bean可以更灵活地控制bean的创建逻辑和初始化过程。
作用:如需我们程序员参数到bean的创建时,使用FactoryBean
6.2 FactoryBean使用步骤
实现FactoryBean接口:创建一个类并实现FactoryBean接口,该接口要求实现getObject()方法来返回所创建的bean实例,并可选择实现getObjectType()方法来指定工厂bean所创建的对象类型。
重写方法【三个】:在实现FactoryBean接口的类中,需要重写getObject()方法来指定如何创建所需的bean实例。可选地,也可以重写getObjectType()方法来提供所创建的bean的类型。
装配工厂bean:将实现了FactoryBean接口的类配置到Spring容器中,可以通过XML配置文件或Java配置类进行装配。
测试
示例代码:
示例代码:
import org.springframework.beans.factory.FactoryBean;

// 实现FactoryBean接口
public class MyBeanFactory implements FactoryBean<MyBean> {

    // 重写getObject()方法,指定创建bean的逻辑
    @Override
    public MyBean getObject() throws Exception {
        // 这里可以根据需要进行一些自定义的逻辑,然后创建并返回所需的bean实例
        return new MyBean();
    }

    // 可选地重写getObjectType()方法,指定所创建的bean的类型
    @Override
    public Class<?> getObjectType() {
        return MyBean.class;
    }
}
在Spring配置文件中装配工厂bean:
<bean id="myBeanFactory" class="com.example.MyBeanFactory"/>
在测试代码中获取并使用工厂bean:
import org.springframework.context.ApplicationContext;
import org.springframework.context.support.ClassPathXmlApplicationContext;

public class Main {
    public static void main(String[] args) {
        // 加载Spring配置文件
        ApplicationContext context = new ClassPathXmlApplicationContext("applicationContext.xml");

        // 获取工厂bean实例
        MyBean myBean = context.getBean("myBeanFactory", MyBean.class);

        // 使用工厂创建的bean实例
        myBean.doSomething();
    }
}


 63万+
63万+


 被折叠的 条评论
为什么被折叠?
被折叠的 条评论
为什么被折叠?
 到【灌水乐园】发言


