


笔者之前在参加比赛的时候和同学合作制做过这样一款语音控制的机器狗,有幸获得过省奖:
In one competition, I cooperated with my team members to make such a voice-control machine dog, and finally won the provincial award:
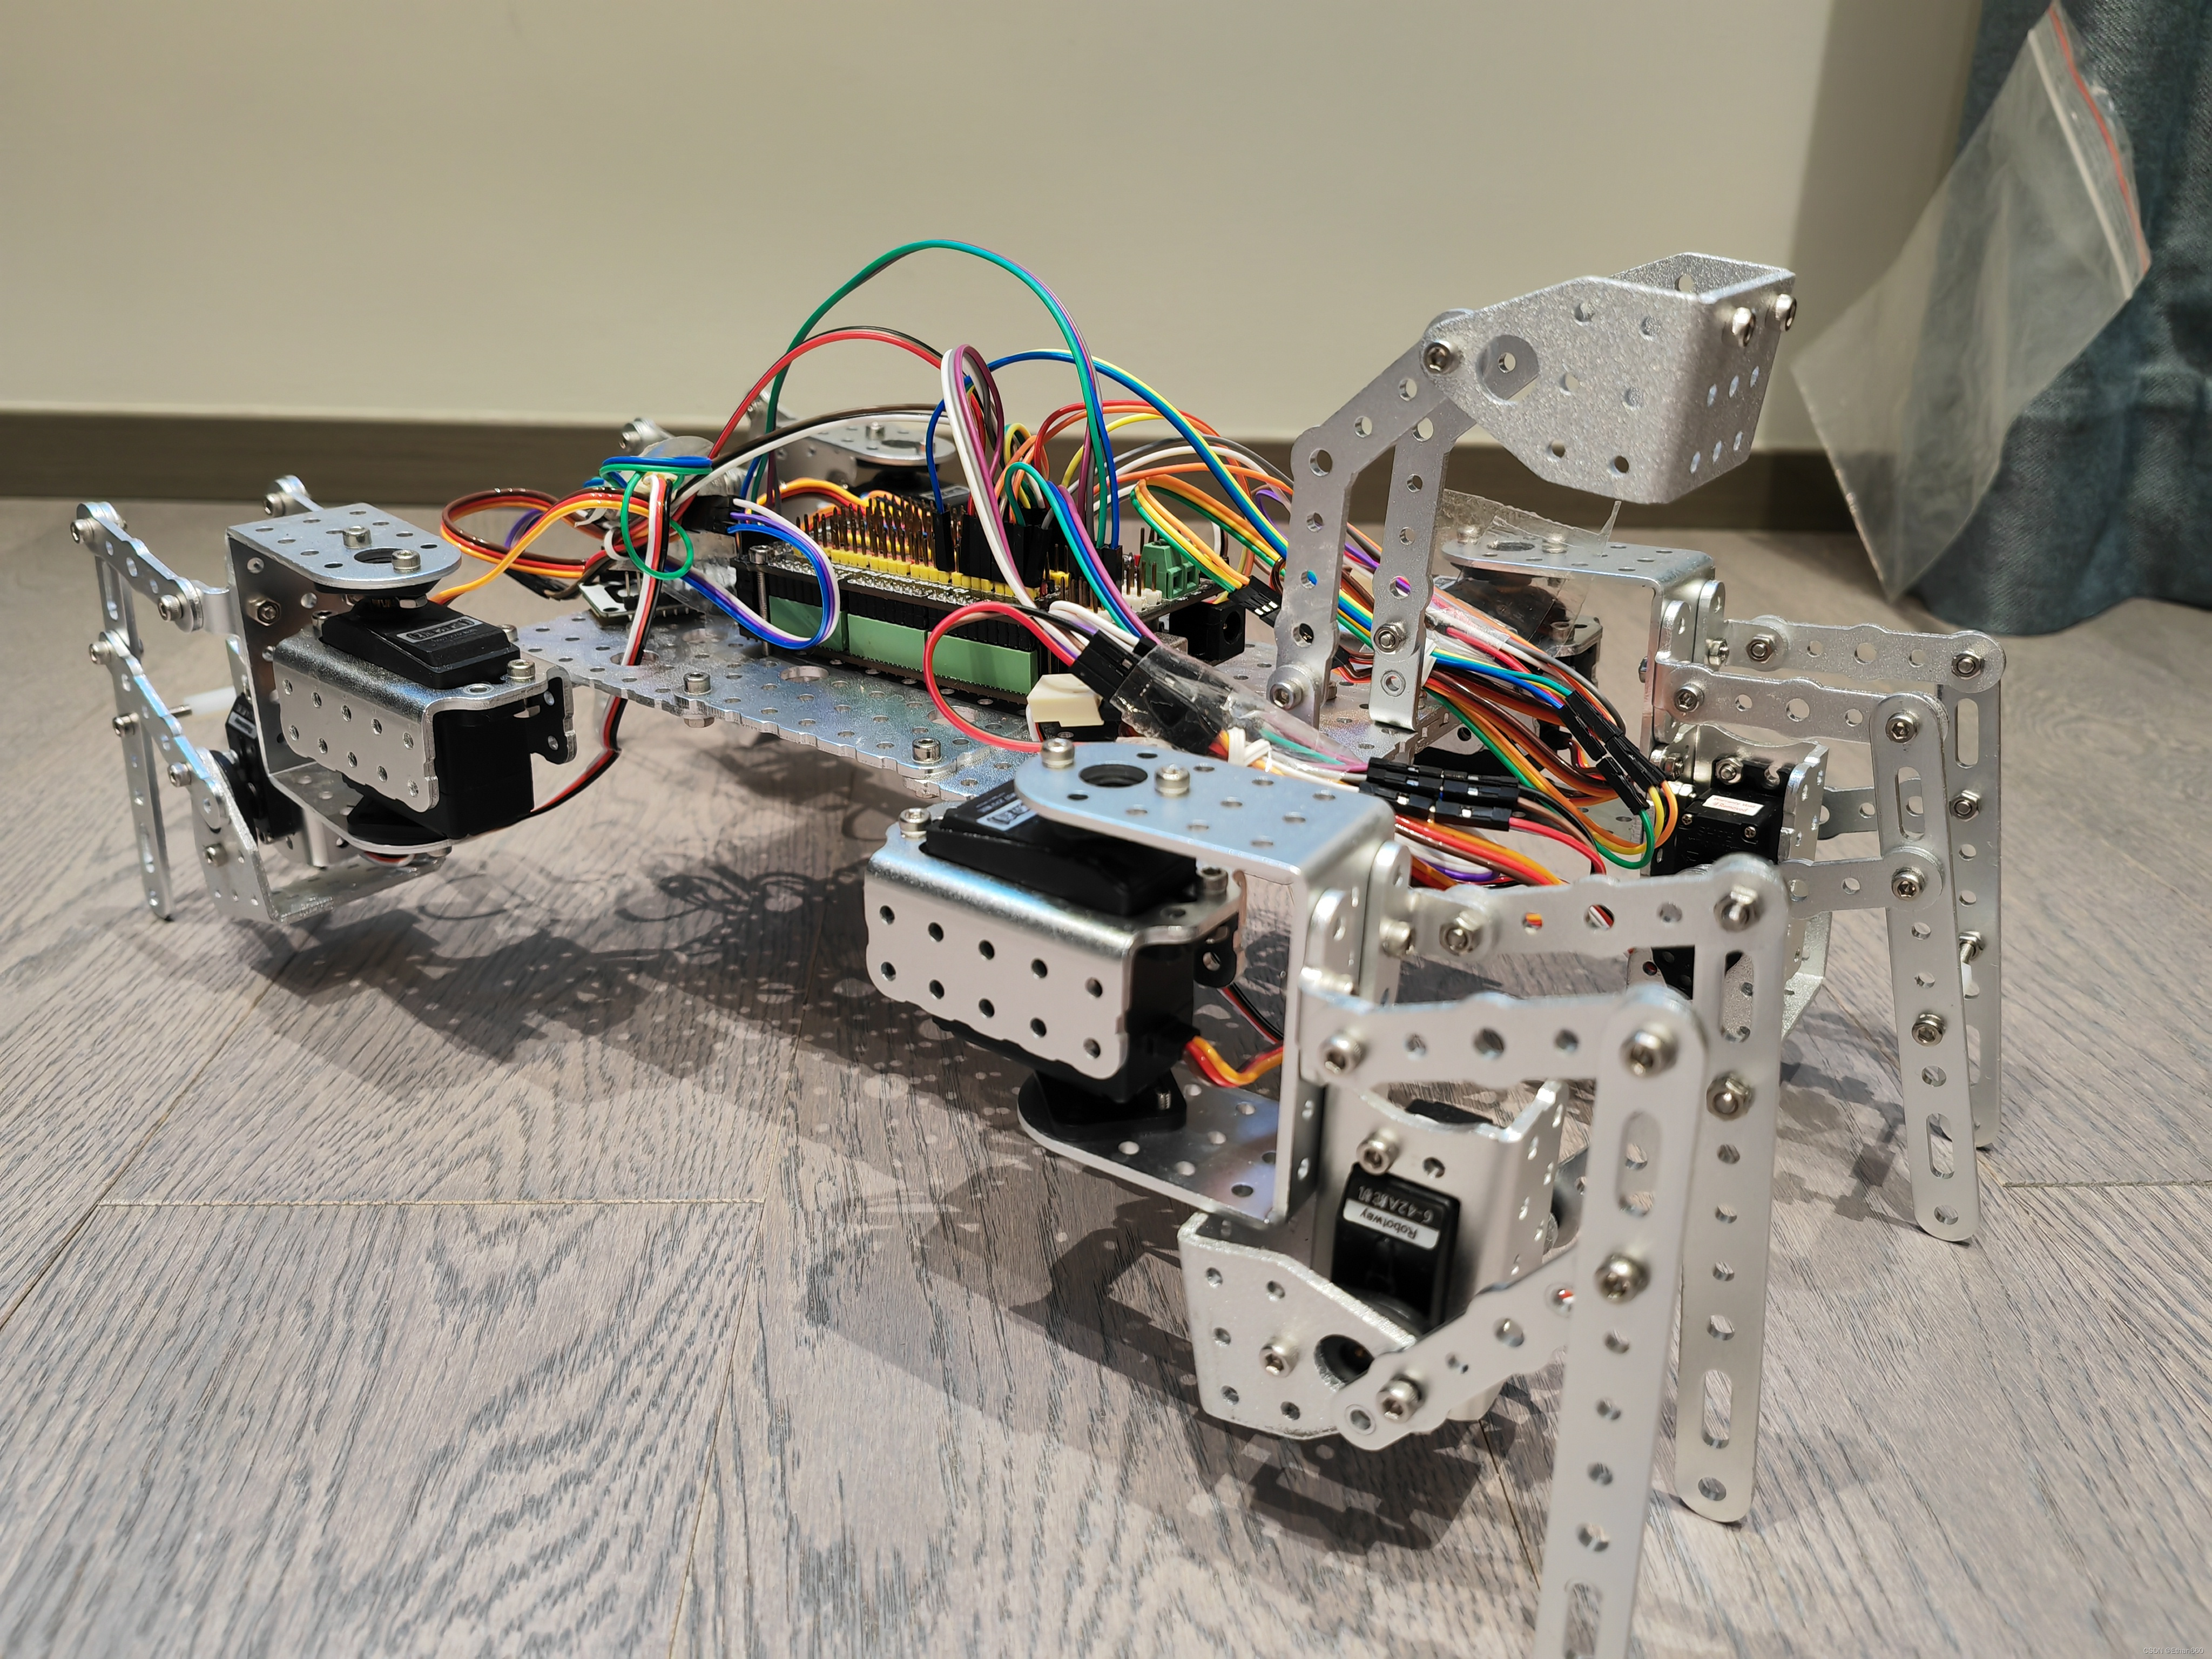
(样子有点原始
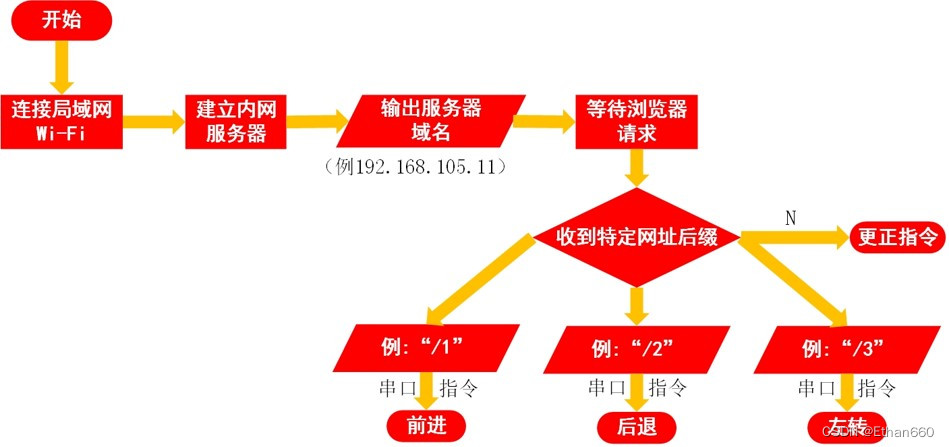
机器狗的工作过程如下:
1、使用NodeMcu搭建内网服务器
2、python调用百度语音API的接口,录音并上传音频并把回传过来的识别结果与设定字典比对,比对成功通过浏览器打开对应网址(向服务器发送特定请求)
3、服务器(NodeMcu)接收到信息后用串口发送指令给Arduino,最后Arduino控制各个舵机完成设定好的动作
Main work process is below:
- Build a web server with NodeMcu
- Call voice recognition API by Baidu, record the voice command and send it through the API, wait until our python program receives the result.
- If the result successfuly match a member in the command dictionary, then a specific website will be opened with Selenium automatically, that is, sending a request to the web server.
- When the server receives a specific request, it will send a code to Arduino MCU. Finally, MCU controls multiple servos to drive the dog.
考虑到网上用百度API和ESP8266通过搭建服务器实现语音控制的内容很少,而且大多没有完整地讲解控制流程,因此我们小组也花了很多功夫摸索,遇到了很多困难也想了很多办法,最终才把这个机器狗的完整功能做出来。为了让后面感兴趣的小伙伴更快更好地入手类似的项目,笔者打算以组长的身份(偷笑)将机器狗工作的各个部分核心代码作一个展示和原理说明。
才疏学浅,若有遗漏和可以改进的地方也请各位大佬指正!
1、NodeMcu服务器搭建
服务器相当于机器狗的大脑,是信息交互的枢纽。
我们使用NodeMcu的CP2102版本进行服务器搭建。NodeMcu是一款搭载乐鑫ESP8266-WiFi芯片的开源物联网平台,成本低,运行速度快,并且可以多平台开发。在这里使用兼容的Arduino IDE进行代码编写和烧录。
这部分代码参考了太极创客团队制作的物联网开发教程 用ESP8266搭建网络服务器,非常感谢他们的努力和付出。代码中引入的库需要自行下载。
#include <ESP8266WiFi.h>        // 本程序使用 ESP8266WiFi库
#include <ESP8266WiFiMulti.h>   //  ESP8266WiFiMulti库
#include <ESP8266WebServer.h>   //  ESP8266WebServer库

ESP8266WiFiMulti wifiMulti;     // 建立ESP8266WiFiMulti对象,对象名称是 'wifiMulti'
ESP8266WebServer esp8266_server(80);// 建立网络服务器对象,该对象用于响应HTTP请求。监听端口(80)

void setup(void){
  Serial.begin(9600);   // 注意,nodemcu要和2560接在一起,mcu上的tx接2560上的tx脚
  pinMode(LED_BUILTIN, OUTPUT); //设置内置LED引脚为输出模式以便控制LED
  wifiMulti.addAP("WiFi名称", "WiFi密码"); // 将需要连接的一系列WiFi ID和密码输入这里
  int i = 0;
  while (wifiMulti.run() != WL_CONNECTED) {
  delay(1000);
  }
  esp8266_server.begin();                           // 启动网站服务
  esp8266_server.on("/", HTTP_GET, handleRoot);     // 设置服务器根目录即'/'的函数'handleRoot'
  esp8266_server.on("/LED", HTTP_POST, handleLED); // 设置处理LED控制请求的函数'handleLED'
  esp8266_server.on("/1",HTTP_GET,handle1);
  esp8266_server.on("/2",HTTP_GET,handle2);
  esp8266_server.on("/3",HTTP_GET,handle3);
  esp8266_server.on("/4",HTTP_GET,handle4);
  esp8266_server.on("/5",HTTP_GET,handle5);  //从1至5分别对应接收到某个动作后会执行的函数
  esp8266_server.onNotFound(handleNotFound);        // 设置处理404情况的函数'handleNotFound'
}

void loop(void){
  esp8266_server.handleClient();                     // 检查http服务器访问
}
 void handleRoot() {
  esp8266_server.send(200, "text/html", "<form action=\"/LED\" method=\"POST\"><input type=\"submit\" value=\"Toggle LED\"></form>");
}                                                     //处理LED控制请求的函数'handleLED'
void handleLED() {
  digitalWrite(LED_BUILTIN,!digitalRead(LED_BUILTIN));// 改变LED的点亮或者熄灭状态
  esp8266_server.sendHeader("Location","/");          // 跳转回页面根目录
  esp8266_server.send(303);                           // 发送Http相应代码303 跳转

}
void handle1()                                        //设置接收到后缀为”/1"后执行的函数
{
 esp8266_server.send(200,"text/html","<font size=\"7\"><font
 color=\"red\">straight</font><br>");  //向服务器发送HTML语句,意为显示一段字号为7的红色文字
 Serial.print(0);                      //串口发送指令“0”给Arduino,下同
  }
void handle2()
{
  esp8266_server.send(200,"text/html","<font size=\"7\"><font color=\"red\">left</font><br>");
  Serial.print(1);
  }
// 设置处理404情况的函数'handleNotFound'
void handle3()
{
  esp8266_server.send(200,"text/html","<font size=\"7\"><font color=\"red\">right</font><br>");
  Serial.print(2);
  }
void handle4()
{
  esp8266_server.send(200,"text/html","<font size=\"7\"><font color=\"red\">shakehead</font><br>");
  Serial.print(3);
  }
void handle5()
{
  esp8266_server.send(200,"text/html","<font size=\"7\"><font color=\"red\">light</font><br>");
  Serial.print(4);
  }
void handleNotFound(){
  esp8266_server.send(404, "text/plain", "404: Not found"); // 发送 HTTP 状态 404 (未找到页面) 并向浏览器发送文字 "404: Not found"
}
需要注意的是,每一个NodeMcu服务器搭建成功之后都有一个IP地址,而这个地址已经打印在串口监视器当中,它对我们后续的开发过程而言非常重要,务必记住。
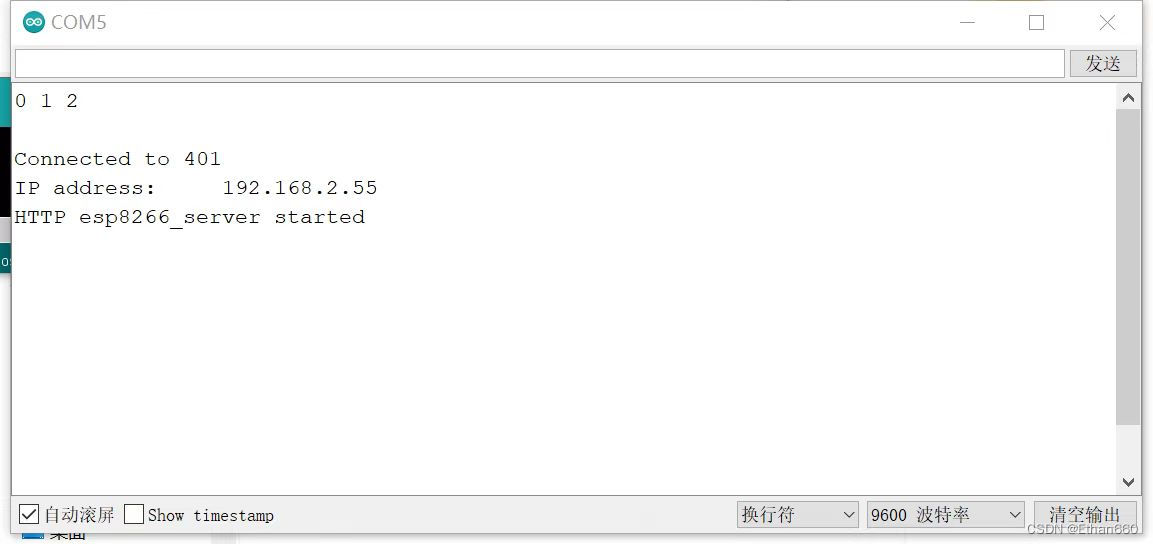
如果有小伙伴打开监视器后没有显示以上内容,记得按一下开发板上的复位按钮再等待几秒就会显示了。
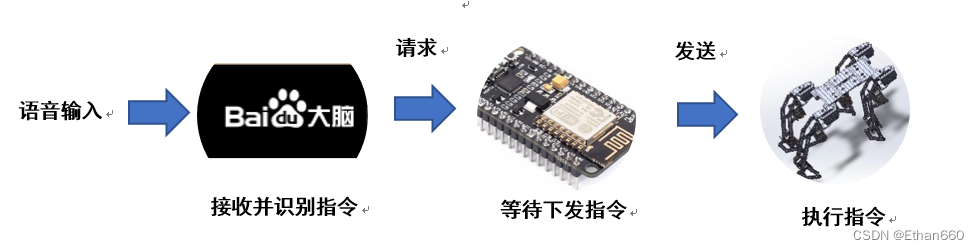
总之就是,搭建服务器等待特定请求,做出反应即可,上流程图:
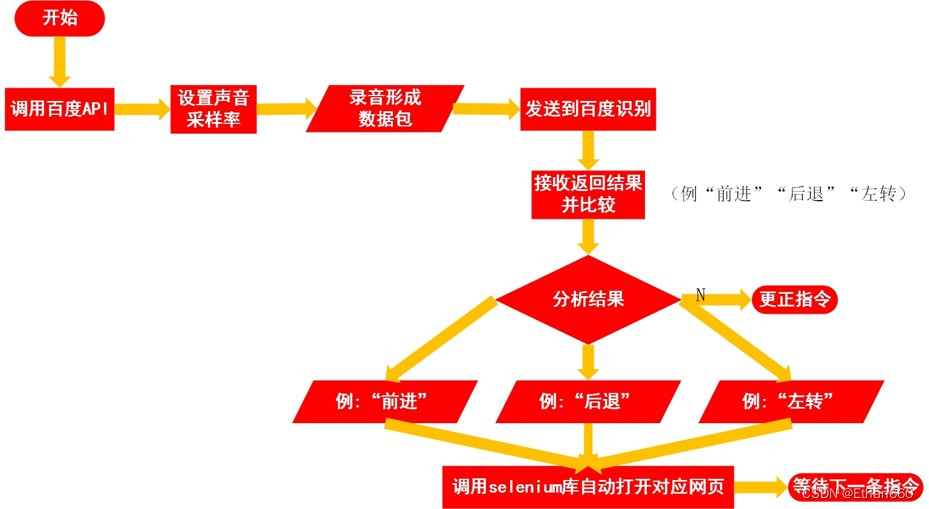
2、Python语音识别部分
使用Python调用百度语音API的教程在C站已经有很多了,这里不再介绍。
比较有意思的是如何将对比后的结果转变成网络请求发出去,在这里就需要用到一个叫做Selenium的自动化测试工具,使用Selenium库可以自动控制浏览器打开指定的网页,正好适合发送我们的网络请求。要注意的是使用Selenium库需要事先下载浏览器的驱动文件并存放在Python源文件夹内。下面的代码以谷歌的Chrome浏览器为例。Chrome各版本驱动下载
from selenium import webdriver

option = webdriver.ChromeOptions()
option.add_experimental_option("detach", True)

driver = webdriver.Chrome(chrome_options=option)
driver.get('http://espurl+特定后缀')
使用方法也非常简单,在.get()方法后面加上URL,运行后就可以自动打开该网页了。
以下是显示效果:

注意语言命令和内部指令的对应关系。
espurl='http://服务器根地址'  //向服务器发送网页响应请求
dicts=['前进','左转','右转','后退','闪烁']    //以列表形式设置内部指令方便比对
上流程图:
3、Arduino端
Arduino单片机与NodeMcu通过串口直接相连,起到动作执行的作用。上文提到对于每一个指令NodeMcu都会向串口发送一个数字(ASCII码),在接收到串口发来的信号之后会驱动舵机转动,带动机器狗运动。
#include <Servo.h>

Servo servo1;  //定义舵机对象(不超过8个)
Servo servo2;
Servo servo3;
Servo servo4;
Servo servo5;
Servo servo6;
Servo servo7;
Servo servo8;
void setup()
{
  servo1.attach(13);
  servo2.attach(10);
  servo3.attach(12);
  servo4.attach(11);  // 设置舵机连接口
  servo5.attach(9);
  servo6.attach(8);
  servo7.attach(7);
  servo8.attach(5);
  Serial.begin(9600);  //开启串口通讯
  pinMode(LED_BUILTIN,OUTPUT);  //LED灯设置为输出模式
}
void straight()  //篇幅限制,这里只展示“前进”的舵机运动内容
{
  int pos = 0;
  int i = 0;
  while (i<10)
  {
  for(pos = 0; pos < 180; pos += 1)  // goes from 0 degrees to 180 degrees
  {                                  // in steps of 1 degree
    servo2.write(pos);
    servo4.write(pos);// tell servo to go to position in variable 'pos'
    delay(10);                       // waits 15ms for the servo to reach the position
  }
  for(pos = 180; pos>=1; pos-=1)     // goes from 180 degrees to 0 degrees
  {
    servo2.write(pos);
    servo4.write(pos);// tell servo to go to position in variable 'pos'
    delay(10);                       // waits 15ms for the servo to reach the position
  }
  for(pos = 0; pos < 180; pos += 1)  // goes from 0 degrees to 180 degrees
  {                                  // in steps of 1 degree
    servo1.write(pos);
    servo3.write(pos);// tell servo to go to position in variable 'pos'
    delay(10);                       // waits 15ms for the servo to reach the position
  }
  for(pos = 180; pos>=1; pos-=1)     // goes from 180 degrees to 0 degrees
  {
    servo1.write(pos);
    servo3.write(pos);// tell servo to go to position in variable 'pos'
    delay(10);                       // waits 15ms for the servo to reach the position
  }
  i++;
  }
}

void loop()
{
  if (Serial.available()>0)   //如果接收到内容则读取
  {
    int pos=Serial.read();  //读取串口内容的ASCII码
     function(pos);
     delay(1000);
  }
}

void function(int input) //
{
  switch(input){
  case 48:straight();break;//接收到前进信号则执行straight()函数,下同
  case 49:left();break;
  case 50:right();break;
  case 51:back();break;
  case 52:light();break;
  }
}
4、总结
机器狗的功能实现流程就是这样:
这是一篇开学前夕的空闲时间整理的博客,希望对大家有所帮助。


 被折叠的 条评论
为什么被折叠?
被折叠的 条评论
为什么被折叠?
 到【灌水乐园】发言


