


在鸿蒙应用开发中,若是遇到布局相对复杂的场景,往往需要嵌套许多层组件,去还原UI图的效果,若是能够掌握相对布局容器的使用,对于复杂的布局场景,可直接减少组件嵌套,且随心所欲完成复杂场景的布局。
官方地址:
RelativeContainer-行列与堆叠-ArkTS组件-ArkUI(方舟UI框架)-应用框架 - 华为HarmonyOS开发者
关键属性
RelativeContainer能够帮我们随心所欲完成布局的关键在于,子组件可以通过alignRules这个属性去设置和什么什么组件对齐,通过锚点,去向某一个组件对齐,比如,父组件RelativeContainer()组件,它的锚点必须是:__container__,其他的组件可以通过设置id(接收字符串自定义)的方式来锁定锚点,下面这些参数,就是alignRules属性接收的参数。
| 名称 | 类型 | 描述 |
|---|---|---|
| left | { anchor: string, align: HorizontalAlign } | 设置左对齐参数。 - anchor:设置作为锚点的组件的id值。 - align:设置相对于锚点组件的对齐方式。 元服务API: 从API version 11开始,该接口支持在元服务中使用。 |
| right | { anchor: string, align: HorizontalAlign } | 设置右对齐参数。 - anchor:设置作为锚点的组件的id值。 - align:设置相对于锚点组件的对齐方式。 元服务API: 从API version 11开始,该接口支持在元服务中使用。 |
| middle | { anchor: string, align: HorizontalAlign } | 设置横向居中对齐方式的参数。 - anchor:设置作为锚点的组件的id值。 - align:设置相对于锚点组件的对齐方式。 元服务API: 从API version 11开始,该接口支持在元服务中使用。 |
| top | { anchor: string, align: VerticalAlign } | 设置顶部对齐的参数。 - anchor:设置作为锚点的组件的id值。 - align:设置相对于锚点组件的对齐方式。 元服务API: 从API version 11开始,该接口支持在元服务中使用。 |
| bottom | { anchor: string, align: VerticalAlign } | 设置底部对齐的参数。 - anchor:设置作为锚点的组件的id值。 - align:设置相对于锚点组件的对齐方式。 元服务API: 从API version 11开始,该接口支持在元服务中使用。 |
| center | { anchor: string, align: VerticalAlign } | 设置纵向居中对齐方式的参数。 元服务API: 从API version 11开始,该接口支持在元服务中使用。 |
用法
下面代码块所示:在RelativeContainer中有一个子组件,它的alignRules设置了顶部对齐RelativeContainer容器的顶部,左边对齐RelativeContainer的左边,为啥是RelativeContainer,因为,对齐的锚点是__contanier__,它就代表RelativeContainer容器,像其他子组件若是要向这个子组件对齐,就可以通过,这个组件绑定的id(img1)作为锚点,设置对齐方式
  RelativeContainer() {
     Column({ space: 2 }) {
            Image($r('app.media.nvwu'))
              .height(40)
              .width(40)
              .borderRadius(20)
            Text('女巫')
              .fontWeight(700)
              .fontSize(12)
          }
          .id('img1')
          .alignRules({
            top: { anchor: '__container__', align: VerticalAlign.Top }
          , left: { anchor: '__container__', align: HorizontalAlign.Start }
          })
          .margin({ top: 80, left: 15 })
      }
像下面这个代码块,img2这个组件,就是相对img1,和RelativeContainer设置的对齐方式
 RelativeContainer() {
          Text('狼人杀')
            .fontSize(20)
            .fontWeight(700)
            .alignRules({
              middle: { anchor: '__container__', align: HorizontalAlign.Center }
            })
            .margin({ top: 20 })
          Column({ space: 2 }) {
            Image($r('app.media.nvwu'))
              .height(40)
              .width(40)
              .borderRadius(20)
            Text('女巫')
              .fontWeight(700)
              .fontSize(12)
          }
          .id('img1')
          .alignRules({
            top: { anchor: '__container__', align: VerticalAlign.Top }
          , left: { anchor: '__container__', align: HorizontalAlign.Start }
          })
          .margin({ top: 80, left: 15 })

          Column({ space: 2 }) {
            Image($r('app.media.langren'))
              .height(40)
              .width(40)
              .borderRadius(20)
            Text('狼人')
              .fontWeight(700)
              .fontSize(12)
          }
          .id('img2')
          .alignRules({
            top: { anchor: 'img1', align: VerticalAlign.Bottom }
          , left: { anchor: '__container__', align: HorizontalAlign.Start }
          })
          .margin({ top: 20, left: 15 })
         }
注意点
加了组件,就必须给它设置对齐方式否则,组件将默认堆积在容器的左上角,组件margin的方向,也会跟着对齐方式的方向走,比如img2的上边,是对着img1的下边,img2的margin({top:10}) 就会对着img1的下边走10vp
完整代码
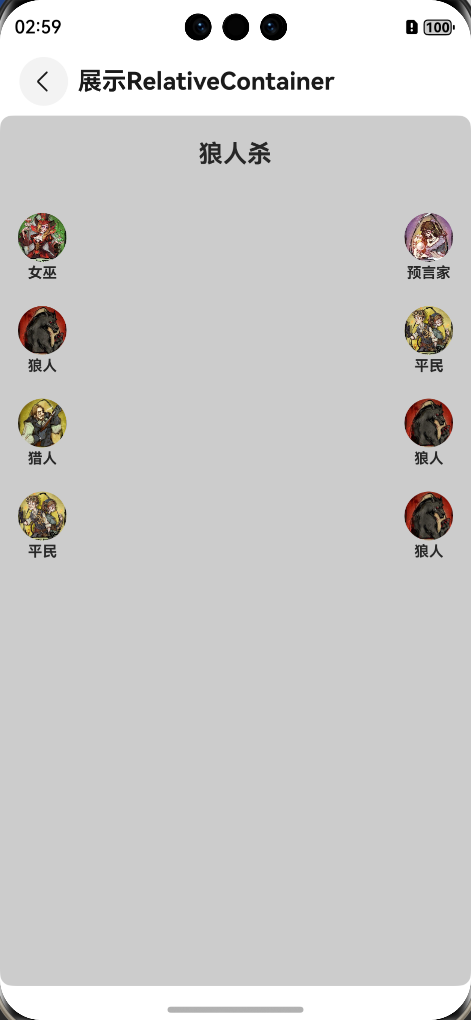
下面是一个简单的布局,给RelativeContainer的一级子组件都加上了id,也调整了对齐方式,img1到img4的左边,相对RelativeContainer的左边对齐,img5到img8的右边相对于RelativeContainer的右边对齐,img1的顶部相对于RelativeContainer的顶部对齐,img2到img4的顶部相对于前一个img的底部对齐,img5的顶部相对于RelativeContainer的顶部对齐,img6到img8的顶部相对于前一个img的底部对齐。
@Preview
@Component
export struct RelativeContainerCase {
  build() {
    NavDestination() {
      Column({ space: 20 }) {
        RelativeContainer() {
          Text('狼人杀')
            .fontSize(20)
            .fontWeight(700)
            .alignRules({
              middle: { anchor: '__container__', align: HorizontalAlign.Center }
            })
            .margin({ top: 20 })
          Column({ space: 2 }) {
            Image($r('app.media.nvwu'))
              .height(40)
              .width(40)
              .borderRadius(20)
            Text('女巫')
              .fontWeight(700)
              .fontSize(12)
          }
          .id('img1')
          .alignRules({
            top: { anchor: '__container__', align: VerticalAlign.Top }
          , left: { anchor: '__container__', align: HorizontalAlign.Start }
          })
          .margin({ top: 80, left: 15 })

          Column({ space: 2 }) {
            Image($r('app.media.langren'))
              .height(40)
              .width(40)
              .borderRadius(20)
            Text('狼人')
              .fontWeight(700)
              .fontSize(12)
          }
          .id('img2')
          .alignRules({
            top: { anchor: 'img1', align: VerticalAlign.Bottom }
          , left: { anchor: '__container__', align: HorizontalAlign.Start }
          })
          .margin({ top: 20, left: 15 })

          Column({ space: 2 }) {
            Image($r('app.media.lieren'))
              .height(40)
              .width(40)
              .borderRadius(20)
            Text('猎人')
              .fontWeight(700)
              .fontSize(12)
          }
          .id('img3')
          .alignRules({
            top: { anchor: 'img2', align: VerticalAlign.Bottom }
          , left: { anchor: '__container__', align: HorizontalAlign.Start }
          })
          .margin({ top: 20, left: 15 })

          Column({ space: 2 }) {
            Image($r("app.media.pingmin"))
              .height(40)
              .width(40)
              .borderRadius(20)
            Text('平民')
              .fontWeight(700)
              .fontSize(12)
          }
          .id('img4')
          .alignRules({
            top: { anchor: 'img3', align: VerticalAlign.Bottom }
          , left: { anchor: '__container__', align: HorizontalAlign.Start }
          })
          .margin({ top: 20, left: 15 })

          Column({ space: 2 }) {
            Image($r('app.media.yvyanjia'))
              .height(40)
              .width(40)
              .borderRadius(20)
            Text('预言家')
              .fontWeight(700)
              .fontSize(12)
          }
          .id('img5')
          .alignRules({
            top: { anchor: '__container__', align: VerticalAlign.Top }
          , right: { anchor: '__container__', align: HorizontalAlign.End }
          })
          .margin({ top: 80, right: 15 })

          Column({ space: 2 }) {
            Image($r('app.media.pingmin'))
              .height(40)
              .width(40)
              .borderRadius(20)
            Text('平民')
              .fontWeight(700)
              .fontSize(12)
          }
          .id('img6')

          .alignRules({
            top: { anchor: 'img5', align: VerticalAlign.Bottom }
          , right: { anchor: '__container__', align: HorizontalAlign.End }
          })
          .margin({ top: 20, right: 15 })

          Column({ space: 2 }) {
            Image($r('app.media.langren'))
              .height(40)
              .width(40)
              .borderRadius(20)
            Text('狼人')
              .fontWeight(700)
              .fontSize(12)
          }
          .id('img7')
          .alignRules({
            top: { anchor: 'img6', align: VerticalAlign.Bottom }
          , right: { anchor: '__container__', align: HorizontalAlign.End }
          })
          .margin({ top: 20, right: 15 })

          Column({ space: 2 }) {
            Image($r('app.media.langren'))
              .height(40)
              .width(40)
              .borderRadius(20)
            Text('狼人')
              .fontWeight(700)
              .fontSize(12)
          }
          .id('img8')
          .alignRules({
            top: { anchor: 'img7', align: VerticalAlign.Bottom }
          , right: { anchor: '__container__', align: HorizontalAlign.End }
          })
          .margin({ top: 20, right: 15 })

        }
        .borderRadius(10)
        .backgroundColor('#ccc')
      }
      .justifyContent(FlexAlign.Center)
      .height('100%')
      .width('100%')
    }.height('100%')
    .width('100%')
    .title('展示RelativeContainer')
  }
}


@Builder
function RelativeContainerCaseBuilder() {
  RelativeContainerCase()
}
使用RelativeContainer的好处
对于这种布局,可以使用线性布局来展示,比如:两个Column,或者四个Row,那么用RelativeContainer的好处在哪?
如果使用线性布局,就会多出是组件的嵌套,影响渲染的性能,使用RelativeContainer,可以直接将组件树拍平,提升渲染性能,对于更加复杂的场景,使用RelativeContainer更是可以做到随心所欲布局,只要对照UI设计稿,把控好距离,设置id,我的组件想放那块就放哪块,不需要像线性布局那样考虑如何嵌套才能达到UI效果
效果展示


 被折叠的 条评论
为什么被折叠?
被折叠的 条评论
为什么被折叠?
 到【灌水乐园】发言


