一、SpringBoot配置加载顺序
- 官方文档
SpringBoot 允许在代码之外,提供应用程序运行的数据,以便在不同的环境中使用相同的应用程序代码。避免硬编码,提供系统的灵活性。可使用各种外部配置源,包括 配置文件、环境变量和命令行参数。
1.SpringBoot配置优先级
- 以下是常用的
Spring Boot 配置形式及其加载顺序(优先级由高到低):
- ① 命令行参数
- ② 来自
java.comp/env 的 JNDI 属性 - ③ Java 系统属性(
System.getProperties()) - ④ 操作系统环境变量
- ⑤
RandomValuePropertySource 配置的 random.* 属性值 - ⑥ 配置文件(YAML文件、Properties 文件)
- ⑦
@Configuration 注解类上的 @PropertySource 指定的配置文件 - ⑧ 通过
SpringApplication.setDefaultProperties 指定的默认属性
- 以上所有形式的配置都会被加载,当存在相同配置内容时,高优先级的配置会覆盖低优先级的配置;存在不同的配置内容时,高优先级和低优先级的配置内容取并集,共同生效,形成互补配置。
(1)命令行参数
- Spring Boot 中的所有配置,都可以通过命令行参数进行指定,其配置形式如下。
java -jar {Jar文件名} --{参数1}={参数值1} --{参数2}={参数值2}
例如:java -jar olive-0.1.jar --server.port=8800 --server.servlet.context-path=/olive
(2)配置文件
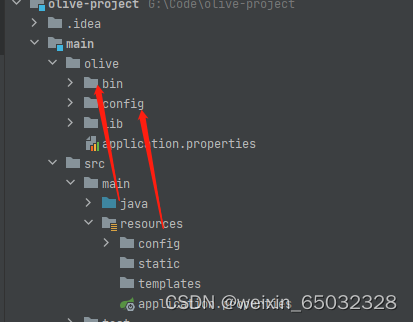
- Spring Boot 启动时,会自动加载 JAR 包内部及 JAR 包所在目录指定位置的配置文件(Properties 文件、YAML 文件),下图中展示了 Spring Boot 自动加载的配置文件的位置及其加载顺序,同一位置下,Properties 文件优先级高于 YAML 文件。
- springboot 启动会扫描以下位置的application.properties或者application.yml文件作为Spring boot的默认配置文件
- ① Jar包外同级目录的config目录
- ② Jar包外同级目录
- ③ jar包内classPath(即resources目录)的config目录
- ④ jar包内的classpath目录
- 配置文件的优先级顺序,遵循以下规则:
- ① 先加载 JAR 包外的配置文件,再加载 JAR 包内的配置文件;
- ② 先加载 config 目录内的配置文件,再加载 config 目录外的配置文件;
- ③ 先加载 config 子目录下的配置文件,再加载 config 目录下的配置文件
- ④ 先加载 appliction-{profile}.properties/yml,再加载application.properties/yml;
- ⑤ 先加载 .properties 文件,再加载 .yml 文件。
二、SpringBoot分离打包:将jar包与lib依赖、配置文件分开
- 之前一直使用SpringBoot初始化建立项目默认的
spring-boot-maven-plugin插件,进行项目打包,这个插件会将项目所有的依赖打入BOOT-INF/lib下,这就导致了jar包的体积非常臃肿,尤其涉及到几十个子项目时,整个项目的体积可想而知。但是,各项目之间有非常多的公共依赖,因此,分离打包还是比较有意义的。
1.pom文件配置
- properties标签中定义依赖的输出目录、jar包的输出目录、resources中配置文件的输出目录。
<properties>
<output.dependence.file.path>lib/</output.dependence.file.path>
<output.jar.file.path>bin/</output.jar.file.path>
<output.resource.file.path>/</output.resource.file.path>
<env.LEARN_HOME>olive</env.LEARN_HOME>
</properties>
- build标签:plugins标签中一共包含三个插件:maven-jar-plugin、maven-dependency-plugin和maven-resources-plugin。
<build>
<plugins>
<plugin>
<groupId>org.apache.maven.plugins</groupId>
<artifactId>maven-jar-plugin</artifactId>
<configuration>
<outputDirectory>${env.LEARN_HOME}/${output.jar.file.path}</outputDirectory>
<excludes>
<exclude>**/*.properties</exclude>
<exclude>**/*.yml</exclude>
<exclude>**/*.xml</exclude>
<exclude>**/*.txt</exclude>
</excludes>
<archive>
<addMavenDescriptor>true</addMavenDescriptor>
<manifest>
<useUniqueVersions>false</useUniqueVersions>
<addClasspath>true</addClasspath>
<classpathPrefix>../${output.dependence.file.path}</classpathPrefix>
<mainClass>com.gdb.main.MainApplication</mainClass>
</manifest>
<manifestEntries>
<Class-Path>../${output.resource.file.path}</Class-Path>
</manifestEntries>
</archive>
</configuration>
</plugin>
<plugin>
<groupId>org.apache.maven.plugins</groupId>
<artifactId>maven-dependency-plugin</artifactId>
<executions>
<execution>
<id>copy-dependencies</id>
<phase>package</phase>
<goals>
<goal>copy-dependencies</goal>
</goals>
<configuration>
<outputDirectory>${env.LEARN_HOME}/${output.dependence.file.path}</outputDirectory>
<excludeTransitive>false</excludeTransitive>
<stripVersion>false</stripVersion>
</configuration>
</execution>
</executions>
</plugin>
<plugin>
<groupId>org.apache.maven.plugins</groupId>
<artifactId>maven-resources-plugin</artifactId>
<executions>
<execution>
<id>copy-resources</id>
<phase>package</phase>
<goals>
<goal>copy-resources</goal>
</goals>
<configuration>
<resources>
<resource>
<directory>src/main/resources</directory>
<includes>
<exclude>**/*.*</exclude>
</includes>
</resource>
</resources>
<outputDirectory>${env.LEARN_HOME}/${output.resource.file.path}</outputDirectory>
</configuration>
</execution>
</executions>
</plugin>
</plugins>
</build>
- 在上面的配置中会看到有…/这种相对路径的配置,这是为了让程序能够找到它依赖的lib和配置文件。即一切从最终的jar包出发,考虑如何让它能够找到它所依赖的lib和配置文件即可。
- 注意:
maven-jar-plugin插件中启动类的位置需要根据自己的项目设置。
2.打包后的目录结构


 753
753


 被折叠的 条评论
为什么被折叠?
被折叠的 条评论
为什么被折叠?
 到【灌水乐园】发言


