


目录
一、Bean的初始化过程

Spring Bean的生命周期
1)通过XML、Java annotation(注解)以及Java Configuration(配置类)
等方式加载Spring Bean
2)BeanDefinitionReader:解析Bean的定义。在Spring容器启动过程中,
会将Bean解析成Spring内部的BeanDefinition结构;
理解为:将spring.xml中的<bean>标签转换成BeanDefinition结构
有点类似于XML解析
3)BeanDefinition:包含了很多属性和方法。例如:id、class(类名)、
scope、ref(依赖的bean)等等。其实就是将bean(例如<bean>)的定义信息
存储到这个对应BeanDefinition相应的属性中
例如:
<bean id="" class="" scope=""> -----> BeanDefinition(id/class/scope)4) :是Spring容器功能的扩展接口。
注意:
①.BeanFactoryPostProcessor在spring容器加载完BeanDefinition之后,
在bean实例化之前执行的
②.对bean元数据(BeanDefinition)进行加工处理,也就是BeanDefinition
属性填充、修改等操作
案例:
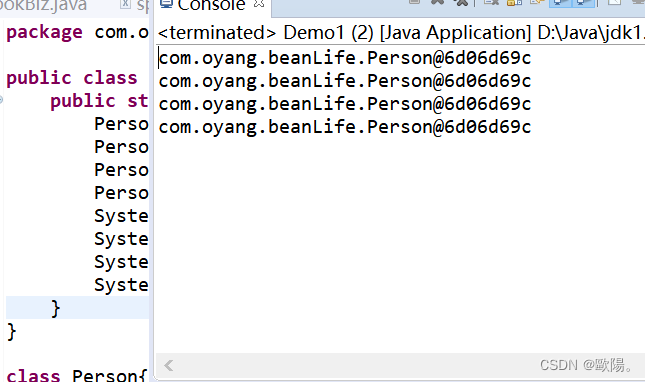
package com.oyang.beanLife;

public class Demo1 {
	public static void main(String[] args) {
		Person p=new Person();
		System.out.println(p.getName());
	}
}

class Person{
	private String name;
	private int age;
	private String sex;
	public String getName() {
		return name;
	}
	public void setName(String name) {
		this.name = name;
	}
	public int getAge() {
		return age;
	}
	public void setAge(int age) {
		this.age = age;
	}
	public String getSex() {
		return sex;
	}
	public void setSex(String sex) {
		this.sex = sex;
	}
	public Person() {
		this.init();
		this.name="oy";
		this.age=19;
		this.sex="男";
	}
	private void init() {
		System.out.println("初始化方法");

	}
	public Person(String name, int age, String sex) {
		super();
		this.name = name;
		this.age = age;
		this.sex = sex;
	}
	@Override
	public String toString() {
		return "Person [name=" + name + ", age=" + age + ", sex=" + sex + "]";
	}


}
运行效果:
5)BeanFactory:bean工厂。它按照我们的要求生产我们需要的各种各样的bean。
例如:
BeanFactory -> List<BeanDefinition>
BeanDefinition(id/class/scope/init-method)
<bean class="com.zking.spring02.biz.BookBizImpl"/>
foreach(BeanDefinition bean : List<BeanDefinition>){
   //根据class属性反射机制实例化对象
   //反射赋值设置属性
}
6)Aware感知接口:在实际开发中,经常需要用到Spring容器本身的功能资源
例如:BeanNameAware、ApplicationContextAware等等
BeanDefinition 实现了 BeanNameAware、ApplicationContextAware----如图所示:
Aware感知接口帮助你拿到Spring内置对象来使用
7)BeanPostProcessor:后置处理器。在Bean对象实例化和引入注入完毕后,
在显示调用初始化方法的前后添加自定义的逻辑。(类似于AOP的绕环通知)
前提条件:如果检测到Bean对象实现了BeanPostProcessor后置处理器才会执行
Before和After方法
修改他原有的属性值。
【 BeanPostProcessor
1)Before
2)调用初始化Bean(InitializingBean和init-method,Bean的初始化才算完成)
3)After
完成了Bean的创建工作 】
8)destory:销毁


总结
1.通过三种方式(配置文件、注解、配置内)将bean标签转成beandifinition对象
2.通过BeanFactoryPostProcessor可以在初始化之前修改属性值
3.BeanFactory进行bean实例化,就是生产Javabean
4.Aware感知接口,能够拿到Spring上下文中内部的资源对象
5.BeanPostProcessor后置处理器,相当于环绕通知(在Spring容器初始化之后,针对它再做进一步的改变)
二、Bean的单例与例模式
如何区分单例与多例
<bean class="com.oyang.web.UserAction" id="userAction" scope="singleton"></bean>scope="singleton" --单例 如果不写,默认就是单例
scope="prototype"--原型 23种设计模式中的原型模式
概述
一个类如果在不同的地方使用了100次,如果这个项目有1W的类,那Spring上下文要创建100W个对象。那么每一个对象都会消耗我的的服务器资源的,就会显得比较臃肿,使用Spring不推荐使用多例,就会采用单例模式。
案例
多列
package com.oyang.beanLife;
public class Demo1 {
	public static void main(String[] args) {
		Person p1=new Person();
		Person p2=new Person();
		Person p3=new Person();
		Person p4=new Person();
		System.out.println(p1);
		System.out.println(p2);
		System.out.println(p3);
		System.out.println(p4);
	}
}

class Person{
	private String name;
	private int age;
	private String sex;
	public String getName() {
		return name;
	}
	public void setName(String name) {
		this.name = name;
	}
	public int getAge() {
		return age;
	}
	public void setAge(int age) {
		this.age = age;
	}
	public String getSex() {
		return sex;
	}
	public void setSex(String sex) {
		this.sex = sex;
	}

public Person() {
	// TODO Auto-generated constructor stub
}
}

单例
package com.oyang.beanLife;

public class Demo1 {
	public static void main(String[] args) {
		Person p1=Person.newInstance();
		Person p2=Person.newInstance();
		Person p3=Person.newInstance();
		Person p4=Person.newInstance();
		System.out.println(p1);
		System.out.println(p2);
		System.out.println(p3);
		System.out.println(p4);
	}
}

class Person{
	private Person() {

	}

	private final static Person p=new Person();

	public static Person newInstance() {
		return p;
	}
}

Spring单例模式的弊端

体现单例与多例的区别
InstanceFactory
package com.oyang.beanLife;

public class InstanceFactory {
	public void init() {
		System.out.println("初始化方法");
	}

	public void destroy() {
		System.out.println("销毁方法");
	}

	public void service() {
		System.out.println("业务方法");
	}
}
ParamAction
package com.oyang.beanLife;
import java.util.List;
/**
* 印证单例多例模式的区别
* @author Administrator
*
*/
public class ParamAction {
private int age;
private String name;
private List<String> hobby;
private int num = 1;
// private UserBiz userBiz = new UserBizImpl1();
public ParamAction() {
super();
}
public ParamAction(int age, String name, List<String> hobby) {
super();
this.age = age;
this.name = name;
this.hobby = hobby;
}
public void execute() {
// userBiz.upload();
// userBiz = new UserBizImpl2();
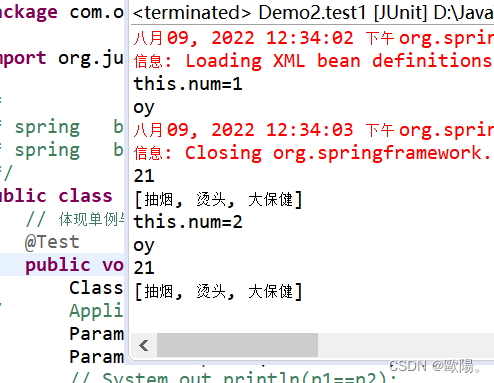
System.out.println("this.num=" + this.num++);
System.out.println(this.name);
System.out.println(this.age);
System.out.println(this.hobby);
}
}
spring-context.xml
<bean id="paramAction" class="com.oyang.beanLife.ParamAction">
		<constructor-arg name="name" value="oy"></constructor-arg>
		<constructor-arg name="age" value="21"></constructor-arg>
		<constructor-arg name="hobby">
			<list>
				<value>抽烟</value>
				<value>烫头</value>
				<value>大保健</value>
			</list>
		</constructor-arg>
	</bean>

	<bean id="instanceFactory" class="com.oyang.beanLife.InstanceFactory"
		scope="prototype" init-method="init" destroy-method="destroy"></bean>
Demo2
package com.oyang.beanLife;

import org.junit.Test;
import org.springframework.beans.factory.BeanFactory;
import org.springframework.beans.factory.xml.XmlBeanFactory;
import org.springframework.context.ApplicationContext;
import org.springframework.context.support.ClassPathXmlApplicationContext;
import org.springframework.core.io.ClassPathResource;
import org.springframework.core.io.Resource;

/*
 * spring	bean的生命週期
 * spring	bean的單例多例
 */
public class Demo2 {
	// 体现单例与多例的区别
	@Test
	public void test1() {
		ClassPathXmlApplicationContext applicationContext = new ClassPathXmlApplicationContext("/spring-context.xml");
//		ApplicationContext applicationContext = new ClassPathXmlApplicationContext("/spring-context.xml");
		ParamAction p1 = (ParamAction) applicationContext.getBean("paramAction");
		ParamAction p2 = (ParamAction) applicationContext.getBean("paramAction");
		// System.out.println(p1==p2);
		p1.execute();
		p2.execute();

//		单例时,容器销毁instanceFactory对象也销毁;多例时,容器销毁对象不一定销毁;
		applicationContext.close();
	}

	// 体现单例与多例的初始化的时间点 instanceFactory
	@Test
	public void test2() {
		ApplicationContext applicationContext = new ClassPathXmlApplicationContext("/spring-context.xml");
	}

	// BeanFactory会初始化bean对象,但会根据不同的实现子类采取不同的初始化方式
	// 默认情况下bean的初始化,单例模式立马会执行,但是此时XmlBeanFactory作为子类,单例模式下容器创建,bean依赖没有初始化,只有要获取使用bean对象才进行初始化
	@Test
	public void test3() {
		// ClassPathXmlApplicationContext applicationContext = new
		// ClassPathXmlApplicationContext("/spring-context.xml");

		Resource resource = new ClassPathResource("/spring-context.xml");
		BeanFactory beanFactory = new XmlBeanFactory(resource);
//		InstanceFactory i1 = (InstanceFactory) beanFactory.getBean("instanceFactory");

	}

}
test1
容器默认是单例的
修改一下配置,改成多例模式
<bean id="paramAction" class="com.oyang.beanLife.ParamAction" scope="prototype">
单例时,容器销毁instanceFactory对象也销毁;多例时,容器销毁对象不一定销毁;
test3

总结:
单例模式下Javabean的生命周期
容器生对象生,容器死对象死
多例模式下Javabean的生命周期
使用时对象生,死亡跟着jvm垃圾回收机制走
OK,今日的学习就到此结束啦,如果对个位看官有帮助的话可以留下免费的赞哦(收藏或关注也行),如果文章中有什么问题或不足以及需要改正的地方可以私信博主,博主会做出改正的。个位看官,小陽在此跟大家说拜拜啦


 1408
1408


 被折叠的 条评论
为什么被折叠?
被折叠的 条评论
为什么被折叠?
 到【灌水乐园】发言


