


基本思路流程:win+r打开运行输入cmd打开命令输入界面,输入安装命令
mvn install:install-file -Dfile=E:\maven-example\common-user.jar -DgroupId=cn.itcast -DartifactId=common-pojo -Dversion=1.0 -Dpackaging=jar-Dfile=jar包在本地磁盘的路径
-DgroupId=组织名称
-DartifactId=项目名称
-Dversion=版本号
-Dpackaging=打包方式
请把-Dfille=jar包地址更换为自己的jar包地址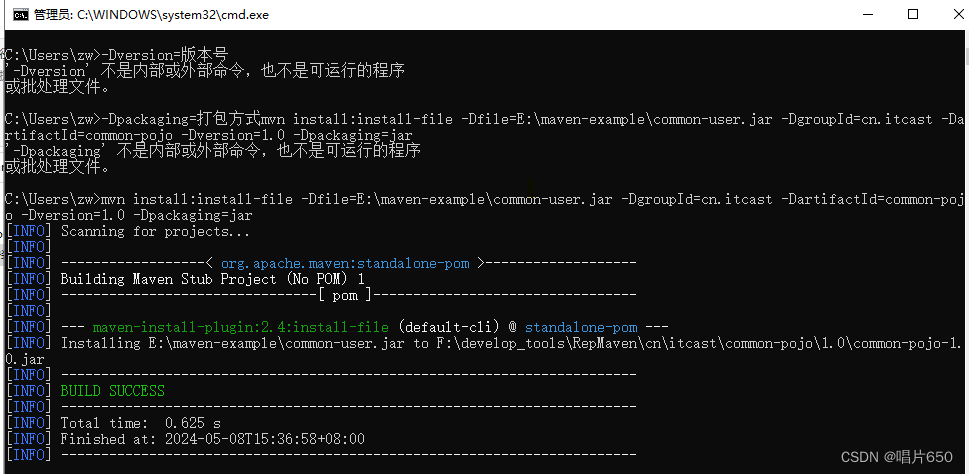
注意命令安装jar包必须要maven环境变量要配置好,在apach-maven安装目录conf下settings.xml里的内容是否完整,文件里不能有多余的空格。如果出错命令窗口会提示出错的行数。

依赖包安装完后,新建springboot-register项目,在pom文件里导入安装的jar包依赖
        <!--导入外部依赖-->
        <dependency>
            <groupId>cn.itcast</groupId>
            <artifactId>common-pojo</artifactId>
            <version>1.0</version>
        </dependency>
将jar包里面的类注入到ioc容器有两种方式
1、@Bean加在@Configruation的类下的方法上。必须在启动类同等目录或者子类里,才能被扫描被加载
2、@Import 加在启动类(@SpringBootApplication)的类上,该注释一般用在导入配置类、ImportSelector接口实现类。用在不同于启动类同等目录或者子类里。
首先展示@Bean使用流程:
写一个名为CommonConfig配置类用@Configuration注解,在配置类用名为jar包里面类名的方法,返回一个jar包的实体类。并用@Bean注册到ioc容器里。
具体过程是在启动类同等目录或其子类创建config包,在包内创建配置类CommonConfig并在类中加入代码
@Configuration
public class CmonnonConfig {
    @Bean
    public User user(@Value("${User.id}") int id,@Value("${User.username}") String username,@Value("${User.password}") String password,@Value("${User.email}") String email){
        User user=new User();
        user.setId(id);
        user.setUsername(username);
        user.setPassword(password);
        user.setEmail(email);
        return user;
    }

    @Bean
    public UserProfile userProfile(){
        UserProfile userProfile=new UserProfile();
        userProfile.setId(01);
        userProfile.setAddress("西部大厦");
        userProfile.setBankcard("62012345623");
        return userProfile;
    }
用户配置属性可有外部输入,在资源文件夹resources下创建application.yml文件,写入如下代码
User:
  id: 1001
  username: "李部长"
  password: "affff123"
  email: "111@qq.com"

UserProfile:
  id: 101
  address: "ddddjjjj"
  bankcard: "1233444"
在@Bean方法参数里用@Value("${value}")提取application.yml配置的参数。
2、@Import的使用
首先@Bean 注解的类不在@SpringBootApplication注解类的同目录或者子目录里,就要在启动类添加@Import(ImportSelector类名.class)导入从配置文件读取的配置全类文件名
2.1首先在resources文件夹创建common.imports文件
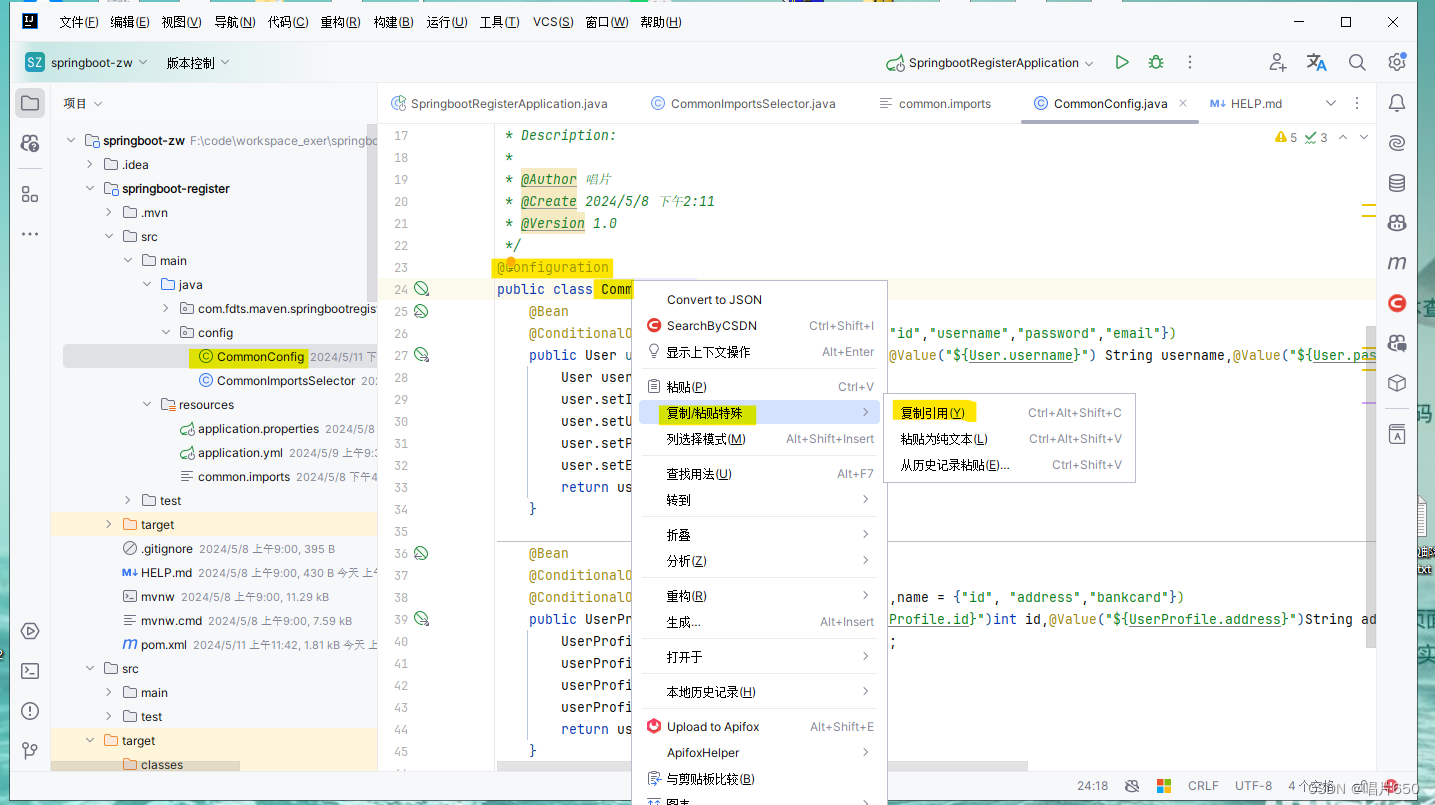 在CommonConfig里的类名复制引用,将复制到的引用拷贝到common.imports配置文件里
config.CommonConfig2.2、在config配置文件夹里写一个名为CommonImprtsSelector的ImportSelector接口的实现类。读取common.imports配置文件里的配置。代码如下:
package config;

import org.springframework.context.annotation.ImportSelector;
import org.springframework.core.type.AnnotationMetadata;

import java.io.BufferedReader;
import java.io.IOException;
import java.io.InputStream;
import java.io.InputStreamReader;
import java.util.ArrayList;
import java.util.List;

/**
 * ClassName: CommonImportsSelector
 * Package: com.fdts.maven.springbootregister.config
 * Description:
 *
 * @Author 唱片
 * @Create 2024/5/8 下午4:19
 * @Version 1.0
 */
public class CommonImportsSelector implements ImportSelector {
    @Override
    public String[] selectImports(AnnotationMetadata importingClassMetadata) {
        List<String> imports=new ArrayList<>();
        //读取common.imports配置文件里的配置,配置文件里可以写入多个配置全类名,每个配置全类名都需要左面顶格写
        InputStream is =CommonImportsSelector.class.getClassLoader().getResourceAsStream("common.imports");
        BufferedReader br=new BufferedReader(new InputStreamReader(is));
        String line =null;
        try {
           while ((line = br.readLine())!=null){
               imports.add(line);
           }
        }catch (IOException e){

        }finally {
            if(br!=null){
                try {
                    br.close();
                }catch (IOException e){
                    throw new RuntimeException(e);
                }
            }
        }
        //返回一个配置类字符串数组
        return imports.toArray(new String[0]);
        //返回一个配置类字符串
//        return new String[]{"config.CommonConfig"};
    }
}
2.3、在启动类上添加注解@Import(CommonImportSelector)将读取到的配置类注册到ioc容器
package com.fdts.maven.springbootregister;

import config.CommonConfig;
import config.CommonImportsSelector;
import my.db.User;
import my.db.UserProfile;
import org.springframework.boot.SpringApplication;
import org.springframework.boot.autoconfigure.SpringBootApplication;
import org.springframework.context.ApplicationContext;
import org.springframework.context.annotation.Bean;
import org.springframework.context.annotation.Import;

@SpringBootApplication
@Import(CommonImportsSelector.class)
public class SpringbootRegisterApplication {

    public static void main(String[] args) {
        //从引用上下文取出bean对象,并打印出来可以用方法名取,也可以用类取
        ApplicationContext context= SpringApplication.run(SpringbootRegisterApplication.class, args);
        User user= (User) context.getBean("user");
        System.out.println(user);


        UserProfile userProfile=context.getBean(UserProfile.class);
        System.out.println(userProfile);
    }


}
3、@Bean的注册条件,有常见三种条件注解:
//prefix=yml文件前缀名 name=属性名数组。属性值匹配则注册bean类到ioc容器,否则不注册。
@ConditionalOnProperty(prefic="UserProfile",name={"id","address","bankcard"}
//检测环境变量是否有Dispatcher.class这个bean对象,有则注册,没有则不注册。(Dispatcher.class这个类在pom文件引入依赖spring-boot-starter-web则存在)
@ConditionalOnMissingBean(Dispatcher.class)
//有User这个类则注册,没有则不注册
@ConditionalOnClass(User.class)
代码如下:
package config;

import my.db.User;
import my.db.UserProfile;
import org.springframework.beans.factory.annotation.Value;
import org.springframework.boot.autoconfigure.amqp.RabbitConnectionDetails;
import org.springframework.boot.autoconfigure.condition.ConditionalOnBean;
import org.springframework.boot.autoconfigure.condition.ConditionalOnClass;
import org.springframework.boot.autoconfigure.condition.ConditionalOnMissingBean;
import org.springframework.boot.autoconfigure.condition.ConditionalOnProperty;
import org.springframework.cglib.proxy.Dispatcher;
import org.springframework.context.annotation.Bean;
import org.springframework.context.annotation.Configuration;

/**
 * ClassName: CmonnonConfig
 * Package: com.fdts.maven.springbootregister.config
 * Description:
 *
 * @Author 唱片
 * @Create 2024/5/8 下午2:11
 * @Version 1.0
 */
@Configuration
public class CommonConfig {
    @Bean
    //@ConditionOnClass意思是如果有参数里面的类则注册bean对象,如果没有则不注册
    @ConditionalOnClass(UserProfile.class)
    //@ConditionOnProperty意思是如果有参数里的配置,则注入对象。如果没有相应配置则不注入bean对象
    @ConditionalOnProperty(prefix = "User",name={"id","username","password","email"})
    public User user(@Value("${User.id}") int id,@Value("${User.username}") String username,@Value("${User.password}") String password,@Value("${User.email}") String email){
        User user=new User();
        user.setId(id);
        user.setUsername(username);
        user.setPassword(password);
        user.setEmail(email);
        return user;
    }

    @Bean
    //@ConditionOnMissingBean的意思是检测环境变量是否有Dispatcher.class这个bean对象没有则不注入,有则注入
    @ConditionalOnMissingBean(Dispatcher.class)
    @ConditionalOnProperty(prefix = "UserProfile",name = {"id", "address","bankcard"})
    public UserProfile userProfile(@Value("${UserProfile.id}")int id,@Value("${UserProfile.address}")String address,@Value("${UserProfile.bankcard}")String bankcard){
        UserProfile userProfile=new UserProfile();
        userProfile.setId(id);
        userProfile.setAddress(address);
        userProfile.setBankcard(bankcard);
        return userProfile;
    }


}
4、复合注解
4.1创建anno文件夹
4.2创建EnableAutoConfiguration注解
package com.fdts.maven.springbootregister.anno;

import config.CommonImportsSelector;
import org.springframework.context.annotation.Import;

import java.lang.annotation.ElementType;
import java.lang.annotation.Retention;
import java.lang.annotation.RetentionPolicy;
import java.lang.annotation.Target;

/**
 * ClassName: EnableAutoConfiguration
 * Package: com.fdts.maven.springbootregister.anno
 * Description:
 *
 * @Author 唱片
 * @Create 2024/5/11 下午4:25
 * @Version 1.0
 */
@Target({ElementType. TYPE})
@Retention(RetentionPolicy. RUNTIME)
@Import(CommonImportsSelector.class)
public @interface EnableAutoConfiguration {


}
4.3在启动类直接用@EnableAutoConfiguration进行注解
4.4用相同方法把@EnableAutoConfiguration写入到@SpringBootApplication注解里,最后直接只用@SpringBootApplication就能直接自动把自定义jar包注册到ioc容器。
package com.fdts.maven.springbootregister;

import com.fdts.maven.springbootregister.anno.EnableAutoConfiguration;
import config.CommonConfig;
import config.CommonImportsSelector;
import my.db.User;
import my.db.UserProfile;
import org.springframework.boot.SpringApplication;
import org.springframework.boot.autoconfigure.SpringBootApplication;
import org.springframework.context.ApplicationContext;
import org.springframework.context.annotation.Bean;
import org.springframework.context.annotation.Import;

@SpringBootApplication
//@EnableAutoConfiguration已经包含了@Import(CommonImportsSelector.class),可以不使用@Import
//@Import(CommonImportsSelector.class)
//这里只是演示,最终@SpringBootApplication复合注解已经包含@EnableAutoConfiguration注解,直接使用@SpringBootApplication就可以了
@EnableAutoConfiguration
public class SpringbootRegisterApplication {

    public static void main(String[] args) {
        //从引用上下文取出bean对象,并打印出来可以用方法名取,也可以用类取
        ApplicationContext context= SpringApplication.run(SpringbootRegisterApplication.class, args);
        //用方法名获从ioc容器获取User对象,并打印出来
        User user= (User) context.getBean("user");
        System.out.println(user);

        //用类名从ioc容器获取UserProfile对象,并打印出来
        UserProfile userProfile=context.getBean(UserProfile.class);
        System.out.println(userProfile);
    }


}
总结:
1.使用cmd命令把自定义jar包安装到库文件包
2.pom文件引入jar包依赖
3.写配置文件类用@Configruation注解,
3.1在配置类写返回类型为jar包类的方法,方法名为类名
3.2用@Bean类注解方法
3.2.1分别有三种常用注册条件
//如果从yml文件读取到配置属性则注册,否则不注册
@ConditionalOnProperty(prefix="前缀名",name={"属性名","属性名","属性名"}、
//检测环境变量是否有已经注册的bean对象,如果有则注册,没有则不注册
@ConditionalOnMissingBean(类名.class)
//检测环境是否有参数里面的类,有则注册,没有则不注册
@ConditionalOnClass(类名.class)
3.3用@Import注解
3.3.1在resources里写common.imports配置文件,配置文件可以写入多个类引用
3.3.2在config配置文件夹写ImportSelector接口的实现类CommonImportSelector。
3.3.3在实现类读取common.imports配置文件,并返回字符串数组。
3.3.4在启动类用@Import(CommonImportSelector.class)注释引入@Bean注释类
4.复合注解
4.1创建anno文件包
4.2创建@EnableAutoConfiguration注解,并用@Import(CommonImportSelector.class)注解
4.3在启动类上使用@EnableAutoConfiguration。
正常情况下@SpringBootApplication就是复合注解,已经包含@EnableAutoConfiguration,所以只需要使用@SpringBootApplicaton注解即可。


 被折叠的 条评论
为什么被折叠?
被折叠的 条评论
为什么被折叠?
 到【灌水乐园】发言


