


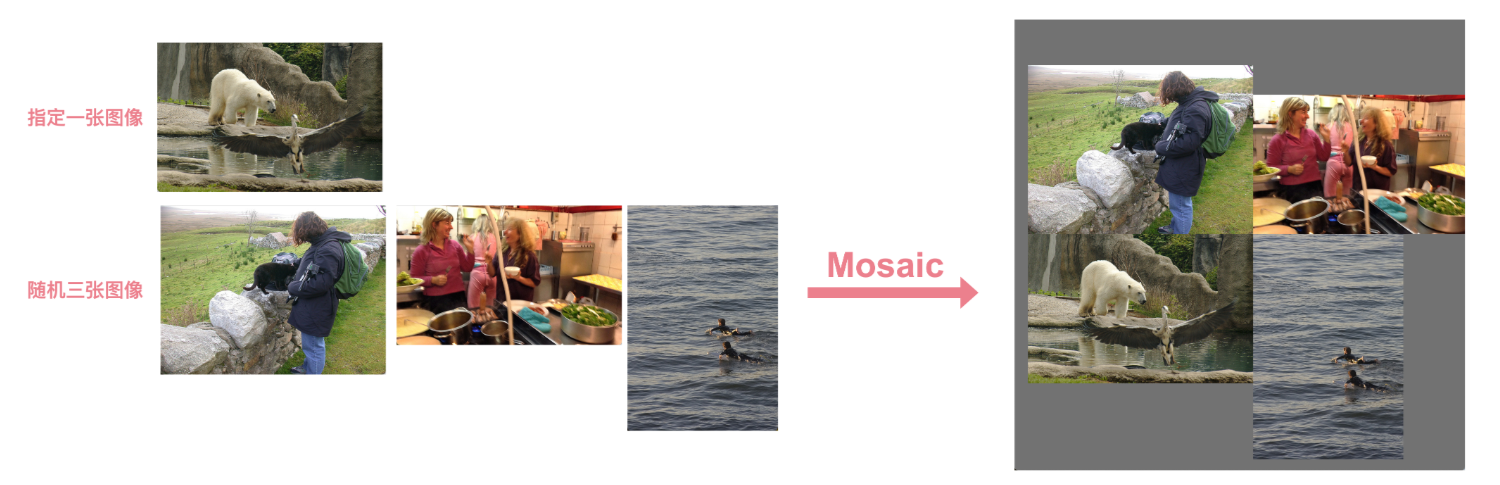
1、Mosaic
-
将4张小图,按照 “左上、右上,左下、右下” 的位置关系,给拼接成一张大图
-
大图中没有被覆盖到的地方,默认像素值为 [114, 114, 114] 的灰底
-
会先将 4张小图的较长边都 resize 到指定值 (比如 640),较短边按等比例缩放。大图的尺寸为小图较长边的2倍(比如 1280 x 1280)

2、整体代码示例
-
将如下代码中的 数据集地址更换为你的数据集地址
-
默认使用 coco 数据集,小图较长边尺寸 resize 到 640,拼接大图尺寸为 1280 x 1280
import numpy as np
import random
import torch
from pycocotools.coco import COCO
import math
import cv2

dataDir = '/Users/dataset/COCO2017'
annFile = '{}/annotations/instances_val2017.json'.format(dataDir)
imgFile = '{}/val2017'.format(dataDir)

img_size = 640

def xywh2xyxy(x, w=640, h=640, padw=0, padh=0):
    """
    x 形式为 :xmin, ymin,w, h
    padw 与 padh :为小图左上角点放置在大图坐标系下的位置
    y 形式为 :xmin, ymin, xmax, ymax
    """
    y = x.clone() if isinstance(x, torch.Tensor) else np.copy(x)
    y[..., 0] = w * x[..., 0] + padw  # top left x
    y[..., 1] = h * x[..., 1] + padh  # top left y
    y[..., 2] = w * (x[..., 0] + x[..., 2]) + padw  # bottom right x
    y[..., 3] = h * (x[..., 1] + x[..., 3]) + padh  # bottom right y
    return y


def xyn2xy(x, w=640, h=640, padw=0, padh=0):
    """Convert normalized segments into pixel segments, shape (n,2)."""
    y = x.clone() if isinstance(x, torch.Tensor) else np.copy(x)
    y[..., 0] = w * x[..., 0] + padw  # top left x
    y[..., 1] = h * x[..., 1] + padh  # top left y
    return y


def load_image(index, file_names):
    f = imgFile + '/' + file_names[index]
    im = cv2.imread(f)
    assert im is not None, f"Image Not Found {f}"

    h0, w0 = im.shape[:2]  # orig hw
    r = img_size / max(h0, w0)  # ratio

    if r != 1:  # if sizes are not equal
        interp = cv2.INTER_LINEAR if r > 1 else cv2.INTER_AREA
        im = cv2.resize(im, (math.ceil(w0 * r), math.ceil(h0 * r)), interpolation=interp)
    return im, (h0, w0), im.shape[:2]  # im, hw_original, hw_resized


def mosaic(indices, file_names, labels, segments, index=0):

    labels4, segments4 = [], []
    mosaic_border = [-320, -320]
    s = 640
    yc, xc = (int(random.uniform(-x, 2 * s + x)) for x in mosaic_border)  # mosaic center x, y
    indices = [index] + random.choices(indices, k=3)  # 3 additional image indices
    random.shuffle(indices)
    for i, index in enumerate(indices):
        # Load image
        img, _, (h, w) = load_image(index, file_names)

        # place img in img4
        if i == 0:  # top left
            img4 = np.full((s * 2, s * 2, img.shape[2]), 114, dtype=np.uint8)  # base image with 4 tiles
            x1a, y1a, x2a, y2a = max(xc - w, 0), max(yc - h, 0), xc, yc  # xmin, ymin, xmax, ymax (large image)
            x1b, y1b, x2b, y2b = w - (x2a - x1a), h - (y2a - y1a), w, h  # xmin, ymin, xmax, ymax (small image)
        elif i == 1:  # top right
            x1a, y1a, x2a, y2a = xc, max(yc - h, 0), min(xc + w, s * 2), yc
            x1b, y1b, x2b, y2b = 0, h - (y2a - y1a), min(w, x2a - x1a), h
        elif i == 2:  # bottom left
            x1a, y1a, x2a, y2a = max(xc - w, 0), yc, xc, min(s * 2, yc + h)
            x1b, y1b, x2b, y2b = w - (x2a - x1a), 0, w, min(y2a - y1a, h)
        elif i == 3:  # bottom right
            x1a, y1a, x2a, y2a = xc, yc, min(xc + w, s * 2), min(s * 2, yc + h)
            x1b, y1b, x2b, y2b = 0, 0, min(w, x2a - x1a), min(y2a - y1a, h)

        img4[y1a:y2a, x1a:x2a] = img[y1b:y2b, x1b:x2b]  # img4[ymin:ymax, xmin:xmax]
        padw = x1a - x1b
        padh = y1a - y1b

        # Labels
        one_img_label, one_img_segments = labels[index].copy(), segments[index].copy()
        if one_img_label.size:
            one_img_label[:, 1:] = xywh2xyxy(one_img_label[:, 1:], w, h, padw, padh)  # normalized xywh to pixel xyxy format
            one_img_segments = [xyn2xy(x, w, h, padw, padh) for x in one_img_segments]
        labels4.append(one_img_label)
        segments4.extend(one_img_segments)

    # Concat/clip labels
    labels4 = np.concatenate(labels4, 0)
    for x in (labels4[:, 1:], *segments4):
        np.clip(x, 0, 2 * s, out=x)  # clip when using random_perspective()

    return img4, labels4, segments4


if __name__ == '__main__':

    coco = COCO(annFile)
    indices = range(len(coco.imgs))

    file_names = []
    labels = []
    segments = []
    for i in coco.imgs:
        file_names.append(coco.imgs[i]['file_name'])
        img_w, img_h = coco.imgs[i]['width'], coco.imgs[i]['height']

        labels_one_img = []
        segments_one_img = []
        for ann in coco.imgToAnns[i]:
            if ann['iscrowd'] == 0:
                category_id = ann['category_id']
                bbox = ann['bbox']

                labels_one_img.append(np.array([category_id, bbox[0]/img_w, bbox[1]/img_h, bbox[2]/img_w, bbox[3]/img_h]))

                segmentation = np.array(ann['segmentation'][0]).reshape((-1, 2)) / (img_w, img_h)
                segments_one_img.append(segmentation)

        labels.append(np.array(labels_one_img))
        segments.append(segments_one_img)

    # 随便选一张图像举例
    img4, labels4, segments4 = mosaic(indices, file_names, labels, segments, index=55)

    # 可视化 segmentation
    for seg in segments4:
        points = np.array(seg).reshape((-1, 2)).astype(np.int32)
        cv2.drawContours(img4, [points], -1, (0, 0, 255), thickness=2)

    # # 可视化 bbox
    # for rect in labels4:
    #     cv2.rectangle(img4, (int(rect[1]), int(rect[2])), (int(rect[3]), int(rect[4])), color=(0, 0, 255), thickness=2)

    cv2.imshow('img4', img4)
    cv2.waitKey()
    cv2.destroyAllWindows()
3、代码步骤解析
Step 1、获取4张图像的 图像索引
-
指定一张图像(的索引),上面例子中,我们指定的图像索引为 55,实际训练中,图像索引index 由 dataset 的
__getitem__函数得到。img4, labels4, segments4 = mosaic(indices, file_names, labels, segments, index=55) -
从数据集中再随机筛选出 3张图像(的索引):
indices = [index] + random.choices(indices, k=3),一共4张图像 -
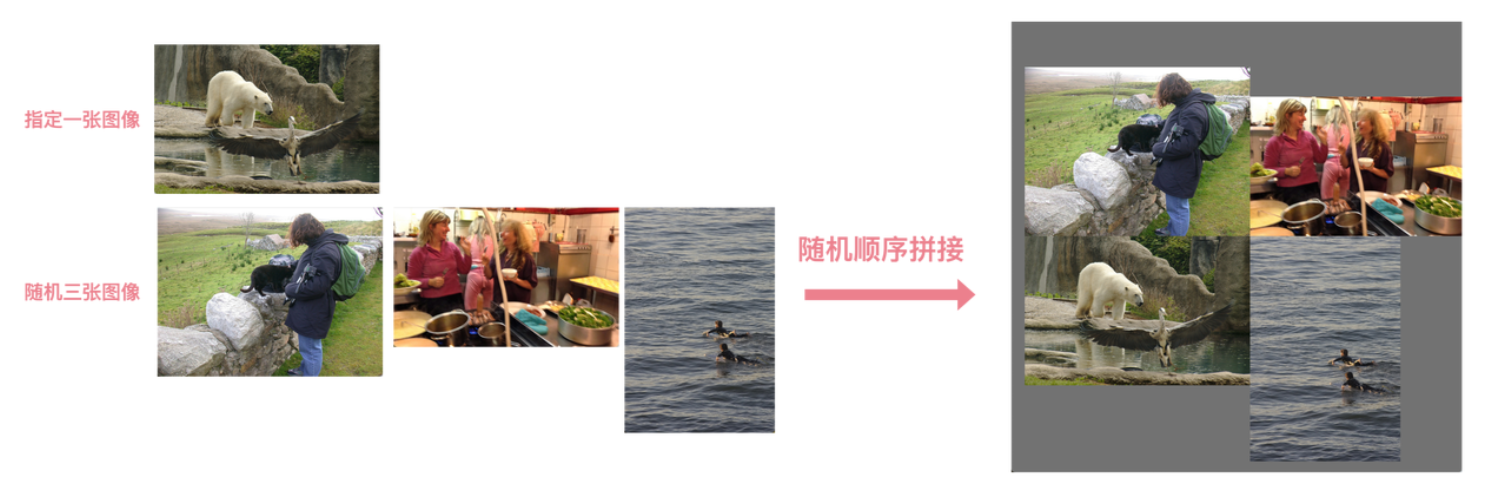
将4张图像索引顺序进行打乱,
random.shuffle(indices), 打乱之后:-
第1个索引对应的图像会放在左上角
-
第2个索引对应的图像 放在右上角
-
第3个索引对应的图像 放在左下角
-
第4个索引对应的图像 放在右下角
-
Step 2、在指定范围内随机出一个拼接点
-
在大图中的指定区域(下图中粉色区域),随机出一个点,作为4张图像的拼接点
下面例子中,我们随机出了坐标点(590, 491)作为 拼接点
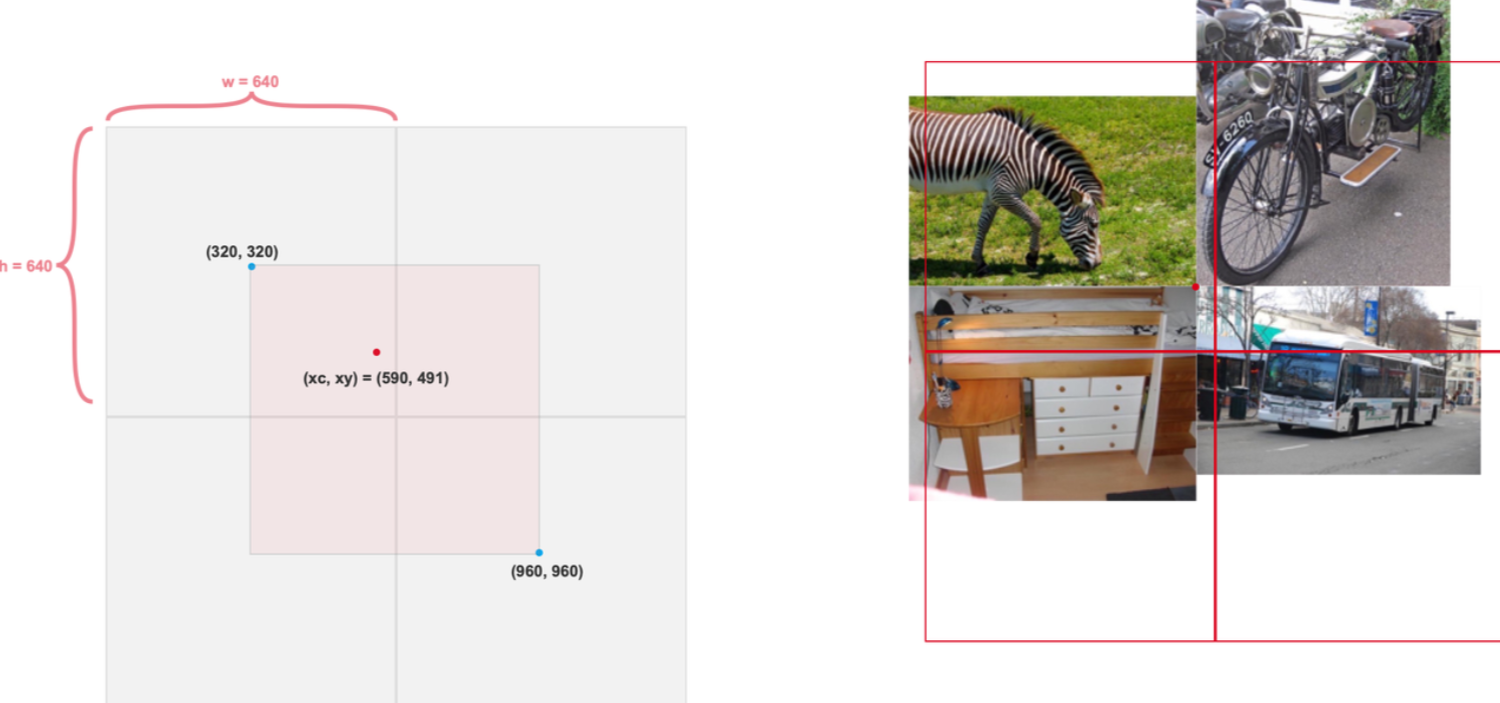
相关代码:
    mosaic_border = [-320, -320]
    s = 640
    yc, xc = (int(random.uniform(-x, 2 * s + x)) for x in mosaic_border)
Step 3、依次读取4张图像,并将图像较长边 缩放为640,然后进行拼接
-
读取图像 :按顺序读取图像,图像(索引)顺序决定了图像放置位置,不同位置的处理细节会有差异
-
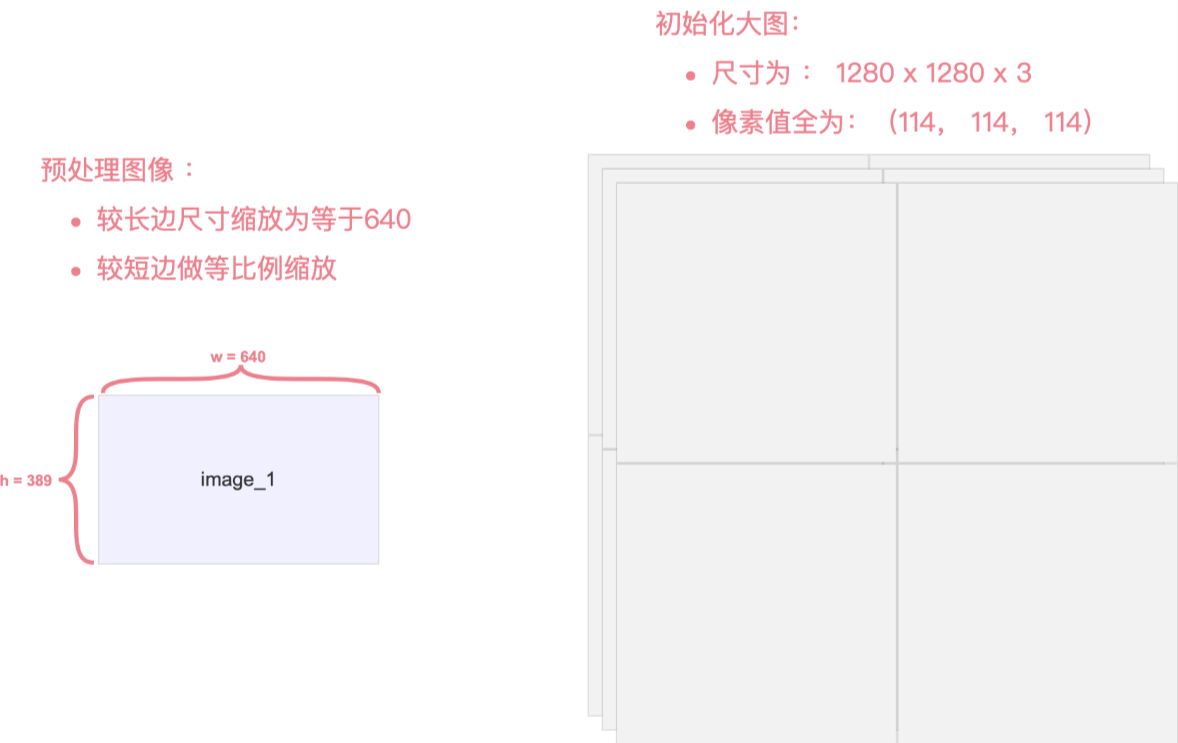
预处理 :将图像的较长边缩放为等于 640,较短边做等比例缩放。
-
初始化一张大图作为底图,尺寸为 1280x1280x3,初始化像素值全为
[114, 114, 114] -
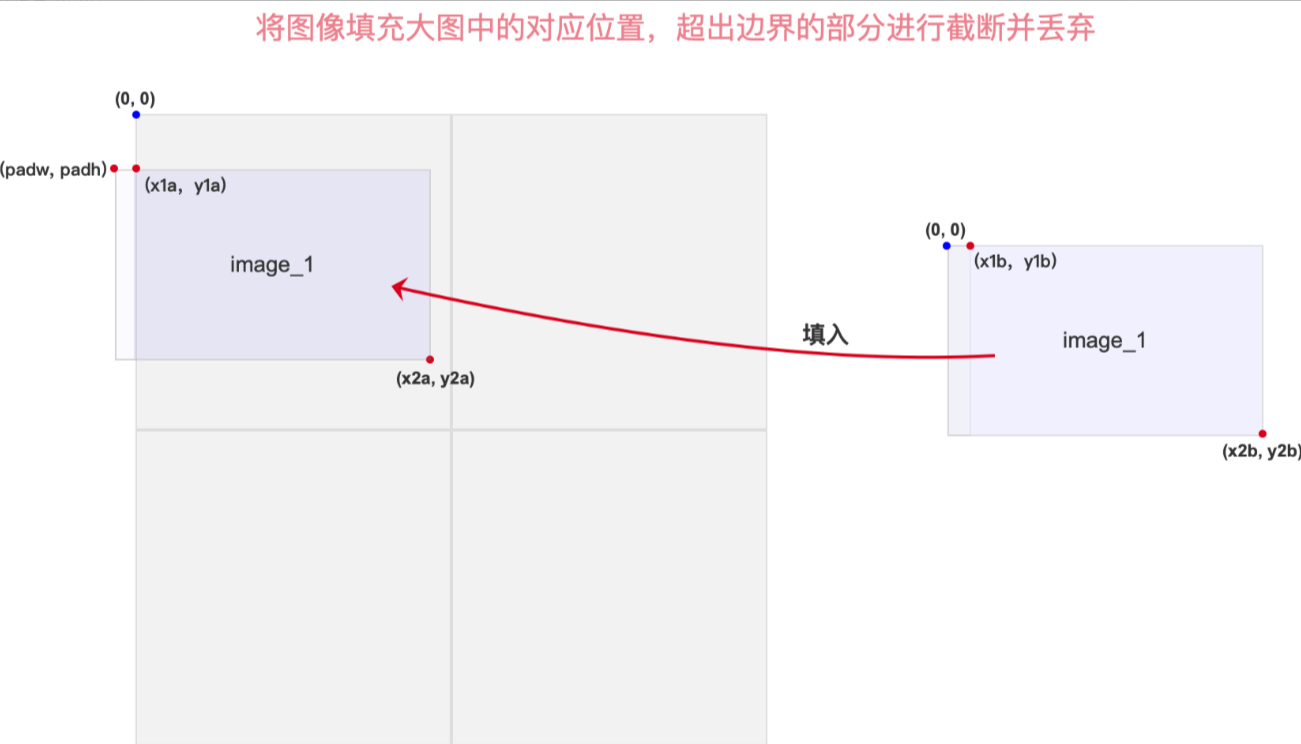
将缩放后的图像,填充到大图中去,超出边界的部分截断丢弃
对应代码片段:
def load_image(index, file_names):
    f = imgFile + '/' + file_names[index]   # 图像路径
    im = cv2.imread(f)   # 读取图像
    assert im is not None, f"Image Not Found {f}"  # 检查图像是否存在

    h0, w0 = im.shape[:2]  # 图像原始高宽
    r = img_size / max(h0, w0)  # 将较长边缩放为640时的缩放比例

    if r != 1:  # if sizes are not equal
        interp = cv2.INTER_LINEAR if r > 1 else cv2.INTER_AREA   # 插值方式
        im = cv2.resize(im, (math.ceil(w0 * r), math.ceil(h0 * r)), interpolation=interp)  # 按照缩放比例r 缩放图像
    return im, (h0, w0), im.shape[:2]  # im, hw_original, hw_resized
    for i, index in enumerate(indices):
        # 返回缩放后的图像 与 缩放后的图像尺寸
        img, _, (h, w) = load_image(index, file_names)

        # 将 4张图像按位置填充到大图中
        if i == 0:  # top left
            img4 = np.full((s * 2, s * 2, img.shape[2]), 114, dtype=np.uint8)  # base image with 4 tiles
            x1a, y1a, x2a, y2a = max(xc - w, 0), max(yc - h, 0), xc, yc  # xmin, ymin, xmax, ymax (large image)
            x1b, y1b, x2b, y2b = w - (x2a - x1a), h - (y2a - y1a), w, h  # xmin, ymin, xmax, ymax (small image)
        elif i == 1:  # top right
            x1a, y1a, x2a, y2a = xc, max(yc - h, 0), min(xc + w, s * 2), yc
            x1b, y1b, x2b, y2b = 0, h - (y2a - y1a), min(w, x2a - x1a), h
        elif i == 2:  # bottom left
            x1a, y1a, x2a, y2a = max(xc - w, 0), yc, xc, min(s * 2, yc + h)
            x1b, y1b, x2b, y2b = w - (x2a - x1a), 0, w, min(y2a - y1a, h)
        elif i == 3:  # bottom right
            x1a, y1a, x2a, y2a = xc, yc, min(xc + w, s * 2), min(s * 2, yc + h)
            x1b, y1b, x2b, y2b = 0, 0, min(w, x2a - x1a), min(y2a - y1a, h)

        img4[y1a:y2a, x1a:x2a] = img[y1b:y2b, x1b:x2b]  # img4[ymin:ymax, xmin:xmax]
step 4、处理 bbox在4张拼接图中的位置
-
获取图像对应的标签,形为
[class, min_x, min_y, w, h] -
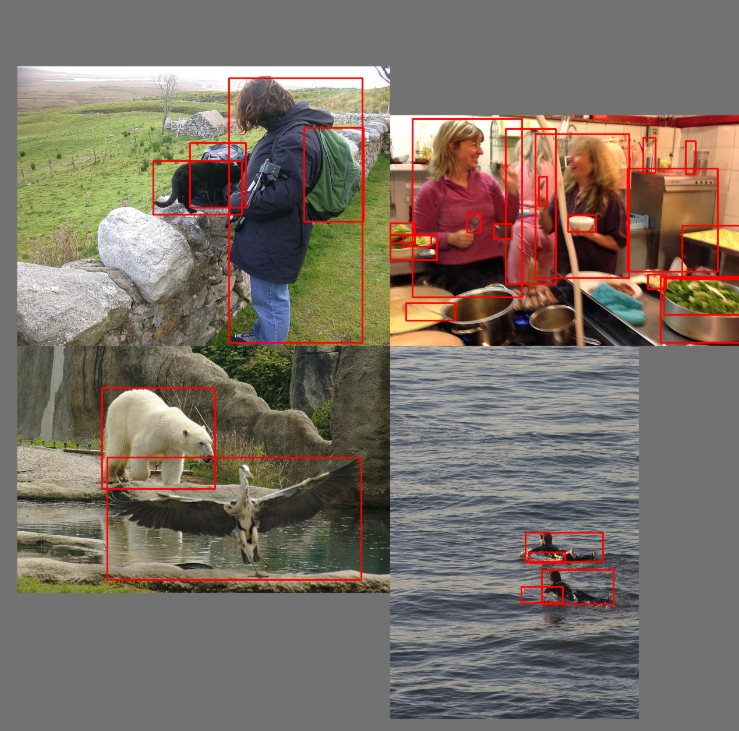
将图像中的 gt bbox坐标 和 segmentation坐标 转换到在拼接大图中的 坐标位置,对应代码片段:
# Labels
one_img_label, one_img_segments = labels[index].copy(), segments[index].copy()
if one_img_label.size:
    one_img_label[:, 1:] = xywh2xyxy(one_img_label[:, 1:], w, h, padw, padh)  # normalized xywh to pixel xyxy format
    one_img_segments = [xyn2xy(x, w, h, padw, padh) for x in one_img_segments]
labels4.append(one_img_label)
segments4.extend(one_img_segments)-
因为 转换到 大图中的 gt bbox 的坐标 和 segmentation坐标 有可能超出 大图的边界范围,我们需要将这样的坐标进行截断,让 gt bbox 的坐标 和 segmentation坐标 ,最小不能小于0, 最大不成超过 1280, 对应代码片段:
# Concat/clip labels
labels4 = np.concatenate(labels4, 0)
for x in (labels4[:, 1:], *segments4):
    np.clip(x, 0, 2 * s, out=x)  # clip when using random_perspective()


 被折叠的 条评论
为什么被折叠?
被折叠的 条评论
为什么被折叠?
 到【灌水乐园】发言


