


非父子组件间的通信
方式一 全局事件总线
方式二 Provide/Inject
Vue3从实例中移除了$on $off $once方法 所以我们如果希望继续使用全局事件总线 要通过第三方库
vue3 官方推荐了一些库 如mitt 或 tiny-emitter
Provide和Inject
用于非父子组件之间的共享数据
比如有一些深度嵌套的组件 子组件想要获取父组件的部分内容
在这种情况下 如果我们仍然将props沿着组件链逐级传递下去 就会非常麻烦
对于这种情况下 我们可以使用Provide 和 Inject
无论层级结构有多深 父组件都可以作为其所有子组件的依赖提供者
父组件有一个provide选项来提供数据
子组件有一个inject选项来开始使用这些数据
Provide 可以写成对象 在export default中
provide :{
	name:"lbj",
	age:18
}
然后再子组件中使用Inject的数组写法注册
inject:['name','aga']
最后再子组件中{{}}使用
但是provide我们一般都使用函数的写法
因为如果提供的数据有的是来自data 我们使用this获取时 指向会出问题
provide的函数写法
data(){
	return {
		name:['abc','cba']
	}
}
provide(){
	return {
		name:'lbj',
		age:18,
		length:this.names.length;
	}
}
在这种情况下 如果我们修改了this.name的内容 那么使用length的子组件不会的响应式的
因为 当我们修改了names后 之前在provide中引入的this.names.length 本身并不是响应式的
那如何才能将我们的数据变成响应式的呢
我们可以使用一些响应式的API来完成这些功能 比如computed函数(vue3中)
注意:我们在使用length的时候要获取其中的value
这是因为computed返回的是一个ref对象 需要取出其中的value来使用
    data() {
      return {
        name: ['abc', 'cba'],
      };
    },
    provide() {
      return {
        name: 'lbj',
        age: 18,
        length: computed(()=>this.names.length),
      };
    },
<h2>App:{{ length.value }}</h2>
组件生命周期
生命周期:每个组件都可能会经历从创建 挂载 更新 卸载 等一系列过程
在这个过程中的某一个阶段 我们可能会想要添加一些属于自己的代码逻辑
vue为我们提供了生命周期函数 让我们可以知道目前组件正在哪一个过程
生命周期函数:生命周期函数是一些钩子函数(回调函数) 在某个事件会被Vue源码内部进行回调
通过生命周期函数的回调 我们可以知道目前组件正在经历什么阶段
那么我们就可以在该生命周期中编写属于自己的逻辑代码了
生命周期的流程
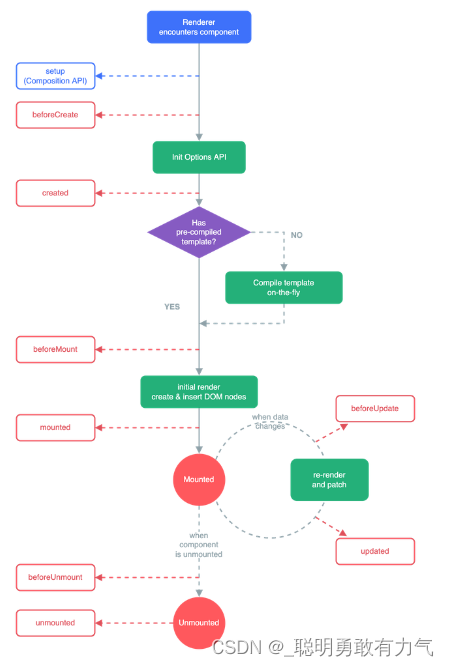
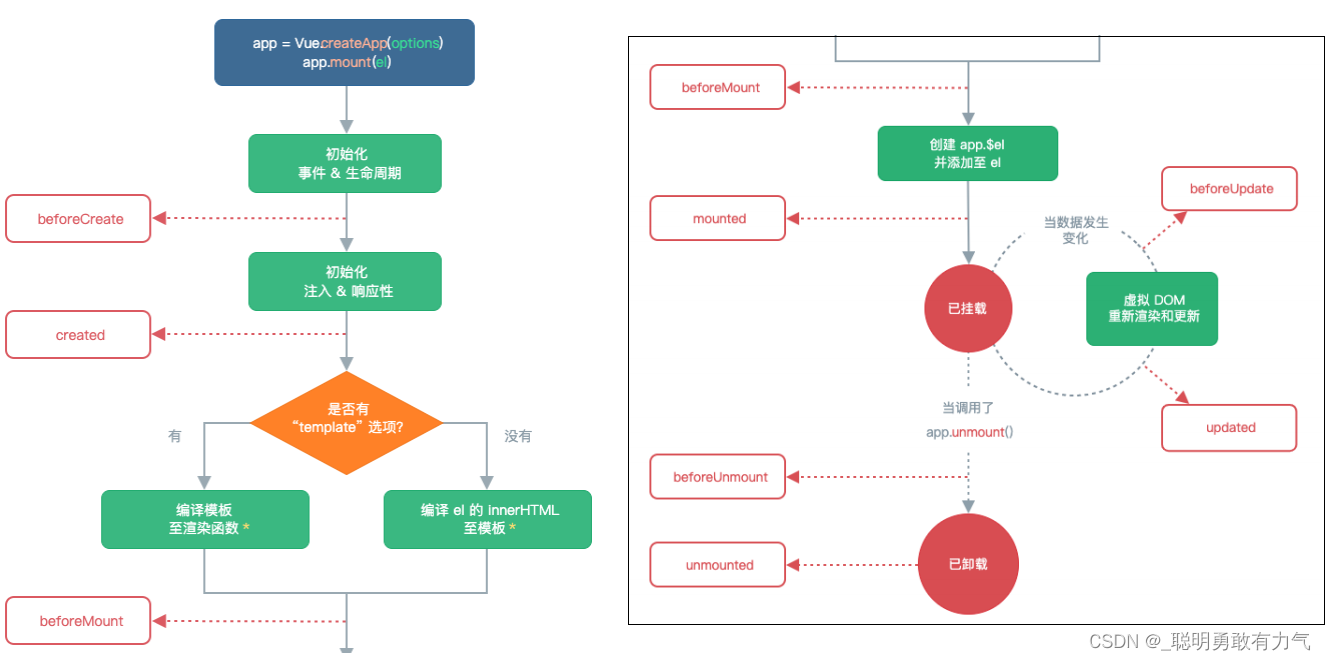
beforeCreate 组件被创建之前
create 组件被创建完成
一般用于 发送网络请求 监听event事件 监听watch数据
beforeMount 组件template准备挂载
mounted 组件的template被挂载 虚拟dom -> 真实dom
beforeUpdate 准备更新dom
update 更新dom
beforeUnmount 卸载之前 准备卸载VNode -> dom元素
unmounted dom元素卸载完成
$refs的使用
在某些情况下 我们在组件中想要直接获取到元素对象或者子组件实例
在Vue开发中我们是不推荐进行DOM操作的
这个时候我们可以给元素或者组件绑定一个ref的attribute属性
组件实例有一个$refs属性
获取h2与button的dom元素
<template>
	<div class="app">
		<h2 ref="title" class="title" :style="{color:titleColor}">{{message}}</h2>
		<button ref="btn" @click="changeMessage">修改title</button>
		<banner ref="banner" />
	</div>
</template>

<script>
import Banner from './Banner.vue'
export default {
	data() {
		return {
			message: 'hello world',
			titleColor: "red"
		}
	},
	components: {
		Banner
	},
	methods: {
		changeMessage() {
			console.log(this.$refs.title);
			console.log(this.$refs.btn);
		}
	}
}
</script>
获取banner组件
<template>
	<div class="app">
		<h2 ref="title" class="title" :style="{color:titleColor}">{{message}}</h2>
		<button ref="btn" @click="changeMessage">修改title</button>

		<banner ref="banner" />
	</div>
</template>

<script>
import Banner from './Banner.vue'
export default {
	data() {
		return {
			message: 'hello world',
			titleColor: "red"
		}
	},
	components: {
		Banner
	},
	methods: {
		changeMessage() {
			console.log(this.$refs.banner);
		}
	}
}
</script>
父组件中可以主动的调用子组件的对象方法
app.vue中
<template>
	<div class="app">
		<h2 ref="title" class="title" :style="{color:titleColor}">{{message}}</h2>
		<button ref="btn" @click="changeMessage">修改title</button>

		<banner ref="banner" />
	</div>
</template>

<script>
import Banner from './Banner.vue'
export default {
	data() {
		return {
			message: 'hello world',
			titleColor: "red"
		}
	},
	components: {
		Banner
	},
	methods: {
		changeMessage() {
			this.$refs.banner.bannerClick()
		}
	}
}
</script>
banner.vue中
<template>
	<div class="banner">
		<h2>banner</h2>
	</div>
	<div class="banner2"></div>
</template>

<script>
export default {
	methods: {
		bannerClick() {
			console.log('bannerClick');
		}
	}
}
</script>

<style scoped>

</style>
获取banner组件实例 获取banner组件中的根元素
<template>
	<div class="app">
		<h2 ref="title" class="title" :style="{color:titleColor}">{{message}}</h2>
		<button ref="btn" @click="changeMessage">修改title</button>

		<banner ref="banner" />
	</div>
</template>

<script>
import Banner from './Banner.vue'
export default {
	data() {
		return {
			message: 'hello world',
			titleColor: "red"
		}
	},
	components: {
		Banner
	},
	methods: {
		changeMessage() {
			console.log(this.$refs.banner.$el);
		}
	}
}
</script>

<style scoped>

</style>
如果banner中的template是多根 则拿到的是第一个node节点(文本节点)
<template>
	<div class="app">
		<h2 ref="title" class="title" :style="{color:titleColor}">{{message}}</h2>
		<button ref="btn" @click="changeMessage">修改title</button>

		<banner ref="banner" />
	</div>
</template>

<script>
import Banner from './Banner.vue'
export default {
	data() {
		return {
			message: 'hello world',
			titleColor: "red"
		}
	},
	components: {
		Banner
	},
	methods: {
		changeMessage() {
			console.log(this.$refs.banner.$el.nextSibling);
		}
	}
}
</script>

<style scoped>

</style>
$patent 使用this. $parents用来访问父组件(vue3中已删除)
$root 使用this. $root 获取跟组件
动态组件
动态组件通过component来实现 通过一个特殊的attribute is来实现
is中的组件需要来自两个地方 1. 全局注册的组件 2.局部注册的组件
<template>
	<component :is="currentTab">
</template>
给动态组件传值和监听事件与给普通组件传值和监听事件是一样的
只不过要将属性与监听的事件放到component上
<template>
	<component :name="aaa" @appClick="appClick" :is="currentTab">
</template>
keep-alive
在开发中 某些情况下我们希望保持组件的状态 而不是销毁 这个时候我们就可以使用一个内置组件 keep-alive
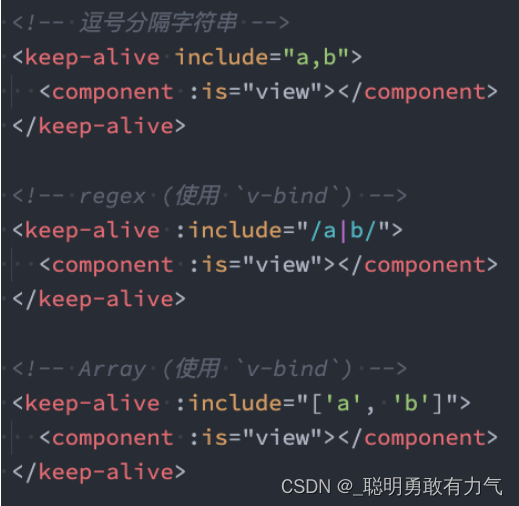
keep-alive 中的属性
include - string | RegExp | Array 只有名称匹配的组件会被缓存
exclude - string | RegExp | Array 任何名称匹配的组件都不会被缓存
max - number | string 最多可以缓存多少组件实例 一旦达到这个数字 那么缓存组件中最近没有被访问的实例会被销毁
include 和 exclude 允许组件有条件的缓存
二者都可以用逗号分割字符串 正则表达式或一个数组来表示
匹配首先检查组件自身的name选项
对于缓存的组件来说 在次进入时 我们是不会执行created或者mounted等生命周期函数的
但是有的时候我们确实希望监听到何时重新进入到了组件里 何时离开了组件
这时我们可以使用activated和deactivated这两个生命周期钩子函数来监听
export default {
	name: 'home',
	data() {
		return {
			counter: 0
		}
	},
	created() {
		console.log('home created');
	},
	unmounted() {
		console.log('home unmounted');
	},
	//对于保持keep-alive组件监听有没有进行切换
	//keep-alive进入活跃状态
	activated() {
		console.log('activated');
	},
	deactivated() {
		console.log('deactivated');
	}
}
小知识
默认情况下,在构建整个组件树的过程中,因为组件和组件之间是通过模块化直接依赖的,那么webpack在打包时就会将组
件模块打包到一起(比如一个app.js文件中);
这个时候随着项目的不断庞大,app.js文件的内容过大,会造成首屏的渲染速度变慢;
所以,对于一些不需要立即使用的组件,我们可以单独对它们进行拆分,拆分成一些小的代码块
import 函数就可以让webpack对导入的文件进行分包


 6043
6043


 被折叠的 条评论
为什么被折叠?
被折叠的 条评论
为什么被折叠?
 到【灌水乐园】发言


