


文章目录
泛型的理解和好处
引入
需求:编写程序,在ArrayList中,添加3个Dog对象。Dog对象含有name和age,并输出name和age(要求使用getXxx())
传统的方法解决
package com.zanedu.generic;

import java.util.ArrayList;
@SuppressWarnings({"all"})
public class Generic01 {
    public static void main(String[] args) {
        //用传统的方式来解决
        ArrayList arrayList = new ArrayList();
        arrayList.add(new Dog("旺财", 10));
        arrayList.add(new Dog("发财", 1));
        arrayList.add(new Dog("小黄", 5));

        //假如程序员,不小心添加了一只猫Cat进去
        arrayList.add(new Cat("招财猫", 8));//这里就会抛出异常,向下转型抛出异常

        //遍历
        for (Object o : arrayList) {
            //向下转型 Object -> Dog
            Dog dog = (Dog) o;
            System.out.println(dog.getName() + "-" + dog.getAge());
        }

    }
}
/*
编写程序,在ArrayList中,创建3个Dog对象
Dog对象含有name 和 age,并输出name和age(要求用getXxx))
 */
class Dog {
    private String name;
    private int age;

    public Dog(String name, int age) {
        this.name = name;
        this.age = age;
    }

    public String getName() {
        return name;
    }

    public void setName(String name) {
        this.name = name;
    }

    public int getAge() {
        return age;
    }

    public void setAge(int age) {
        this.age = age;
    }
}
class Cat {
    private String name;
    private int age;

    public Cat(String name, int age) {
        this.name = name;
        this.age = age;
    }

    public String getName() {
        return name;
    }

    public void setName(String name) {
        this.name = name;
    }

    public int getAge() {
        return age;
    }

    public void setAge(int age) {
        this.age = age;
    }
}
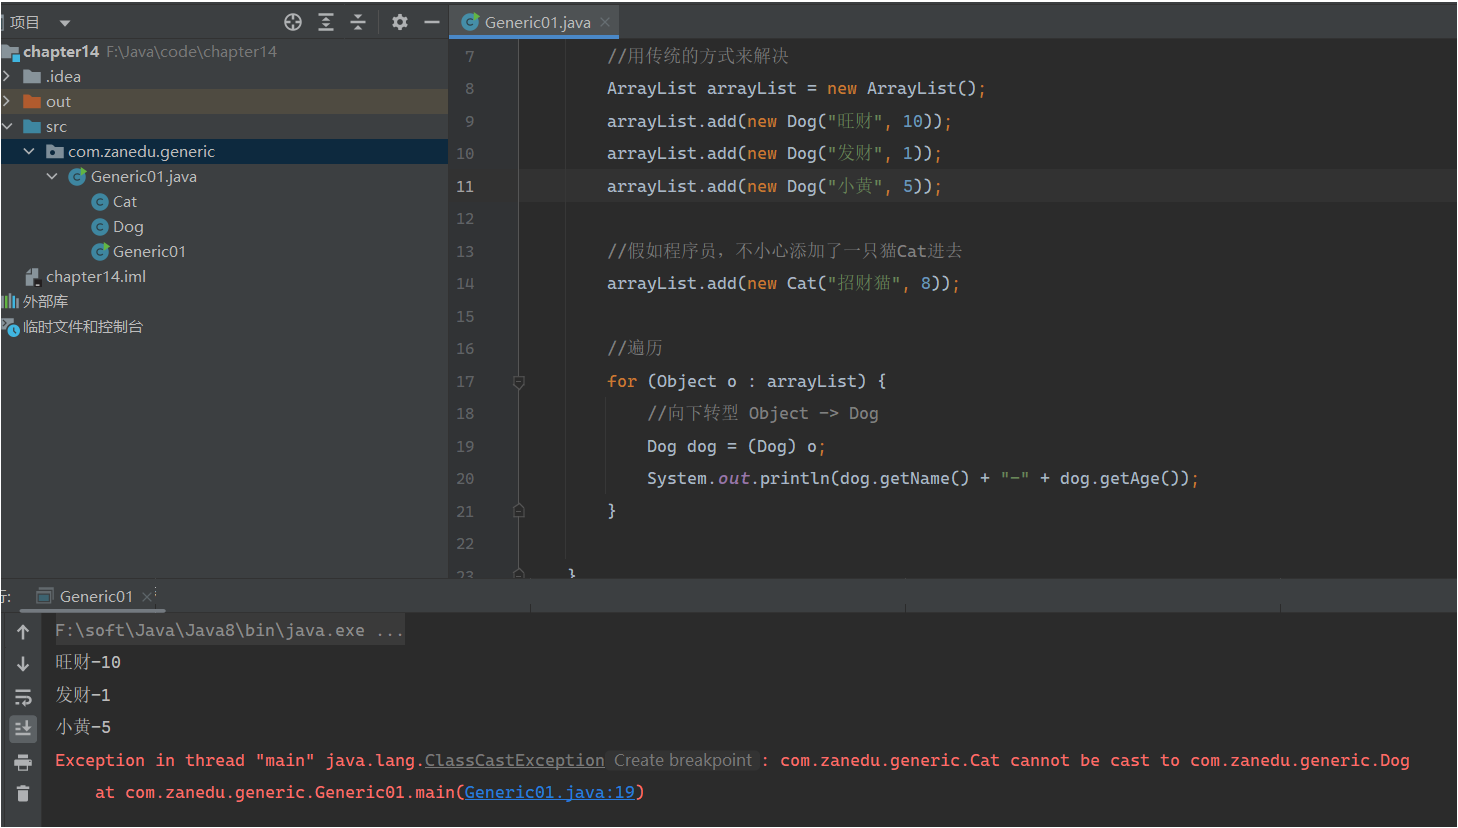
使用传统方法的问题分析:
- 不能对加入到集合ArrayList中的数据类型进行约束(不安全)
- 遍历的时候,需要进行类型转换,如果集合中的数据量较大,对效率会有所影响
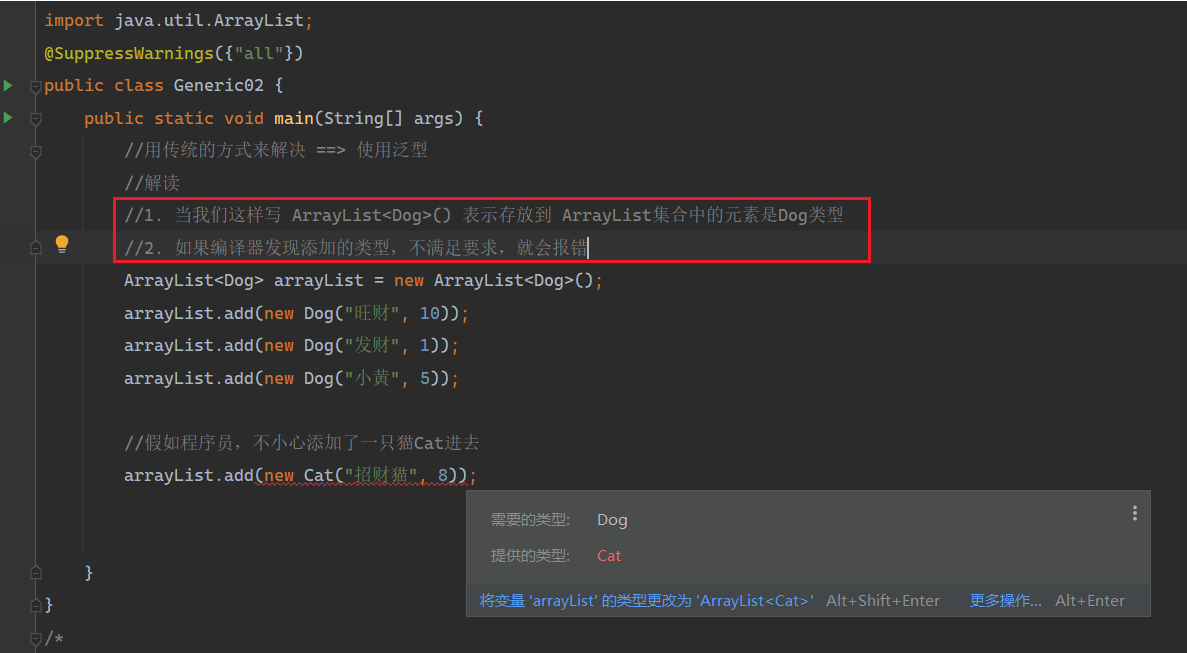
使用泛型的方式来解决
package com.zanedu.generic.improve;


import java.util.ArrayList;
@SuppressWarnings({"all"})
public class Generic02 {
    public static void main(String[] args) {
        //用传统的方式来解决 ==> 使用泛型
        //解读
        //1. 当我们这样写 ArrayList<Dog>() 表示存放到 ArrayList集合中的元素是Dog类型
        //2. 如果编译器发现添加的类型,不满足要求,就会报错
        //3. 在遍历的时候,可以直接取出Dog类型,而不是Object类型
        //4. public class ArrayList<E> {}  E 称为泛型,那么这里 Dog -> E,就是ArrayList里面的 E都是Dog
        ArrayList<Dog> arrayList = new ArrayList<Dog>();
        arrayList.add(new Dog("旺财", 10));
        arrayList.add(new Dog("发财", 1));
        arrayList.add(new Dog("小黄", 5));

        //假如程序员,不小心添加了一只猫Cat进去
//        arrayList.add(new Cat("招财猫", 8));
        System.out.println("===使用泛型===");
        for (Dog dog : arrayList) {
            //少了个向下转型
            System.out.println(dog.getName() + "-" + dog.getAge());
        }


    }
}
/*
编写程序,在ArrayList中,创建3个Dog对象
Dog对象含有name 和 age,并输出name和age(要求用getXxx))
这里使用泛型
 */
class Dog {
    private String name;
    private int age;

    public Dog(String name, int age) {
        this.name = name;
        this.age = age;
    }

    public String getName() {
        return name;
    }

    public void setName(String name) {
        this.name = name;
    }

    public int getAge() {
        return age;
    }

    public void setAge(int age) {
        this.age = age;
    }
}
class Cat {
    private String name;
    private int age;

    public Cat(String name, int age) {
        this.name = name;
        this.age = age;
    }

    public String getName() {
        return name;
    }

    public void setName(String name) {
        this.name = name;
    }

    public int getAge() {
        return age;
    }

    public void setAge(int age) {
        this.age = age;
    }
}

泛型的好处
-
编译时,检查添加元素的类型,提高了安全性
-
减少了类型转换的次数,提高了效率
-
- 不使用泛型
Dog 加入 -> Object 取出 ->Dog //放入到ArrayList会先转成Object,在取出时,还需要转换成Dog类型
-
- 使用泛型
**Dog -> Dog -> Dog //放入时和取出时,**不需要类型转换,从而提高了效率
- 不再提示编译警告
泛型介绍
泛(广泛)型(类型) ==> Integer, String, Dog
- 泛型又称参数化类型,是jdk5.0出现的新特性,解决数据类型的安全性问题
- 在类声明或实例化时只要指定好需要的具体的类型即可
- Java泛型可以保证如果程序在编译时没有发出警告,运行时就不会产生ClassCastException异常。同时,代码更加简洁、健壮
- 泛型的作用是:可以在类声明时通过一个标识表示类中某个属性的类型,或者是某个方法的返回值的类型,或者是参数类型
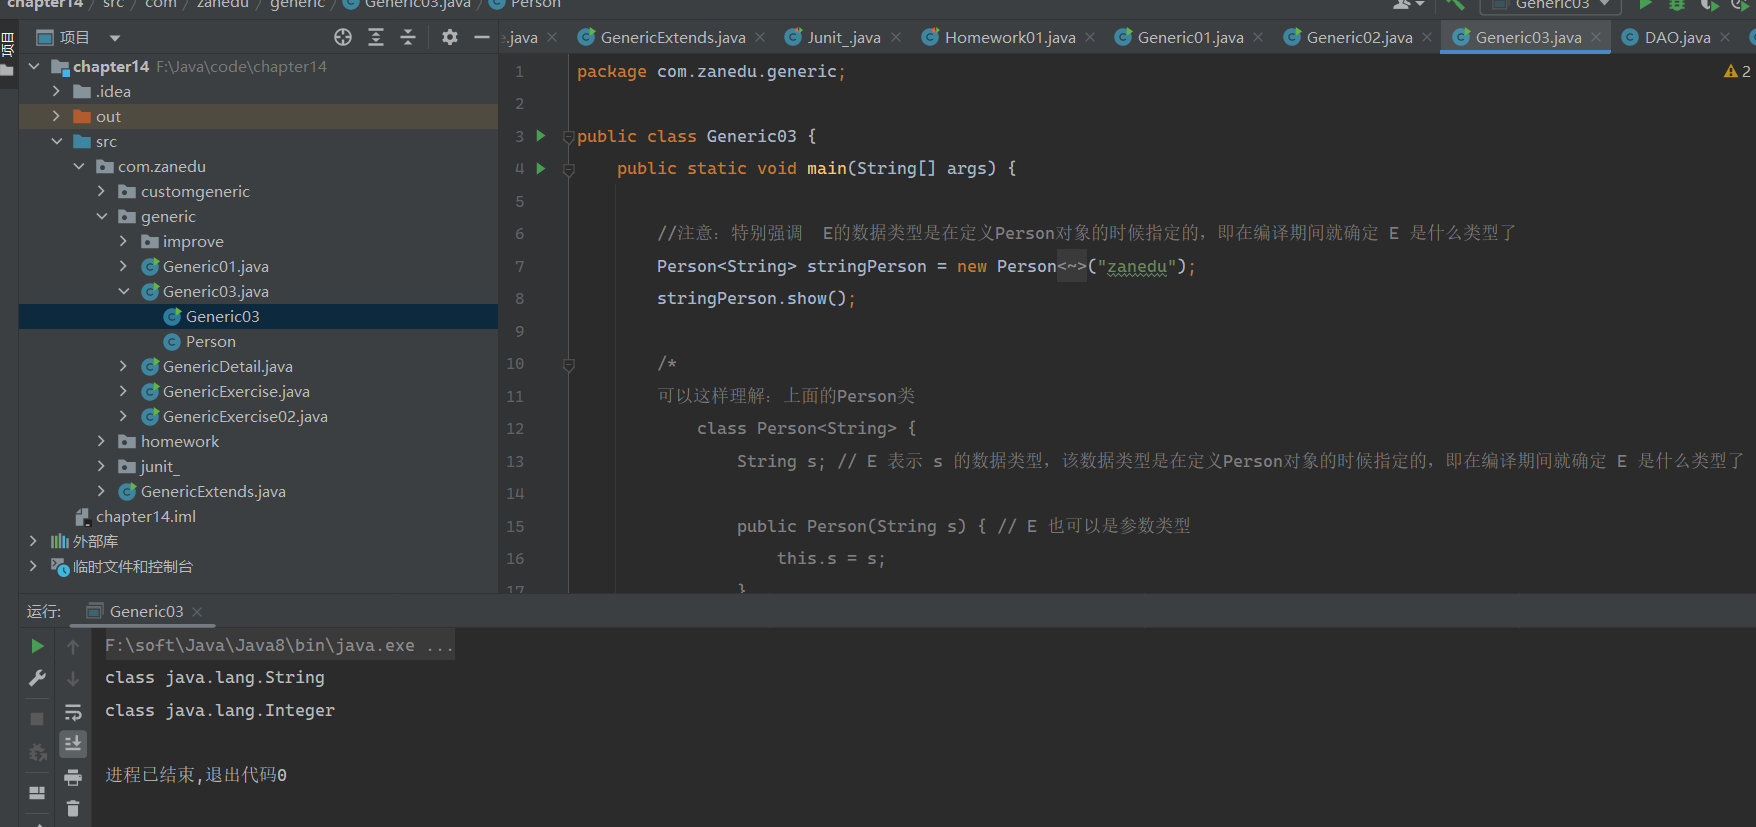
- 分析泛型的作用
package com.zanedu.generic;

public class Generic03 {
    public static void main(String[] args) {

        //注意:特别强调  E的数据类型是在定义Person对象的时候指定的,即在编译期间就确定 E 是什么类型了
        Person<String> stringPerson = new Person<String>("zanedu");
        stringPerson.show();

        /*
        可以这样理解:上面的Person类
            class Person<String> {
                String s; // E 表示 s 的数据类型,该数据类型是在定义Person对象的时候指定的,即在编译期间就确定 E 是什么类型了

                public Person(String s) { // E 也可以是参数类型
                    this.s = s;
                }

                public String f() { // E 也可以是返回类型
                    return s;
                }
            }
         */

        Person<Integer> integerPerson = new Person<>(100);
        integerPerson.show();
        /*
            class Person<Integer> {
                Integer s; // E 表示 s 的数据类型,该数据类型是在定义Person对象的时候指定的,即在编译期间就确定 E 是什么类型了

                public Person(Integer s) { // E 也可以是参数类型
                    this.s = s;
                }

                public Integer f() { // E 也可以是返回类型
                    return s;
                }
            }
         */
    }
}
//泛型的作用:可以在类声明时通过一个标识标识类中某个属性的类型
//           或者是某个方法的返回值的类型,或者是参数类型
class Person<E> {
    E s; // E 表示 s 的数据类型,该数据类型是在定义Person对象的时候指定的,即在编译期间就确定 E 是什么类型了

    public Person(E s) { // E 也可以是参数类型
        this.s = s;
    }

    public E f() { // E 也可以是返回类型
        return s;
    }

    public void show() {
        System.out.println(s.getClass());//显示s的运行类型
    }
}
泛型的语法
泛型的声明
interface 接口 {} 和 class 类<K, V> {}
//比如:List,ArrayList
说明:
- 其中,T,K,V不代表值,而是表示类型
- 任意字母都可以,常用T表示,是Type的缩写
泛型的实例化
要在类名后面指定类型参数的值(类型)
- List strList = new ArrayList();
- literator iterator = customers.iterator();
泛型使用举例
举例说明:泛型在HashSet和HashMap的使用情况
练习:
- 创建3个学生对象
- 放入到HashSet中学生对象,使用
- 放入到HashMap中,要求Key是String name,Value就是学生对象
- 使用两种方式遍历
package com.zanedu.generic;

import java.util.*;
@SuppressWarnings({"all"})
public class GenericExercise {
    public static void main(String[] args) {
        //使用泛型的方式给HashSet放入3个学生对象
        HashSet<Student> students = new HashSet<Student>();
        students.add(new Student("john", 20));
        students.add(new Student("tom", 18));
        students.add(new Student("smith", 15));
        //遍历
        //第一种:迭代器
        Iterator<Student> iterator = students.iterator();
        while (iterator.hasNext()) {
            Student student = iterator.next();
            System.out.println(student.getName() + "-" + student.getAge());
        }

        //第二种:增强for
        for (Student student : students) {
            System.out.println(student.getName() + "-" + student.getAge());
        }

        //使用泛型方式给HashMap放入3个学生对象
        HashMap<String, Student> stringStudentHashMap = new HashMap<String, Student>();
        stringStudentHashMap.put("john", new Student("jonh", 20));
        stringStudentHashMap.put("tom", new Student("tom", 18));
        stringStudentHashMap.put("mary", new Student("mary", 12));


        //用迭代器 EntrySet遍历 HashMap
        /*
            public Set<Map.Entry<K,V>> entrySet() {
                Set<Map.Entry<K,V>> es;
                return (es = entrySet) == null ? (entrySet = new EntrySet()) : es;
            }
         */
        Set<Map.Entry<String, Student>> entries = stringStudentHashMap.entrySet();
        /*
            public final Iterator<Map.Entry<K,V>> iterator() {
                return new EntryIterator();
            }
         */
        Iterator<Map.Entry<String, Student>> iterator1 = entries.iterator();
        while (iterator1.hasNext()) {
            Map.Entry<String, Student> next = iterator1.next();
            System.out.println(next.getKey() + "-" + next.getValue());
        }

    }
}
/**
 * 创建  3个学生对象
 * 放入到HashSet中学生对象, 使用.
 * 放入到  HashMap中,要求 Key 是 String name, Value 就是 学生对象
 * 使用两种方式遍历
 */
class Student {
    private String name;
    private int age;

    public Student(String name, int age) {
        this.name = name;
        this.age = age;
    }

    public String getName() {
        return name;
    }

    public void setName(String name) {
        this.name = name;
    }

    public int getAge() {
        return age;
    }

    public void setAge(int age) {
        this.age = age;
    }

    @Override
    public String toString() {
        return "Student{" +
                "name='" + name + '\'' +
                ", age=" + age +
                '}';
    }
}
泛型使用的注意事项和细节
- interface List {} 和 public class HashSet {}…等等
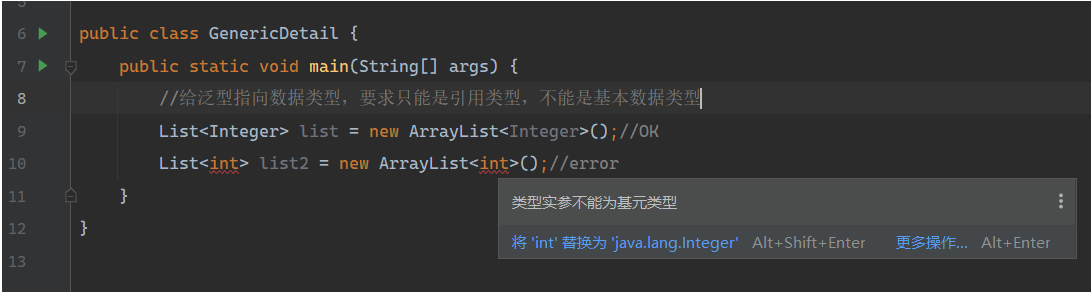
- 说明:T、E只能是引用类型
package com.zanedu.generic;

import java.util.ArrayList;
import java.util.List;
@SuppressWarnings({"all"})
public class GenericDetail {
    public static void main(String[] args) {
        //1. 给泛型指向数据类型,要求只能是引用类型,不能是基本数据类型
        List<Integer> list = new ArrayList<Integer>();//OK
//        List<int> list2 = new ArrayList<int>();//error
}
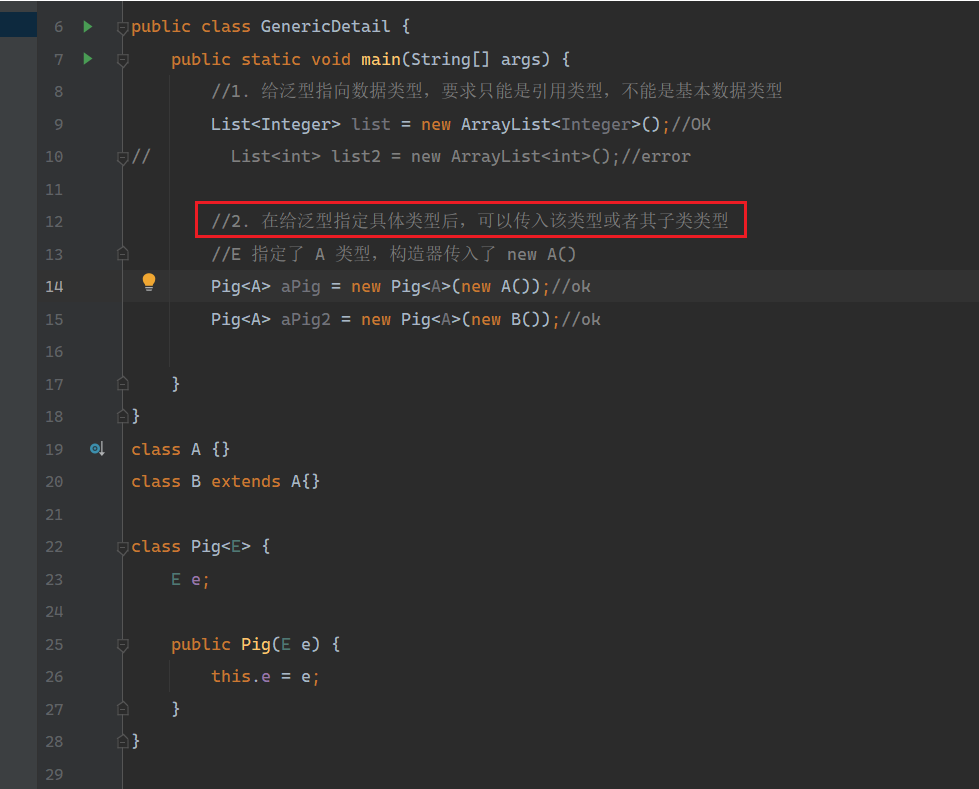
- 在给泛型指定具体类型后,可以传入该类型或者子类类型
package com.zanedu.generic;

import java.util.ArrayList;
import java.util.List;
@SuppressWarnings({"all"})
public class GenericDetail {
    public static void main(String[] args) {
        //2. 在给泛型指定具体类型后,可以传入该类型或者其子类类型
        //E 指定了 A 类型,构造器传入了 new A()
        Pig<A> aPig = new Pig<A>(new A());//ok
        aPig.f();
        Pig<A> aPig2 = new Pig<A>(new B());//ok
        aPig2.f();
    }
}

class A {}
class B extends A{}

class Pig<E> {
    E e;

    public Pig(E e) {
        this.e = e;
    }

    public void f() {
        System.out.println(e.getClass());
    }
}
- 泛型使用形式
List<Integer> list1 = new ArrayList<Integer> ();
List<Integer> list1 = new ArrayList<> ();
package com.zanedu.generic;

import java.util.ArrayList;
import java.util.List;
@SuppressWarnings({"all"})
public class GenericDetail {
    public static void main(String[] args) {
        //3. 泛型的使用形式
        ArrayList<Integer> integers1 = new ArrayList<Integer>();
        List<Integer> list1 = new ArrayList<Integer>();
        //在实际开发中,我们往往简写
        //编译器会进行类型推断,推荐使用下面的写法
        ArrayList<Integer> integers2 = new ArrayList<>();
        List<Integer> list2 = new ArrayList<>();

        ArrayList<Pig> pigs = new ArrayList<>();
    }
}
class Pig<E> {
    E e;

    public Pig(E e) {
        this.e = e;
    }

    public void f() {
        System.out.println(e.getClass());
    }
}
- 如果我们这样写 List list3 = new ArrayList(); 默认给它的泛型是[ E 就是 Object]
package com.zanedu.generic;

import java.util.ArrayList;
import java.util.List;
@SuppressWarnings({"all"})
public class GenericDetail {
    public static void main(String[] args) {
        //4. 如果是这样写 泛型默认是 Object
        ArrayList arrayList = new ArrayList();//等价ArrayList<Object> arrayList = new ArrayList();

        Tiger tiger = new Tiger();
        //相当于
        /*
            class Tiger {
                Object e;

                public Tiger() {
                }

                public Tiger(Object e) {
                    this.e = e;
                }
            }
         */

    }
}
class Tiger<E> {
    E e;

    public Tiger() {
    }

    public Tiger(E e) {
        this.e = e;
    }
}
泛型练习题
package com.zanedu.generic;
import java.util.ArrayList;
import java.util.Comparator;
@SuppressWarnings({"all"})
public class GenericExercise02 {
public static void main(String[] args) {
ArrayList<Employee> employees = new ArrayList<>();
employees.add(new Employee("tom", 20000, new MyDate(1980, 11, 11)));
employees.add(new Employee("smith", 40000, new MyDate(2001, 12, 12)));
employees.add(new Employee("tom", 300000, new MyDate(1980, 12, 10)));
System.out.println(employees);
System.out.println("==进行排序===");
employees.sort(new Comparator<Employee>() {
@Override
public int compare(Employee o1, Employee o2) {
//先按照name排序,如果name相同,则按生日日期的先后排序。【即:定制排序】
//先对传入的参数进行验证
if (!(o1 instanceof Employee && o2 instanceof Employee)) {
System.out.println("类型不匹配");
return 0;
}
//比较名字
int i = o1.getName().compareTo(o2.getName());
if (i != 0) {
return i;
}
//下面是对birthday的比较,因此,我们最好将这个比较,放在MyDate类完成
//封装后,将来的可维护性和复用性就大大增强了
return o1.getBirthday().compareTo(o2.getBirthday());
}
});
System.out.println("===排序后===");
System.out.println(employees);
}
}
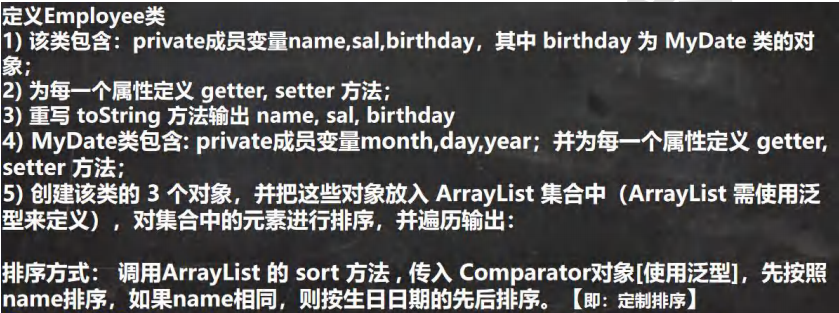
/**
* 定义Employee类
* 1) 该类包含:private成员变量name,sal,birthday,其中 birthday 为 MyDate 类的对象;
* 2) 为每一个属性定义 getter, setter 方法;
* 3) 重写 toString 方法输出 name, sal, birthday
* 4) MyDate类包含: private成员变量month,day,year;并为每一个属性定义 getter, setter 方法;
* 5) 创建该类的 3 个对象,并把这些对象放入 ArrayList 集合中(ArrayList 需使用泛型来定义),对集合中的元素进行排序,并遍历输出:
*
* 排序方式: 调用ArrayList 的 sort 方法 ,
* 传入 Comparator对象[使用泛型],先按照name排序,如果name相同,则按生日日期的先后排序。【即:定制排序】
* 有一定难度 15min , 比较经典 泛型使用案例 GenericExercise02.java
*/
class Employee {
private String name;
private double sal;
private MyDate birthday;
public Employee(String name, double sal, MyDate birthday) {
this.name = name;
this.sal = sal;
this.birthday = birthday;
}
public String getName() {
return name;
}
public void setName(String name) {
this.name = name;
}
public double getSal() {
return sal;
}
public void setSal(double sal) {
this.sal = sal;
}
public MyDate getBirthday() {
return birthday;
}
public void setBirthday(MyDate birthday) {
this.birthday = birthday;
}
@Override
public String toString() {
return "\nEmployee{" +
"name='" + name + '\'' +
", sal=" + sal +
", birthday=" + birthday +
'}';
}
}
class MyDate implements Comparable<MyDate>{
private int year;
private int month;
private int day;
public MyDate(int year, int month, int day) {
this.month = month;
this.day = day;
this.year = year;
}
public int getMonth() {
return month;
}
public void setMonth(int month) {
this.month = month;
}
public int getDay() {
return day;
}
public void setDay(int day) {
this.day = day;
}
public int getYear() {
return year;
}
public void setYear(int year) {
this.year = year;
}
@Override
public String toString() {
return "MyDate{" +
"year=" + year +
", month=" + month +
", day=" + day +
'}';
}
@Override
public int compareTo(MyDate o) { //把对year-month-day比较放在这里
int yearMinus = year - o.getYear();
if (yearMinus != 0) {
return yearMinus;
}
//如果year相同,就比较Month
int monthMinus = month - o.getMonth();
if (monthMinus != 0) {
return monthMinus;
}
//如果month相同,比较day
return day - o.getDay();
}
}
自定义泛型
自定义泛型类
- 基本语法:
class 类名 <T, R…> { //…表示可以有多个泛型
成员
}
- 注意细节:
- 普通成员可以使用泛型(属性、方法)
- 使用泛型的数组,不能初始化
- 静态方法中不能使用类的泛型
- 泛型类的类型,是在创建对象时就确定的(因为创建对象时,需要指定确定类型)
- 如果在创建对象时,没有指定类型,默认为Object
package com.zanedu.customgeneric;
public class CustomGeneric_ {
public static void main(String[] args) {
//T=Double, R=String, M=Integer
Tiger<Double,String,Integer> g = new Tiger<>("john");
g.setT(10.9); //OK
//g.setT("yy"); //错误,类型不对
System.out.println(g);
Tiger g2 = new Tiger("john~~");//OK T=Object R=Object M=Object
g2.setT("yy"); //OK ,因为 T=Object "yy"=String 是Object子类
System.out.println("g2=" + g2);
}
}
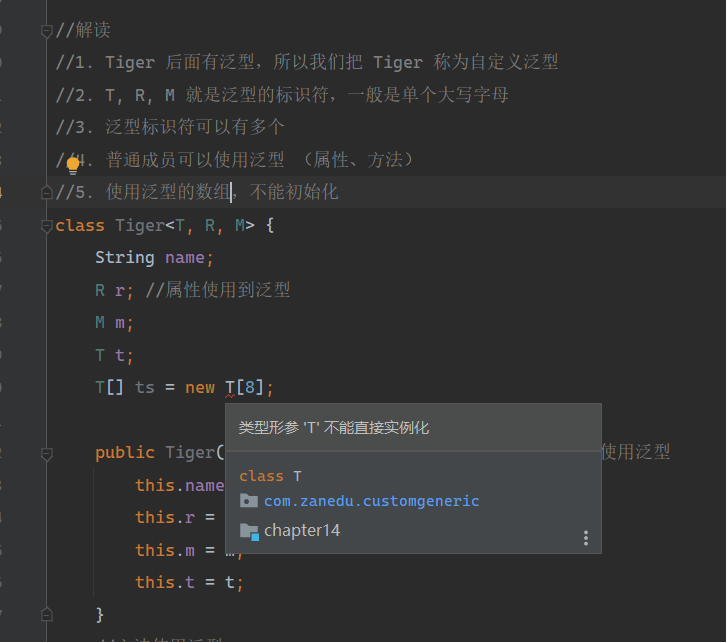
//解读
//1. Tiger 后面有泛型,所以我们把 Tiger 称为自定义泛型
//2. T, R, M 就是泛型的标识符,一般是单个大写字母
//3. 泛型标识符可以有多个
//4. 普通成员可以使用泛型 (属性、方法)
//5. 使用泛型的数组,不能初始化
//6. 静态方法不能使用泛型
class Tiger<T, R, M> {
String name;
R r; //属性使用到泛型
M m;
T t;
//因为数组在new 不能确定T的类型,就无法在内存开辟空间
// T[] ts = new T[8];
T[] ts;
public Tiger(String name) {
this.name = name;
}
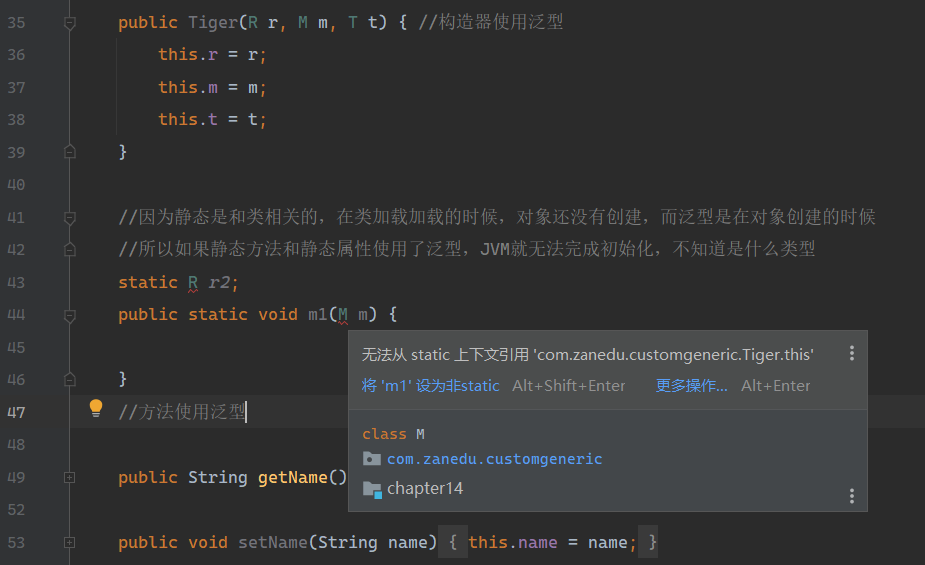
public Tiger(R r, M m, T t) { //构造器使用泛型
this.r = r;
this.m = m;
this.t = t;
}
//因为静态是和类相关的,在类加载加载的时候,对象还没有创建,而泛型是在对象创建的时候
//所以如果静态方法和静态属性使用了泛型,JVM就无法完成初始化,不知道是什么类型
// static R r2;
// public static void m1(M m) {
//
// }
//方法使用泛型
public String getName() {
return name;
}
public void setName(String name) {
this.name = name;
}
public R getR() { //返回类型可以使用泛型
return r;
}
public void setR(R r) { //方法使用泛型
this.r = r;
}
public M getM() {
return m;
}
public void setM(M m) {
this.m = m;
}
public T getT() {
return t;
}
public void setT(T t) {
this.t = t;
}
}
- 使用泛型的数组,不能初始化
- 静态方法不能使用泛型
自定义泛型接口
- 基本语法:
interface 接口名<T, R…> {
}
- 注意细节:
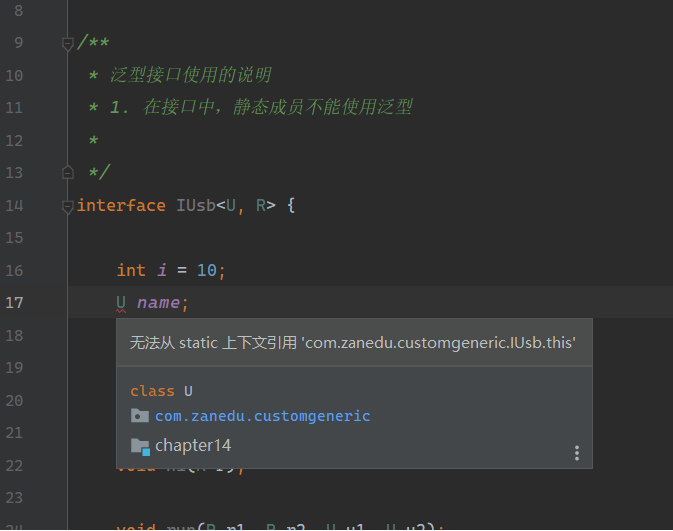
- 接口中,静态成员也不能使用泛型(这个和泛型类规定一样)
- 泛型接口的类型,在继承接口或者实现接口时确定
- 没有指定类型,默认为Object
package com.zanedu.customgeneric;

public class CustomInterfaceGeneric {
    public static void main(String[] args) {

    }
}

/**
 * 泛型接口使用的说明
 * 1. 在接口中,静态成员不能使用泛型
 * 2. 泛型接口的类型,在继承接口或者实现接口的时候确定
 * 3. 没有指定类型,默认是Object
 */

//在继承接口时 指定泛型接口的类型
interface IA extends IUsb<String, Double> {

}
//当我们去实现 IA 接口时,因为IA在继承IUsb接口时,指定了U为String,R为Double
//因此在实现IUsb接口的方法时,使用String替换U,使用Double替换R
class AA implements IA {

    @Override
    public Double get(String s) {
        return null;
    }

    @Override
    public void hi(Double aDouble) {

    }

    @Override
    public void run(Double r1, Double r2, String u1, String u2) {

    }
}

//实现接口时,直接指定泛型接口的类型
//给U指定了Integer,给R指定了Float
//所以当我们实现IUsb方法时,会使用Integer替换U,使用Float替换R
class BB implements IUsb<Integer, Float> {

    @Override
    public Float get(Integer integer) {
        return null;
    }

    @Override
    public void hi(Float aFloat) {

    }

    @Override
    public void run(Float r1, Float r2, Integer u1, Integer u2) {

    }
}

//3. 没有指定类型,默认是Object
//建议还是写上类型
class CC implements IUsb { //等价于class CC implements IUsb<Object>
    @Override
    public Object get(Object o) {
        return null;
    }

    @Override
    public void hi(Object o) {

    }

    @Override
    public void run(Object r1, Object r2, Object u1, Object u2) {

    }
}

interface IUsb<U, R> {

    int i = 10;
//    U name; //不能这样使用

    //普通方法中,可以使用接口泛型
    R get(U u);

    void hi(R r);

    void run(R r1, R r2, U u1, U u2);

    //在jdk8中,可以在接口中,使用默认方法,也是可以使用泛型的
    default R method(U u) {
        return null;
    }
}
- 在接口中,静态成员不能使用泛型
自定义泛型方法
- 基本语法:
修饰符 <T, R…> 返回类型 方法名(参数列表) {
}
- 注意细节:
- 泛型方法,可以定义在普通类中,也可以定义在泛型类中
- 当泛型方法被调用时,类型会确定
- public void eat(E e) {},修饰符后没有<T, R…> ear,则说明这个方法不是泛型方法,而是使用了泛型
package com.zanedu.customgeneric;

import java.util.ArrayList;

/**
 * 泛型方法的使用
 */
public class CustomMethodGeneric {
    public static void main(String[] args) {
        Car car = new Car();
        car.fly("宝马", 100);//当调用方法时,传入参数,编译器就会确定对应的泛型类型<T, R>
        System.out.println("=====");
        car.fly(300, 100.1);//Integer Double

        //测试
        //T -> String , R -> ArrayList
        Fish<String, ArrayList> stringArrayListFish = new Fish<>();
        stringArrayListFish.hello(new ArrayList(), 11.3f);//ArrayList Float
    }
}
//泛型方法,可以定义在普通类中,也可以定义在泛型类中
class Car { //普通类
    public void run() { //普通方法
    }
    //说明:
    //1. <T, R> 就是泛型
    //2. 提供给fly使用的
    public<T, R> void fly(T t, R r) { //泛型方法
        System.out.println(t.getClass());//String
        System.out.println(r.getClass());//Integer
    }
}
class Fish<T, R> { //泛型类
    public void run() { //普通方法
    }
    public<U, M> void eat(U u, M m) { //泛型方法
    }

    //说明
    //1. 下面的hi方法不是泛型方法,因为前面没有标识符
    //2. 而是hi方法使用了类声明的 泛型,即方法使用泛型
    public void hi(T t) {
    }
    //泛型方法可以使用类声明的泛型,也可以使用自己声明的泛型
    public<K> void hello(R r, K k) {
        System.out.println(r.getClass());
        System.out.println(k.getClass());
    }
}
练习题
- 看看下面代码是否正确,如果有错误,修改正确,并说明输出什么
package com.zanedu.customgeneric;

public class CustomMethodGenericExercise {
    public static void main(String[] args) {
        //T->String, R->Integer, M->Double
        Apple<String, Integer, Double> apple = new Apple<>();
        apple.fly(10);//10 会被自动装箱 Integer10, 输出Integer
        apple.fly(new Dog());//Dog

    }
}

class Apple<T, R, M> {//自定义泛型类

    public <E> void fly(E e) {  //泛型方法
        System.out.println(e.getClass().getSimpleName());
    }

    //public void eat(U u) {}//错误,因为U没有声明
    public void run(M m) {
    } //ok
}

class Dog {
}
泛型的继承和通配符
泛型的继承和通配符说明
- 泛型不具备继承性
List list = new ArrayList();//error
- <?>:支持任意泛型类型
- <? extends A>:支持A类以及A类的子类,规定了泛型的上限
- <? super A>:支持A类以及A类的父类,不限于直接父类,规定了泛型的下限
package com.zanedu;


import java.util.ArrayList;
import java.util.List;

/*
泛型的继承和通配符
 */
public class GenericExtends {
    public static void main(String[] args) {
        Object o = new String("xx");//ok

        //泛型没有继承性
//        List<Object> list = new ArrayList<String>();//error

        //举例说明
        List<Object> list1 = new ArrayList<>();
        List<String> list2 = new ArrayList<>();
        List<AA> list3 = new ArrayList<>();
        List<BB> list4 = new ArrayList<>();
        List<CC> list5 = new ArrayList<>();

        //如果是 List<?> c,可以接受任意的泛型类型
//        printCollection1(list1);
//        printCollection1(list2);
//        printCollection1(list3);
//        printCollection1(list4);
//        printCollection1(list5);

        //List<? extends AA> c  可以接受 AA 或者 AA子类
//        printCollection2(list1);//error
//        printCollection2(list2);//error
        printCollection2(list3);//ok
        printCollection2(list4);//ok
        printCollection2(list5);//ok

        //List<? super AA> c  支持AA类以及AA类的父类,不限于直接父类,规定了泛型的下限
        printCollection3(list1);//ok
//        printCollection3(list2);//error
        printCollection3(list3);//ok
//        printCollection3(list4);//error
//        printCollection3(list5);//error
    }

    //说明:List<?> 表示任意的泛型类型都可以接受
    public static void printCollection1(List<?> c) {
        for (Object object : c) {
            System.out.println(object);
        }
    }

    // ? extend AA 表示上限,可以接受 AA 或者 AA子类
    public static void printCollection2(List<? extends AA> c) {
        for (Object object : c) {
            System.out.println(object);
        }
    }

    // ? super 子类类名AA:支持AA类以及AA类的父类,不限于直接父类,规定了泛型的下限
    public static void printCollection3(List<? super AA> c) {
        for (Object object : c) {
            System.out.println(object);
        }
    }
}

class AA {

}

class BB extends AA {

}

class CC extends BB {

}
JUnit
- 一个类有很多功能代码需要测试,为了测试,就需要写入到main方法中
- 如果有多个功能代码测试,就需要来回注销,切换很麻烦
- 如果可以直接运行一个方法,就方便很多,并且可以给出相关信息 ==> JUnit
- 基本介绍
- JUnit是Java语言的单元测试框架
- 多数Java的开发环境都已经集成了JUnit作为单元测试的工具
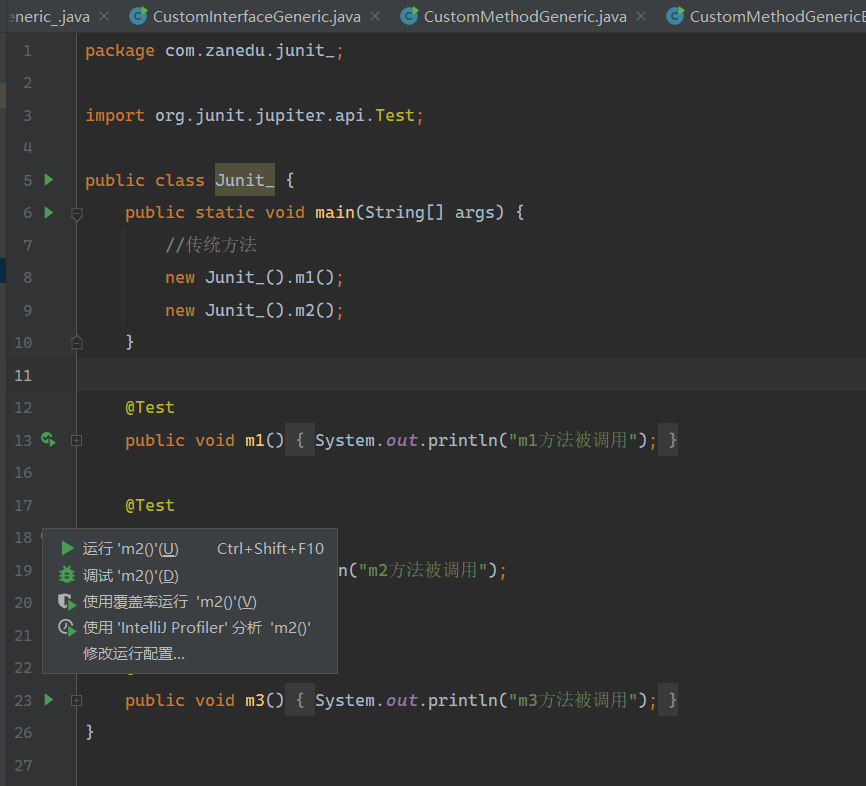
package com.zanedu.junit_;

import org.junit.jupiter.api.Test;

public class Junit_ {
    public static void main(String[] args) {
        //传统方法
        new Junit_().m1();
        new Junit_().m2();
    }

    @Test
    public void m1() {
        System.out.println("m1方法被调用");
    }

    @Test
    public void m2() {
        System.out.println("m2方法被调用");
    }

    @Test
    public void m3() {
        System.out.println("m3方法被调用");
    }
}


 297
297


 被折叠的 条评论
为什么被折叠?
被折叠的 条评论
为什么被折叠?
 到【灌水乐园】发言


