


前言
LNMP架构是指在Linux操作系统上,使用Nginx作为Web服务器,MySQL作为数据库系统,以及PHP作为服务器端脚本语言的一种开发环境。这种架构被广泛应用于网站开发和服务器部署中,因为它具有高性能、高可靠性和易于扩展等特点,能够帮助企业快速构建高质量的Web应用。
一、php编译安装
软件依赖性
[root@server1 ~]# yum install -y systemd-devel libxml2-devel sqlite-devel libcurl-devel libpng-devel
[root@server1 ~]# yum install -y oniguruma-devel-6.8.2-1.el7.x86_64.rpm oniguruma-6.8.2-1.el7.x86_64.rpm
php源码编译
[root@server1 ~]# tar zxf php-7.4.12.tar.bz2
[root@server1 ~]# cd php-7.4.12/
[root@server1 php-7.4.12]# ./configure --prefix=/usr/local/php --with-config-file-path=/usr/local/php/etc --enable-fpm --with-fpm-user=nginx --with-fpm-group=nginx  --with-curl --with-mhash --with-zlib --with-openssl --enable-mysqlnd --with-mysqli --with-pdo-mysql --disable-debug --enable-sockets --enable-soap --enable-inline-optimization --enable-xml --enable-ftp --enable-gd --enable-mbstring  --enable-bcmath --with-fpm-systemd

[root@server1 php-7.4.12]# make
[root@server1 php-7.4.12]# make install

[root@server1 php-7.4.12]# cp php.ini-production /usr/local/php/etc/php.ini
[root@server1 php-7.4.12]# cp sapi/fpm/php-fpm.service /lib/systemd/system

[root@server1 php-7.4.12]# cd /usr/local/php/etc/
[root@server1 etc]# cp php-fpm.conf.default php-fpm.conf
[root@server1 etc]# vim php-fpm.conf
[global]
; Pid file
; Note: the default prefix is /usr/local/php/var
; Default Value: none
pid = run/php-fpm.pid						#打开注释
修改时区
[root@server1 etc]# vim php.ini
[Date]
; Defines the default timezone used by the date functions
; http://php.net/date.timezone
date.timezone = Asia/Shanghai

[root@server1 etc]# cd php-fpm.d/
[root@server1 php-fpm.d]# cp www.conf.default www.conf

[root@server1 ~]# vim .bash_profile
PATH=$PATH:$HOME/bin:/usr/local/php/bin
[root@server1 ~]# source .bash_profile
编译php-fpm启动文件
[root@server1 ~]# vim /lib/systemd/system/php-fpm.service
#ProtectSystem=full				#注释

[root@server1 ~]# systemctl daemon-reload
[root@server1 ~]# systemctl  start php-fpm.service
[root@server1 ~]# netstat -antlp|grep :9000
tcp        0      0 127.0.0.1:9000          0.0.0.0:*               LISTEN      24342/php-fpm: mast
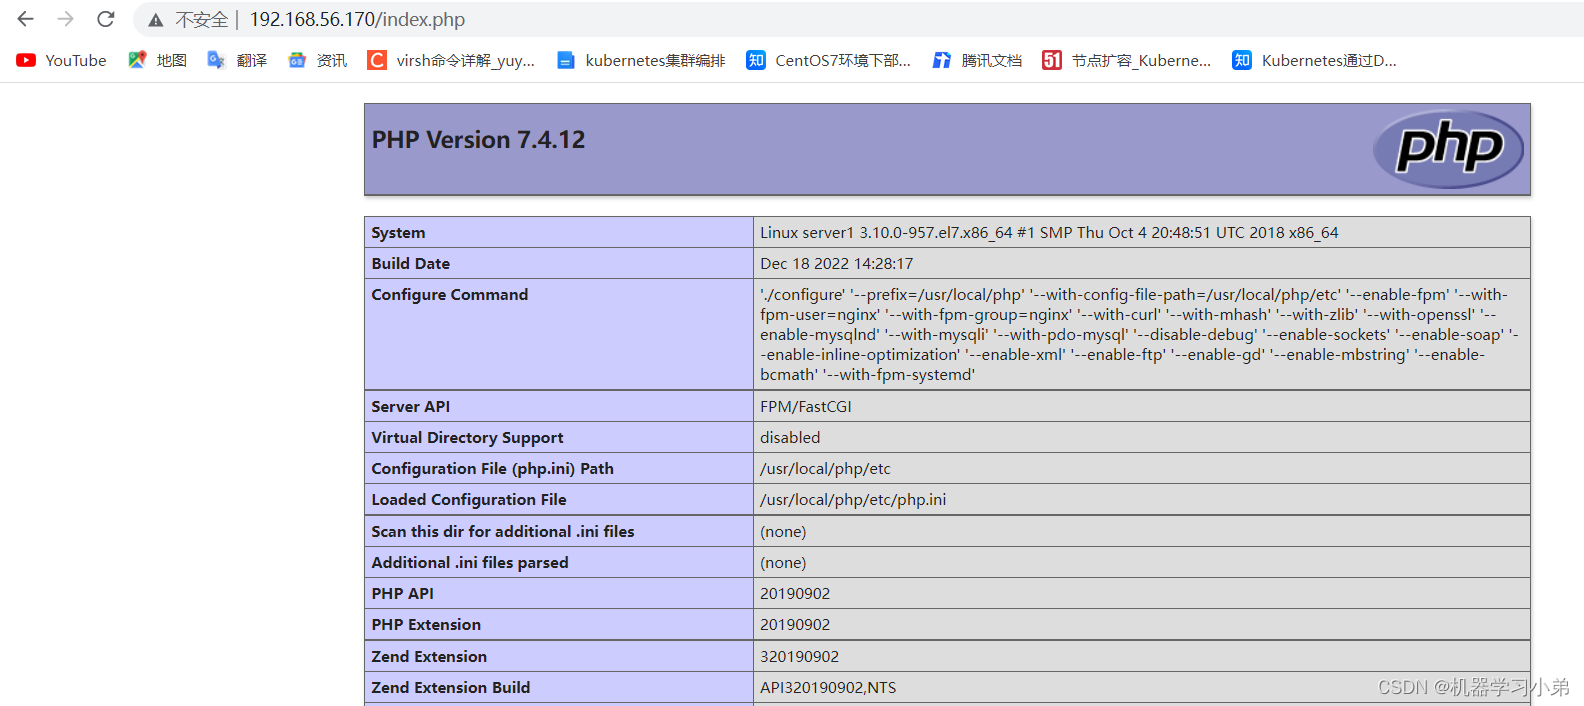
二、nginx整合php
[root@server1 ~]# vim /usr/local/nginx/conf/nginx.conf

        location ~ \.php$ {
            root           html;
            fastcgi_pass   127.0.0.1:9000;
            fastcgi_index  index.php;
            #fastcgi_param  SCRIPT_FILENAME  /scripts$fastcgi_script_name;	#注释
            include        fastcgi.conf;			#修改这行
        }

[root@server1 ~]# systemctl  restart nginx.service

[root@server1 ~]# cd /usr/local/nginx/html/
[root@server1 html]# vim index.php
<?php
phpinfo()
?>
三、传统缓存策略
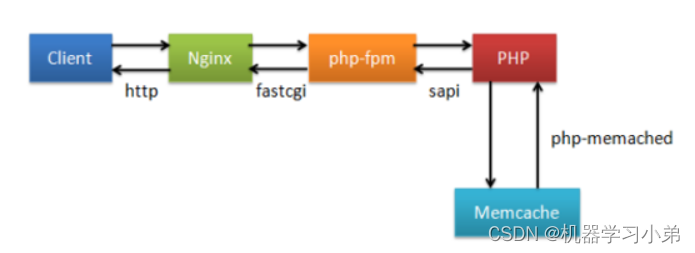
memcache模块编译
[root@server1 ~]# tar zxf memcache-4.0.5.2.tgz
[root@server1 ~]# cd memcache-4.0.5.2/
[root@server1 memcache-4.0.5.2]# yum install -y autoconf
[root@server1 memcache-4.0.5.2]# phpize
[root@server1 memcache-4.0.5.2]# ./configure --enable-memcache
[root@server1 memcache-4.0.5.2]# make
[root@server1 memcache-4.0.5.2]# make install


[root@server1 no-debug-non-zts-20190902]# cd /usr/local/php/etc/
[root@server1 etc]# ls
php-fpm.conf  php-fpm.conf.default  php-fpm.d  php.ini
[root@server1 etc]# vim php.ini
extension=memcache

[root@server1 etc]# systemctl reload php-fpm.service
[root@server1 etc]# php -m |grep memcache
memcache
安装memcached服务
[root@server1 html]# yum install -y memcached
[root@server1 html]# systemctl  enable --now memcached
[root@server1 html]# netstat -antlp|grep :11211
tcp        0      0 0.0.0.0:11211           0.0.0.0:*               LISTEN      27633/memcached
tcp6       0      0 :::11211                :::*                    LISTEN      27633/memcached

[root@server1 memcache-4.0.5.2]# cp memcache.php example.php /usr/local/nginx/html/
[root@server1 conf]# cd /usr/local/nginx/html/
[root@server1 html]# vim memcache.php
$MEMCACHE_SERVERS[] = 'localhost:11211';
测试
http://192.168.56.170/memcache.php
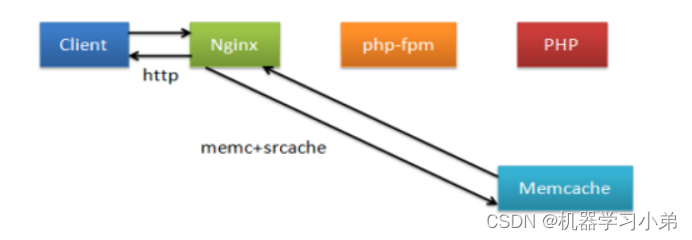
高效缓存系统
[root@server1 ~]# systemctl  stop nginx.service
[root@server1 ~]# tar zxf openresty-1.21.4.1.tar.gz
[root@server1 ~]# cd openresty-1.21.4.1/
[root@server1 openresty-1.21.4.1]# ./configure --prefix=/usr/local/openresty --with-http_stub_status_module --with-http_ssl_module --with-threads --with-file-aio
[root@server1 openresty-1.21.4.1]# make
[root@server1 openresty-1.21.4.1]# make install

[root@server1 html]# pwd
/usr/local/openresty/nginx/html
[root@server1 html]# cp /usr/local/nginx/html/example.php .
[root@server1 html]# cp /usr/local/nginx/html/index.php .

[root@server1 conf]# pwd
/usr/local/openresty/nginx/conf
[root@server1 conf]# vim nginx.conf
user  nginx;
worker_processes  2;

events {
    worker_connections  65535;
}

http {
    upstream memcache {
        server 127.0.0.1:11211;
        keepalive 512;
        }
...
    server {
        listen       80;
        server_name  localhost;

        location / {
            root   html;
            index  index.html index.htm;
        }
        error_page   500 502 503 504  /50x.html;
        location = /50x.html {
            root   html;
        }

        location /memc {
        internal;
        memc_connect_timeout 100ms;
        memc_send_timeout 100ms;
        memc_read_timeout 100ms;
        set $memc_key $query_string;
        set $memc_exptime 300;
        memc_pass memcache;
        }

        location ~ \.php$ {
            set $key $uri$args;
            srcache_fetch GET /memc $key;
            srcache_store PUT /memc $key;
            root           html;
            fastcgi_pass   127.0.0.1:9000;
            fastcgi_index  index.php;
            #fastcgi_param  SCRIPT_FILENAME  /scripts$fastcgi_script_name;
            include        fastcgi.conf;
        }
    }
}

[root@server1 conf]# /usr/local/openresty/nginx/sbin/nginx -t

[root@server1 conf]# /usr/local/openresty/nginx/sbin/nginx
[root@server1 conf]# netstat -antlp|grep :80
tcp        0      0 0.0.0.0:80              0.0.0.0:*               LISTEN      37163/nginx: master
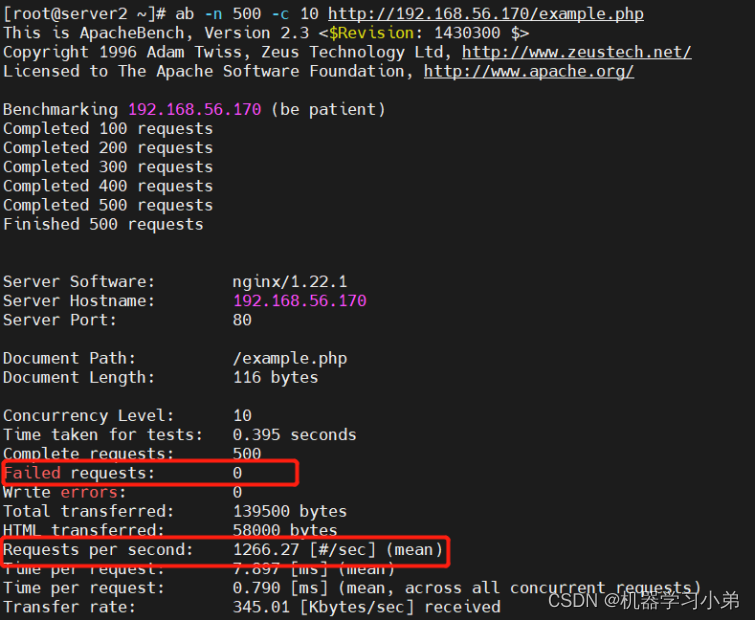
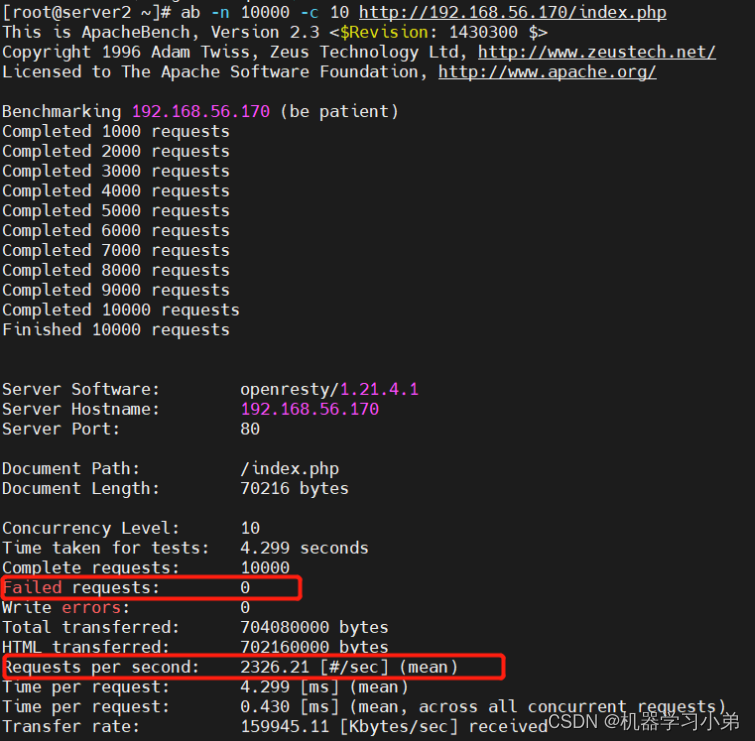
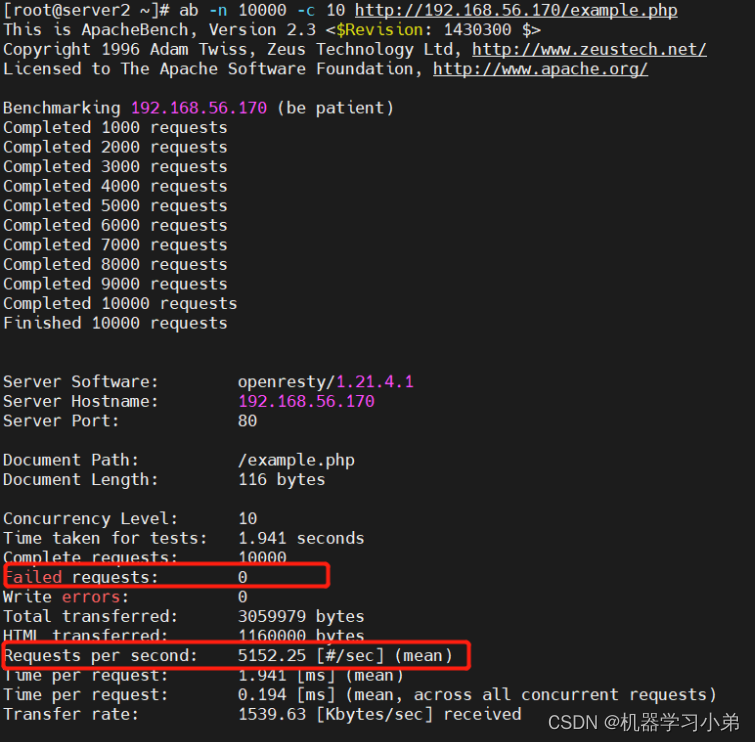
站点压测
四、session共享
tomcat部署
[root@server3 ~]# tar zxf apache-tomcat-7.0.37.tar.gz -C /usr/local/
[root@server3 ~]# cd /usr/local/
[root@server3 local]# ln -s apache-tomcat-7.0.37/ tomcat
安装jdk
[root@server3 tomcat]# yum install -y java-1.8.0-openjdk.x86_64
启动服务
[root@server3 tomcat]# cd /usr/local/tomcat/
[root@server3 tomcat]# bin/startup.sh
Using CATALINA_BASE:   /usr/local/tomcat
Using CATALINA_HOME:   /usr/local/tomcat
Using CATALINA_TMPDIR: /usr/local/tomcat/temp
Using JRE_HOME:        /usr
Using CLASSPATH:       /usr/local/tomcat/bin/bootstrap.jar:/usr/local/tomcat/bin/tomcat-juli.jar

[root@server3 tomcat]# netstat -antlp |grep :8080
tcp6       0      0 :::8080                 :::*                    LISTEN      7790/java
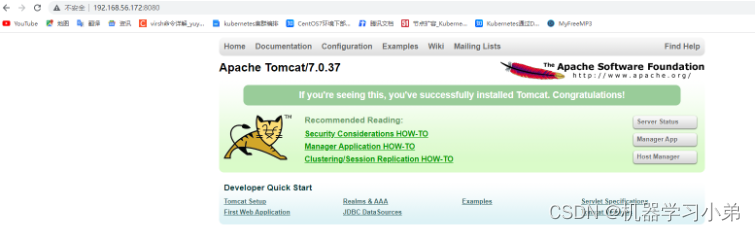
浏览器可以访问默认页面
如法炮制第二台tomcat主机
五、nginx整合tomcat
[root@server1 conf]# vim nginx.conf
http {
    upstream tomcat {
        sticky;						#基于cookie调度算法,session保持
        server server2:8080;
        server server3:8080;
    }
...
location ~ \.jsp$ {					#所有.jsp页面转发到tomcat服务处理
            proxy_pass   http://tomcat;
        }
...

[root@server1 conf]# systemctl  reload nginx.service
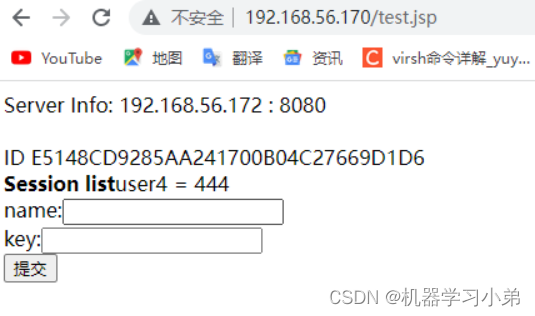
同步测试页面
[root@server2 ~]# cd /usr/local/tomcat/webapps/ROOT/
[root@server2 ROOT]# scp test.jsp  server3:/usr/local/tomcat/webapps/ROOT/
实现session共享
配置tomcat
[root@server2 jar]# ls
asm-3.2.jar kryo-serializers-0.10.jar memcached-session-manager-tc7-1.6.3.jar msm-kryo-serializer-1.6.3.jar spymemcached-2.7.3.jar
kryo-1.04.jar memcached-session-manager-1.6.3.jar minlog-1.2.jar reflectasm-1.01.jar
[root@server2 jar]# cp * /usr/local/tomcat/lib/
[root@server2 ~]# vim /usr/local/tomcat/conf/context.xml
<Manager className=“de.javakaffee.web.msm.MemcachedBackupSessionManager”
memcachedNodes=“n1:192.168.56.171:11211,n2:192.168.56.172:11211”
failoverNodes=“n1” #另一台tomcat改为n2,交叉存储
requestUriIgnorePattern=“.*.(ico|png|gif|jpg|css|js)$”
transcoderFactoryClass=“de.javakaffee.web.msm.serializer.kryo.KryoTranscoderFactory”
/>
安装memcached
[root@server2 tomcat]# yum install -y memcached
[root@server2 tomcat]# systemctl  enable --now memcached

重启tomcat
[root@server2 ~]# /usr/local/tomcat/bin/shutdown.sh
Using CATALINA_BASE:   /usr/local/tomcat
Using CATALINA_HOME:   /usr/local/tomcat
Using CATALINA_TMPDIR: /usr/local/tomcat/temp
Using JRE_HOME:        /usr
Using CLASSPATH:       /usr/local/tomcat/bin/bootstrap.jar:/usr/local/tomcat/bin/tomcat-juli.jar
[root@server2 ~]# /usr/local/tomcat/bin/startup.sh
Using CATALINA_BASE:   /usr/local/tomcat
Using CATALINA_HOME:   /usr/local/tomcat
Using CATALINA_TMPDIR: /usr/local/tomcat/temp
Using JRE_HOME:        /usr
Using CLASSPATH:       /usr/local/tomcat/bin/bootstrap.jar:/usr/local/tomcat/bin/tomcat-juli.jar

查看启动日志
[root@server2 ~]# cat /usr/local/tomcat/logs/catalina.out
依此类推配置另一台tomcat
测试,依次关闭tomcat服务和memcached服务,查看session是否共享
六、mysql部署
数据库安装
[root@server1 mysql-5.7.36]# yum install -y cmake bison gcc-c++

[root@server1 ~]# tar zxf mysql-boost-5.7.36.tar.gz
[root@server1 ~]# cd mysql-5.7.36/
[root@server1 mysql-5.7.36]# cmake -DCMAKE_INSTALL_PREFIX=/usr/local/mysql -DMYSQL_DATADIR=/data/mysql -DMYSQL_UNIX_ADDR=/data/mysql/mysql.sock -DWITH_INNOBASE_STORAGE_ENGINE=1 -DSYSCONFDIR=/etc -DENABLED_LOCAL_INFILE=1 -DWITH_EXTRA_CHARSETS=all -DDEFAULT_CHARSET=utf8mb4 -DDEFAULT_COLLATION=utf8mb4_unicode_ci -DWITH_BOOST=/root/mysql-5.7.36/boost/boost_1_59_0
[root@server1 mysql-5.7.36]# make
[root@server1 mysql-5.7.36]# make install

[root@server1 mysql-5.7.36]# cd /usr/local/mysql/
[root@server1 mysql]# ls
bin  docs  include  lib  LICENSE  man  mysql-test  README  README-test  share  support-files
[root@server1 mysql]# du -sh
1.9G    .
拷贝启动脚本
[root@server1 mysql]# cp support-files/mysql.server /etc/init.d/mysqld

[root@server1 support-files]# useradd -M -d /usr/local/mysql/ -s /sbin/nologin mysql
[root@server1 support-files]# mkdir -p /data/mysql
[root@server1 support-files]# chown mysql.mysql /data/mysql

[root@server1 ~]# vim .bash_profile
PATH=$PATH:$HOME/bin:/usr/local/php/bin:/usr/local/mysql/bin

[root@server1 ~]# source .bash_profile
修改配置
[root@server1 ~]# vim /etc/my.cnf
[mysqld]
datadir=/data/mysql
socket=/data/mysql/mysql.sock
初始化,会生成临时密码
[root@server1 etc]# mysqld --initialize --user=mysql
2022-12-21T06:12:44.773599Z 0 [Warning] TIMESTAMP with implicit DEFAULT value is deprecated. Please use --explicit_defaults_for_timestamp server option (see documentation for more details).
2022-12-21T06:12:45.034564Z 0 [Warning] InnoDB: New log files created, LSN=45790
2022-12-21T06:12:45.065906Z 0 [Warning] InnoDB: Creating foreign key constraint system tables.
2022-12-21T06:12:45.125062Z 0 [Warning] No existing UUID has been found, so we assume that this is the first time that this server has been started. Generating a new UUID: 7c21c134-80f6-11ed-bb13-000c291fbda9.
2022-12-21T06:12:45.126386Z 0 [Warning] Gtid table is not ready to be used. Table 'mysql.gtid_executed' cannot be opened.
2022-12-21T06:12:45.568879Z 0 [Warning] A deprecated TLS version TLSv1 is enabled. Please use TLSv1.2 or higher.
2022-12-21T06:12:45.568895Z 0 [Warning] A deprecated TLS version TLSv1.1 is enabled. Please use TLSv1.2 or higher.
2022-12-21T06:12:45.570187Z 0 [Warning] CA certificate ca.pem is self signed.
2022-12-21T06:12:45.617620Z 1 [Note] A temporary password is generated for root@localhost: wwtpKPt&C3js
启动mysql
[root@server1 etc]# /etc/init.d/mysqld start
Starting MySQL.Logging to '/data/mysql/server1.err'.
 SUCCESS!
安全配置
[root@server1 etc]# mysql_secure_installation

Securing the MySQL server deployment.

Enter password for user root:		#输入上面产生的临时密码

The existing password for the user account root has expired. Please set a new password.

New password:				#输入两遍新密码

Re-enter new password:

VALIDATE PASSWORD PLUGIN can be used to test passwords
and improve security. It checks the strength of password
and allows the users to set only those passwords which are
secure enough. Would you like to setup VALIDATE PASSWORD plugin?

Press y|Y for Yes, any other key for No:			#直接回车,不启用密码插件
Using existing password for root.
Change the password for root ? ((Press y|Y for Yes, any other key for No) :  #直接回车,不修改密码

 ... skipping.
By default, a MySQL installation has an anonymous user,
allowing anyone to log into MySQL without having to have
a user account created for them. This is intended only for
testing, and to make the installation go a bit smoother.
You should remove them before moving into a production
environment.

Remove anonymous users? (Press y|Y for Yes, any other key for No) : y	#移除匿名用户
Success.


Normally, root should only be allowed to connect from
'localhost'. This ensures that someone cannot guess at
the root password from the network.

Disallow root login remotely? (Press y|Y for Yes, any other key for No) : y	#禁止root远程登录
Success.

By default, MySQL comes with a database named 'test' that
anyone can access. This is also intended only for testing,
and should be removed before moving into a production
environment.


Remove test database and access to it? (Press y|Y for Yes, any other key for No) : y   #删除test数据库
 - Dropping test database...
Success.

 - Removing privileges on test database...
Success.

Reloading the privilege tables will ensure that all changes
made so far will take effect immediately.

Reload privilege tables now? (Press y|Y for Yes, any other key for No) : y	#重载
Success.

All done!

登录mysql
[root@server1 etc]# mysql -p
Enter password:
Welcome to the MySQL monitor.  Commands end with ; or \g.
Your MySQL connection id is 5
Server version: 5.7.36 Source distribution

Copyright (c) 2000, 2021, Oracle and/or its affiliates.

Oracle is a registered trademark of Oracle Corporation and/or its
affiliates. Other names may be trademarks of their respective
owners.

Type 'help;' or '\h' for help. Type '\c' to clear the current input statement.

mysql> show databases;
+--------------------+
| Database           |
+--------------------+
| information_schema |
| mysql              |
| performance_schema |
| sys                |
+--------------------+
4 rows in set (0.00 sec)
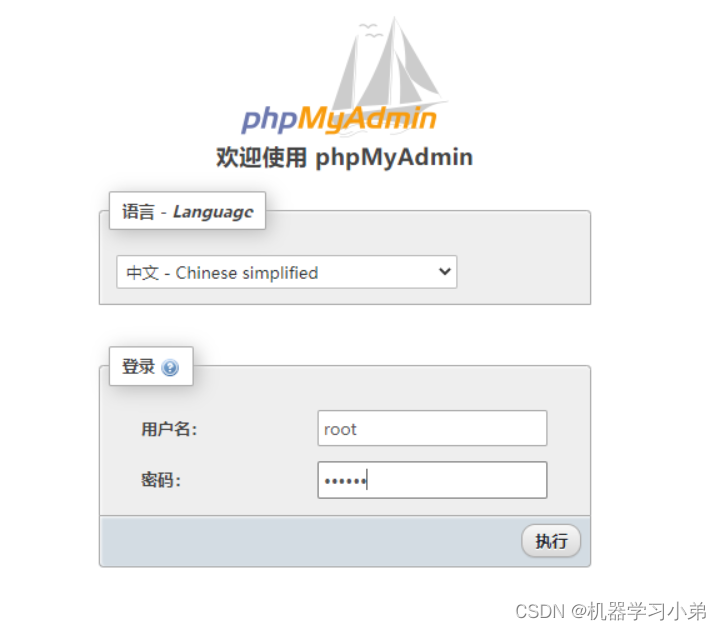
七、lnmp架构整合
[root@server1 ~]# unzip phpMyAdmin-5.0.2-all-languages.zip
[root@server1 ~]# mv phpMyAdmin-5.0.2-all-languages /usr/local/nginx/html/phpadmin
设置nginx默认搜索页面
[root@server1 ~]# vim /usr/local/nginx/conf/nginx.conf
...
 location / {
            root   html;
            index  index.php index.html index.htm;
        }
...
[root@server1 conf]# systemctl  reload nginx.service
修改php配置
[root@server1 ~]# vim /usr/local/php/etc/php.ini
...
[Pdo_mysql]
pdo_mysql.default_socket=/data/mysql/mysql.sock
...

[MySQLi]
mysqli.default_socket = /data/mysql/mysql.sock

[root@server1 ~]# systemctl restart php-fpm
登录phpamdi


 1513
1513


 被折叠的 条评论
为什么被折叠?
被折叠的 条评论
为什么被折叠?
 到【灌水乐园】发言


