


二、SpringMVC接收数据
2.1 访问路径设置
@RequestMapping注解的作用就是将请求的 URL 地址和处理请求的方式(handler方法)关联起来,建立映射关系。
SpringMVC 接收到指定的请求,就会来找到在映射关系中对应的方法来处理这个请求。
-
精准路径匹配
在@RequestMapping注解指定 URL 地址时,不使用任何通配符,按照请求地址进行精确匹配。
@Controller public class UserController { /** * 精准设置访问地址 /user/login */ @RequestMapping(value = {"/user/login"}) @ResponseBody public String login(){ System.out.println("UserController.login"); return "login success!!"; } /** * 精准设置访问地址 /user/register */ @RequestMapping(value = {"/user/register"}) @ResponseBody public String register(){ System.out.println("UserController.register"); return "register success!!"; } } -
模糊路径匹配
在@RequestMapping注解指定 URL 地址时,通过使用通配符,匹配多个类似的地址。
@Controller
public class ProductController {

    /**
     *  路径设置为 /product/*
     *    /* 为单层任意字符串  /product/a  /product/aaa 可以访问此handler
     *    /product/a/a 不可以
     *  路径设置为 /product/**
     *   /** 为任意层任意字符串  /product/a  /product/aaa 可以访问此handler
     *   /product/a/a 也可以访问
     */
    @RequestMapping("/product/*")
    @ResponseBody
    public String show(){
        System.out.println("ProductController.show");
        return "product show!";
    }
}
单层匹配和多层匹配: /*:只能匹配URL地址中的一层,如果想准确匹配两层,那么就写“/*/*”以此类推。 /**:可以匹配URL地址中的多层。 其中所谓的一层或多层是指一个URL地址字符串被“/”划分出来的各个层次 这个知识点虽然对于@RequestMapping注解来说实用性不大,但是将来配置拦截器的时候也遵循这个规则。 -
类和方法级别区别
@RequestMapping注解可以用于类级别和方法级别,它们之间的区别如下:- 设置到类级别:
@RequestMapping注解可以设置在控制器类上,用于映射整个控制器的通用请求路径。这样,如果控制器中的多个方法都需要映射同一请求路径,就不需要在每个方法上都添加映射路径。 - 设置到方法级别:
@RequestMapping注解也可以单独设置在控制器方法上,用于更细粒度地映射请求路径和处理方法。当多个方法处理同一个路径的不同操作时,可以使用方法级别的@RequestMapping注解进行更精细的映射。
//1.标记到handler方法 @RequestMapping("/user/login") @RequestMapping("/user/register") @RequestMapping("/user/logout") //2.优化标记类+handler方法 //类上 @RequestMapping("/user") //handler方法上 @RequestMapping("/login") @RequestMapping("/register") @RequestMapping("/logout") - 设置到类级别:
-
附带请求方式限制
HTTP 协议定义了八种请求方式,在 SpringMVC 中封装到了下面这个枚举类:
public enum RequestMethod {
  GET, HEAD, POST, PUT, PATCH, DELETE, OPTIONS, TRACE
}
默认情况下:@RequestMapping(“/logout”) 任何请求方式都可以访问!
如果需要特定指定:
@Controller
public class UserController {

    /**
     * 精准设置访问地址 /user/login
     * method = RequestMethod.POST 可以指定单个或者多个请求方式!
     * 注意:违背请求方式会出现405异常!
     */
    @RequestMapping(value = {"/user/login"} , method = RequestMethod.POST)
    @ResponseBody
    public String login(){
        System.out.println("UserController.login");
        return "login success!!";
    }

    /**
     * 精准设置访问地址 /user/register
     */
    @RequestMapping(value = {"/user/register"},method = {RequestMethod.POST,RequestMethod.GET})
    @ResponseBody
    public String register(){
        System.out.println("UserController.register");
        return "register success!!";
    }

}
注意:违背请求方式,会出现405异常!!!
-
进阶注解
还有
@RequestMapping的 HTTP 方法特定快捷方式变体:@GetMapping@PostMapping@PutMapping@DeleteMapping@PatchMapping
@RequestMapping(value="/login",method=RequestMethod.GET)
||
@GetMapping(value="/login")
注意:进阶注解只能添加到handler方法上,无法添加到类上!
-
常见配置问题
出现原因:多个 handler 方法映射了同一个地址,导致 SpringMVC 在接收到这个地址的请求时该找哪个 handler 方法处理。
There is already ‘demo03MappingMethodHandler’ bean method com.atguigu.mvc.handler.Demo03MappingMethodHandler#empGet() mapped.
2.2 接收参数(重点)
2.2.1 param 和 json参数比较
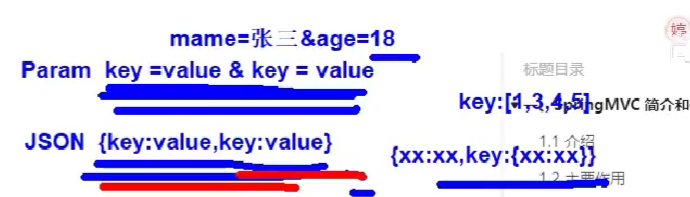
在 HTTP 请求中,我们可以选择不同的参数类型,如 param 类型和 JSON 类型。下面对这两种参数类型进行区别和对比:
-
参数编码:
param 类型的参数会被编码为 ASCII 码。例如,假设
name=john doe,则会被编码为name=john%20doe。而 JSON 类型的参数会被编码为 UTF-8。 -
参数顺序:
param 类型的参数没有顺序限制。但是,JSON 类型的参数是有序的。JSON 采用键值对的形式进行传递,其中键值对是有序排列的。
-
数据类型:
param 类型的参数仅支持字符串类型、数值类型和布尔类型等简单数据类型。而 JSON 类型的参数则支持更复杂的数据类型,如数组、对象等。
-
嵌套性:
param 类型的参数不支持嵌套。但是,JSON 类型的参数支持嵌套,可以传递更为复杂的数据结构。
-
可读性:
param 类型的参数格式比 JSON 类型的参数更加简单、易读。但是,JSON 格式在传递嵌套数据结构时更加清晰易懂。
总的来说,param 类型的参数适用于单一的数据传递,而 JSON 类型的参数则更适用于更复杂的数据结构传递。根据具体的业务需求,需要选择合适的参数类型。在实际开发中,常见的做法是:在 GET 请求中采用 param 类型的参数,而在 POST 请求中采用 JSON 类型的参数传递。
2.2.2 param参数接收
-
直接接值
客户端请求

handler接收参数
只要形参数名和类型与传递参数相同,即可自动接收!
@Controller @RequestMapping("param") public class ParamController { /** * 前端请求: http://localhost:8080/param/value?name=xx&age=18 * * 可以利用形参列表,直接接收前端传递的param参数! * 要求: 参数名 = 形参名 * 类型相同 * 出现乱码正常,json接收具体解决!! * @return 返回前端数据 */ @GetMapping(value="/value") @ResponseBody public String setupForm(String name,int age){ System.out.println("name = " + name + ", age = " + age); return name + age; } } -
@RequestParam注解
可以使用
@RequestParam注释将 Servlet 请求参数(即查询参数或表单数据)绑定到控制器中的方法参数。@RequestParam使用场景:- 指定绑定的请求参数名
- 要求请求参数必须传递
- 为请求参数提供默认值
基本用法:
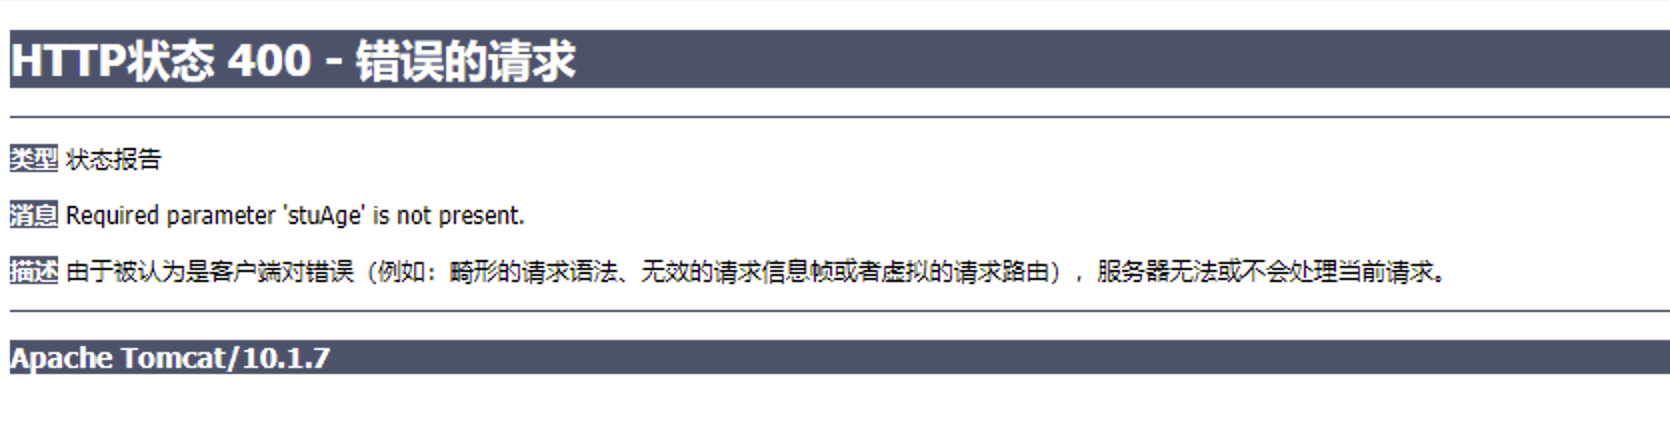
 /**
 * 前端请求: http://localhost:8080/param/data?name=xx&stuAge=18
 *
 *  使用@RequestParam注解标记handler方法的形参
 *  指定形参对应的请求参数@RequestParam(请求参数名称)
 */
@GetMapping(value="/data")
@ResponseBody
public Object paramForm(@RequestParam("name") String name,
                        @RequestParam("stuAge") int age){
    System.out.println("name = " + name + ", age = " + age);
    return name+age;
}
默认情况下,使用此批注的方法参数是必需的,但您可以通过将
@RequestParam批注的required标志设置为false!如果没有没有设置非必须,也没有传递参数会出现:
将参数设置非必须,并且设置默认值:
@GetMapping(value="/data") @ResponseBody public Object paramForm(@RequestParam("name") String name, @RequestParam(value = "stuAge",required = false,defaultValue = "18") int age){ System.out.println("name = " + name + ", age = " + age); return name+age; } -
特殊场景接值
-
一名多值
多选框,提交的数据的时候一个key对应多个值,我们可以使用集合进行接收!
/** * 前端请求: http://localhost:8080/param/mul?hbs=吃&hbs=喝 * * 一名多值,可以使用集合接收即可!但是需要使用@RequestParam注解指定 */ @GetMapping(value="/mul") @ResponseBody public Object mulForm(@RequestParam List<String> hbs){ System.out.println("hbs = " + hbs); return hbs; } -
实体接收
Spring MVC 是 Spring 框架提供的 Web 框架,它允许开发者使用实体对象来接收 HTTP 请求中的参数。通过这种方式,可以在方法内部直接使用对象的属性来访问请求参数,而不需要每个参数都写一遍。下面是一个使用实体对象接收参数的示例:
定义一个用于接收参数的实体类:
public class User {

  private String name;

  private int age = 18;

  // getter 和 setter 略
}
在控制器中,使用实体对象接收,示例代码如下:
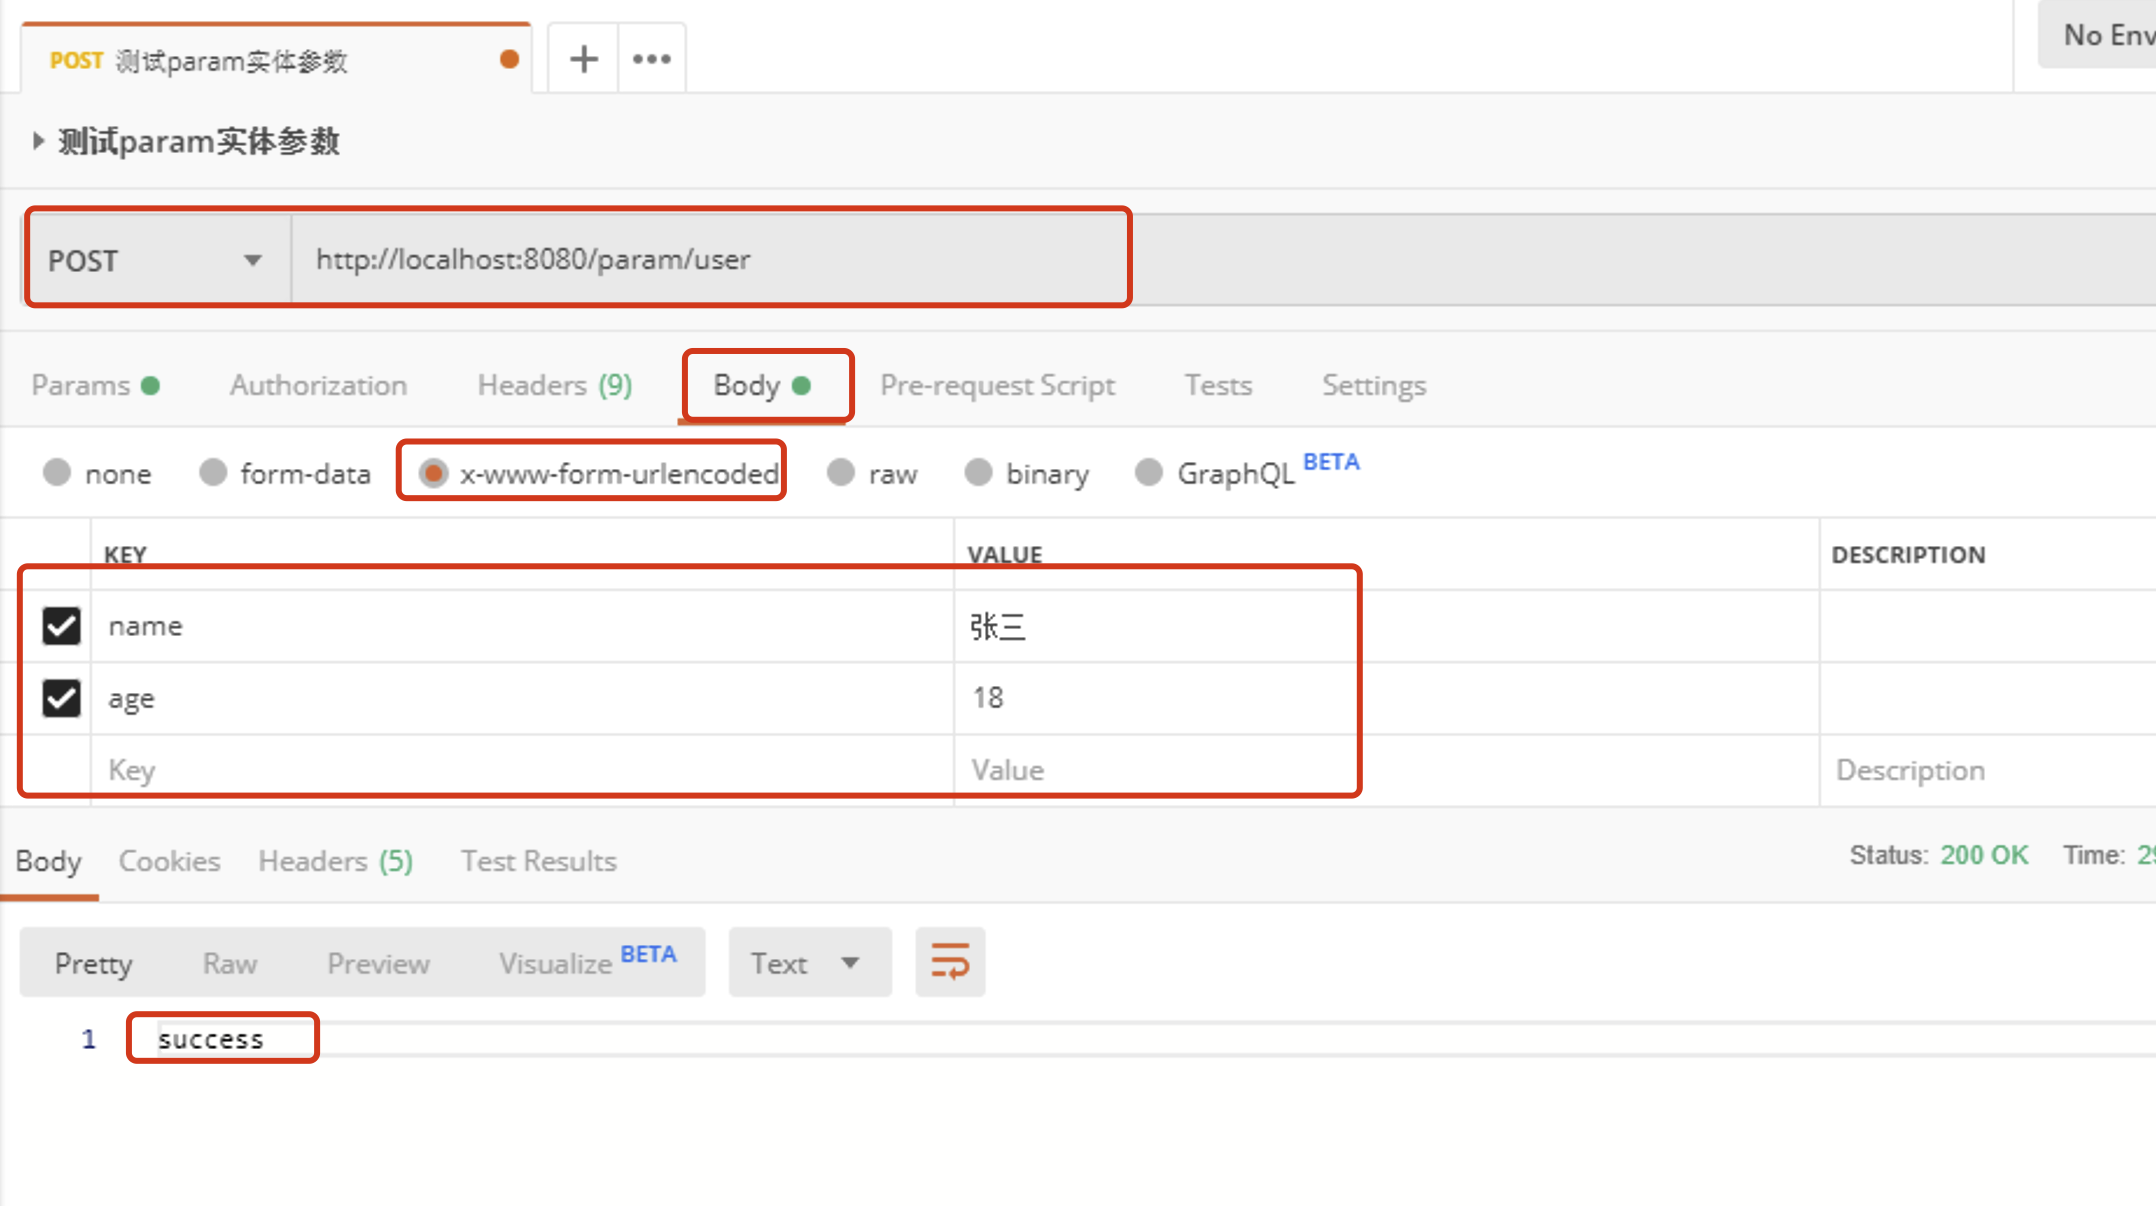
@Controller
@RequestMapping("param")
public class ParamController {

    @RequestMapping(value = "/user", method = RequestMethod.POST)
    @ResponseBody
    public String addUser(User user) {
        // 在这里可以使用 user 对象的属性来接收请求参数
        System.out.println("user = " + user);
        return "success";
    }
}
在上述代码中,将请求参数name和age映射到实体类属性上!要求属性名必须等于参数名!否则无法映射!
使用postman传递参数测试:
-
2.2.3 路径 参数接收
路径传递参数是一种在 URL 路径中传递参数的方式。在 RESTful 的 Web 应用程序中,经常使用路径传递参数来表示资源的唯一标识符或更复杂的表示方式。而 Spring MVC 框架提供了 @PathVariable 注解来处理路径传递参数。
@PathVariable 注解允许将 URL 中的占位符映射到控制器方法中的参数。
例如,如果我们想将 /user/{id} 路径下的 {id} 映射到控制器方法的一个参数中,则可以使用 @PathVariable 注解来实现。
下面是一个使用 @PathVariable 注解处理路径传递参数的示例:
 /**
 * 动态路径设计: /user/{动态部分}/{动态部分}   动态部分使用{}包含即可! {}内部动态标识!
 * 形参列表取值: @PathVariable Long id  如果形参名 = {动态标识} 自动赋值!
 *              @PathVariable("动态标识") Long id  如果形参名 != {动态标识} 可以通过指定动态标识赋值!
 *
 * 访问测试:  /param/user/1/root  -> id = 1  uname = root
 */
@GetMapping("/user/{id}/{name}")
@ResponseBody
public String getUser(@PathVariable Long id,
                      @PathVariable("name") String uname) {
    System.out.println("id = " + id + ", uname = " + uname);
    return "user_detail";
}
2.2.4 json参数接收
前端传递 JSON 数据时,Spring MVC 框架可以使用 @RequestBody 注解来将 JSON 数据转换为 Java 对象。@RequestBody 注解表示当前方法参数的值应该从请求体中获取,并且需要指定 value 属性来指示请求体应该映射到哪个参数上。其使用方式和示例代码如下:
-
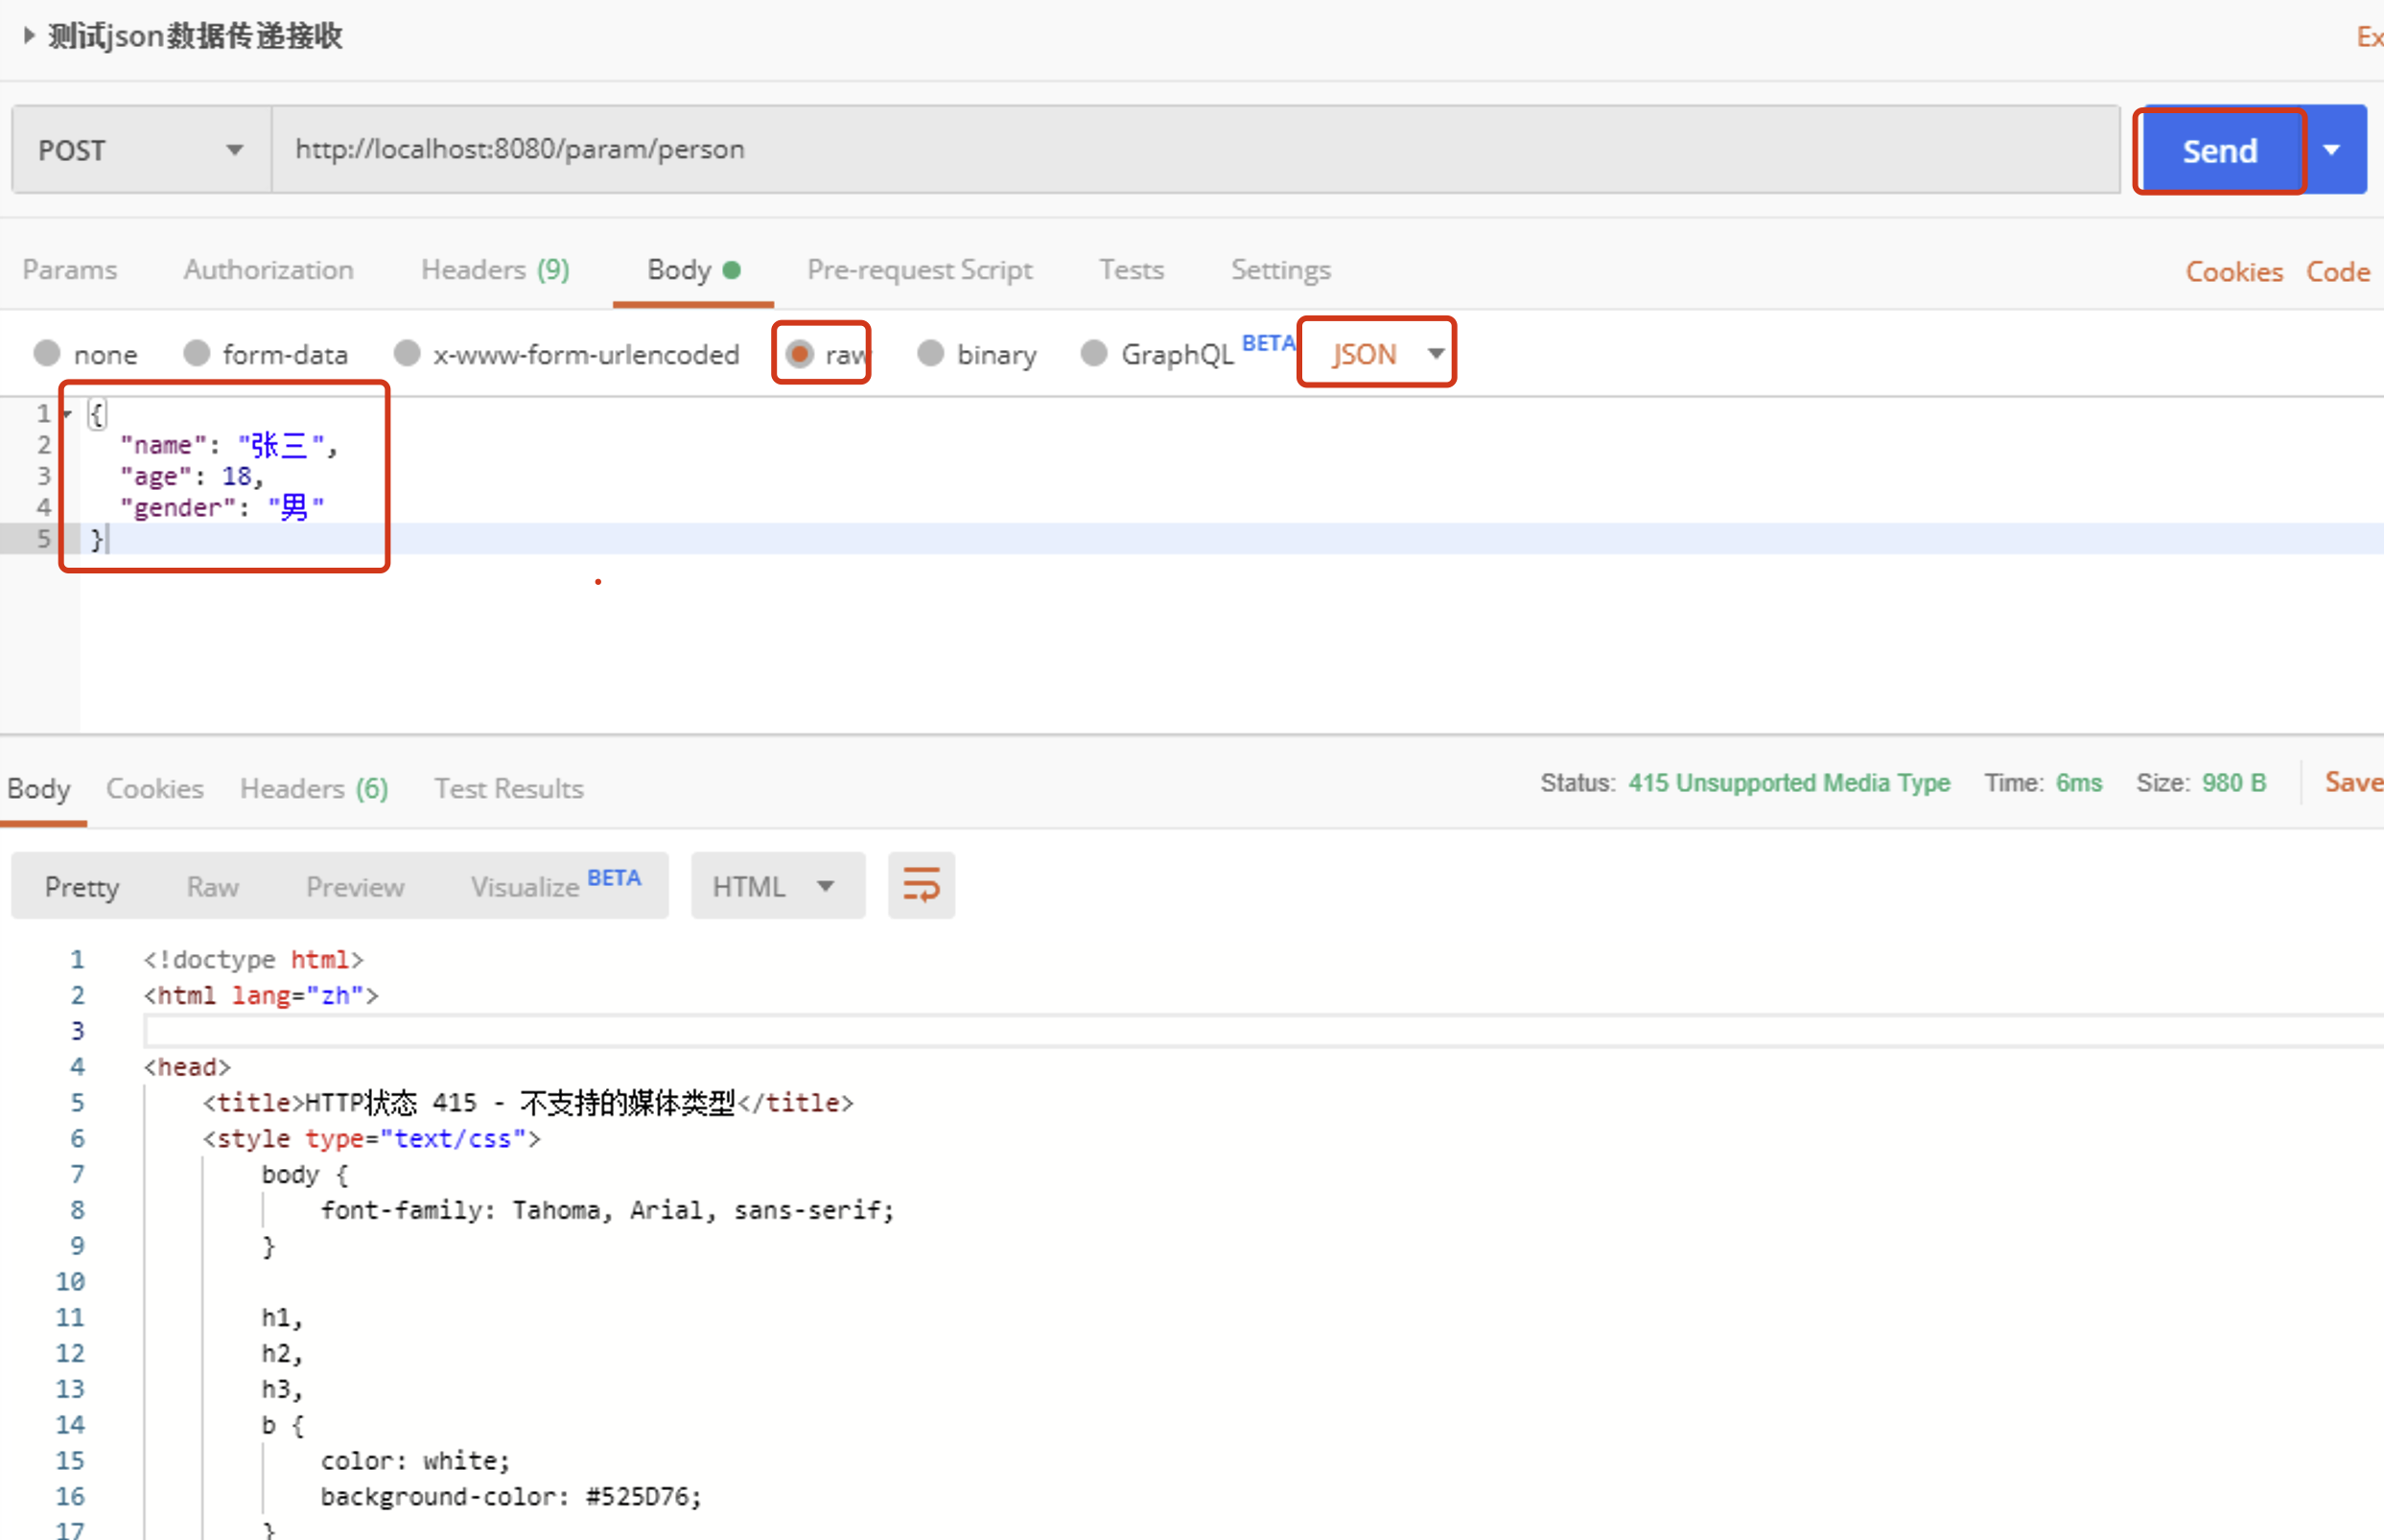
前端发送 JSON 数据的示例:(使用postman测试)
{ "name": "张三", "age": 18, "gender": "男" } -
定义一个用于接收 JSON 数据的 Java 类,例如:
public class Person { private String name; private int age; private String gender; // getter 和 setter 略 } -
在控制器中,使用
@RequestBody注解来接收 JSON 数据,并将其转换为 Java 对象,例如:@PostMapping("/person") @ResponseBody public String addPerson(@RequestBody Person person) { // 在这里可以使用 person 对象来操作 JSON 数据中包含的属性 return "success"; }在上述代码中,
@RequestBody注解将请求体中的 JSON 数据映射到Person类型的person参数上,并将其作为一个对象来传递给addPerson()方法进行处理。 -
完善配置
测试:
问题:
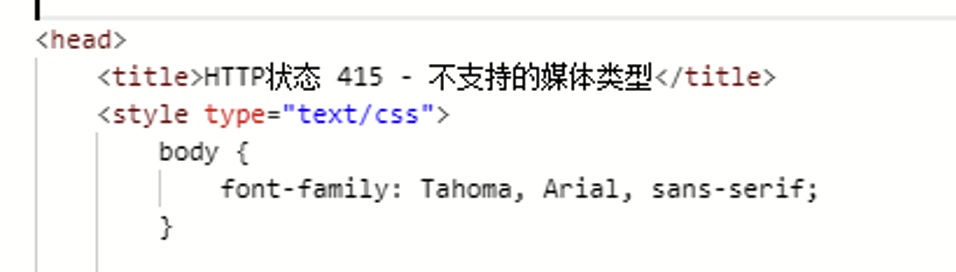
org.springframework.web.HttpMediaTypeNotSupportedException: Content-Type ‘application/json;charset=UTF-8’ is not supported]
原因:
- 不支持json数据类型处理
- 没有json类型处理的工具(jackson)
解决:
springmvc handlerAdpater配置json转化器,配置类需要明确:
//TODO: SpringMVC对应组件的配置类 [声明SpringMVC需要的组件信息]

//TODO: 导入handlerMapping和handlerAdapter的三种方式
 //1.自动导入handlerMapping和handlerAdapter [推荐]
 //2.可以不添加,springmvc会检查是否配置handlerMapping和handlerAdapter,没有配置默认加载
 //3.使用@Bean方式配置handlerMapper和handlerAdapter
@EnableWebMvc  //json数据处理,必须使用此注解,因为他会加入json处理器
@Configuration
@ComponentScan(basePackages = "com.atguigu.controller") //TODO: 进行controller扫描

//WebMvcConfigurer springMvc进行组件配置的规范,配置组件,提供各种方法! 前期可以实现
public class SpringMvcConfig implements WebMvcConfigurer {
}
pom.xml 加入jackson依赖 ```xml <dependency> <groupId>com.fasterxml.jackson.core</groupId> <artifactId>jackson-databind</artifactId> <version>2.15.0</version> </dependency> -
@EnableWebMvc注解说明
@EnableWebMvc注解效果等同于在 XML 配置中,可以使用
<mvc:annotation-driven>元素!我们来解析<mvc:annotation-driven>对应的解析工作!让我们来查看下
<mvc:annotation-driven>具体的动作!-
先查看
<mvc:annotation-driven>标签最终对应解析的Java类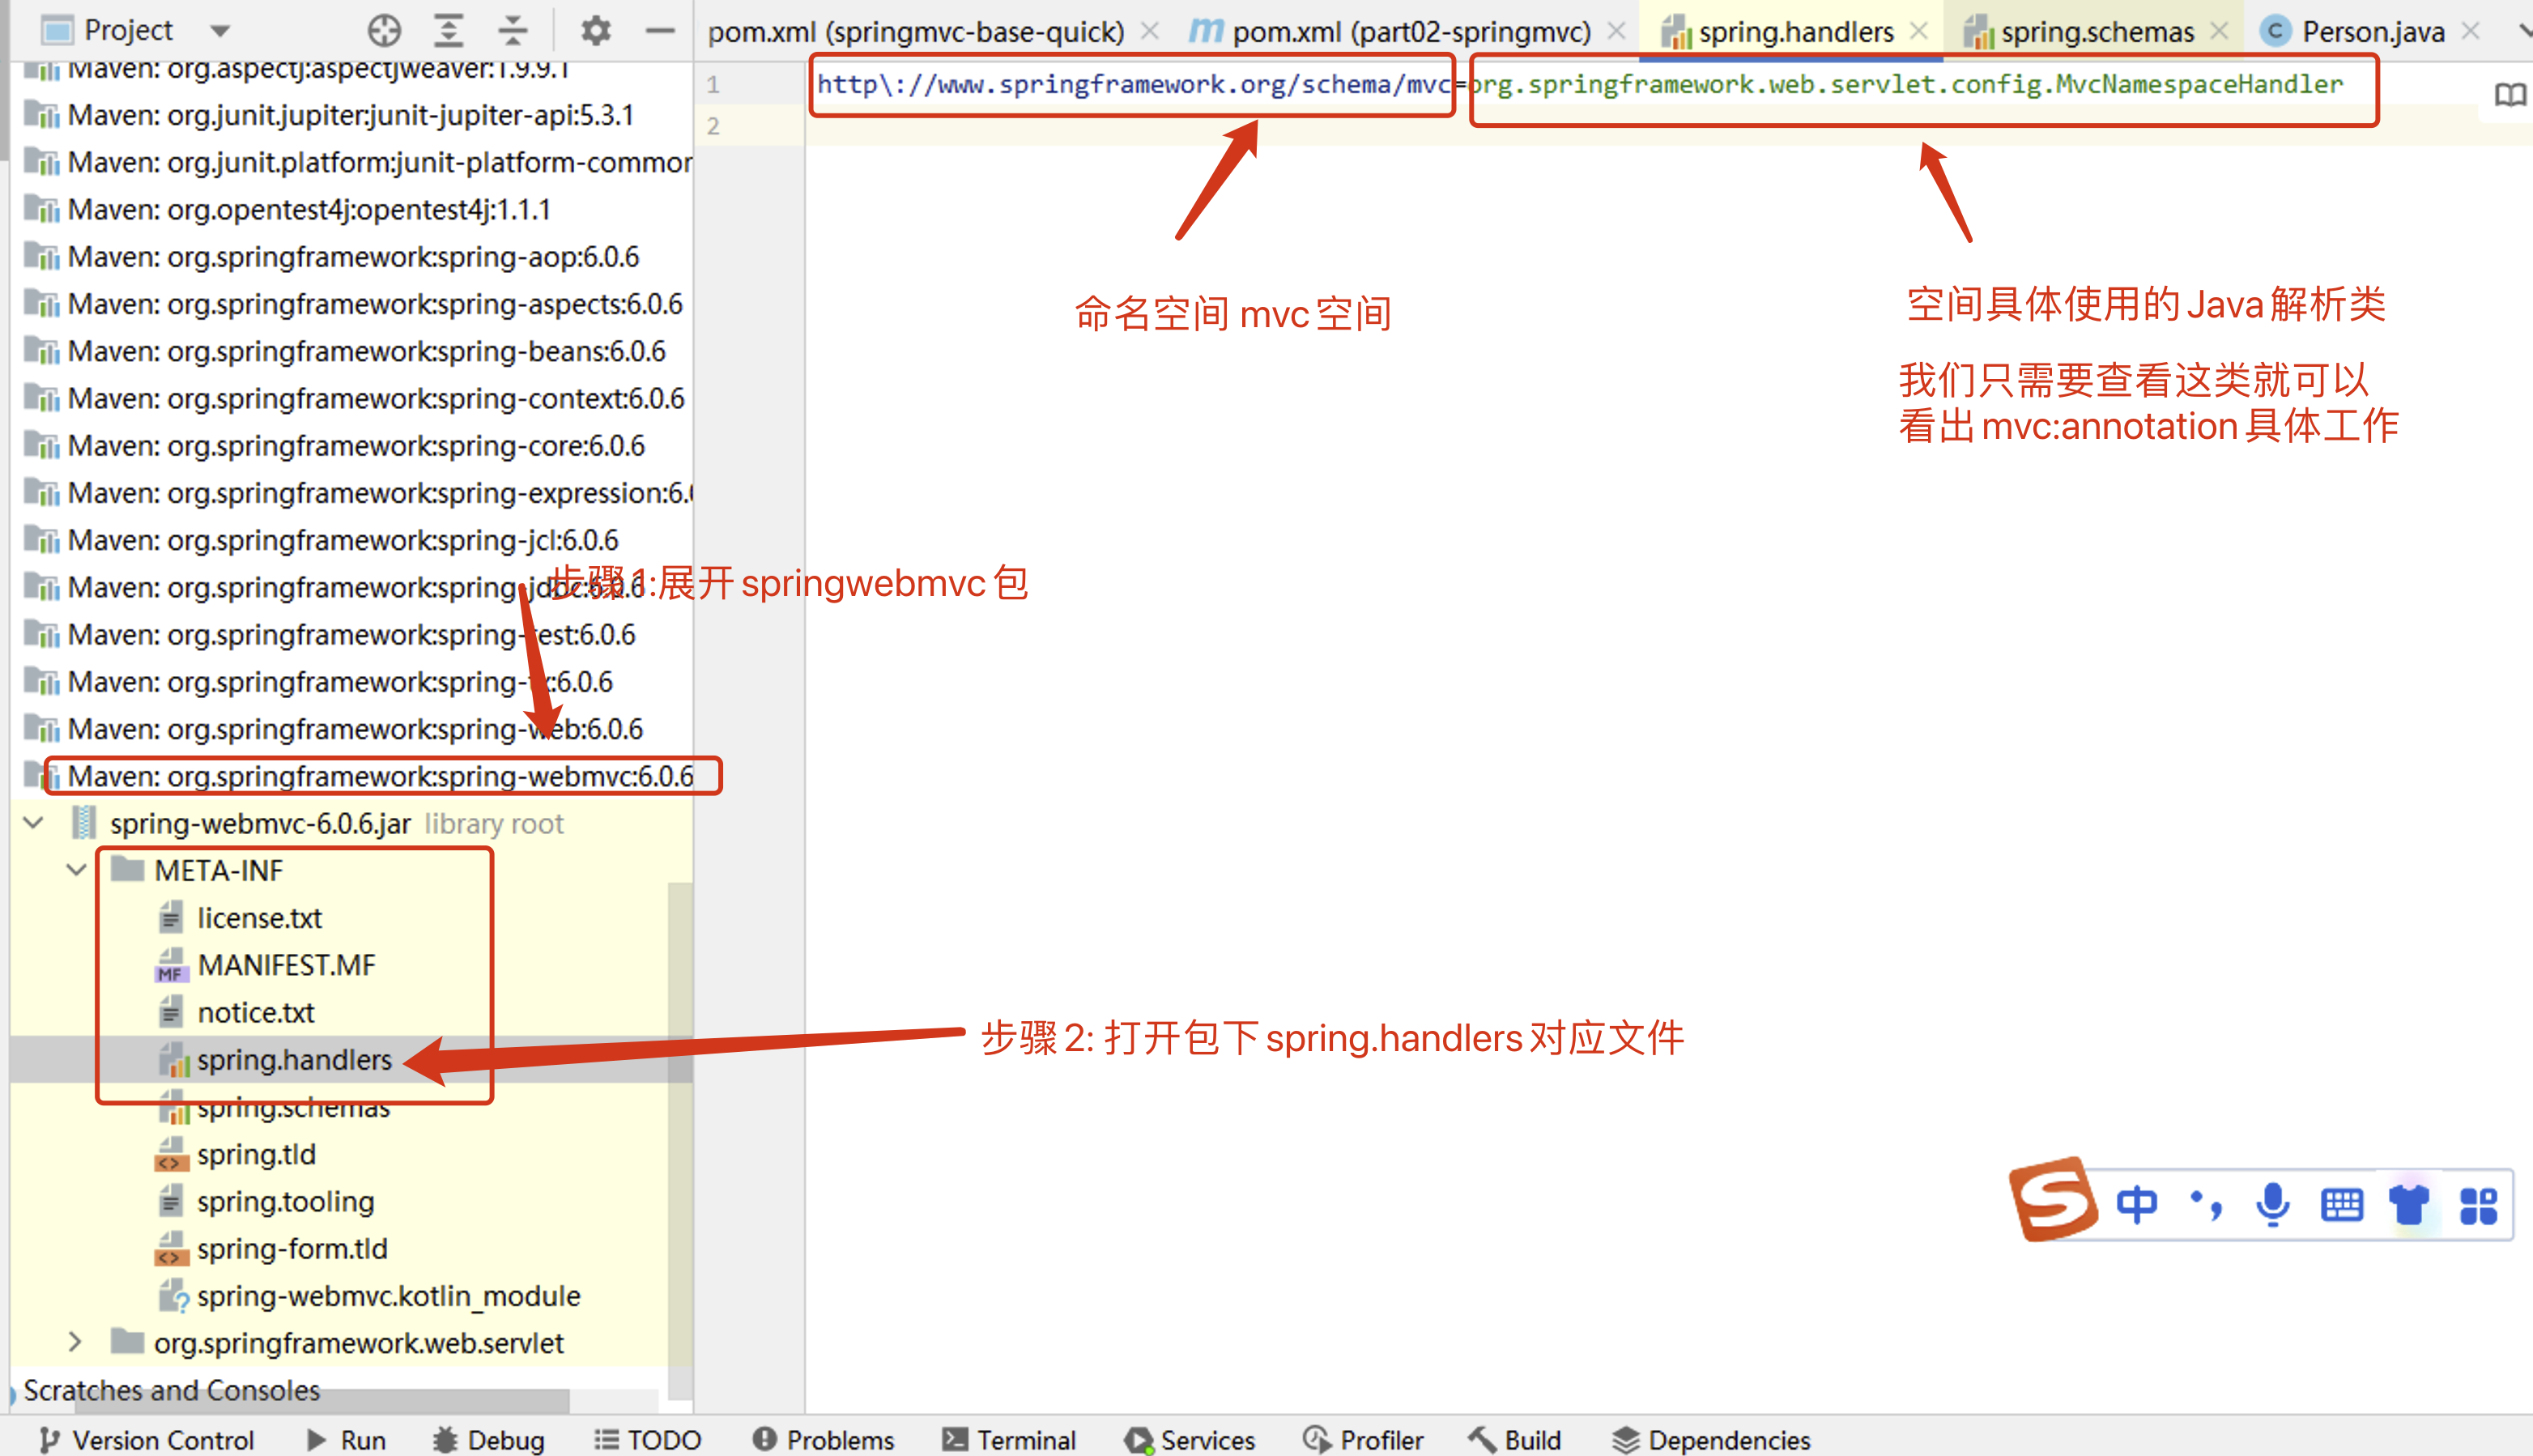
-
查看解析类中具体的动作即可
打开源码:org.springframework.web.servlet.config.MvcNamespaceHandler
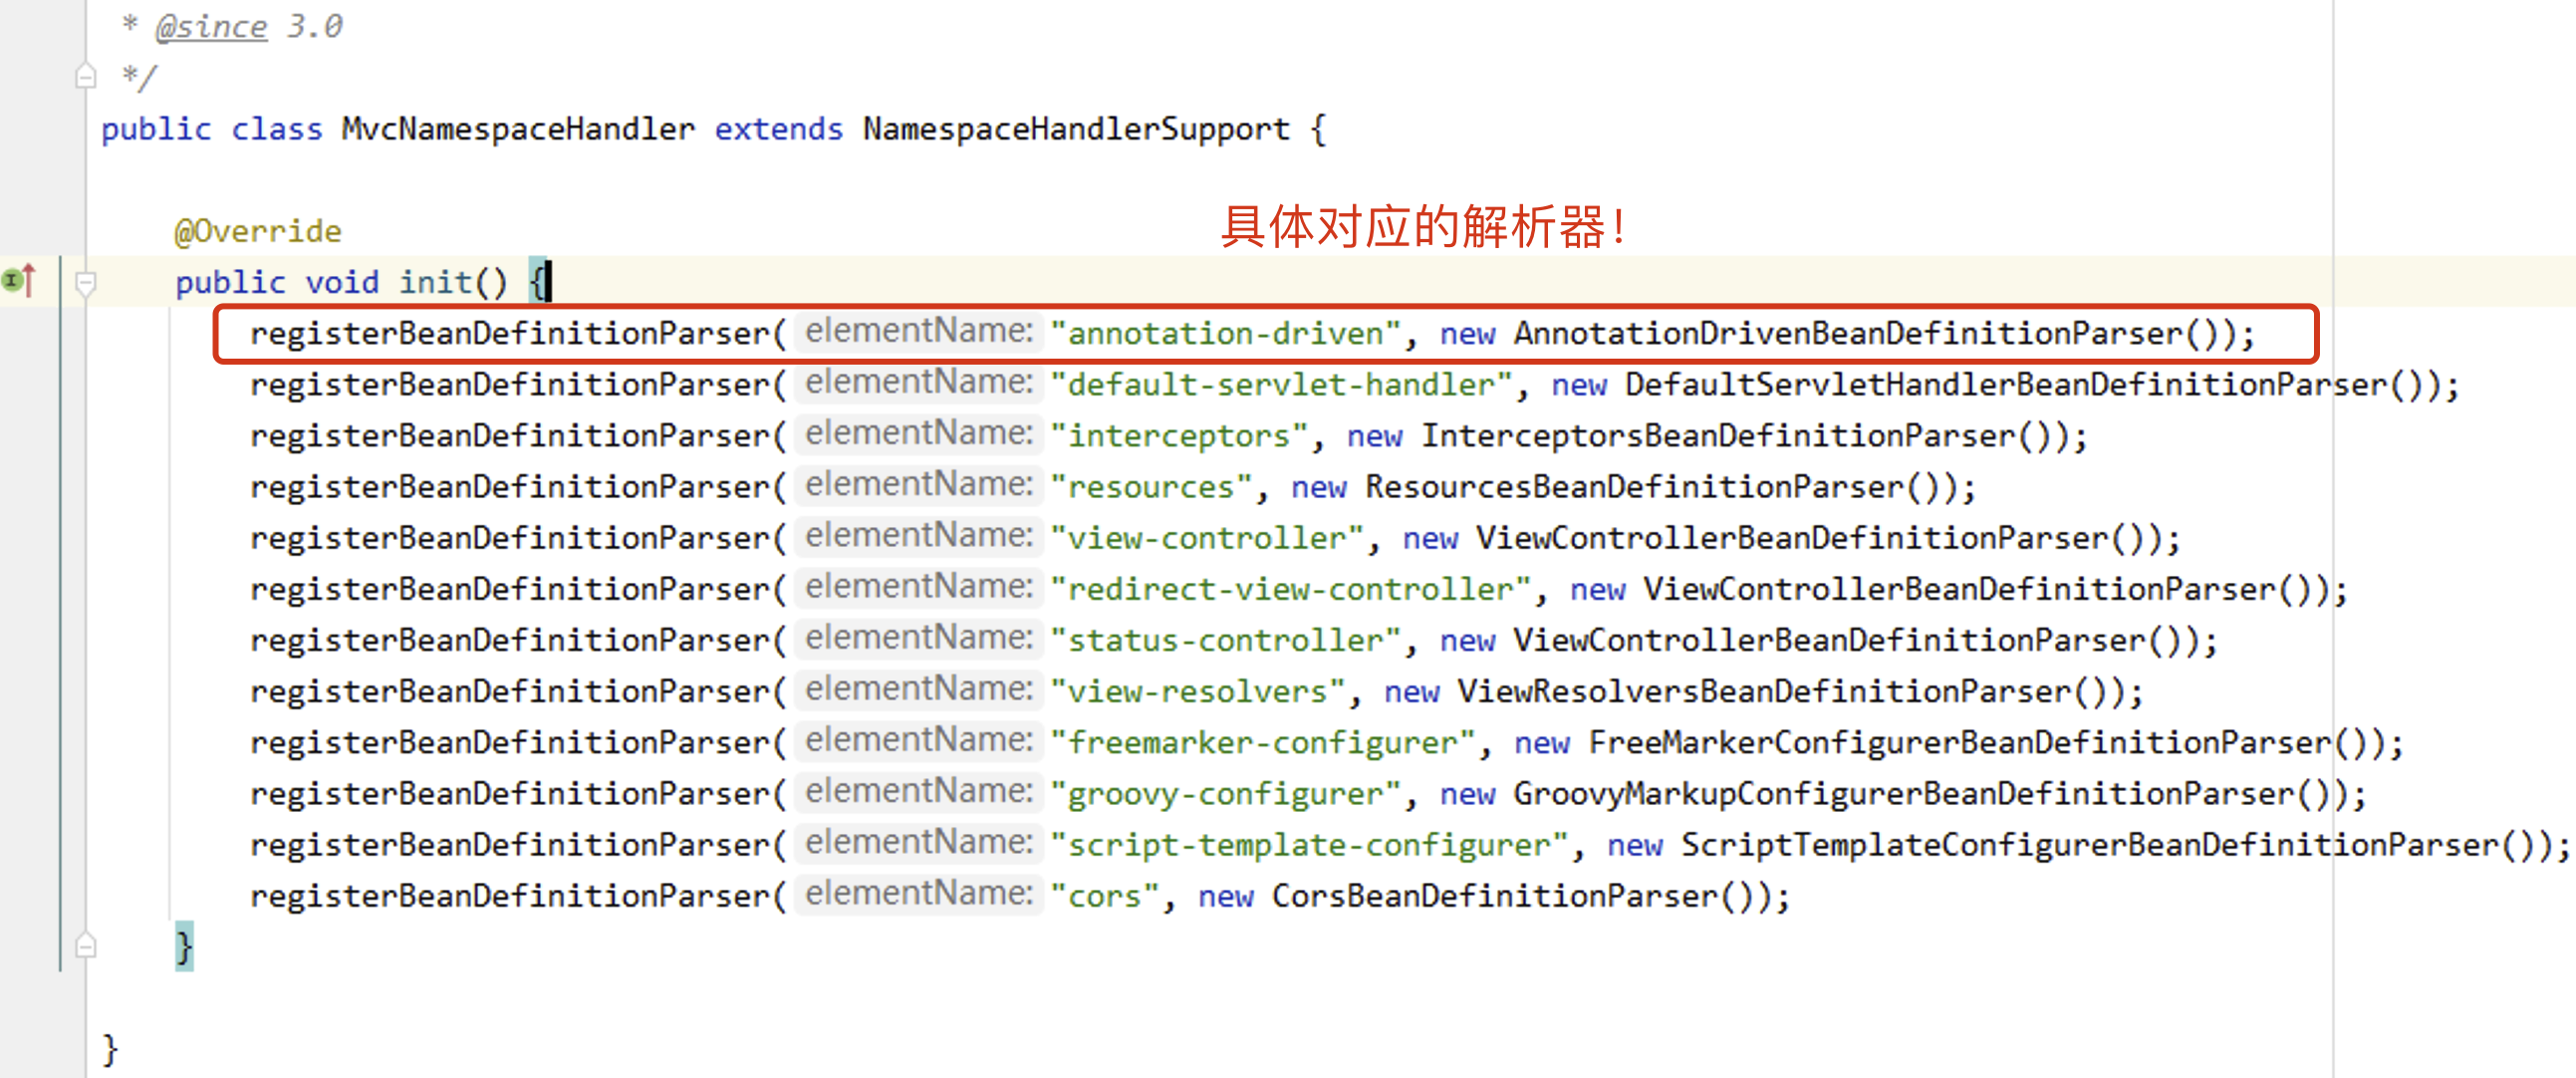
打开源码:org.springframework.web.servlet.config.AnnotationDrivenBeanDefinitionParser
class AnnotationDrivenBeanDefinitionParser implements BeanDefinitionParser {

  public static final String HANDLER_MAPPING_BEAN_NAME = RequestMappingHandlerMapping.class.getName();

  public static final String HANDLER_ADAPTER_BEAN_NAME = RequestMappingHandlerAdapter.class.getName();

  static {
    ClassLoader classLoader = AnnotationDrivenBeanDefinitionParser.class.getClassLoader();
    javaxValidationPresent = ClassUtils.isPresent("jakarta.validation.Validator", classLoader);
    romePresent = ClassUtils.isPresent("com.rometools.rome.feed.WireFeed", classLoader);
    jaxb2Present = ClassUtils.isPresent("jakarta.xml.bind.Binder", classLoader);
    jackson2Present = ClassUtils.isPresent("com.fasterxml.jackson.databind.ObjectMapper", classLoader) &&
            ClassUtils.isPresent("com.fasterxml.jackson.core.JsonGenerator", classLoader);
    jackson2XmlPresent = ClassUtils.isPresent("com.fasterxml.jackson.dataformat.xml.XmlMapper", classLoader);
    jackson2SmilePresent = ClassUtils.isPresent("com.fasterxml.jackson.dataformat.smile.SmileFactory", classLoader);
    jackson2CborPresent = ClassUtils.isPresent("com.fasterxml.jackson.dataformat.cbor.CBORFactory", classLoader);
    gsonPresent = ClassUtils.isPresent("com.google.gson.Gson", classLoader);
  }
@Override @Nullable public BeanDefinition parse(Element element, ParserContext context) { //handlerMapping加入到ioc容器 readerContext.getRegistry().registerBeanDefinition(HANDLER_MAPPING_BEAN_NAME, handlerMappingDef); //添加jackson转化器 addRequestBodyAdvice(handlerAdapterDef); addResponseBodyAdvice(handlerAdapterDef); //handlerAdapter加入到ioc容器 readerContext.getRegistry().registerBeanDefinition(HANDLER_ADAPTER_BEAN_NAME, handlerAdapterDef); return null; } //具体添加jackson转化对象方法 protected void addRequestBodyAdvice(RootBeanDefinition beanDef) { if (jackson2Present) { beanDef.getPropertyValues().add("requestBodyAdvice", new RootBeanDefinition(JsonViewRequestBodyAdvice.class)); } } protected void addResponseBodyAdvice(RootBeanDefinition beanDef) { if (jackson2Present) { beanDef.getPropertyValues().add("responseBodyAdvice", new RootBeanDefinition(JsonViewResponseBodyAdvice.class)); } }
-
2.3 接收Cookie数据
可以使用 @CookieValue 注释将 HTTP Cookie 的值绑定到控制器中的方法参数。
考虑使用以下 cookie 的请求:
JSESSIONID=415A4AC178C59DACE0B2C9CA727CDD84
下面的示例演示如何获取 cookie 值:
@GetMapping("/demo")
public void handle(@CookieValue("JSESSIONID") String cookie) {
  //...
}
2.4 接收请求头数据
可以使用 @RequestHeader 批注将请求标头绑定到控制器中的方法参数。
请考虑以下带有标头的请求:
Host                    localhost:8080
Accept                  text/html,application/xhtml+xml,application/xml;q=0.9
Accept-Language         fr,en-gb;q=0.7,en;q=0.3
Accept-Encoding         gzip,deflate
Accept-Charset          ISO-8859-1,utf-8;q=0.7,*;q=0.7
Keep-Alive              300
下面的示例获取 Accept-Encoding 和 Keep-Alive 标头的值:
@GetMapping("/demo")
public void handle(
    @RequestHeader("Accept-Encoding") String encoding,
    @RequestHeader("Keep-Alive") long keepAlive) {
  //...
}
2.5 原生Api对象操作
下表描述了支持的控制器方法参数
| Controller method argument 控制器方法参数 | Description |
|---|---|
jakarta.servlet.ServletRequest, jakarta.servlet.ServletResponse | 请求/响应对象 |
jakarta.servlet.http.HttpSession | 强制存在会话。因此,这样的参数永远不会为 null 。 |
java.io.InputStream, java.io.Reader | 用于访问由 Servlet API 公开的原始请求正文。 |
java.io.OutputStream, java.io.Writer | 用于访问由 Servlet API 公开的原始响应正文。 |
@PathVariable | 接收路径参数注解 |
@RequestParam | 用于访问 Servlet 请求参数,包括多部分文件。参数值将转换为声明的方法参数类型。 |
@RequestHeader | 用于访问请求标头。标头值将转换为声明的方法参数类型。 |
@CookieValue | 用于访问Cookie。Cookie 值将转换为声明的方法参数类型。 |
@RequestBody | 用于访问 HTTP 请求正文。正文内容通过使用 HttpMessageConverter 实现转换为声明的方法参数类型。 |
java.util.Map, org.springframework.ui.Model, org.springframework.ui.ModelMap | 共享域对象,并在视图呈现过程中向模板公开。 |
Errors, BindingResult | 验证和数据绑定中的错误信息获取对象! |
获取原生对象示例:
/**
 * 如果想要获取请求或者响应对象,或者会话等,可以直接在形参列表传入,并且不分先后顺序!
 * 注意: 接收原生对象,并不影响参数接收!
 */
@GetMapping("api")
@ResponseBody
public String api(HttpSession session , HttpServletRequest request,
                  HttpServletResponse response){
    String method = request.getMethod();
    System.out.println("method = " + method);
    return "api";
}
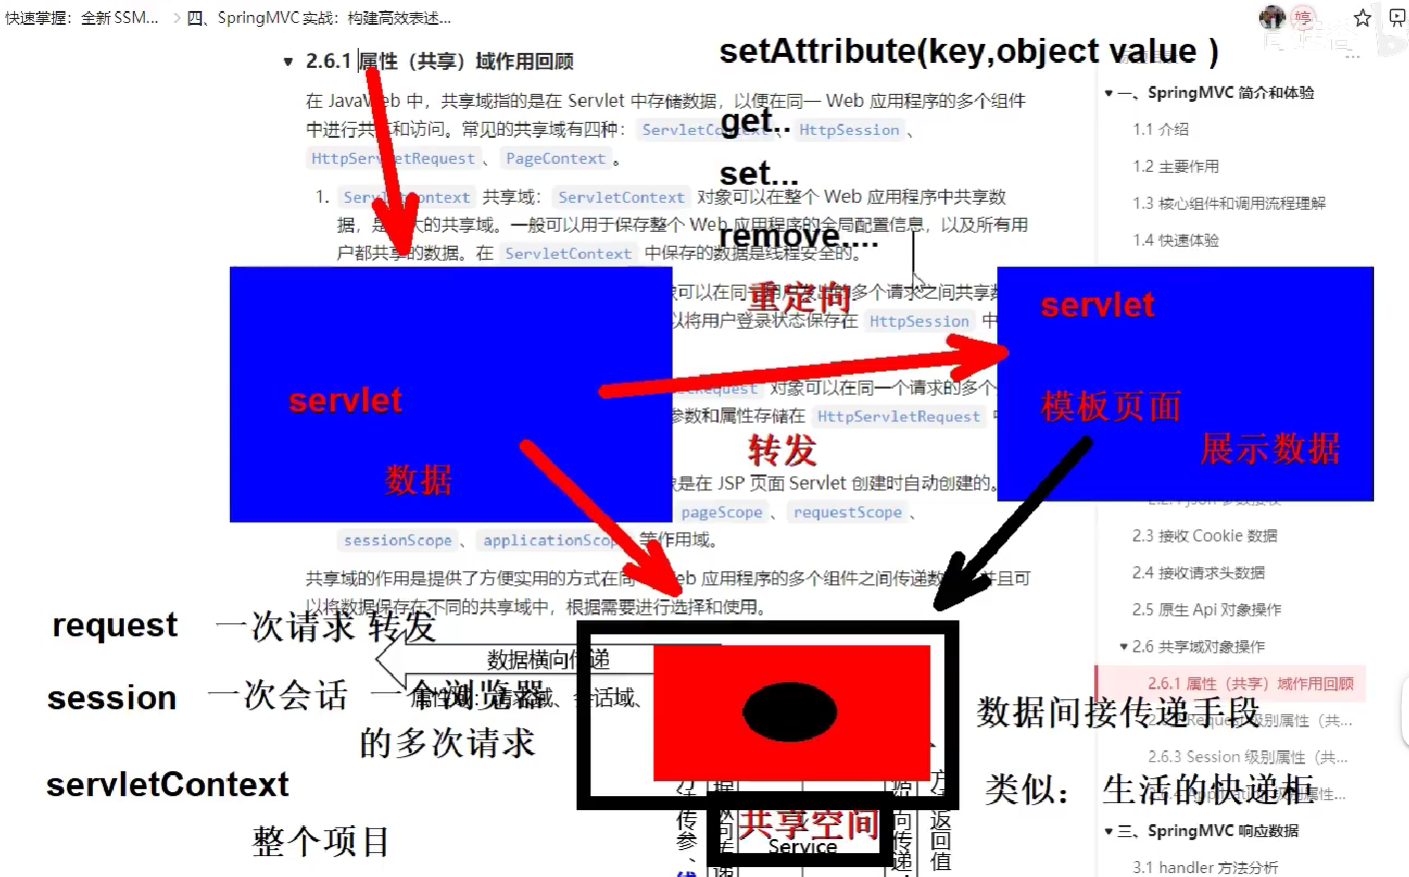
2.6 共享域对象操作
2.6.1 属性(共享)域作用回顾
在 JavaWeb 中,共享域指的是在 Servlet 中存储数据,以便在同一 Web 应用程序的多个组件中进行共享和访问。常见的共享域有四种:ServletContext、HttpSession、HttpServletRequest、PageContext。
ServletContext共享域:ServletContext对象可以在整个 Web 应用程序中共享数据,是最大的共享域。一般可以用于保存整个 Web 应用程序的全局配置信息,以及所有用户都共享的数据。在ServletContext中保存的数据是线程安全的。HttpSession共享域:HttpSession对象可以在同一用户发出的多个请求之间共享数据,但只能在同一个会话中使用。比如,可以将用户登录状态保存在HttpSession中,让用户在多个页面间保持登录状态。HttpServletRequest共享域:HttpServletRequest对象可以在同一个请求的多个处理器方法之间共享数据。比如,可以将请求的参数和属性存储在HttpServletRequest中,让处理器方法之间可以访问这些数据。PageContext共享域:PageContext对象是在 JSP 页面Servlet 创建时自动创建的。它可以在 JSP 的各个作用域中共享数据,包括pageScope、requestScope、sessionScope、applicationScope等作用域。
共享域的作用是提供了方便实用的方式在同一 Web 应用程序的多个组件之间传递数据,并且可以将数据保存在不同的共享域中,根据需要进行选择和使用。
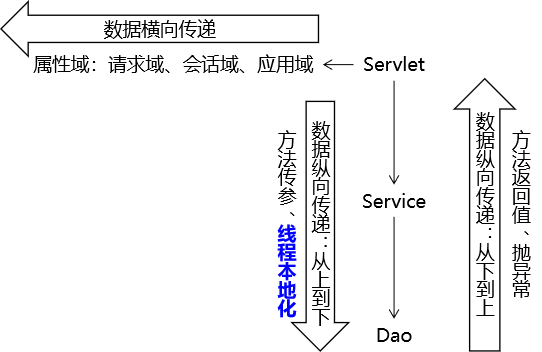
2.6.2 Request级别属性(共享)域
-
使用 Model 类型的形参
@RequestMapping("/attr/request/model") @ResponseBody public String testAttrRequestModel( // 在形参位置声明Model类型变量,用于存储模型数据 Model model) { // 我们将数据存入模型,SpringMVC 会帮我们把模型数据存入请求域 // 存入请求域这个动作也被称为暴露到请求域 model.addAttribute("requestScopeMessageModel","i am very happy[model]"); return "target"; } -
使用 ModelMap 类型的形参
@RequestMapping("/attr/request/model/map") @ResponseBody public String testAttrRequestModelMap( // 在形参位置声明ModelMap类型变量,用于存储模型数据 ModelMap modelMap) { // 我们将数据存入模型,SpringMVC 会帮我们把模型数据存入请求域 // 存入请求域这个动作也被称为暴露到请求域 modelMap.addAttribute("requestScopeMessageModelMap","i am very happy[model map]"); return "target"; } -
使用 Map 类型的形参
@RequestMapping("/attr/request/map") @ResponseBody public String testAttrRequestMap( // 在形参位置声明Map类型变量,用于存储模型数据 Map<String, Object> map) { // 我们将数据存入模型,SpringMVC 会帮我们把模型数据存入请求域 // 存入请求域这个动作也被称为暴露到请求域 map.put("requestScopeMessageMap", "i am very happy[map]"); return "target"; } -
使用原生 request 对象
@RequestMapping("/attr/request/original") @ResponseBody public String testAttrOriginalRequest( // 拿到原生对象,就可以调用原生方法执行各种操作 HttpServletRequest request) { request.setAttribute("requestScopeMessageOriginal", "i am very happy[original]"); return "target"; } -
使用 ModelAndView 对象
@RequestMapping("/attr/request/mav")
public ModelAndView testAttrByModelAndView() {

    // 1.创建ModelAndView对象
    ModelAndView modelAndView = new ModelAndView();
    // 2.存入模型数据
    modelAndView.addObject("requestScopeMessageMAV", "i am very happy[mav]");
    // 3.设置视图名称
    modelAndView.setViewName("target");

    return modelAndView;
}
2.6.3 Session级别属性(共享)域
@RequestMapping("/attr/session")
@ResponseBody
public String testAttrSession(HttpSession session) {
    //直接对session对象操作,即对会话范围操作!
    return "target";
}
2.6.4 Application级别属性(共享)域
解释:springmvc会在初始化容器的时候,讲servletContext对象存储到ioc容器中!
@Autowired
private ServletContext servletContext;

@RequestMapping("/attr/application")
@ResponseBody
public String attrApplication() {

    servletContext.setAttribute("appScopeMsg", "i am hungry...");

    return "target";
}
回顾总结
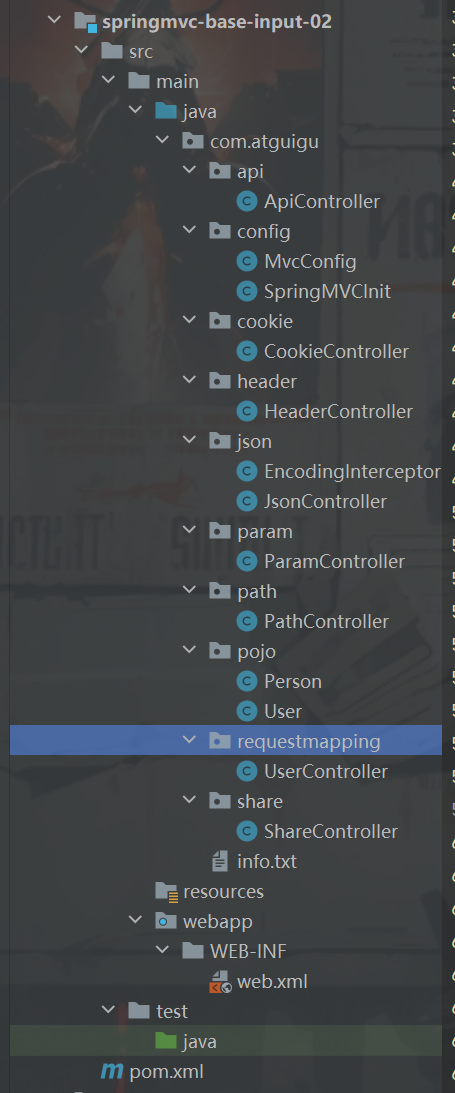
requestmapping 包下的UserController //请求方式 编写相关知识点
package com.atguigu.requestmapping;

import org.springframework.stereotype.Controller;
import org.springframework.web.bind.annotation.GetMapping;
import org.springframework.web.bind.annotation.PostMapping;
import org.springframework.web.bind.annotation.RequestMapping;
import org.springframework.web.bind.annotation.RequestMethod;

/**
 * projectName: com.atguigu.requestmapping
 *
 * @author: 赵伟风
 * description:
 */


//@Controller
//@RequestMapping("user")
public class UserController {

    //handler -> handlerMapping 指定访问地址

    /**
     * @WebServlet(" 必须使用 /开头")
     *
     * @RequestMapping(不要必须使用/开头)  user/login  /user/login
     *
     *  1. 精准地址 [一个 | 多个]  /user/login  {"地址1","地址2"}
     *  2. 支持模糊 * 任意一层字符串 | **  任意层任意字符串
     *           /user/* -> user/a  user/aaaaa 可以  /user/a/b 不行
     *           /user/** -> user user/a  user/a/a/a/a/a/a
     *  3. 类上和方法上添加@RequestMapping的区别
     *          类上提取通用的访问地址
     *          方法上是具体的handler地址
     *          访问: 类地址 + 方法地址即可
     *  4. 请求方式指定
     *      客户端 -> http (get | post | put | delete ) -> ds ->  handler
     *      默认情况:  @RequestMapping("login") 主要地址正确,任何请求方式都可以访问
     *      指定请求方式: method = {RequestMethod.GET,RequestMethod.POST}
     *      不符合请求方式: 会出现405异常!
     *  5.注解进阶   只能使用在方法上!
     *      get @GetMapping  == @RequestMapping(xxx,method=GET);
     *       post @PostMapping  == @RequestMapping(xxx,method=POST);
     *        put @PUTMapping  == @RequestMapping(xxx,method=PUT);
     *         delete @DeleteMapping  == @RequestMapping(xxx,method=DELETE);
     *
     */

    @RequestMapping  //  /user
    @GetMapping //get请求地址
    public String index(){

        return null;
    }

    @RequestMapping(value = "login",method = RequestMethod.POST)  //作用注册地址 将handler注册到handlerMapping
    // ||
    @PostMapping("login")
    public String login(){

        return null;
    }

    @RequestMapping(value = "register", method = {RequestMethod.GET,RequestMethod.POST})
    public String register(){

        return null;
    }
}
参数接收
主流json
param 包下的paramController类
package com.atguigu.param;

import com.atguigu.pojo.User;
import org.springframework.stereotype.Controller;
import org.springframework.web.bind.annotation.GetMapping;
import org.springframework.web.bind.annotation.RequestMapping;
import org.springframework.web.bind.annotation.RequestParam;
import org.springframework.web.bind.annotation.ResponseBody;

import java.util.List;

/**
 * projectName: com.atguigu.param
 *
 * @author: 赵伟风
 * description: 讲解下如何接收前端的param参数
 */

@Controller
@RequestMapping("param")
public class ParamController {

    //直接接收
    //  /param/data?name=root&age=18
    //  形参列表,填写对应名称的参数即可!  请求参数名 = 形参参数名即可!
    //  1. 名称相同  2.可以不传递 不报错
    @RequestMapping("data")
    @ResponseBody
    public String data(String name,int age){
        System.out.println("name = " + name + ", age = " + age);
        return "name = " + name + ", age = " + age;
    }

    //注解指定
    //指定任意的请求参数名  要求必须传递  要求不必须传递 给与一个默认值

    // /param/data1?account=root&page=1
    // account必须传递   page可以不必须传递,如果不传递默认值就是1

    /**
     * @RequestParam -> 形参列表  指定请求参数名 或者是否必须传递 或者 非必须传递设置默认值
     *                用法: @RequestParam(value="指定请求参数名,如果形参名和请求参数名一致,可以省略!",
     *                                    required = false 前端是否必须传递此参数,默认是必须 , 不传400异常!,
     *                                    defaultValue = "1" 当非必须传递 false ,可以设置默认值)
     */

    @GetMapping("data1")
    @ResponseBody
    public String data1(@RequestParam(value = "account") String username,
                        @RequestParam(required = false,defaultValue = "1") int page){

        System.out.println("username = " + username + ", page = " + page);

        return "username = " + username + ", page = " + page;
    }

    //特殊值
    // 一名多值   key=1&key=2 直接使用集合接值即可

    //param/data2?hbs=吃&hbs=玩&hbs=学习
    //不加注解@RequestParam 将 hbs对应的一个字符串直接赋值给集合! 类型异常!
    //加了注解,经理就会将集合 add加入对应的字符串
    @GetMapping("data2")
    @ResponseBody
    public String data2(@RequestParam List<String> hbs){
        System.out.println("hbs = " + hbs);
        return "ok";
    }

    //使用实体对象接值   用户注册(用户的信息)    -》    对应的实体类   -》     插入到数据库 表
    //param/data3?name=二狗子&age=18 准备一个对应属性和get|set方法的实体类即可! -> 形参列表声明对象参数即可!

    @RequestMapping("data3")
    @ResponseBody
    public String data3(User user){
        System.out.println("user = " + user);
        return user.toString();
    }

}

//这是paramController整体的编写  下面则是对其一部分一部分的编写
//直接接收
 //直接接收
    //  /param/data?name=root&age=18
    //  形参列表,填写对应名称的参数即可!  请求参数名 = 形参参数名即可!
    //  1. 名称相同  2.可以不传递 不报错
    @RequestMapping("data")
    @ResponseBody
    public String data(String name,int age){
        System.out.println("name = " + name + ", age = " + age);
        return "name = " + name + ", age = " + age;
    }
当然测试的前提是编写配置类
也就是config包下的MvcConfig类
也就是注释了的两个bean方法
package com.atguigu.config;

import com.atguigu.json.EncodingInterceptor;
import org.springframework.context.annotation.Bean;
import org.springframework.context.annotation.ComponentScan;
import org.springframework.context.annotation.Configuration;
import org.springframework.web.servlet.config.annotation.EnableWebMvc;
import org.springframework.web.servlet.config.annotation.InterceptorRegistry;
import org.springframework.web.servlet.config.annotation.WebMvcConfigurer;
import org.springframework.web.servlet.mvc.method.annotation.RequestMappingHandlerAdapter;
import org.springframework.web.servlet.mvc.method.annotation.RequestMappingHandlerMapping;

/**
 * projectName: com.atguigu.config
 *
 * @author: 赵伟风
 * description: 项目的配置类,controller handlerMapping handlerAdapater加入ioc容器
 */

@EnableWebMvc  //handlerAdapter配置了json转化器
               // 添加秘书 添加经理  给经理添加jacksonjson处理器
@Configuration
@ComponentScan("com.atguigu.json")
public class MvcConfig implements WebMvcConfigurer {
    @Override
    public void addInterceptors(InterceptorRegistry registry) {
        registry.addInterceptor(new EncodingInterceptor());
    }


    //    @Bean
//    public RequestMappingHandlerMapping handlerMapping(){
//       return  new RequestMappingHandlerMapping();
//    }
//
//    @Bean
//    public RequestMappingHandlerAdapter handlerAdapter(){
//        return  new RequestMappingHandlerAdapter();
//    }
}
设置完抽象类还要写初始化配置类,同包下的SpringMVCInit类
package com.atguigu.config;

import org.springframework.web.servlet.support.AbstractAnnotationConfigDispatcherServletInitializer;

/**
 * projectName: com.atguigu.config
 *
 * @author: 赵伟风
 * description: 初始化类
 */
public class SpringMVCInit extends AbstractAnnotationConfigDispatcherServletInitializer {
    /**
     * Specify {@code @Configuration} and/or {@code @Component} classes for the
     * {@linkplain #createRootApplicationContext() root application context}.
     *
     * @return the configuration for the root application context, or {@code null}
     * if creation and registration of a root context is not desired
     */
    @Override
    protected Class<?>[] getRootConfigClasses() {
        return new Class[0];
    }

    /**
       springmvc需要组件的配置类
     */
    @Override
    protected Class<?>[] getServletConfigClasses() {
        return new Class[]{MvcConfig.class};
    }

    /**
     *
     * Servlet DispatcherServlet
     *
     */
    @Override
    protected String[] getServletMappings() {
        return new String[]{ "/"};
    }
}
部署测试
//注解指定
 //注解指定
    //指定任意的请求参数名  要求必须传递  要求不必须传递 给与一个默认值

    // /param/data1?account=root&page=1
    // account必须传递   page可以不必须传递,如果不传递默认值就是1

    /**
     * @RequestParam -> 形参列表  指定请求参数名 或者是否必须传递 或者 非必须传递设置默认值
     *                用法: @RequestParam(value="指定请求参数名,如果形参名和请求参数名一致,可以省略!",
     *                                    required = false 前端是否必须传递此参数,默认是必须 , 不传400异常!,
     *                                    defaultValue = "1" 当非必须传递 false ,可以设置默认值)
     */

    @GetMapping("data1")
    @ResponseBody
    public String data1(@RequestParam(value = "account") String username,
                        @RequestParam(required = false,defaultValue = "1") int page){

        System.out.println("username = " + username + ", page = " + page);

        return "username = " + username + ", page = " + page;
    }
测试即可
当然这里先加上@ResponseBody注解 具体原因后期再解释
//特殊情况1
//特殊值
    // 一名多值   key=1&key=2 直接使用集合接值即可

    //param/data2?hbs=吃&hbs=玩&hbs=学习
    //不加注解@RequestParam 将 hbs对应的一个字符串直接赋值给集合! 类型异常!
    //加了注解,经理就会将集合 add加入对应的字符串
    @GetMapping("data2")
    @ResponseBody
    public String data2(@RequestParam List<String> hbs){
        System.out.println("hbs = " + hbs);
        return "ok";
    }
测试即可
//特殊情概况2
先创建实体类 pojo下的 User类
package com.atguigu.pojo;

import lombok.Data;
import org.springframework.web.bind.annotation.RequestParam;

/**
 * projectName: com.atguigu.pojo
 *
 * @author: 赵伟风
 * description:
 */

@Data
public class User {


    private String name;  //属性必须等于参数名
    private int age = 18;  //这是直接赋值,也就是说外面对应的可传值可不传


}
//使用实体对象接值   用户注册(用户的信息)    -》    对应的实体类   -》     插入到数据库 表
    //param/data3?name=二狗子&age=18 准备一个对应属性和get|set方法的实体类即可! -> 形参列表声明对象参数即可!

    @RequestMapping("data3")
    @ResponseBody
    public String data3(User user){
        System.out.println("user = " + user);
        return user.toString();
    }
测试即可
//路径传参
path 包下的PathController类
package com.atguigu.path;

import org.springframework.stereotype.Controller;
import org.springframework.web.bind.annotation.PathVariable;
import org.springframework.web.bind.annotation.RequestMapping;
import org.springframework.web.bind.annotation.ResponseBody;

/**
 * projectName: com.atguigu.path
 *
 * @author: 赵伟风
 * description: 路径参数演示
 */

@Controller
@RequestMapping("path")
@ResponseBody
public class PathController {


    //  path/账号/密码

    //动态路径设计  {key} =  *  {key} 在形参列表获取传入的参数
    //接受路径参数  String account,String password ->如果不使用@PathVariable则视为 接受param格式参数
    // 必须使用 @PathVariable
    @RequestMapping("{account}/{password}")
    public String login(@PathVariable(value = "account") String username, @PathVariable String password){
        System.out.println("username = " + username + ", password = " + password);
        return "username = " + username + ", password = " + password;
    }

}
当然要测试前提这个包要被扫描,也就是在config包下的MVCConfig类设置
@ComponentScan(“com.atguigu.path”)
测试即可eg:localhost:8080/path/root/admin
//json请求,但他是post请求这里就要用postman工具了
创建实体类 pojo包下的 Person类
package com.atguigu.pojo;

import lombok.Data;

/**
 * projectName: com.atguigu.pojo
 *
 * @author: 赵伟风
 * description:
 */

@Data
public class Person {

    private String name;
    private int age;
    private String gender;
}
json包下的JsonController类
package com.atguigu.json;

import com.atguigu.pojo.Person;
import org.springframework.aop.support.DelegatePerTargetObjectIntroductionInterceptor;
import org.springframework.stereotype.Controller;
import org.springframework.web.bind.annotation.PostMapping;
import org.springframework.web.bind.annotation.RequestBody;
import org.springframework.web.bind.annotation.RequestMapping;
import org.springframework.web.bind.annotation.ResponseBody;

/**
 * projectName: com.atguigu.json
 *
 * @author: 赵伟风
 * description:
 */

@RequestMapping("json")
@Controller
@ResponseBody
public class JsonController {

    // data  -> 请求体 post  {name,age,gender}
    // 前端 -》 json -> 415 不支持数据类型呢??
    // 原因: Java原生的api,只支持路径参数和param参数 request.getParameter("key"); param  不支持json
    //        json就是前端的格式
    // 解决: 1. 导入json处理的依赖  2. handlerAdapter配置json转化器
    @PostMapping("data")
    public String data(@RequestBody Person person){
        System.out.println("person = " + person);
        return person.toString();
    }


    @PostMapping("data1")
    public Person data1(@RequestBody Person person){
        System.out.println("person = " + person);
        return person;
    }
}
其中的RresponseBody 只是返回结果的
而RequestBody 是请求体中的数据
当然测试前一定要确定好自己的包有没有被扫描,也就是config包下的MvcConfig
@ComponentScan(“com.atguigu.json”)
//但是Java原生的api,只支持路径参数和param参数 request.getParameter(“key”); param 不支持json
// json就是前端的格式
// 解决: 1. 导入json处理的依赖 2. handlerAdapter配置json转化器
 <dependency>
            <groupId>com.fasterxml.jackson.core</groupId>
            <artifactId>jackson-databind</artifactId>
            <version>2.15.0</version>
        </dependency>
然后config包下的MvcConfig加注解
@EnableWebMvc //handlerAdapter配置了json转化器
// 添加秘书 添加经理 给经理添加jacksonjson处理器
postman工具测试
//接收cookie
cookie包下的CookieController类
package com.atguigu.cookie;

import jakarta.servlet.http.Cookie;
import jakarta.servlet.http.HttpServletResponse;
import org.springframework.stereotype.Controller;
import org.springframework.web.bind.annotation.CookieValue;
import org.springframework.web.bind.annotation.GetMapping;
import org.springframework.web.bind.annotation.RequestMapping;
import org.springframework.web.bind.annotation.ResponseBody;

/**
 * projectName: com.atguigu.cookie
 *
 * @author: 赵伟风
 * description: 接收cookie
 */

@Controller
@RequestMapping("cookie")
@ResponseBody
public class CookieController {

    @RequestMapping("data")
    public String data(@CookieValue(value = "cookieName") String value){
        System.out.println("value = " + value);
        return value;
    }


    @GetMapping("save")
    public String save(HttpServletResponse response){
        Cookie cookie = new Cookie("cookieName","root");
        response.addCookie(cookie);
        return "ok";
    }

}
注意还是包扫描要改一下
测试即可
//请求头
header包下的HeaderController
package com.atguigu.header;

import org.springframework.stereotype.Controller;
import org.springframework.web.bind.annotation.GetMapping;
import org.springframework.web.bind.annotation.RequestHeader;
import org.springframework.web.bind.annotation.RequestMapping;
import org.springframework.web.bind.annotation.ResponseBody;

/**
 * projectName: com.atguigu.header
 *
 * @author: 赵伟风
 * description: 获取请求头
 */

@Controller
@RequestMapping("header")
@ResponseBody
public class HeaderController {

    @GetMapping("data")
    public String data(@RequestHeader("Host") String host){
        System.out.println("host = " + host);
        return "host = " + host;
    }
}
测试即可
//原生对象
api包下的ApiController类
package com.atguigu.api;

import jakarta.servlet.ServletContext;
import jakarta.servlet.http.HttpServletRequest;
import jakarta.servlet.http.HttpServletResponse;
import jakarta.servlet.http.HttpSession;
import org.springframework.beans.factory.annotation.Autowired;
import org.springframework.stereotype.Controller;

/**
 * projectName: com.atguigu.api
 *
 * @author: 赵伟风
 * description:
 */
@Controller
public class ApiController {

    @Autowired  // ioc容器获取对应类型实体对象(组件) 并自动装配
    private ServletContext servletContext;

    public void data(HttpServletResponse response,
                     HttpServletRequest request,
                     HttpSession session){

        //使用原生对象就可以
        //ServletContext  [1.最大的配置文件 2.全局最大共享域  3.核心api getRealPath]
        //方案1: request获取 session获取
        ServletContext servletContext = request.getServletContext();
        ServletContext servletContext1 = session.getServletContext();
        //方案2: ServletContext 会自动装入到ioc容器! 程序启动servletContext - ioc容器
        //直接全局注入可以
    }
}
//共享域对象获取
share包下的ShareController类
mvc提供的方法可以了解即可,不用太在意
import java.util.Map;

/**
 * projectName: com.atguigu.share
 *
 * @author: 赵伟风
 * description: 演示共享域对象获取
 */

@Controller
@RequestMapping("share")
@ResponseBody
public class ShareController {

    @Autowired
    private ServletContext servletContext;

    //原生api
    public  void  data(HttpServletRequest request , HttpSession session){

    }


    //springmvc提供的方法: request提供了几种 {了解}
    // model modelMap map modelAndView

    public void data1(Model model){
        model.addAttribute("key","value"); //request
    }

    public void data1(ModelMap model){
        model.addAttribute("key","value"); //request
    }

    public void data1(Map map){
        map.put("key","value"); //request
    }

    public ModelAndView data1(){
        ModelAndView modelAndView = new ModelAndView();
        modelAndView.addObject("key","value");
        modelAndView.setViewName("试图名 页面名称");
        return modelAndView;
    }
}
    //使用原生对象就可以
    //ServletContext  [1.最大的配置文件 2.全局最大共享域  3.核心api getRealPath]
    //方案1: request获取 session获取
    ServletContext servletContext = request.getServletContext();
    ServletContext servletContext1 = session.getServletContext();
    //方案2: ServletContext 会自动装入到ioc容器! 程序启动servletContext - ioc容器
    //直接全局注入可以
}
}
//*共享域对象获取*

[外链图片转存中...(img-Gfv02AZV-1718979328999)]

share包下的ShareController类

mvc提供的方法可以了解即可,不用太在意
import java.util.Map;
/**
- projectName: com.atguigu.share
- @author: 赵伟风
- description: 演示共享域对象获取
*/
@Controller
@RequestMapping(“share”)
@ResponseBody
public class ShareController {
@Autowired
private ServletContext servletContext;

//原生api
public  void  data(HttpServletRequest request , HttpSession session){

}


//springmvc提供的方法: request提供了几种 {了解}
// model modelMap map modelAndView

public void data1(Model model){
    model.addAttribute("key","value"); //request
}

public void data1(ModelMap model){
    model.addAttribute("key","value"); //request
}

public void data1(Map map){
    map.put("key","value"); //request
}

public ModelAndView data1(){
    ModelAndView modelAndView = new ModelAndView();
    modelAndView.addObject("key","value");
    modelAndView.setViewName("试图名 页面名称");
    return modelAndView;
}
}
##


 被折叠的 条评论
为什么被折叠?
被折叠的 条评论
为什么被折叠?
 到【灌水乐园】发言


