


可修改图片,详见下文 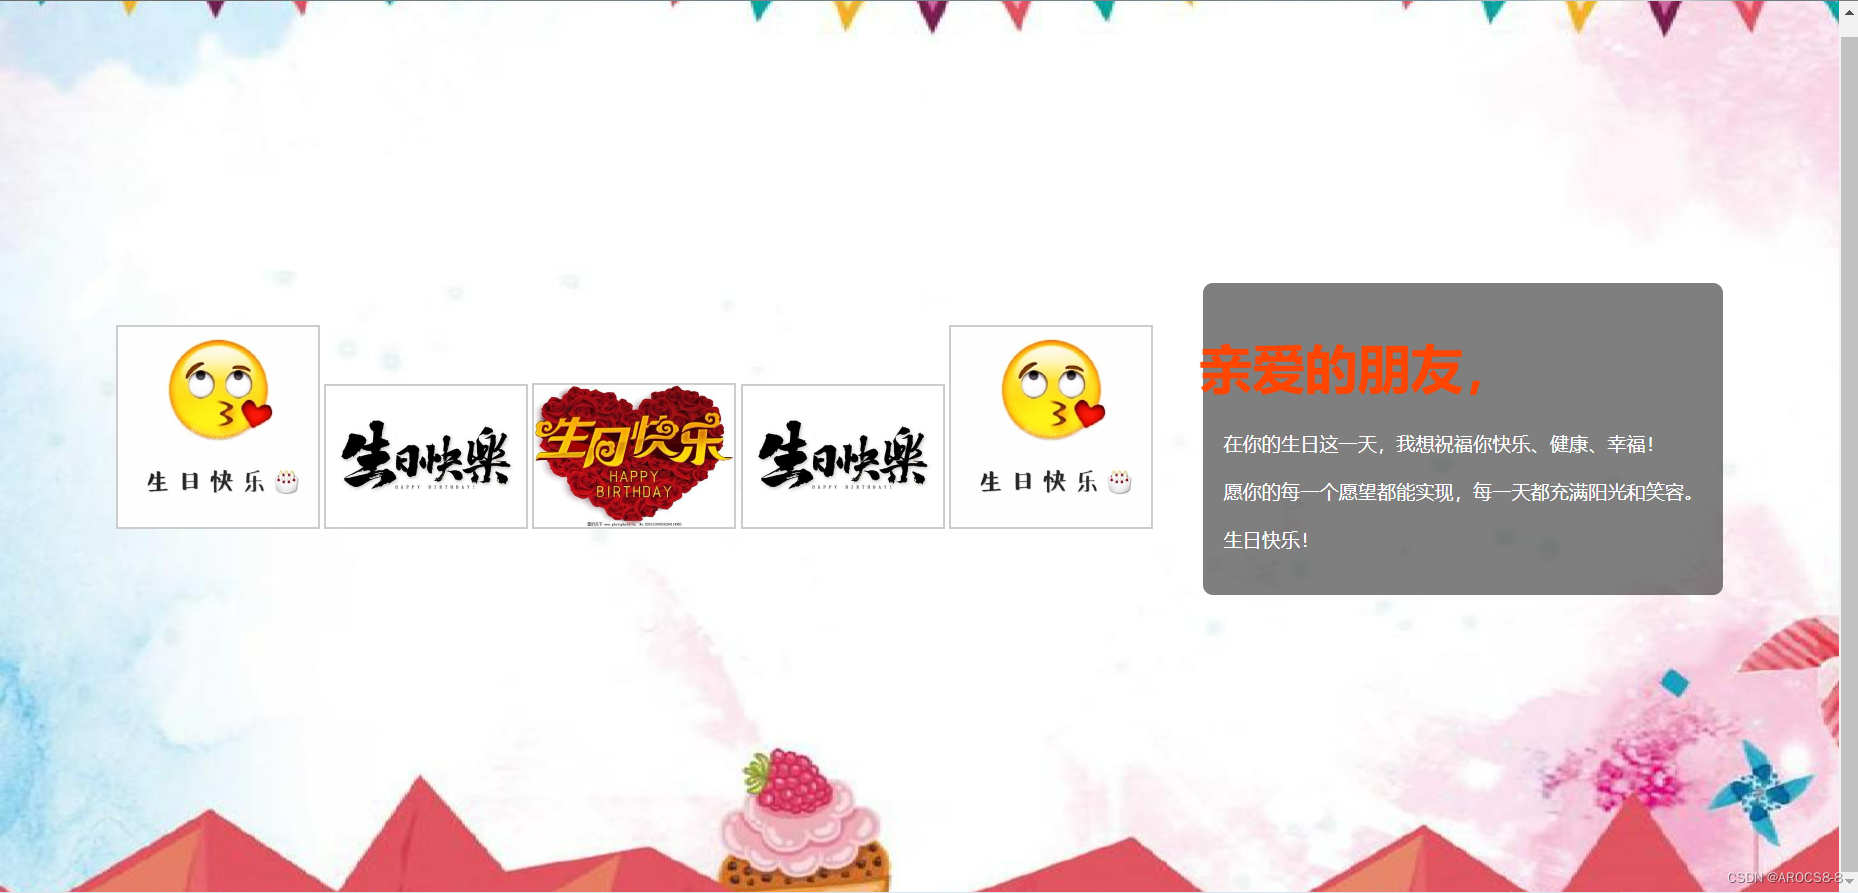
页面运行的结果
代码如下:
<!DOCTYPE html>
<html lang="en">
<head>
    <meta charset="UTF-8">
    <meta name="viewport" content="width=device-width, initial-scale=1.0">
    <title>Happy Birthday!</title>
    <style>
        body {
            font-family: Arial, sans-serif;
            display: flex;
            justify-content: center;
            align-items: center;
            height: 100vh;
            background-image: url('file:///C:/Users/23243/Desktop/121.jpg');
            background-size: cover;
            background-position: center;
            background-repeat: no-repeat;
        }
        .container {
            display: flex;
            align-items: center;
        }
        .photo-gallery {
            margin-right: 50px;
        }
        .photo {
            width: 200px;
            height: auto;
            margin-bottom: 20px;
            border: 2px solid #ccc;
            transition: transform 0.3s ease-in-out;
        }
        .photo:hover {
            transform: translateX(-10px);
        }
        .birthday-message {
            text-align: left;
            color: white;
            padding: 20px;
            background-color: rgba(0, 0, 0, 0.5);
            border-radius: 10px;
        }
        h1 {
            color: #ff4500;
            font-size: 3em;
            animation: scale 2s infinite alternate;
        }
        @keyframes scale {
            0% {
                transform: scale(1);
            }
            100% {
                transform: scale(1.1);
            }
        }
        .message {
            font-size: 1.2em;
            line-height: 1.5;
        }
    </style>
</head>
<body>
    <div class="container">
        <div class="photo-gallery">
            <img class="photo" src="file:///C:/Users/23243/Desktop/01.jpg" alt="Photo 1">
            <img class="photo" src="file:///C:/Users/23243/Desktop/02.jpg" alt="Photo 2">
            <img class="photo" src="file:///C:/Users/23243/Desktop/03.jpg" alt="Photo 3">
            <img class="photo" src="file:///C:/Users/23243/Desktop/02.jpg" alt="Photo 4">
            <img class="photo" src="file:///C:/Users/23243/Desktop/01.jpg" alt="Photo 5">
        </div>
        <div class="birthday-message">
            <h1>亲爱的朋友,</h1>
            <div class="message">
                <p>在你的生日这一天,祝福你快乐、健康、幸福!</p>
                <p>愿你的每一个愿望都能实现,每一天都充满阳光和笑容。</p>
                <p>生日快乐!</p>
            </div>
        </div>
    </div>
</body>
</html>
对于上述代码,简单做个解释。
1、<head>:包含了页面的元信息,如字符集、视口设置和标题等。
<meta name="viewport" content="width=device-width, initial-scale=1.0">:指定了视口的宽度为设备的宽度,并且初始缩放比例为 1.0,用于响应式布局。
<title>Happy Birthday!</title>:设置页面的标题为 "Happy Birthday!"。
<style>:内嵌样式表,用于定义页面的样式。
2、body:对页面的整体样式进行定义,包括字体、布局和背景等。
.container:定义了一个容器,包裹着图片和生日祝福。
.photo-gallery:定义了图片展示区域的样式,包括图片的边距。
.photo:定义了图片的样式,包括宽度、高度、边框以及鼠标悬停时的动画效果。
.birthday-message:定义了生日祝福的样式,包括文字颜色、背景颜色、内边距和边框圆角等。
h1:定义了标题的样式,包括颜色、字体大小和动画效果。
@keyframes scale:定义了一个动画关键帧,使标题在缩放时产生一个循环交替的动画效果。(页面”亲爱的朋友“那里)
3、<body>:包含了页面的主要内容。
.container:定义了一个容器,包裹着图片和生日祝福。
.photo-gallery:图片展示区域,包含了五张图片的链接。
.birthday-message:生日祝福区域,包含了一个标题和寄语内容。
<h1>:页面标题,显示 "亲爱的朋友,"。
.message:包含了寄语的内容,用 <p> 标签表示每一句话。
如果说对于文件进行修改的话,还有图片地址(如果说对于图片保存在桌面上的话,可以使用快捷键Alt+Enter+图片命名.jpg;也可以右键点击图片,选中属性),可以将好朋友的合照放进去,背景图片也是同理切换照片路径即可。右侧寄语可以上代码中p标签处修改。
以上是对有代码有基础的同学,如果说你对代码不了解的话,我将一步步的给你说步骤!!
第一步,在桌面创建一个txt文件,将上述代码复制进去、
第二步,修改图片地址以及文字内容并保存,本文是指这里,
background-image: url('file:///C:/Users/23243/Desktop/121.jpg')
<img class="photo" src="file:///C:/Users/23243/Desktop/01.jpg" alt="Photo 1">
<img class="photo" src="file:///C:/Users/23243/Desktop/02.jpg" alt="Photo 2">
<img class="photo" src="file:///C:/Users/23243/Desktop/03.jpg" alt="Photo 3">
<img class="photo" src="file:///C:/Users/23243/Desktop/02.jpg" alt="Photo 4">
<img class="photo" src="file:///C:/Users/23243/Desktop/01.jpg" alt="Photo 5">
<div class="message">
<p>在你的生日这一天,我想祝福你快乐、健康、幸福!</p>
<p>愿你的每一个愿望都能实现,每一天都充满阳光和笑容。</p>
<p>生日快乐!</p>
</div>
第三步,关闭文件,对文件进行重命名。原先应该为”新建 文本文档.txt“改为”新建 文本文档.html“,在次点击文件即可出现结果。
这只是一个静态网页。
大家可以动手试试,学习的过程,如果有问题也可以在评论区讨论。
本文涉及的知识点有html和css,感兴趣的同学可以自行学习学习。


 1666
1666

 被折叠的 条评论
为什么被折叠?
被折叠的 条评论
为什么被折叠?
 到【灌水乐园】发言


