


yolov5是一个非常流行的图像识别的框架,虽然目前yolov7的识别准确率更高,但是付出的算力也是更大的。介于本文针对的群体是初学者,本文使用yolov5训练自己的数据集并使用。
一、下载yolov5并安装所需的依赖项
1、下载yolov5
这个是yolov5的源项目地址yolov5源地址,但由于是在github上,所以大概率进不去,大家可以多试几次。也可以科学上网。
无法下载的可以使用百度网盘。
下载之后解压保存到自己喜欢的位置,我保存在了如下位置,此目录为项目根目录。
D:\Projects\Python_Machine_vision\yolov5+pvz注意yolov5+pvz文件夹下即为刚解压出来的所有子文件夹
2、安装依赖项
推荐大家最好使用Anaconda虚拟环境,过程不做演示了。
由于要用到pytorch,而pytorch分为CPU和GPU(cuda)版本,所以在安装时也会略有不同。其中GPU版本会使用电脑的显卡进行计算,速度相比于CPU版本会更快,没有显卡的同学安装CPU版本即可。
- CPU版本
直接进入自己的虚拟环境,然后进入到刚刚保存的目录下输入
pip install -r requirements.txt -i https://pypi.tuna.tsinghua.edu.cn/simple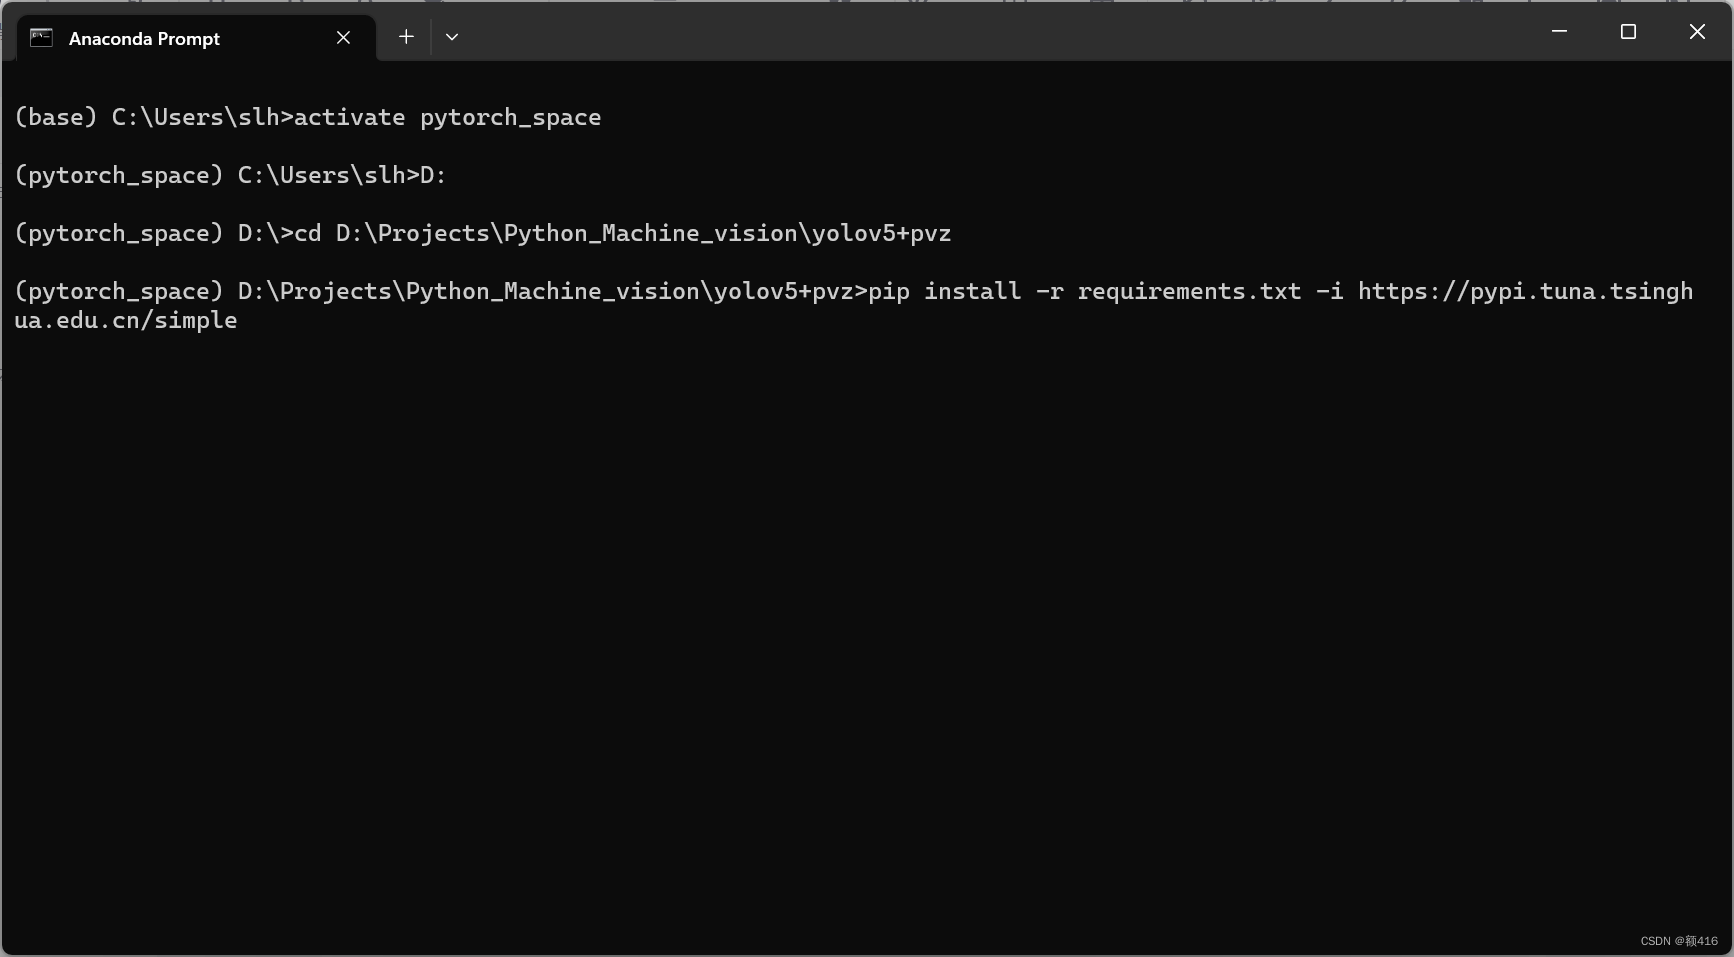
此命令安装所有的依赖项,其中pytorch默认安装的就是CPU版本。
- GPU(cuda)版本
在安装pytorch-cuda前,首先要确保电脑已经安装了CUDA和cuDNN,大家可以自行搜索进行安装。然后安装pytorch,强烈建议安装离线版本,因为这个包较大,在线安装速度慢,且容易容易安装失败。本文只演示离线安装。离线安装网站
进入到网站后找到与自己CUDA适应的pytorch和torchvision两个离线包进行下载。
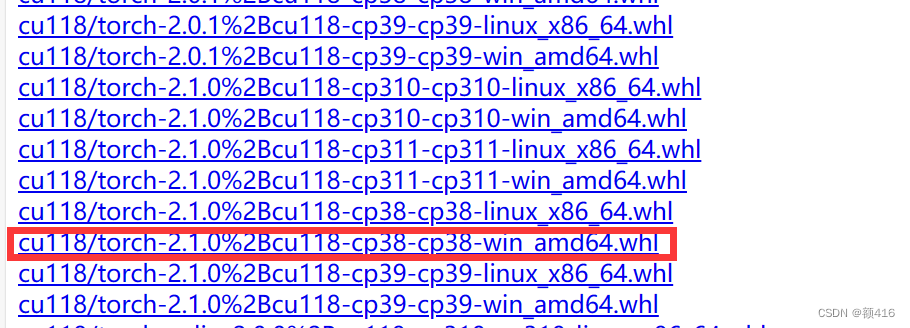
我下载的pytorch是这个,cu118代表CUDA的版本,torch-2.1.0代表所下载torch的版本,cp38代表python版本为3.8,win_amd64代表windows系统。大家选择与自己对应的版本下载。
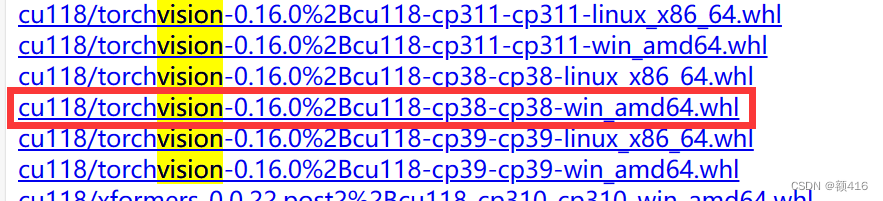
torchvision同理。
然后进入自己的虚拟环境,使用如下命令
pip install (下载的离线资源的绝对地址)
两个都是用以上命令安装,如果安装torchvision时出现了自动更新torch的情况导致安装失败,则使用如下命令重新安装torchvision。
pip install --no-deps (离线资源的绝对地址)
再进入到yolov5+pvz的目录下,使用如下命令安装剩余的包(已经安装过的不会重新安装)
pip install -r requirements.txt -i https://pypi.tuna.tsinghua.edu.cn/simple二、数据集的准备
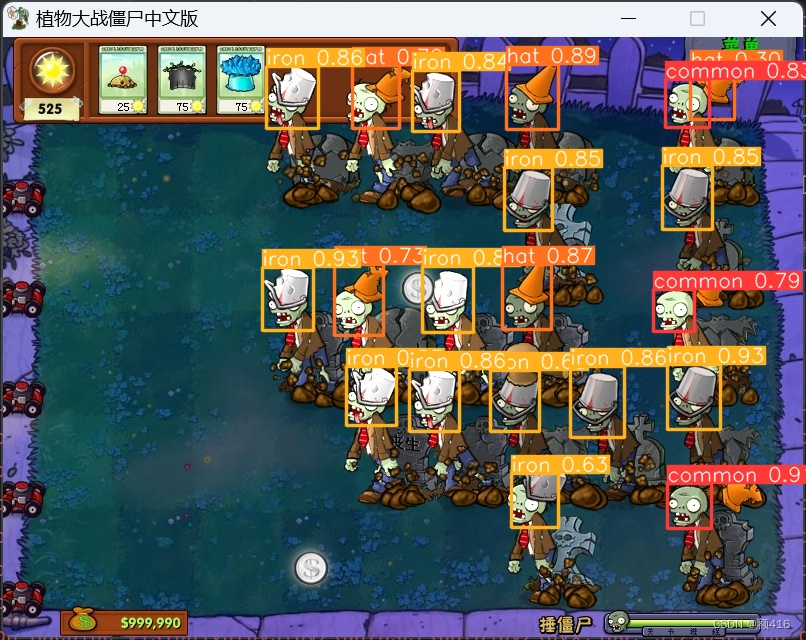
数据集是非常重要的,数据集的好坏将直接影响训练结果。本文将自制数据集来完成pvz自动锤僵尸,严格意义上来讲,本文的数据集其实非常的片面,但是仅针对于植物大战僵尸锤僵尸这个关卡来说已经足够了,因为本文本项目 的 目的并不是追求实用性,而是让大家更好的了解整个训练过程,同时增加一点趣味,使得最终可以很直观的看到训练结果。
本文已经为大家准备好了处理好的数据集,直接在项目根目录创建个dataset文件夹放进去即可。我的数据集共197张,标签分为五类,分别是common,hat, cat(这个是当时打错了,一直没删,不过不影响,数据为0),iron, sun,数据很少,但是在本个项目里足够了,如果想自制数据集,可以按照以下步骤。
对了还有游戏本身,游戏的位置可以随意,我还贴心的为大家准备了外挂,可以直接跳到锤僵尸的关卡。pvz
原始数据的准备
本文使用的原始数据来自一局游戏的录屏,录屏按帧取出图片作为原始数据,然后使用labelimg进行数据标注。
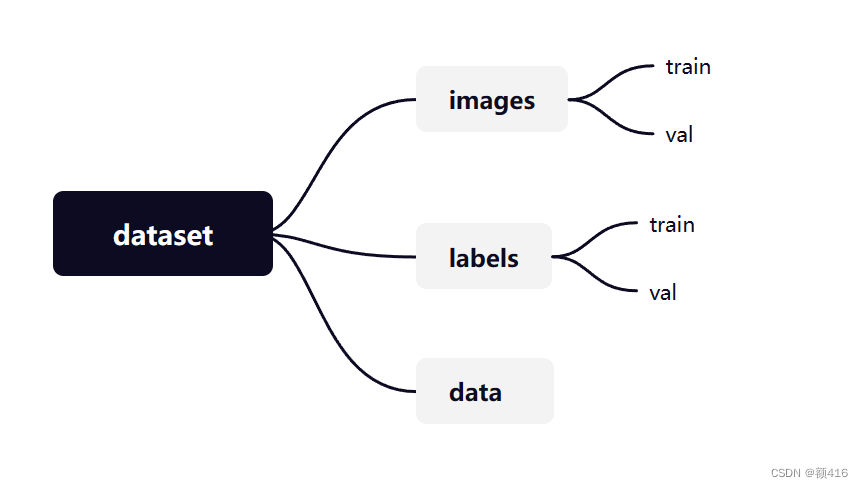
在根目录下创建一个文件夹名为dateset然后按照如下结构创建子文件夹。其中images和labels中存放训练和验证用的图片和标签,data文件里存放未处理的原始数据(其实这个文件夹位置可以任意,只是放在这里比价方便管理)
MP4转pic的代码也为大家准备上,此代码放到项目根目录即可,命名为transform.py,里面包含了pic转MP4和MP4转pic的,自行操作。
import cv2
import os


def mp42pic():
    video_path = r'D:/Projects/Python_Machine_vision/yolov5+pvz/dataset/train_mp4/pvz.mp4'  # 视频地址  自行更改
    out_path = r'D:/Projects/Python_Machine_vision/yolov5+pvz/dataset/data/pic/'  # 输出文件夹   自行更改
    interval = 10  # 每间隔10帧取一张图片,可以自行更改
    num = 1
    video = cv2.VideoCapture(video_path)

    # 帧率(frames per second)
    fps = video.get(cv2.CAP_PROP_FPS)
    # 总帧数(frames)
    frames = video.get(cv2.CAP_PROP_FRAME_COUNT)
    print("总帧数:" + str(frames))
    while video.isOpened():
        is_read, frame = video.read()
        if is_read:
            if num % interval == 1:
                file_name = '%05d' % num
                cv2.imwrite(out_path + str(file_name) + '.jpg', frame)
                cv2.waitKey(1)
            num += 1
        else:
            break


def pic2mp4():
    print()

    fourcc = cv2.VideoWriter_fourcc('m', 'p', '4', 'v')  # 设置输出视频为mp4格式
    # cap_fps是帧率,可自行更改
    cap_fps = 10
    # size要和图片的size一样
    size = (806, 640)
    video = cv2.VideoWriter('./self_data/result.mp4', fourcc, cap_fps, size)

    path = './runs/detect/exp19/'  # 图片所存放的文件夹的地址   根据自己的位置自行更改  后面要加个 /
    file_lst = os.listdir(path)
    print(len(file_lst))
    for i in range(len(file_lst)):
        img = cv2.imread(path + str(i+1) + '.jpg')
        video.write(img)


if __name__ == '__main__':
    mp42pic()
    pic2mp4()
labelimg的安装与使用
直接在虚拟环境里使用pip安装即可(本文所有的pip安装均使用了清华的镜像)
pip install labelimg -i https://pypi.tuna.tsinghua.edu.cn/simple安装完labelimg之后需要安装labelimg的依赖项,同样直接pip即可。
pip install PyQt5 -i https://pypi.tuna.tsinghua.edu.cn/simple

pip install pyqt5-tools -i https://pypi.tuna.tsinghua.edu.cn/simple

pip install lxml -i https://pypi.tuna.tsinghua.edu.cn/simple安装完成之后输入labelimg即可打开页面,具体使用教程可以参考 LabelImg(目标检测标注工具)的安装与使用教程_安装labelimg_knighthood2001的博客-CSDN博客
这里注意,我们选择的标注格式为YOLO,输出位置选择dataset/data/labels(与输入图片位置同级,其实可以任意,但是这样更方便),输出位置理还有一个classes.txt文件,里面记录着标签的种类,移出该文件夹或者删除,否则影响后续随机分配
图片的随机分配
由于我们的数据集是从MP4文件中获取的,所以要对数据打乱随机按比例分配到train和val中,这里的打乱指的是对数据的顺序打乱,但是图片标签仍然一一对应(名字相同),代码如下,此代码也放到项目根目录下,命名可以任意。
import os
import shutil
import random

random.seed(0)


def split_data(file_path, label_path, new_file_path, train_rate, val_rate, test_rate):
    each_class_image = []
    each_class_label = []
    for image in os.listdir(file_path):
        each_class_image.append(image)
    for label in os.listdir(label_path):
        each_class_label.append(label)
    data=list(zip(each_class_image,each_class_label))
    total = len(each_class_image)
    random.shuffle(data)
    each_class_image,each_class_label = zip(*data)
    train_images = each_class_image[0:int(train_rate * total)]
    val_images = each_class_image[int(train_rate * total):int((train_rate + val_rate) * total)]
    test_images = each_class_image[int((train_rate + val_rate) * total):]
    train_labels = each_class_label[0:int(train_rate * total)]
    val_labels = each_class_label[int(train_rate * total):int((train_rate + val_rate) * total)]
    test_labels = each_class_label[int((train_rate + val_rate) * total):]

    for image in train_images:
        print(image)
        old_path = file_path + '/' + image
        new_path1 = new_file_path + '/' + 'images' + '/' + 'train'
        if not os.path.exists(new_path1):
            os.makedirs(new_path1)
        new_path = new_path1 + '/' + image
        shutil.copy(old_path, new_path)

    for label in train_labels:
        print(label)
        old_path = label_path + '/' + label
        new_path1 = new_file_path + '/' + 'labels' + '/' + 'train'
        if not os.path.exists(new_path1):
            os.makedirs(new_path1)
        new_path = new_path1 + '/' + label
        shutil.copy(old_path, new_path)

    for image in val_images:
        old_path = file_path + '/' + image
        new_path1 = new_file_path + '/' + 'images' + '/' + 'val'
        if not os.path.exists(new_path1):
            os.makedirs(new_path1)
        new_path = new_path1 + '/' + image
        shutil.copy(old_path, new_path)

    for label in val_labels:
        old_path = label_path + '/' + label
        new_path1 = new_file_path + '/' + 'labels' + '/' + 'val'
        if not os.path.exists(new_path1):
            os.makedirs(new_path1)
        new_path = new_path1 + '/' + label
        shutil.copy(old_path, new_path)

    for image in test_images:
        old_path = file_path + '/' + image
        new_path1 = new_file_path + '/' + 'images' + '/' + 'test'
        if not os.path.exists(new_path1):
            os.makedirs(new_path1)
        new_path = new_path1 + '/' + image
        shutil.copy(old_path, new_path)

    for label in test_labels:
        old_path = label_path + '/' + label
        new_path1 = new_file_path + '/' + 'labels' + '/' + 'test'
        if not os.path.exists(new_path1):
            os.makedirs(new_path1)
        new_path = new_path1 + '/' + label
        shutil.copy(old_path, new_path)


if __name__ == '__main__':
    file_path = r"D:\Projects\Python_Machine_vision\yolov5+pvz\dataset\data\pic"    # 图片位置
    label_path = r'D:\Projects\Python_Machine_vision\yolov5+pvz\dataset\data\labels'   # 标注的TXT位置
    new_file_path = r"D:\Projects\Python_Machine_vision\yolov5+pvz\dataset"    #随机分配的位置
    split_data(file_path, label_path, new_file_path, train_rate=0.8, val_rate=0.2, test_rate=0)   # 各部分占的比例,由于我们没有测试集,所以为0
执行完之后即可在dataset/train和dataset/val中找到分配好的图片和标签了。至此,数据集准备完成。
三、训练
配置
在训练开始前要进行相关配置
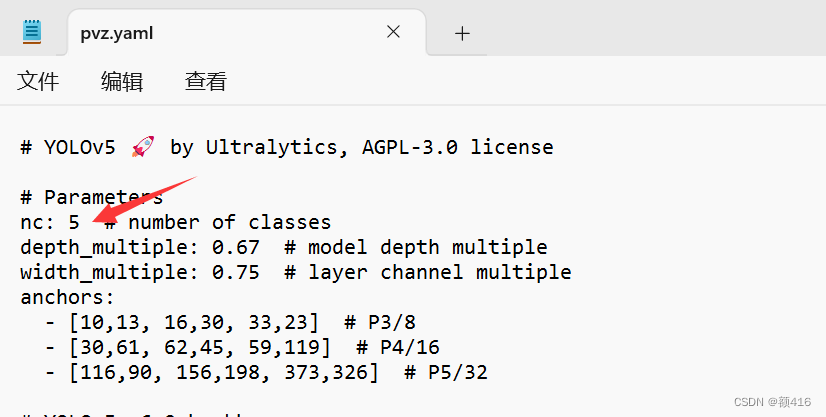
1、在models文件夹中将yolov5m.yaml文件复制一份改名为pvz.yaml(可以任意),然后选择用记事本打开,将如下位置改为5,也就是标签种类的数量,自制数据集的改为自己的标签种类数量即可。
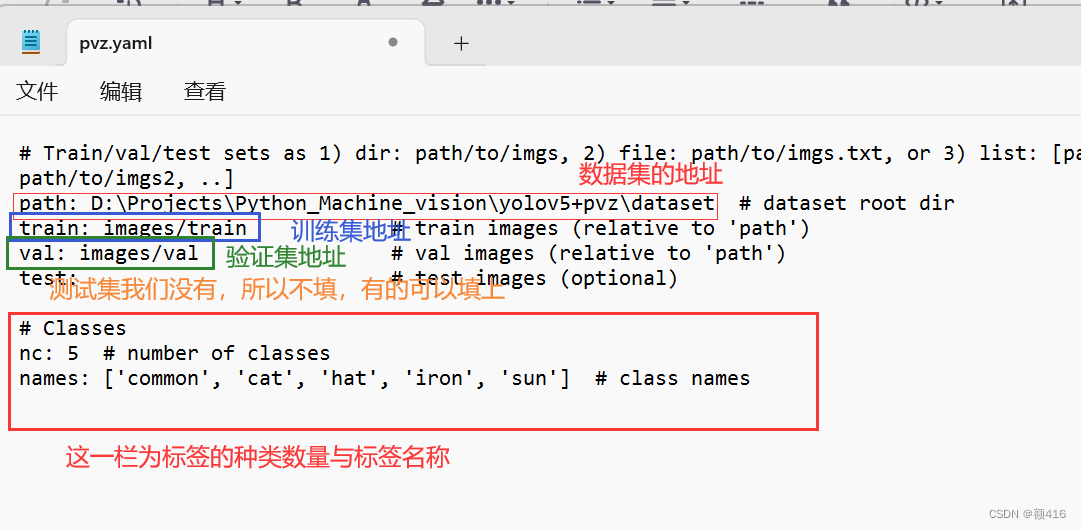
2、在data文件夹中将coco128.yaml文件复制一份改名为pvz.yaml(可以任意),然后选择用记事本打开,按照如下图做更改。
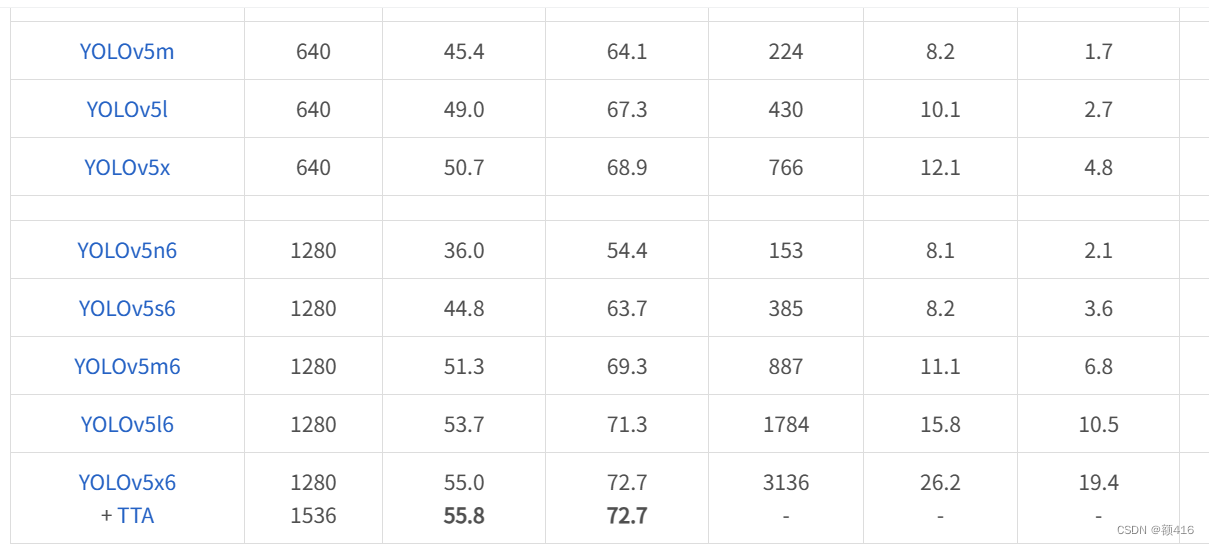
3、在yolov5官网下载yolov5m6预训练模型,放在项目根目录下。github进不去的我也准备了网盘链接
设置参数
在pycharm里打开yolov5+pvz这个项目,然后打开train.py,找到如下部分
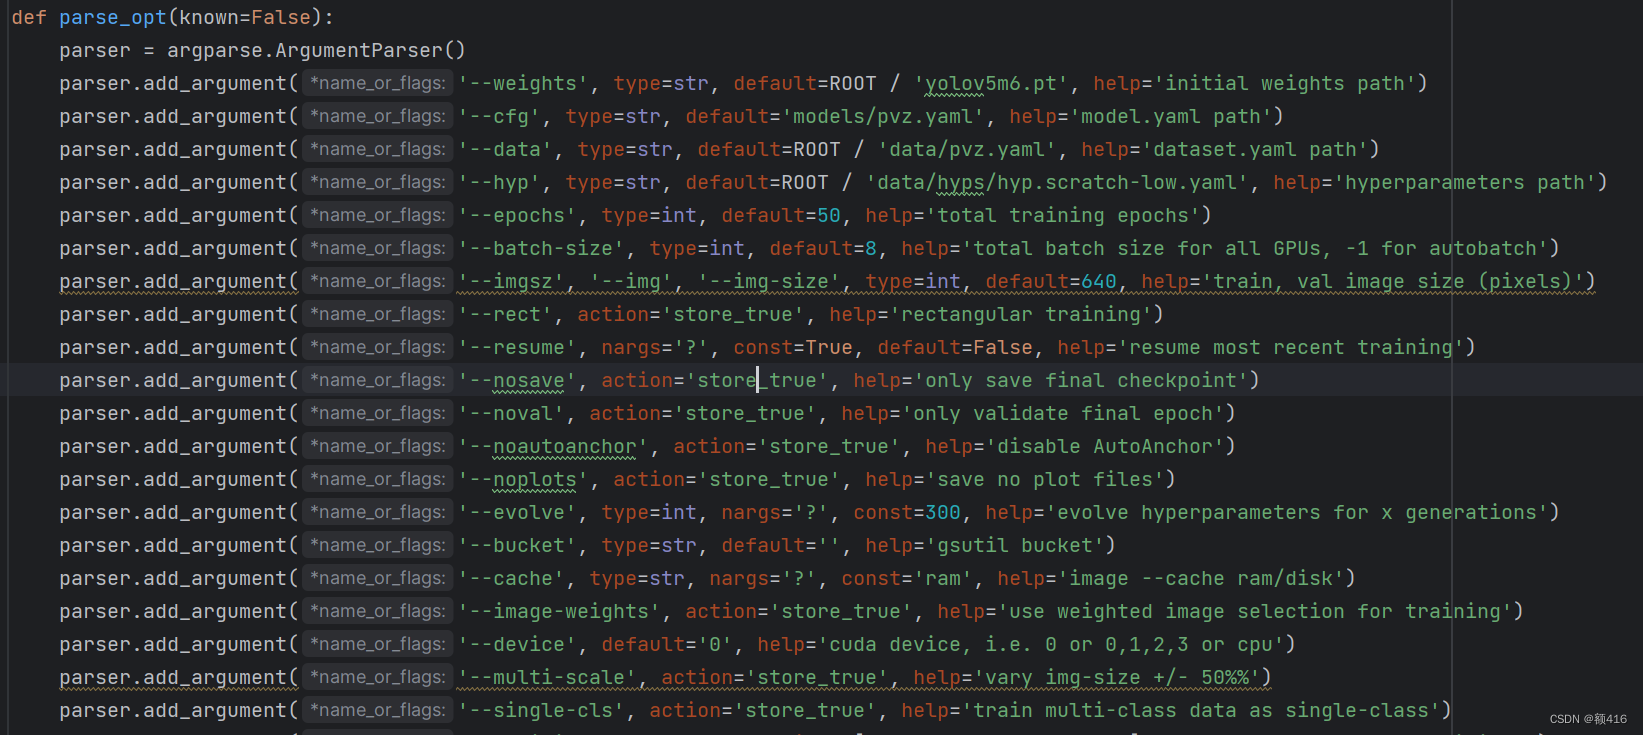
--weight 改为刚下载的yolov5m6.pt
--cfg 改为刚更改过的models/pvz.yaml
--data 改为刚更改过的data/pvz.yaml
--epoch 为训练的轮数,可以不更改
--device 改为0即为GPU模式,默认为CPU,没有显卡的可以不改
--batch-size 一次抓取的样本数量,我的显卡为3050,改为8时基本跑满,可以视自己显卡情况进行改大改小
开始训练
然后即可开始训练,我在训练时遇到了两个错误,一个是电脑的默认编码问题,另一个是字体问题,一般问题百度均可解决。因为数据集小,我的大概训练了20分钟就结束了
四、检测
打开detect.py文件,找到如下界面进行配置

首先配置训练出来的模权重文件,这个文件的地址会在你训练结束之后显示出来

这个是需要检测的图片的目录地址,这个目录里可以是一张或多张图片,也可以是一段MP4,建议重开一把游戏,重新截几张图或录屏一个MP4,注意,只截游戏界面。

--data改为之前在训练数据前改好的data/pvz.yaml
然后直接运行即可,运行结果在runs/detect里。
五、应用到pvz上
配置
因为是锤僵尸,免不了点击函数,我封装了一个click.dll,需要的可以点击下载,解压放在项目根目录即可,用不了的可以看一下下面这个博客,里面介绍了具体封装方法,尝试自己封装。python钢琴块自动脚本_如何用py做钢琴块脚本-CSDN博客
实在不行的,其实pyautogui中的点击函数也同样可以,只需要把212行的
click_test.click(box[0]+int(xy[0]), box[1]+int(xy[1])+20)替换为
pyautogui.click(box[0]+int(xy[0]), box[1]+int(xy[1])+20)即可,记得要导入这个包。
另外,还需要用到以下三个包,大家自行安装一下。
win32gui, win32con, win32com.client然后直接上代码,这个也要放在项目根目录,命名随意。
# YOLOv5 🚀 by Ultralytics, AGPL-3.0 license
"""
Run YOLOv5 detection inference on images, videos, directories, globs, YouTube, webcam, streams, etc.

Usage - sources:
    $ python detect.py --weights yolov5s.pt --source 0                               # webcam
                                                     img.jpg                         # image
                                                     vid.mp4                         # video
                                                     screen                          # screenshot
                                                     path/                           # directory
                                                     list.txt                        # list of images
                                                     list.streams                    # list of streams
                                                     'path/*.jpg'                    # glob
                                                     'https://youtu.be/LNwODJXcvt4'  # YouTube
                                                     'rtsp://example.com/media.mp4'  # RTSP, RTMP, HTTP stream

Usage - formats:
    $ python detect.py --weights yolov5s.pt                 # PyTorch
                                 yolov5s.torchscript        # TorchScript
                                 yolov5s.onnx               # ONNX Runtime or OpenCV DNN with --dnn
                                 yolov5s_openvino_model     # OpenVINO
                                 yolov5s.engine             # TensorRT
                                 yolov5s.mlmodel            # CoreML (macOS-only)
                                 yolov5s_saved_model        # TensorFlow SavedModel
                                 yolov5s.pb                 # TensorFlow GraphDef
                                 yolov5s.tflite             # TensorFlow Lite
                                 yolov5s_edgetpu.tflite     # TensorFlow Edge TPU
                                 yolov5s_paddle_model       # PaddlePaddle
"""

import argparse
import csv
import os
import platform
import sys
from pathlib import Path

import torch

FILE = Path(__file__).resolve()
ROOT = FILE.parents[0]  # YOLOv5 root directory
if str(ROOT) not in sys.path:
    sys.path.append(str(ROOT))  # add ROOT to PATH
ROOT = Path(os.path.relpath(ROOT, Path.cwd()))  # relative

from ultralytics.utils.plotting import Annotator, colors, save_one_box

from models.common import DetectMultiBackend
from utils.dataloaders import IMG_FORMATS, VID_FORMATS, LoadImages, LoadScreenshots, LoadStreams
from utils.general import (LOGGER, Profile, check_file, check_img_size, check_imshow, check_requirements, colorstr, cv2,
                           increment_path, non_max_suppression, print_args, scale_boxes, strip_optimizer, xyxy2xywh)
from utils.torch_utils import select_device, smart_inference_mode

# pvz点击
from ctypes import *
import pyautogui
from PIL import ImageGrab
import win32gui, win32con, win32com.client
import numpy as np
import time

def cilck_init():        # 这个函数经常出错,是win32gui的原因,如果发现截图的区域与游戏画面区域不相符时可手动测量游戏画面所在的区域,放入box即可
    hwnd = win32gui.FindWindow(None, '植物大战僵尸中文版')
    print(hwnd)
    # 发送一个事件,防止窗口无法被放到前台
    shell = win32com.client.Dispatch("WScript.Shell")
    shell.SendKeys('%')
    win32gui.SetForegroundWindow(hwnd)
    window_x, window_y, right, bottom = win32gui.GetWindowRect(hwnd)
    box = (window_x, window_y, right, bottom)
    print(box)
    click_test = CDLL("pro1/Click.dll")
    return box, click_test


@smart_inference_mode()
def run(
        weights=ROOT / 'runs/train/exp6/weights/best.pt',  # model path or triton URL
        source=ROOT / 'self_data/pvz',  # file/dir/URL/glob/screen/0(webcam)
        data=ROOT / 'data/pvz.yaml',  # dataset.yaml path
        imgsz=(640, 640),  # inference size (height, width)
        conf_thres=0.25,  # confidence threshold
        iou_thres=0.45,  # NMS IOU threshold
        max_det=1000,  # maximum detections per image
        device='0',  # cuda device, i.e. 0 or 0,1,2,3 or cpu
        view_img=False,  # show results
        save_txt=False,  # save results to *.txt
        save_csv=False,  # save results in CSV format
        save_conf=False,  # save confidences in --save-txt labels
        save_crop=False,  # save cropped prediction boxes
        nosave=False,  # do not save images/videos
        classes=None,  # filter by class: --class 0, or --class 0 2 3
        agnostic_nms=False,  # class-agnostic NMS
        augment=False,  # augmented inference
        visualize=False,  # visualize features
        update=False,  # update all models
        project=ROOT / 'runs/detect',  # save results to project/name
        name='exp',  # save results to project/name
        exist_ok=False,  # existing project/name ok, do not increment
        line_thickness=3,  # bounding box thickness (pixels)
        hide_labels=False,  # hide labels
        hide_conf=False,  # hide confidences
        half=False,  # use FP16 half-precision inference
        dnn=False,  # use OpenCV DNN for ONNX inference
        vid_stride=1,  # video frame-rate stride
):
    source = str(source)
    save_img = not nosave and not source.endswith('.txt')  # save inference images
    is_file = Path(source).suffix[1:] in (IMG_FORMATS + VID_FORMATS)
    is_url = source.lower().startswith(('rtsp://', 'rtmp://', 'http://', 'https://'))
    webcam = source.isnumeric() or source.endswith('.streams') or (is_url and not is_file)
    screenshot = source.lower().startswith('screen')
    if is_url and is_file:
        source = check_file(source)  # download

    # Directories
    save_dir = increment_path(Path(project) / name, exist_ok=exist_ok)  # increment run
    (save_dir / 'labels' if save_txt else save_dir).mkdir(parents=True, exist_ok=True)  # make dir

    # Load model
    device = select_device(device)
    model = DetectMultiBackend(weights, device=device, dnn=dnn, data=data, fp16=half)
    stride, names, pt = model.stride, model.names, model.pt
    imgsz = check_img_size(imgsz, s=stride)  # check image size

    # Dataloader
    bs = 1  # batch_size
    if webcam:
        view_img = check_imshow(warn=True)
        dataset = LoadStreams(source, img_size=imgsz, stride=stride, auto=pt, vid_stride=vid_stride)
        bs = len(dataset)
    elif screenshot:
        dataset = LoadScreenshots(source, img_size=imgsz, stride=stride, auto=pt)
    else:
        dataset = LoadImages(source, img_size=imgsz, stride=stride, auto=pt, vid_stride=vid_stride)
    vid_path, vid_writer = [None] * bs, [None] * bs

    # Run inference
    model.warmup(imgsz=(1 if pt or model.triton else bs, 3, *imgsz))  # warmup
    seen, windows, dt = 0, [], (Profile(), Profile(), Profile())
    num_pic = 1
    while num_pic:
        background_bgr = np.array(ImageGrab.grab(box))
        background = background_bgr[:, :, [2, 1, 0]]   # bgr图片转为rgb
        cv2.imwrite('dataset/data/pvz/pvx.jpg', background)
        for path, im, im0s, vid_cap, s in dataset:
            with dt[0]:
                im = torch.from_numpy(im).to(model.device)
                im = im.half() if model.fp16 else im.float()  # uint8 to fp16/32
                im /= 255  # 0 - 255 to 0.0 - 1.0
                if len(im.shape) == 3:
                    im = im[None]  # expand for batch dim

            # Inference
            with dt[1]:
                visualize = increment_path(save_dir / Path(path).stem, mkdir=True) if visualize else False
                pred = model(im, augment=augment, visualize=visualize)

            # NMS
            with dt[2]:
                pred = non_max_suppression(pred, conf_thres, iou_thres, classes, agnostic_nms, max_det=max_det)

            # Second-stage classifier (optional)
            # pred = utils.general.apply_classifier(pred, classifier_model, im, im0s)

            # Define the path for the CSV file
            csv_path = save_dir / 'predictions.csv'

            # Create or append to the CSV file
            def write_to_csv(image_name, prediction, confidence):
                data = {'Image Name': image_name, 'Prediction': prediction, 'Confidence': confidence}
                with open(csv_path, mode='a', newline='') as f:
                    writer = csv.DictWriter(f, fieldnames=data.keys())
                    if not csv_path.is_file():
                        writer.writeheader()
                    writer.writerow(data)

            # Process predictions
            for i, det in enumerate(pred):  # per image
                seen += 1
                if webcam:  # batch_size >= 1
                    p, im0, frame = path[i], im0s[i].copy(), dataset.count
                    s += f'{i}: '
                else:
                    p, im0, frame = path, im0s.copy(), getattr(dataset, 'frame', 0)

                p = Path(p)  # to Path
                save_path = str(save_dir / p.name)  # im.jpg
                # save_path = str(save_dir / str(num_pic)) + '.jpg'
                num_pic += 1
                txt_path = str(save_dir / 'labels' / p.stem) + ('' if dataset.mode == 'image' else f'_{frame}')  # im.txt
                s += '%gx%g ' % im.shape[2:]  # print string
                gn = torch.tensor(im0.shape)[[1, 0, 1, 0]]  # normalization gain whwh
                imc = im0.copy() if save_crop else im0  # for save_crop
                annotator = Annotator(im0, line_width=line_thickness, example=str(names))
                if len(det):
                    # Rescale boxes from img_size to im0 size
                    det[:, :4] = scale_boxes(im.shape[2:], det[:, :4], im0.shape).round()

                    # Print results
                    for c in det[:, 5].unique():
                        n = (det[:, 5] == c).sum()  # detections per class
                        s += f"{n} {names[int(c)]}{'s' * (n > 1)}, "  # add to string

                    # Write results
                    xy_list = list()
                    for *xyxy, conf, cls in reversed(det):
                        xy = torch.tensor(xyxy).view(1, 4).tolist()[0]
                        print(xy)
                        # xy_list.append(xy)
                        # for xy in xy_list:
                        click_test.click(box[0]+int(xy[0]), box[1]+int(xy[1])+20)
                        c = int(cls)  # integer class
                        label = names[c] if hide_conf else f'{names[c]}'
                        confidence = float(conf)
                        confidence_str = f'{confidence:.2f}'

                        if save_csv:
                            write_to_csv(p.name, label, confidence_str)

                        if save_txt:  # Write to file
                            xywh = (xyxy2xywh(torch.tensor(xyxy).view(1, 4)) / gn).view(-1).tolist()  # normalized xywh
                            line = (cls, *xywh, conf) if save_conf else (cls, *xywh)  # label format
                            with open(f'{txt_path}.txt', 'a') as f:
                                f.write(('%g ' * len(line)).rstrip() % line + '\n')

                        if save_img or save_crop or view_img:  # Add bbox to image
                            c = int(cls)  # integer class
                            label = None if hide_labels else (names[c] if hide_conf else f'{names[c]} {conf:.2f}')
                            annotator.box_label(xyxy, label, color=colors(c, True))
                        if save_crop:
                            save_one_box(xyxy, imc, file=save_dir / 'crops' / names[c] / f'{p.stem}.jpg', BGR=True)

                # Stream results
                im0 = annotator.result()
                if view_img:
                    if platform.system() == 'Linux' and p not in windows:
                        windows.append(p)
                        cv2.namedWindow(str(p), cv2.WINDOW_NORMAL | cv2.WINDOW_KEEPRATIO)  # allow window resize (Linux)
                        cv2.resizeWindow(str(p), im0.shape[1], im0.shape[0])
                    cv2.imshow(str(p), im0)
                    cv2.waitKey(1)  # 1 millisecond

                # Save results (image with detections)
                if save_img:
                    if dataset.mode == 'image':
                        cv2.imwrite(save_path, im0)
                    else:  # 'video' or 'stream'
                        if vid_path[i] != save_path:  # new video
                            vid_path[i] = save_path
                            if isinstance(vid_writer[i], cv2.VideoWriter):
                                vid_writer[i].release()  # release previous video writer
                            if vid_cap:  # video
                                fps = vid_cap.get(cv2.CAP_PROP_FPS)
                                w = int(vid_cap.get(cv2.CAP_PROP_FRAME_WIDTH))
                                h = int(vid_cap.get(cv2.CAP_PROP_FRAME_HEIGHT))
                            else:  # stream
                                fps, w, h = 30, im0.shape[1], im0.shape[0]
                            save_path = str(Path(save_path).with_suffix('.mp4'))  # force *.mp4 suffix on results videos
                            vid_writer[i] = cv2.VideoWriter(save_path, cv2.VideoWriter_fourcc(*'mp4v'), fps, (w, h))
                        vid_writer[i].write(im0)

            # Print time (inference-only)
            LOGGER.info(f"{s}{'' if len(det) else '(no detections), '}{dt[1].dt * 1E3:.1f}ms")

    # Print results
    t = tuple(x.t / seen * 1E3 for x in dt)  # speeds per image
    LOGGER.info(f'Speed: %.1fms pre-process, %.1fms inference, %.1fms NMS per image at shape {(1, 3, *imgsz)}' % t)
    if save_txt or save_img:
        s = f"\n{len(list(save_dir.glob('labels/*.txt')))} labels saved to {save_dir / 'labels'}" if save_txt else ''
        LOGGER.info(f"Results saved to {colorstr('bold', save_dir)}{s}")
    if update:
        strip_optimizer(weights[0])  # update model (to fix SourceChangeWarning)


def parse_opt():
    parser = argparse.ArgumentParser()
    parser.add_argument('--weights', nargs='+', type=str, default=ROOT / 'runs/train/exp6/weights/best.pt', help='model path or triton URL')
    parser.add_argument('--source', type=str, default=ROOT / 'dataset/data/pvz', help='file/dir/URL/glob/screen/0(webcam)')
    parser.add_argument('--data', type=str, default=ROOT / 'data/pvz.yaml', help='(optional) dataset.yaml path')
    parser.add_argument('--imgsz', '--img', '--img-size', nargs='+', type=int, default=[640], help='inference size h,w')
    parser.add_argument('--conf-thres', type=float, default=0.25, help='confidence threshold')
    parser.add_argument('--iou-thres', type=float, default=0.45, help='NMS IoU threshold')
    parser.add_argument('--max-det', type=int, default=1000, help='maximum detections per image')
    parser.add_argument('--device', default='0', help='cuda device, i.e. 0 or 0,1,2,3 or cpu')
    parser.add_argument('--view-img', action='store_true', help='show results')
    parser.add_argument('--save-txt', action='store_true', help='save results to *.txt')
    parser.add_argument('--save-csv', action='store_true', help='save results in CSV format')
    parser.add_argument('--save-conf', action='store_true', help='save confidences in --save-txt labels')
    parser.add_argument('--save-crop', action='store_true', help='save cropped prediction boxes')
    parser.add_argument('--nosave', action='store_true', help='do not save images/videos')
    parser.add_argument('--classes', nargs='+', type=int, help='filter by class: --classes 0, or --classes 0 2 3')
    parser.add_argument('--agnostic-nms', action='store_true', help='class-agnostic NMS')
    parser.add_argument('--augment', action='store_true', help='augmented inference')
    parser.add_argument('--visualize', action='store_true', help='visualize features')
    parser.add_argument('--update', action='store_true', help='update all models')
    parser.add_argument('--project', default=ROOT / 'runs/detect', help='save results to project/name')
    parser.add_argument('--name', default='exp', help='save results to project/name')
    parser.add_argument('--exist-ok', action='store_true', help='existing project/name ok, do not increment')
    parser.add_argument('--line-thickness', default=2, type=int, help='bounding box thickness (pixels)')
    parser.add_argument('--hide-labels', default=False, action='store_true', help='hide labels')
    parser.add_argument('--hide-conf', default=False, action='store_true', help='hide confidences')
    parser.add_argument('--half', action='store_true', help='use FP16 half-precision inference')
    parser.add_argument('--dnn', action='store_true', help='use OpenCV DNN for ONNX inference')
    parser.add_argument('--vid-stride', type=int, default=1, help='video frame-rate stride')
    opt = parser.parse_args()
    opt.imgsz *= 2 if len(opt.imgsz) == 1 else 1  # expand
    print_args(vars(opt))
    return opt


def main(opt):
    check_requirements(ROOT / 'requirements.txt', exclude=('tensorboard', 'thop'))
    run(**vars(opt))


if __name__ == '__main__':
    box, click_test = cilck_init()
    background_bgr = np.array(ImageGrab.grab(box))
    cv2.imwrite('dataset/data/pvz/pvx.jpg', background_bgr)    # 先在里面任意存一张图片,否则执行代码时无法判断数据类型,我们的数据类型是JPG
    opt = parse_opt()
    main(opt)
大家可以把188与189两行替换一下,即可将过程中所有图片保存,然后可以使用transform.py生成MP4。
save_path = str(save_dir / p.name)  # im.jpg
# save_path = str(save_dir / str(num_pic)) + '.jpg'
讲在最后
由于本人水平有限,如有错误,恳请批评指正!


 被折叠的 条评论
为什么被折叠?
被折叠的 条评论
为什么被折叠?
 到【灌水乐园】发言


