


文章目录
目录
一、标签语言特点:
形式:<开始标签 属性="属性值">标签体</结束标签>
分类:空标签 例:br、hr
UI标签 例:out标签
控制标签 例:if、foreach
数据标签 例:input、table

二、自定义标签
1)步骤
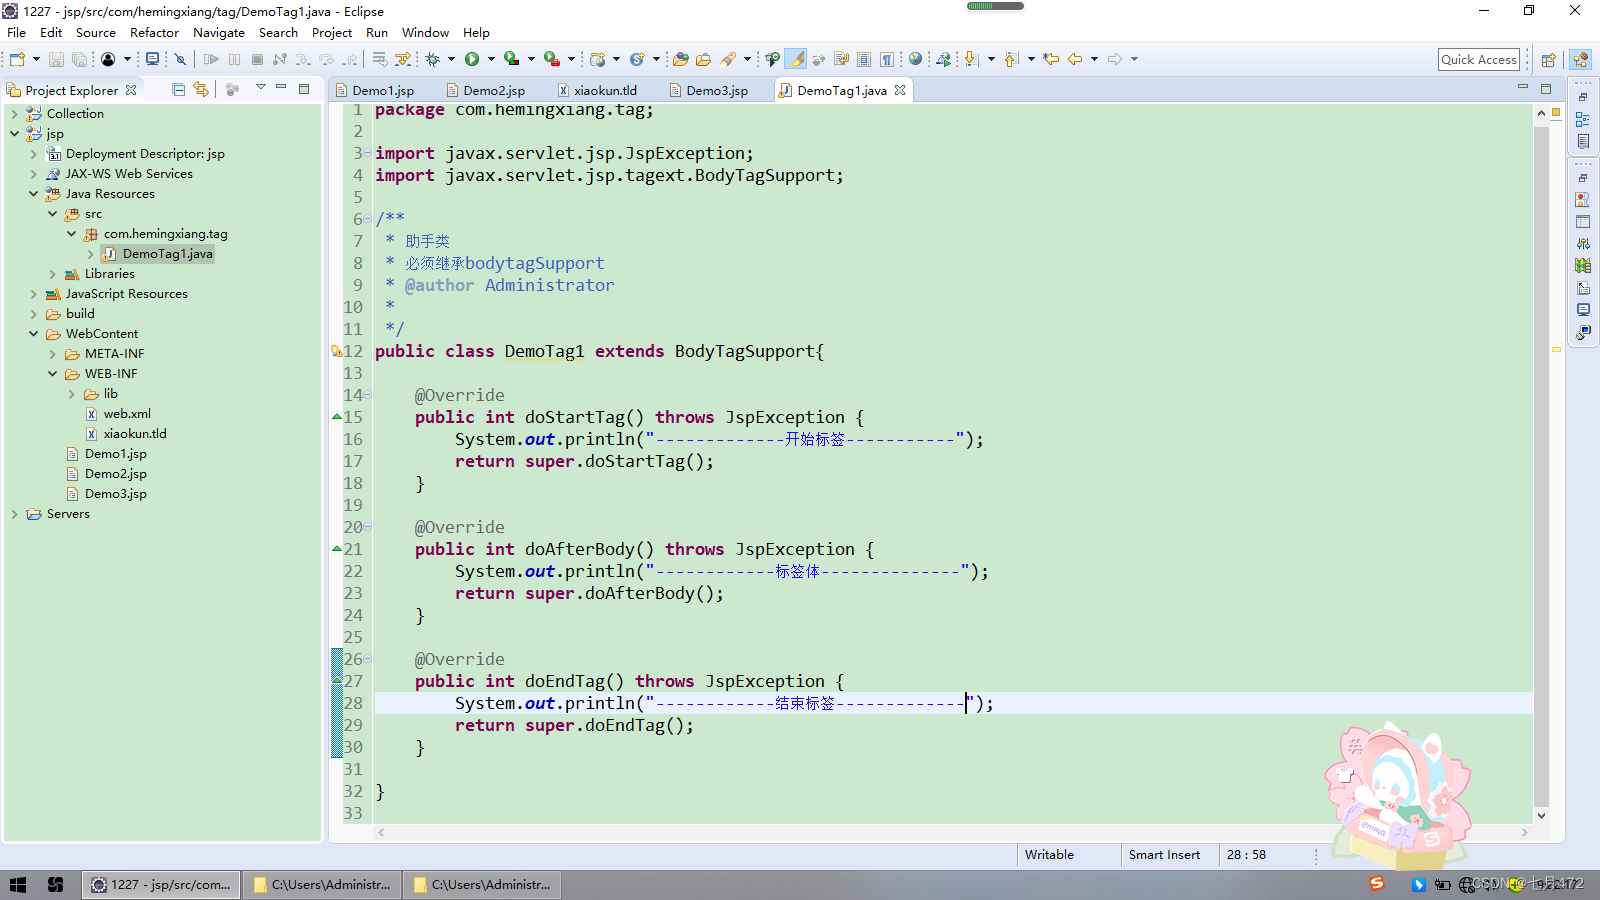
①助手类(继承BodyTagSupport)
源码:
package com.hemingxiang.tag;
import javax.servlet.jsp.JspException;
import javax.servlet.jsp.tagext.BodyTagSupport;
/**
* 助手类
* 必须继承bodytagSupport
* @author Administrator
*
*/
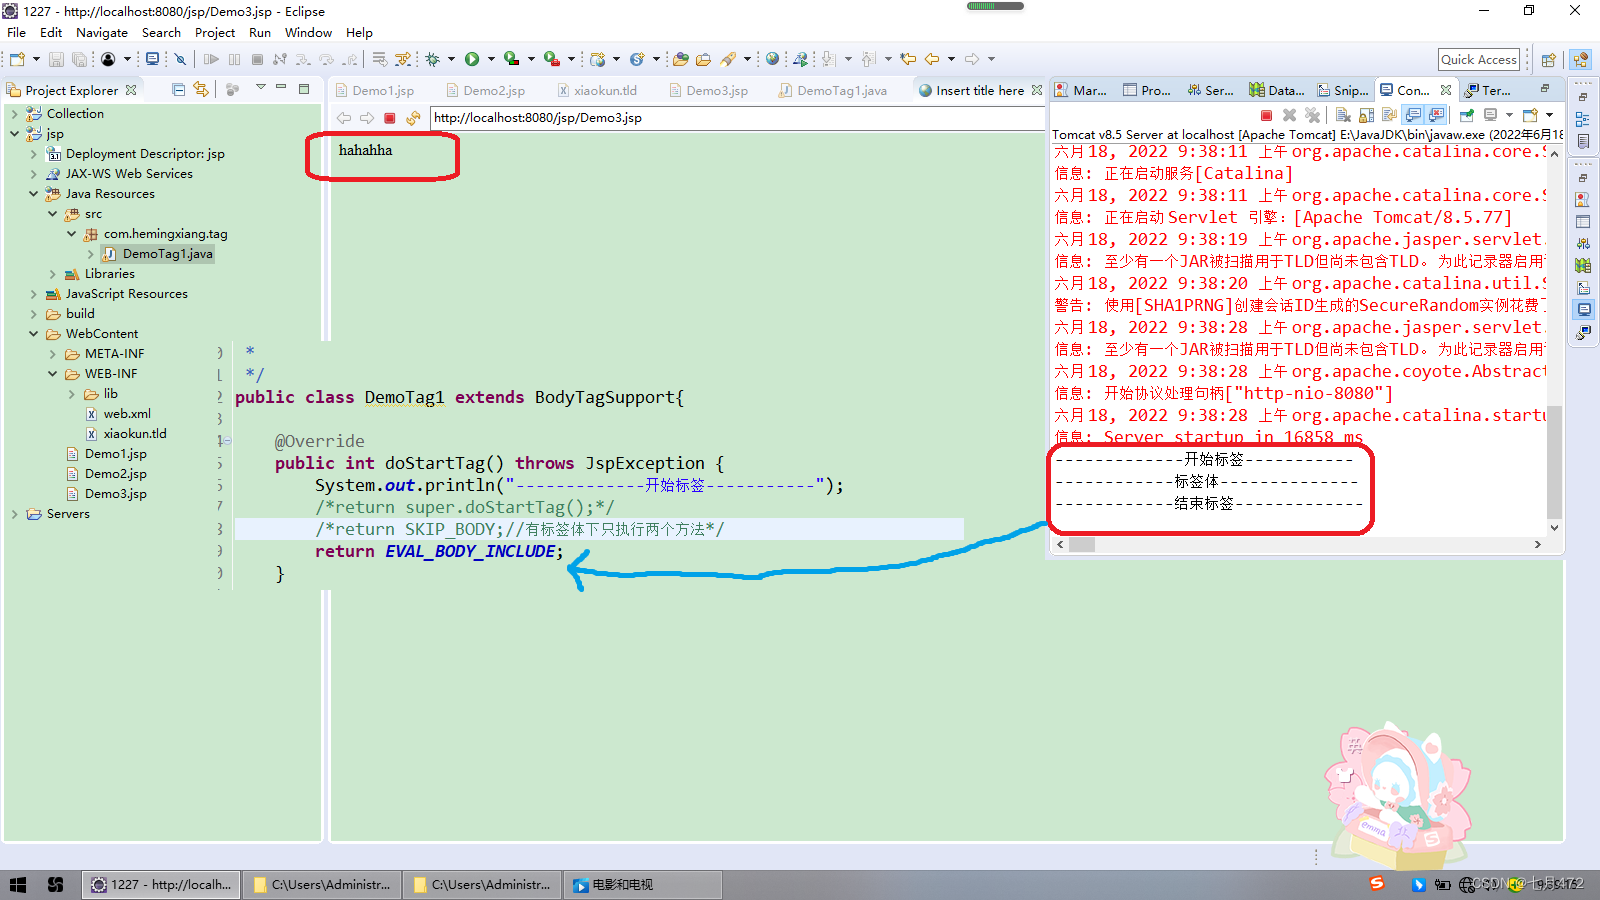
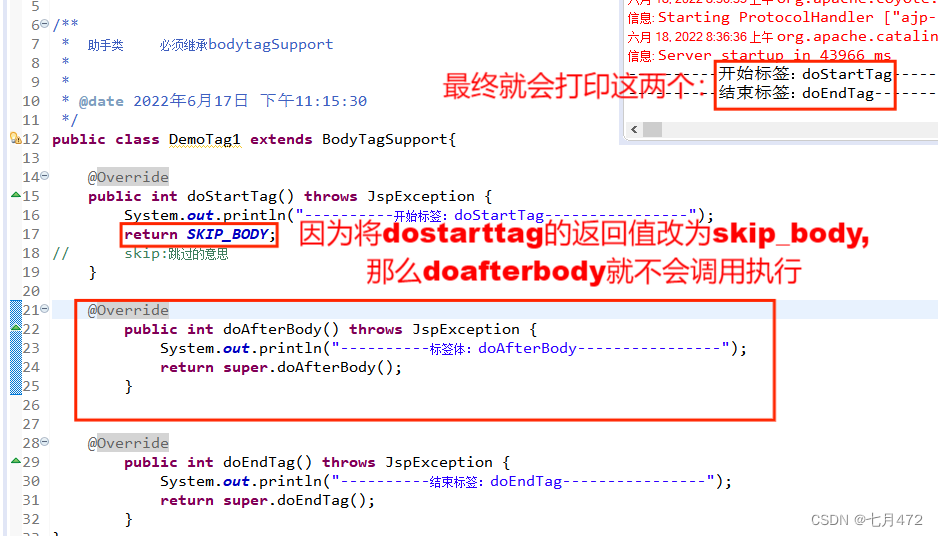
public class DemoTag1 extends BodyTagSupport{
@Override
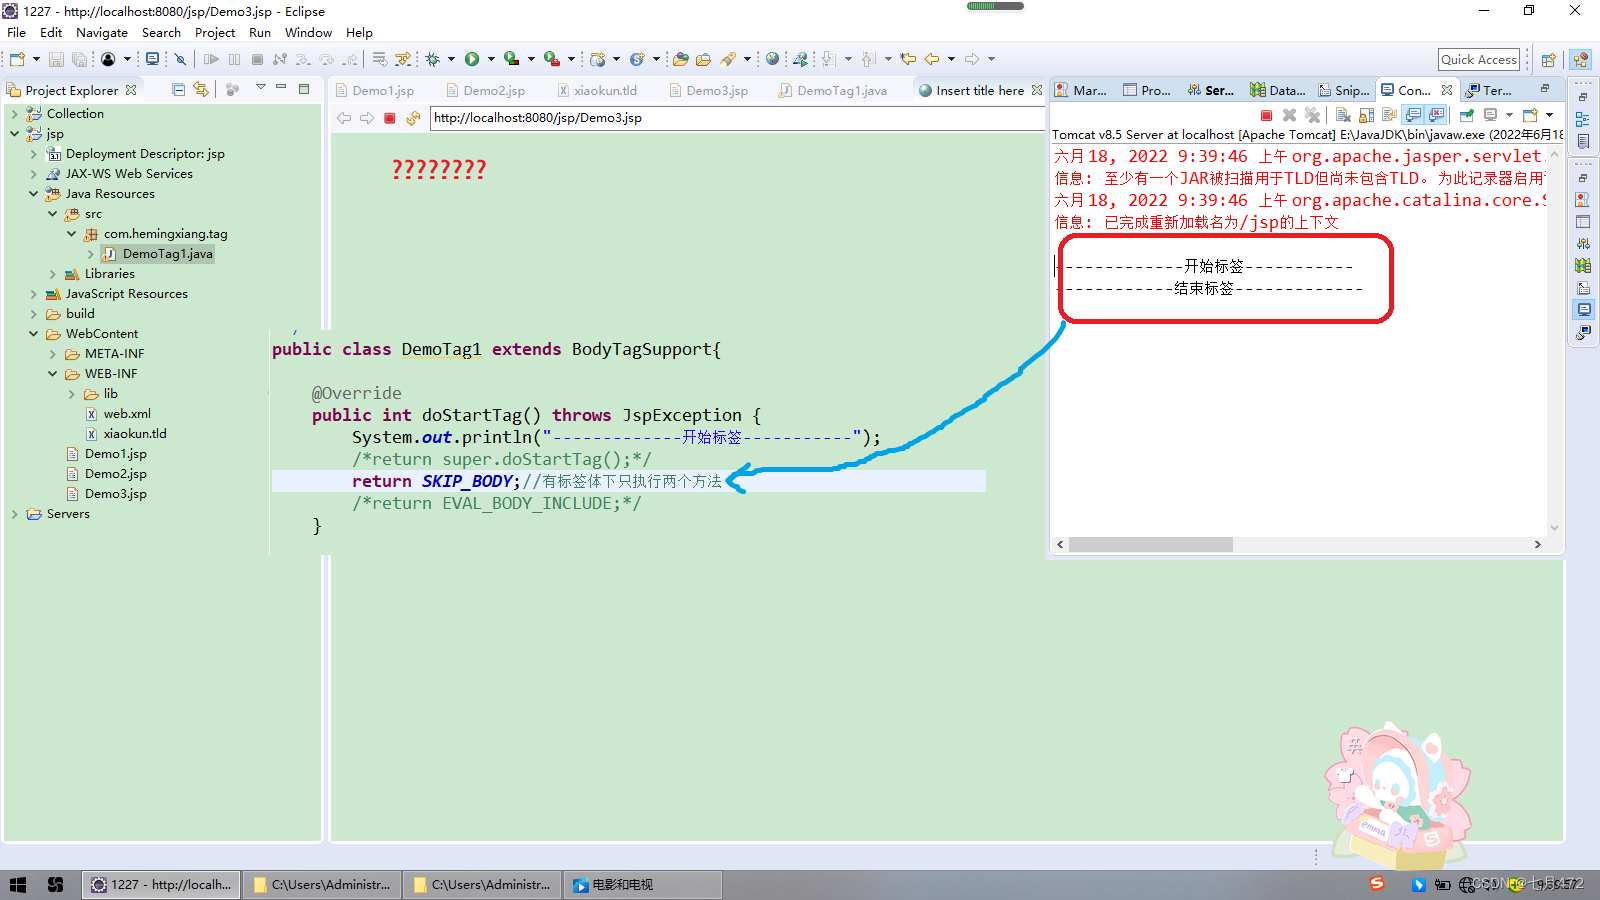
public int doStartTag() throws JspException {
System.out.println("-------------开始标签-----------");
/*return super.doStartTag();*/
/*return SKIP_BODY;//有标签体下只执行两个方法*/
return EVAL_BODY_INCLUDE;
}
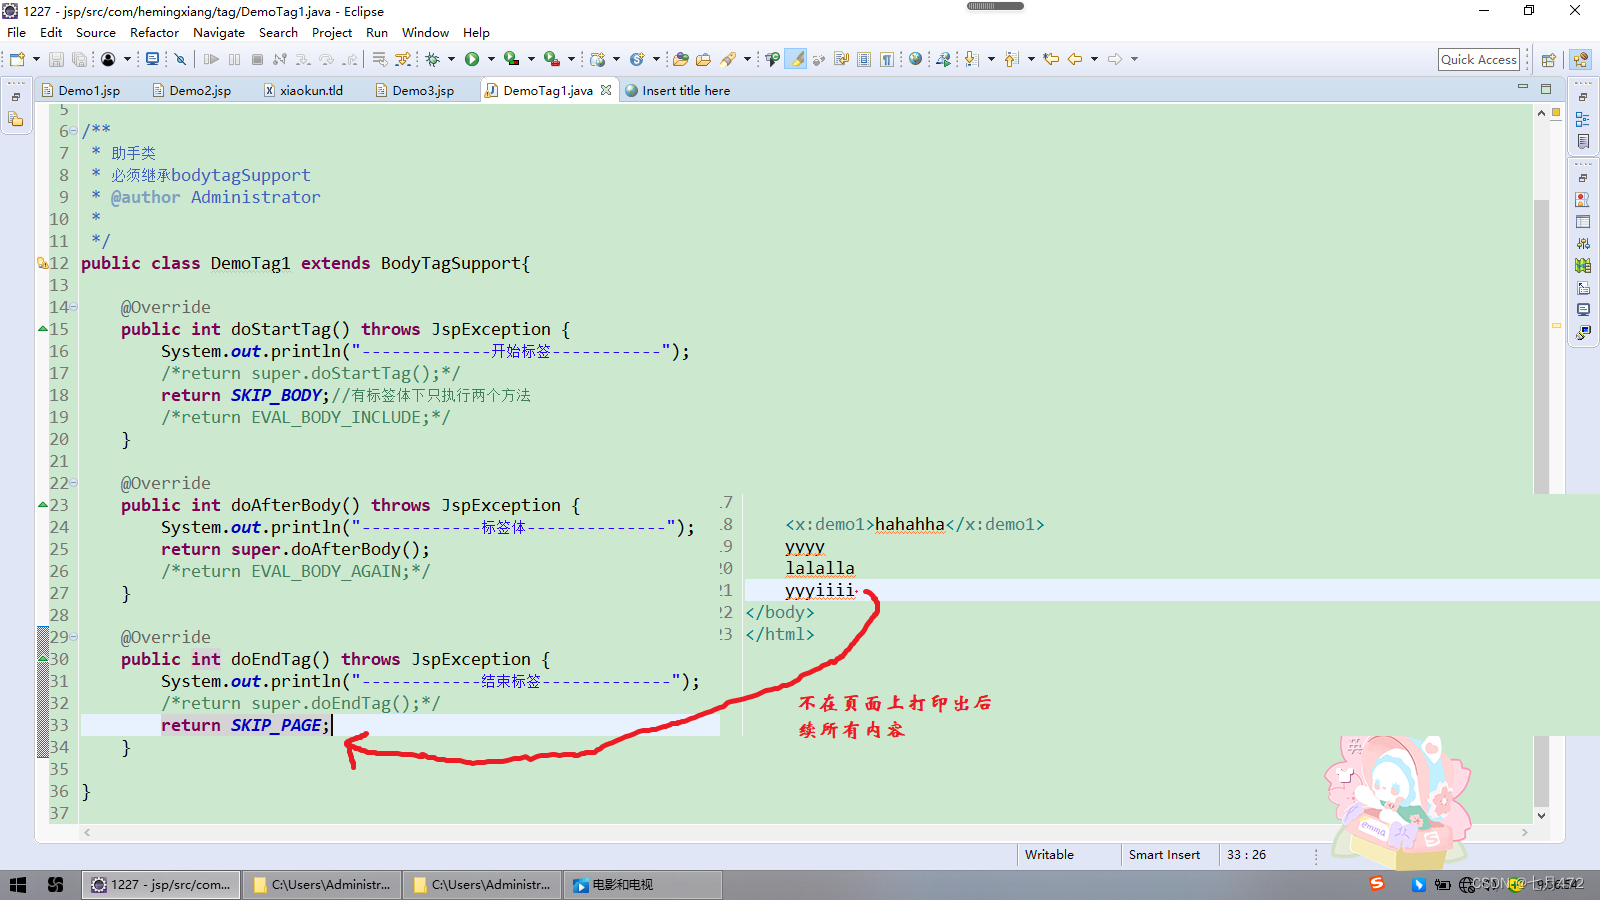
@Override
public int doAfterBody() throws JspException {
System.out.println("------------标签体--------------");
return super.doAfterBody();
/*return EVAL_BODY_AGAIN;*/
}
@Override
public int doEndTag() throws JspException {
System.out.println("------------结束标签-------------");
return super.doEndTag();
/*return SKIP_PAGE;*/
}
}
②标签库描述文件tld(tld文件必须保存到WEB-INF目录或其子目录)
<?xml version="1.0" encoding="UTF-8" ?>

<taglib xmlns="http://java.sun.com/xml/ns/j2ee"
    xmlns:xsi="http://www.w3.org/2001/XMLSchema-instance"
    xsi:schemaLocation="http://java.sun.com/xml/ns/j2ee http://java.sun.com/xml/ns/j2ee/web-jsptaglibrary_2_0.xsd"
    version="2.0">

  <description>JSTL 1.1 core library</description>
  <display-name>JSTL core</display-name>
  <tlib-version>1.1</tlib-version>
  <short-name>x</short-name>
  <uri>http://jsp.veryedu.cn</uri>

  <validator>
    <description>
        Provides core validation features for JSTL tags.
    </description>
    <validator-class>
        org.apache.taglibs.standard.tlv.JstlCoreTLV
    </validator-class>
  </validator>

  <tag>
   <!-- 代表标签库的名字 -->
    <name>demo1</name>
   <!--  该标签对应的助手类 -->
    <tag-class>com.hemingxiang.tag.DemoTag1</tag-class>
   <!--  代表是一个jsp标签 -->
    <body-content>JSP</body-content>
    <attribute>
     <!-- 该自定义标签的属性名称 -->
        <name>var</name>
       <!--  该属性是否必填 -->
        <required>false</required>
        <!-- 该属性值是否支持表达式 -->
        <rtexprvalue>false</rtexprvalue>
    </attribute>
  </tag>

  <tag>
    <name>if</name>
    <tag-class>com.hemingxiang.tag.IfTag</tag-class>
    <body-content>JSP</body-content>
    <attribute>
        <name>test</name>
        <required>true</required>
        <rtexprvalue>true</rtexprvalue>
    </attribute>
  </tag>

  <tag>
    <name>set</name>
    <tag-class>com.hemingxiang.tag.SetTag</tag-class>
    <body-content>JSP</body-content>
    <attribute>
        <name>var</name>
        <required>true</required>
        <rtexprvalue>false</rtexprvalue>
    </attribute>
    <attribute>
        <name>value</name>
        <required>true</required>
        <rtexprvalue>true</rtexprvalue>
    </attribute>
  </tag>

  <tag>
    <name>out</name>
    <tag-class>com.hemingxiang.tag.OutTag</tag-class>
    <body-content>JSP</body-content>
    <attribute>
        <name>value</name>
        <required>true</required>
        <rtexprvalue>true</rtexprvalue>
    </attribute>
  </tag>


</taglib>
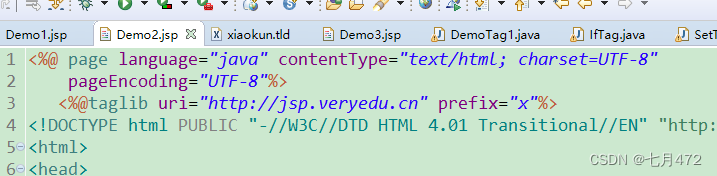
③JSP通过taglib指令导入标签库
2)实例
先创建一个tld文件: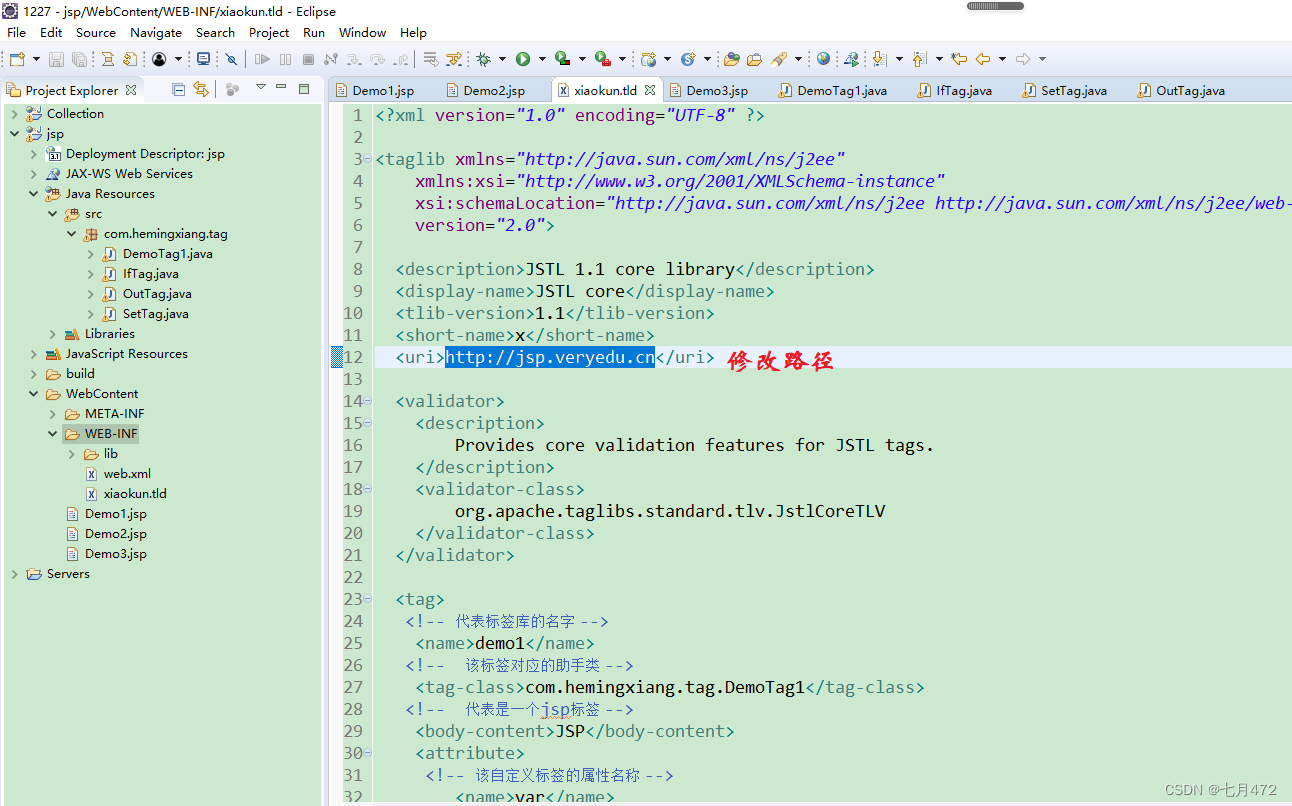
再创建一个助手类:
 在有标签体的情况下,默认会调用助手类的doStartTag,doAfterBody,doEndTag方法
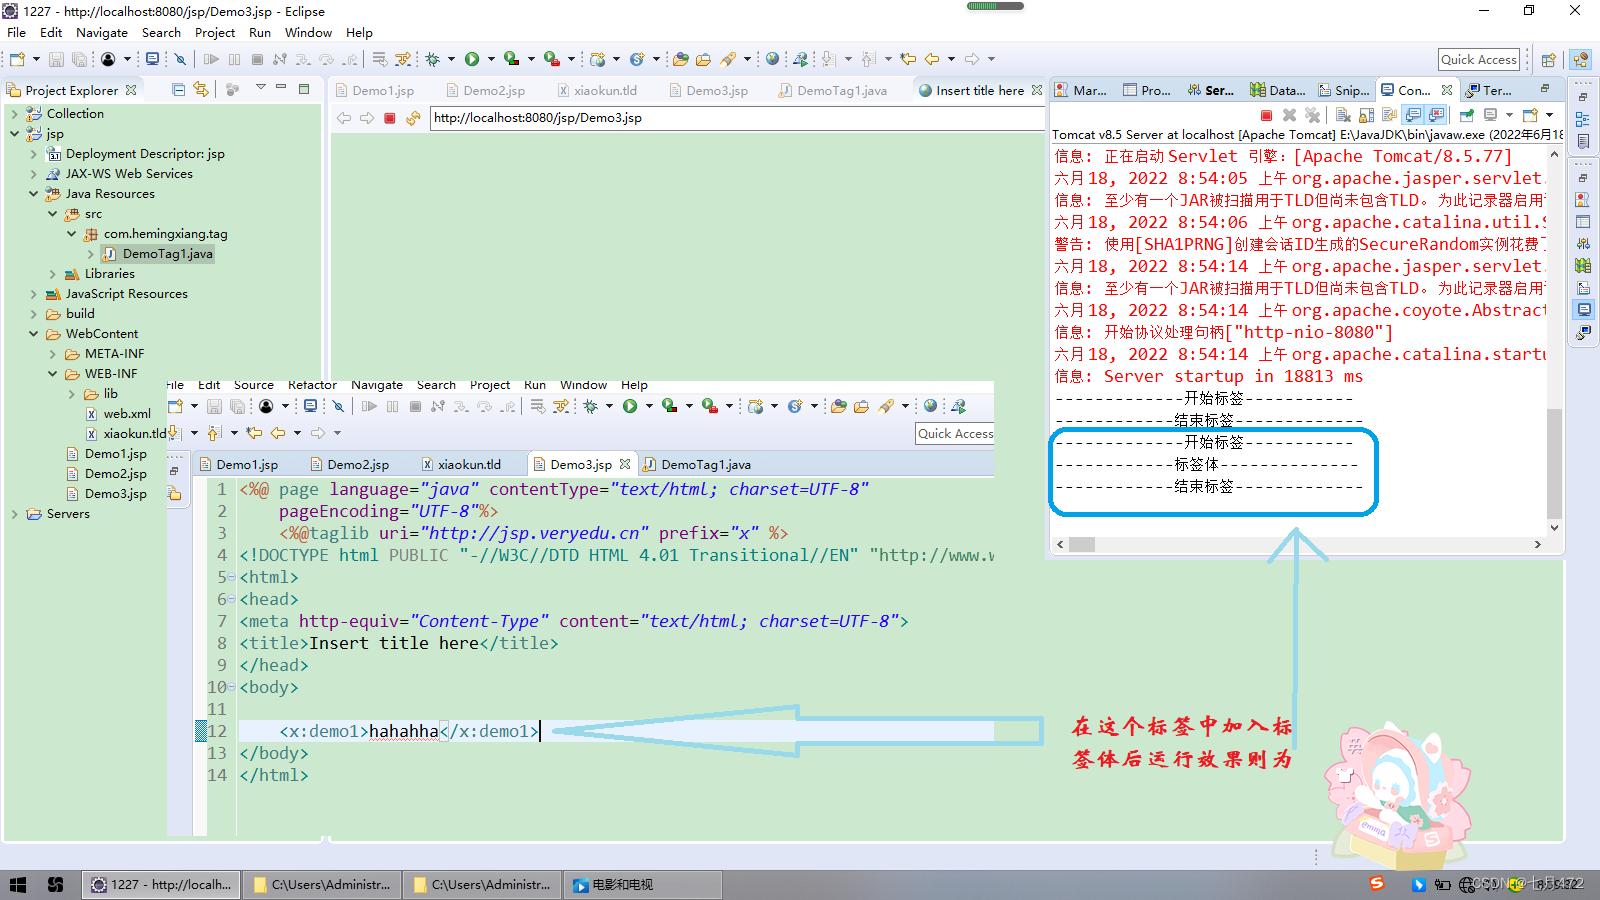
三、标签生命周期
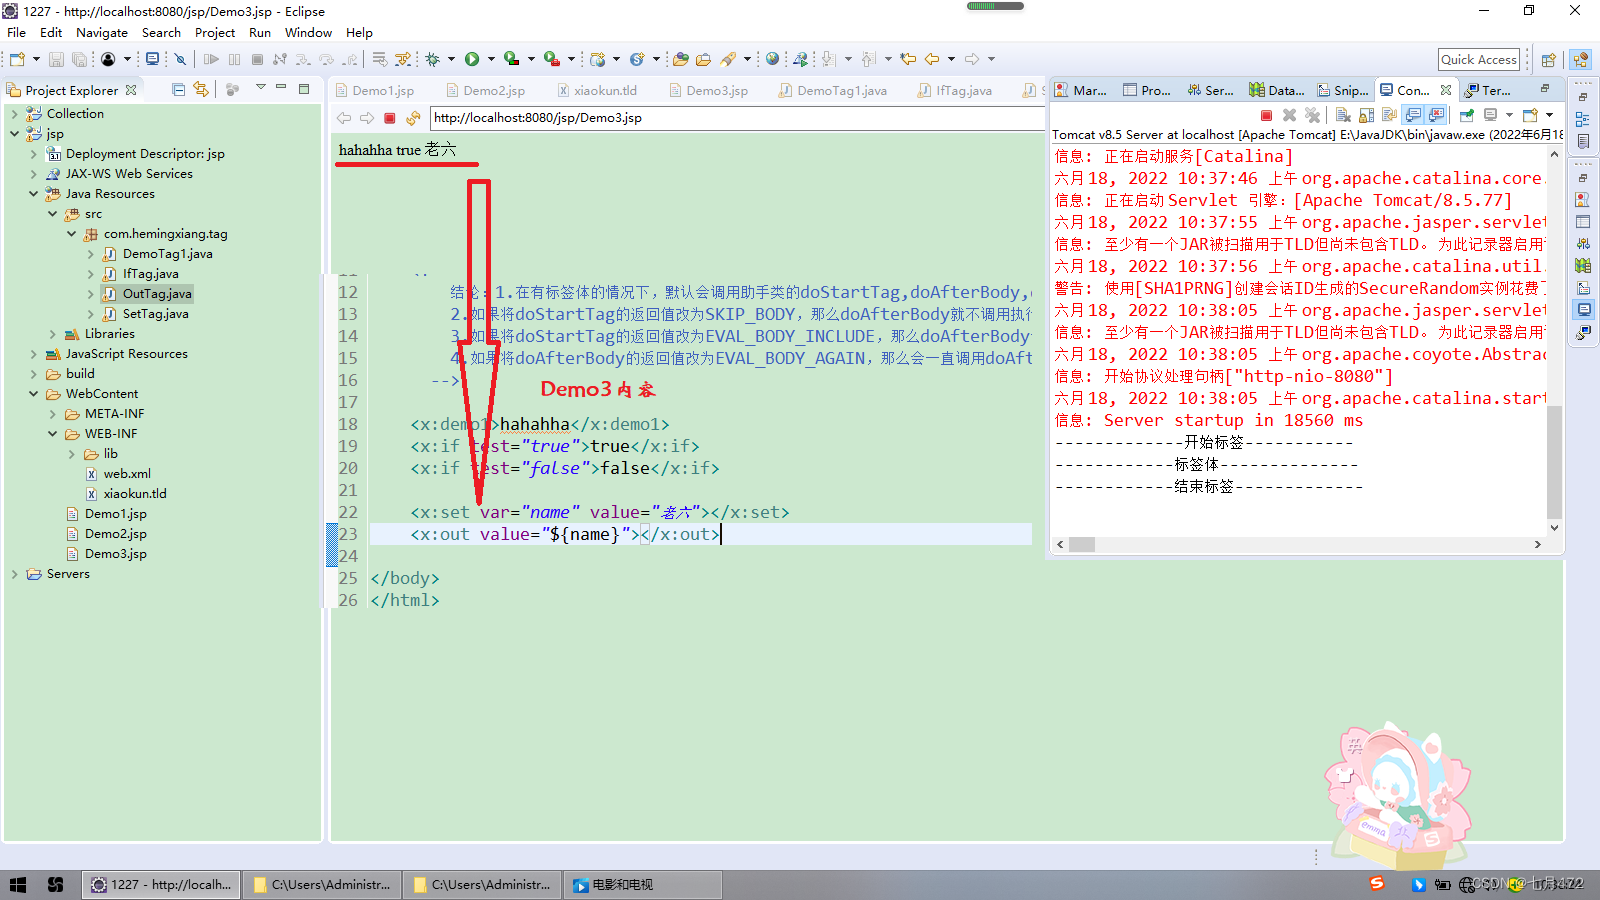
看上面的实例得出3点结论:1.如果将doStartTag的返回值改为SKIP_BODY,那么doAfterBody就不调用执行(路线1)
2.如果将doStartTag的返回值改为EVAL_BODY_INCLUDE,那么doAfterBody会调用执行(路线2)
3.如果将doAfterBody的返回值改为EVAL_BODY_AGAIN,那么会一直调用doAfterBody,进入循环(路线3)
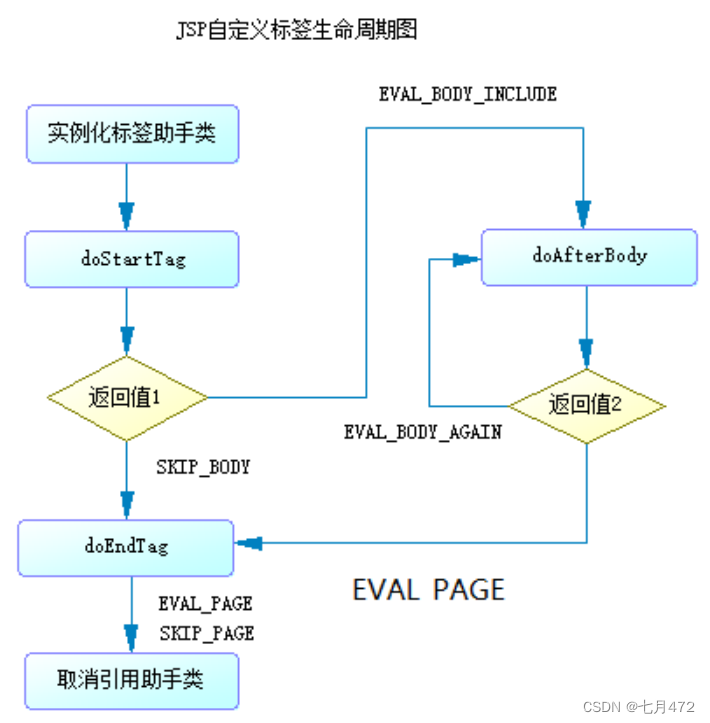
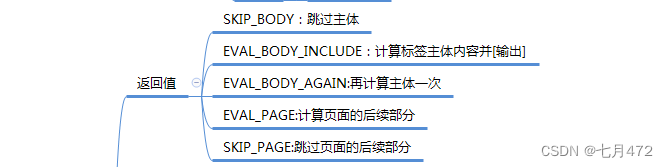
以下的返回值在实例中有用到,具体方法看实例
标签开发场景,以标注为例:

四、forEach标签&select标签
1)forEach标签:
forEach助手类:
package com.hemingxiang.tag;
/**
 * forEach标签 两个属性items:list<Object> var:String
 * 分析线路:
 * 由第二条:eval_body_include
 * 第三条:eval_body_again
 * @author Administrator
 *
 */

import java.util.Iterator;
import java.util.List;

import javax.servlet.jsp.JspException;
import javax.servlet.jsp.tagext.BodyTagSupport;

public class ForeachTag extends BodyTagSupport{

	/**
	 *
	 */
	private static final long serialVersionUID = 1L;
	private String var;
	private List<Object> items;

	public String getVar() {
		return var;
	}
	public void setVar(String var) {
		this.var = var;
	}
	public List<Object> getItems() {
		return items;
	}
	public void setItems(List<Object> items) {
		this.items = items;
	}

	@Override
	public int doStartTag() throws JspException {
		Iterator<Object> it = items.iterator();
		//pageContext.setAttribute("c",items.get(0));
		pageContext.setAttribute(var, it.next());
		//保留迭代时指针现有位置,保留it,遍历到哪it就在哪
		pageContext.setAttribute("it", it);
		return EVAL_BODY_INCLUDE;
	}

    //要不要循环,看这个集合有没有数据
	@Override
	public int doAfterBody() throws JspException {
		//拿到迭代器
		Iterator<Object> it= (Iterator<Object>) pageContext.getAttribute("it");
		//判断,如果它有下一个就进入循环
		if(it.hasNext()) {
			pageContext.setAttribute(var, it.next());
			//保留迭代时指针现有位置,保留it,遍历到哪it就在哪
			pageContext.setAttribute("it", it);
			return EVAL_BODY_AGAIN;
		}
		else {
			//没有下一步就停止
			return EVAL_PAGE;
		}
	}
}
后在xiaokun.tld文件中添加一个foreach循环:
<tag>
    <name>for</name>
    <tag-class>com.hemingxiang.tag.ForeachTag</tag-class>
    <body-content>JSP</body-content>
    <attribute>
        <name>items</name>
        <required>true</required>
        <rtexprvalue>true</rtexprvalue>
    </attribute>
    <attribute>
        <name>var</name>
        <required>true</required>
        <rtexprvalue>false</rtexprvalue>
    </attribute>
  </tag>
创建一个实体类,测试案例效果:
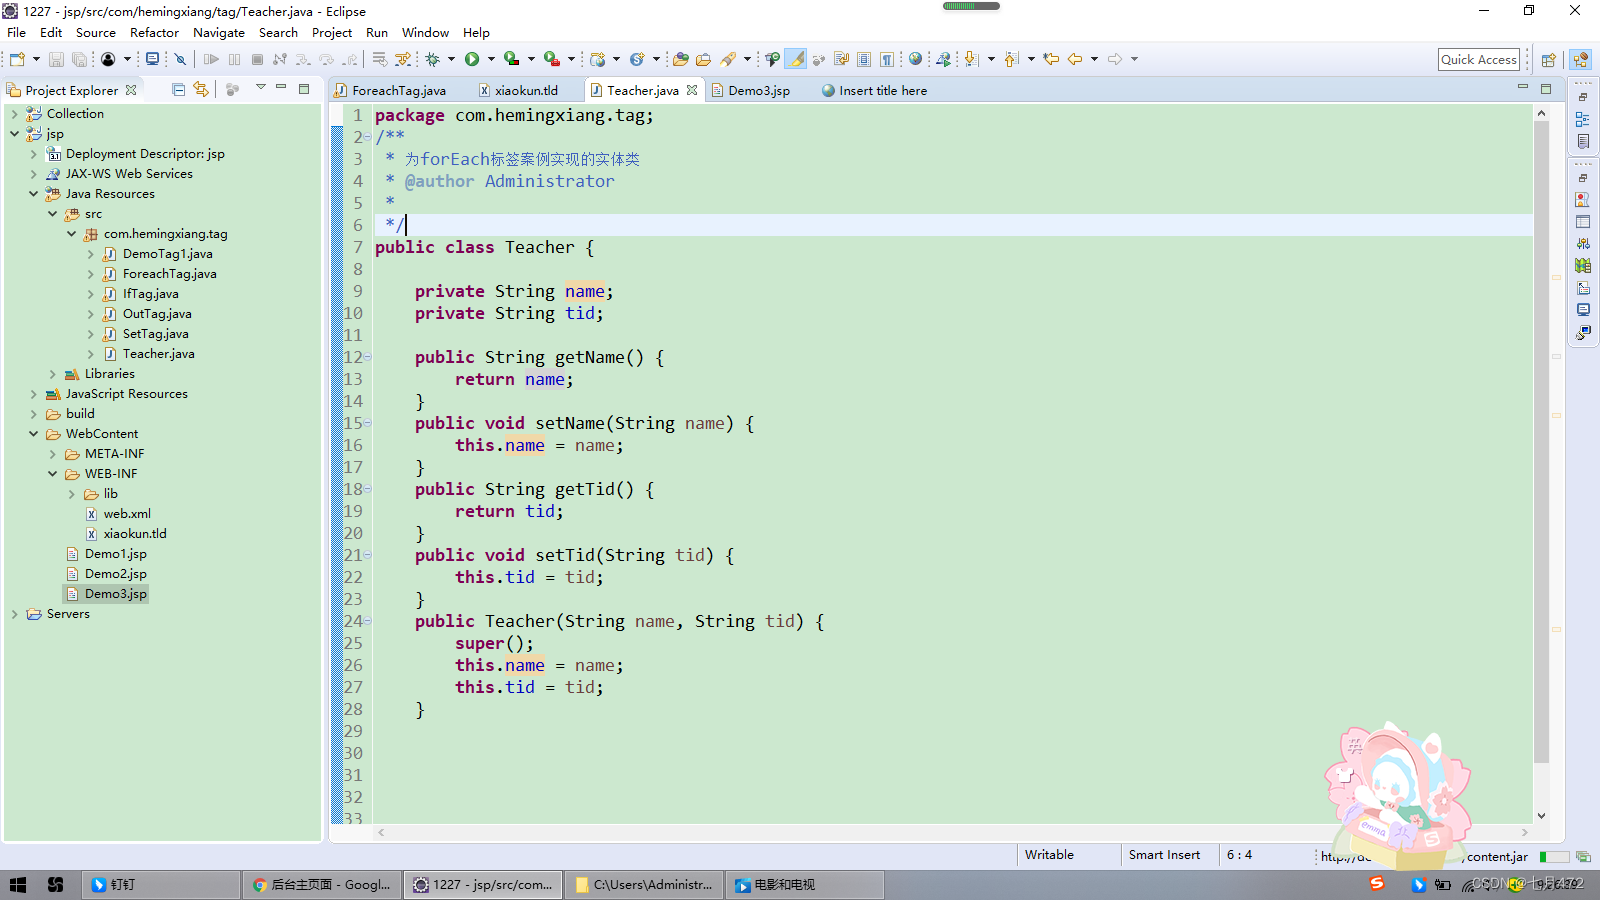
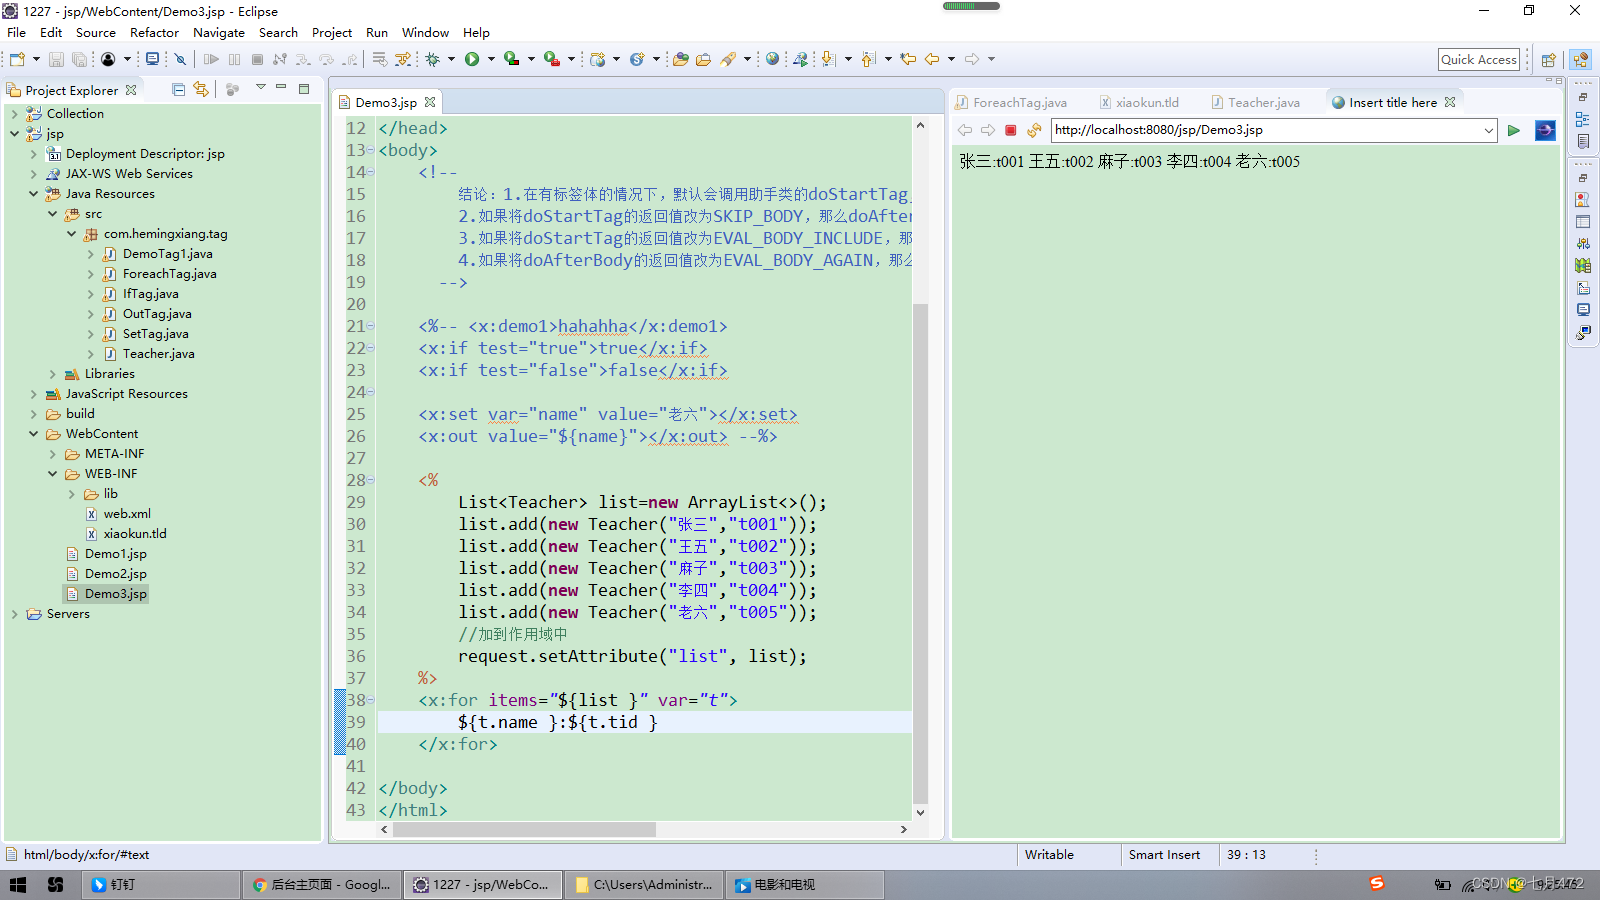
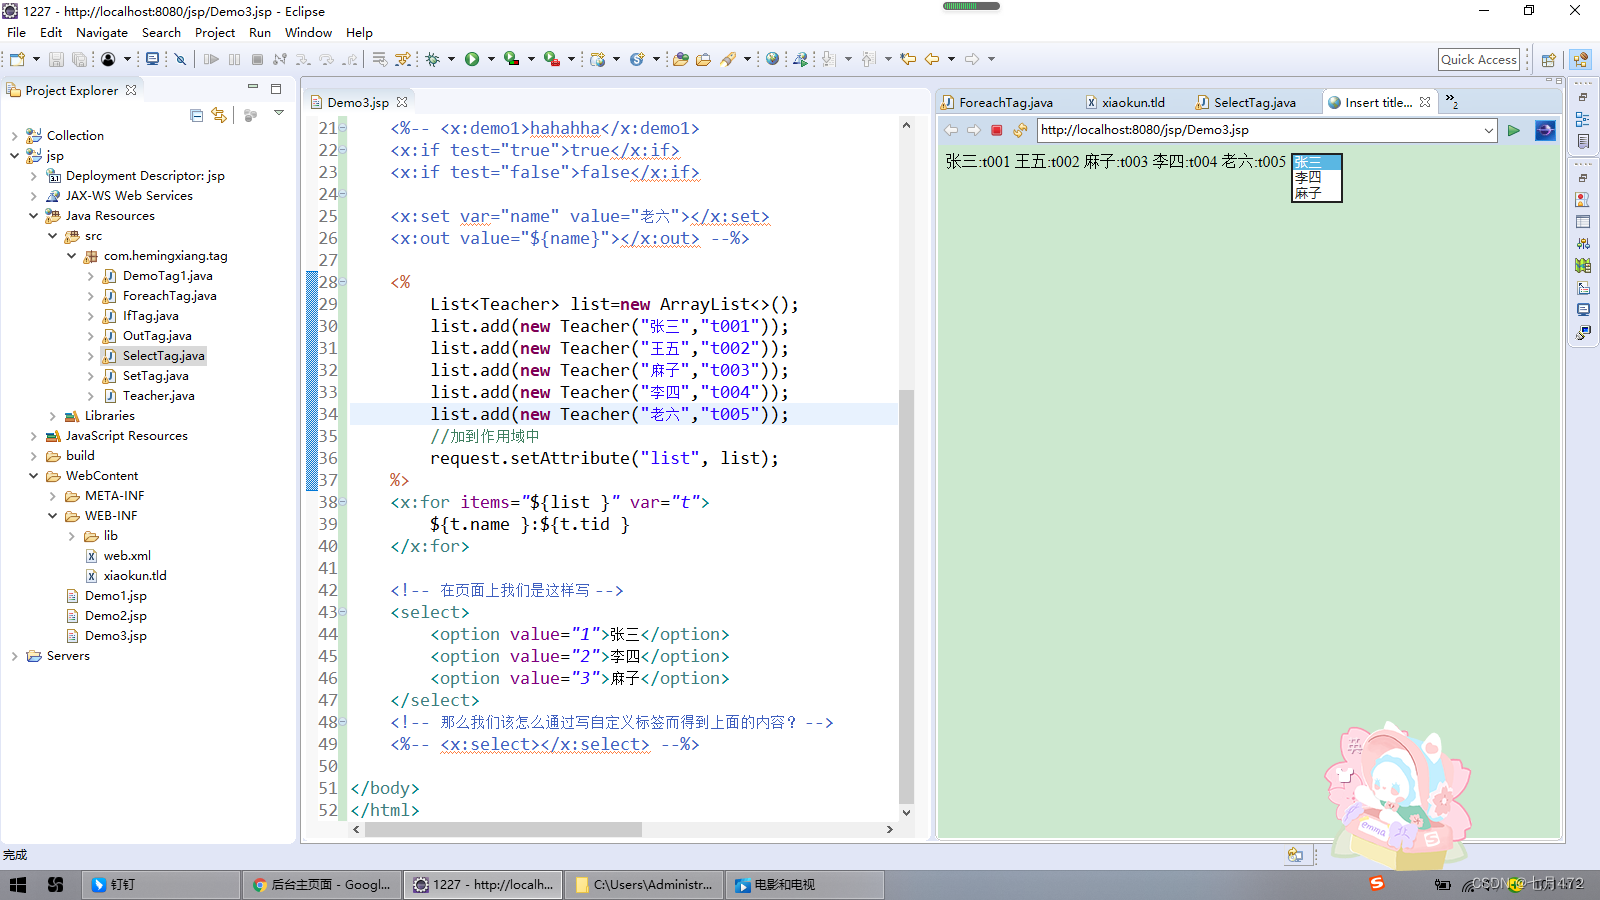
在Demo3进行代码测试:
<%
		List<Teacher> list=new ArrayList<>();
		list.add(new Teacher("张三","t001"));
		list.add(new Teacher("王五","t002"));
		list.add(new Teacher("麻子","t003"));
		list.add(new Teacher("李四","t004"));
		list.add(new Teacher("老六","t005"));
		//加到作用域中
		request.setAttribute("list", list);
	%>
	<x:for items="${list }" var="t">
		${t.name }:${t.tid }
	</x:for>
输出:
2)select标签:
🤔1.怎样省略遍历的过程
2.当做数据回显时,无需增加if判断,无需增加新的代码
selectTag助手类:
分析:
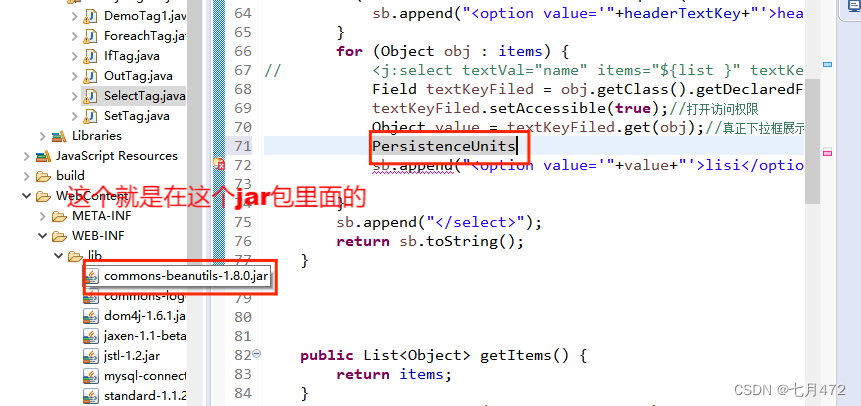
1.后台要遍历-->数据源-->items
2.需要一个对象的属性代表下拉框对应的展示内容-->textVal
3.需要一个对象的属性代表下拉框对应的value值-->textKey
4.默认的头部选项展示内容-->headerTextVal
5.默认的头部选项值-->headerTextKey
6.数据中存储的值,为了方便做数据回显-->selectedVal
7.id
8.name
9.cssStyle..
package com.hemingxiang.tag;
import java.io.IOException;
import java.lang.reflect.Field;
import java.lang.reflect.InvocationTargetException;
import java.util.List;
import javax.servlet.jsp.JspException;
import javax.servlet.jsp.JspWriter;
import javax.servlet.jsp.tagext.BodyTagSupport;
import org.apache.commons.beanutils.PropertyUtils;
/**
* 需求:1.省略遍历过程
* <c:select></select>
* 2.当做数据回显时,无需增加if判断,无需增加新的代码
* @author Administrator
*
*/
public class SelectTag extends BodyTagSupport{
private List<Object> items;
private String textVal;//option的name
private String textKey;//option的value
private String headerTextVal;
private String headerTextKey;
private String selectedVal;
private String id;
private String name;
public List<Object> getItems() {
return items;
}
public void setItems(List<Object> items) {
this.items = items;
}
public String getTextVal() {
return textVal;
}
public void setTextVal(String textVal) {
this.textVal = textVal;
}
public String getTextKey() {
return textKey;
}
public void setTextKey(String textKey) {
this.textKey = textKey;
}
public String getHeaderTextVal() {
return headerTextVal;
}
public void setHeaderTextVal(String headerTextVal) {
this.headerTextVal = headerTextVal;
}
public String getHeaderTextKey() {
return headerTextKey;
}
public void setHeaderTextKey(String headerTextKey) {
this.headerTextKey = headerTextKey;
}
public String getSelectedVal() {
return selectedVal;
}
public void setSelectedVal(String selectedVal) {
this.selectedVal = selectedVal;
}
public String getId() {
return id;
}
public void setId(String id) {
this.id = id;
}
public String getName() {
return name;
}
public void setName(String name) {
this.name = name;
}
@Override
public int doStartTag() throws JspException {
//拿到io流
JspWriter out = pageContext.getOut();
try {
try {
try {
out.print(toHTML());
} catch (InvocationTargetException e) {
// TODO Auto-generated catch block
e.printStackTrace();
} catch (NoSuchMethodException e) {
// TODO Auto-generated catch block
e.printStackTrace();
}
} catch (NoSuchFieldException e) {
// TODO Auto-generated catch block
e.printStackTrace();
} catch (SecurityException e) {
// TODO Auto-generated catch block
e.printStackTrace();
} catch (IllegalArgumentException e) {
// TODO Auto-generated catch block
e.printStackTrace();
} catch (IllegalAccessException e) {
// TODO Auto-generated catch block
e.printStackTrace();
}
} catch (IOException e) {
// TODO Auto-generated catch block
e.printStackTrace();
}
return super.doStartTag();
}
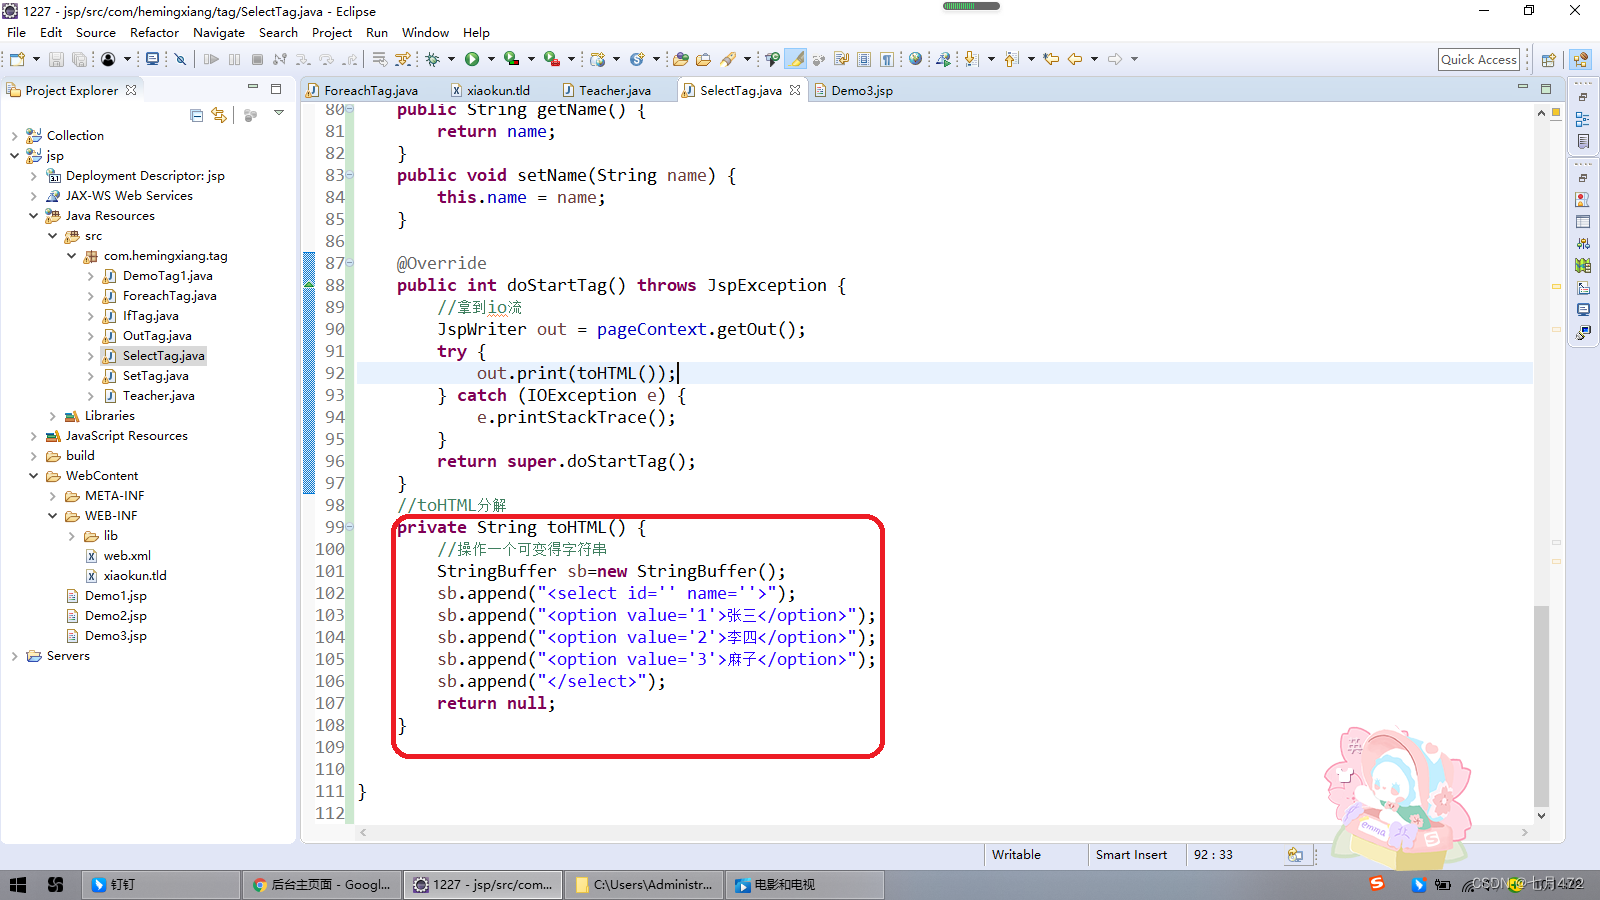
//toHTML分解
private String toHTML() throws NoSuchFieldException, SecurityException, IllegalArgumentException, IllegalAccessException, InvocationTargetException, NoSuchMethodException {
//操作一个可变得字符串
StringBuffer sb = new StringBuffer();
sb.append("<select id='"+id+"' name='"+name+"'>");
//判断
if(headerTextVal != null && !"".equals(headerTextVal)) {
sb.append("<option value='"+headerTextKey+"'>lisi</option>");
}
//下拉框的选项是在遍历中的
for (Object obj : items) {
// 反射读写属性
//拿到类类
Field textKeyField = obj.getClass().getDeclaredField(textKey);
//打开访问权限
textKeyField.setAccessible(true);
//获取obj的属性对象的值 真正下拉框展示的值
Object value = textKeyField.get(obj);
if(selectedVal!=null && !"".equals(selectedVal) && selectedVal.equals(value)) {
sb.append("<option selected value='"+value+"'>"+PropertyUtils.getProperty(obj, textVal)+"</option>");
}
else {
sb.append("<option value='"+value+"'>"+PropertyUtils.getProperty(obj, textVal)+"</option>");
}
}
sb.append("</select>");
return sb.toString();
}
}
在助手类中这样输出的代码运行结果如下:
将代码进行进一步优化:
//toHTML分解
private String toHTML() throws NoSuchFieldException, SecurityException, IllegalArgumentException, IllegalAccessException, InvocationTargetException, NoSuchMethodException {
//操作一个可变得字符串
StringBuffer sb = new StringBuffer();
sb.append("<select id='"+id+"' name='"+name+"'>");
//判断
if(headerTextVal != null && !"".equals(headerTextVal)) {
sb.append("<option value='"+headerTextKey+"'>lisi</option>");
}
//下拉框的选项是在遍历中的
for (Object obj : items) {
//反射读写属性
//拿到类类
Field textKeyField = obj.getClass().getDeclaredField(textKey);
//打开访问权限
textKeyField.setAccessible(true);
//获取obj的属性对象的值 真正下拉框展示的值
Object value = textKeyField.get(obj);
if(selectedVal!=null && !"".equals(selectedVal) && selectedVal.equals(value)) {
sb.append("<option selected value='"+value+"'>"+PropertyUtils.getProperty(obj, textVal)+"</option>");
}
else {
sb.append("<option value='"+value+"'>"+PropertyUtils.getProperty(obj, textVal)+"</option>");
}
}
sb.append("</select>");
return sb.toString();
}
输出结果:
这里用到PropertyUtils,它可以进一步优化简化代码

后在xiaokun.tld文件中添加一个select标签:
<tag>
    <name>select</name>
    <tag-class>com.hemingxiang.tag.SelectTag</tag-class>
    <body-content>JSP</body-content>
    <attribute>
        <name>items</name>
        <required>true</required>
        <rtexprvalue>true</rtexprvalue>
    </attribute>
    <attribute>
        <name>textVal</name>
        <required>true</required>
        <rtexprvalue>false</rtexprvalue>
    </attribute>
    <attribute>
        <name>textKey</name>
        <required>true</required>
        <rtexprvalue>false</rtexprvalue>
    </attribute>
    <attribute>
        <name>headerTextVal</name>
        <required>false</required>
        <rtexprvalue>false</rtexprvalue>
    </attribute>
    <attribute>
        <name>headerTextKey</name>
        <required>false</required>
        <rtexprvalue>false</rtexprvalue>
    </attribute>
    <attribute>
        <name>selectedVal</name>
        <required>false</required>
        <rtexprvalue>true</rtexprvalue>
    </attribute>
    <attribute>
        <name>id</name>
        <required>false</required>
        <rtexprvalue>false</rtexprvalue>
    </attribute>
    <attribute>
        <name>name</name>
        <required>false</required>
        <rtexprvalue>false</rtexprvalue>
    </attribute>
  </tag>
利用上面的list集合,测试:
<%
List<Teacher> list=new ArrayList<>();
list.add(new Teacher("张三","t001"));
list.add(new Teacher("王五","t002"));
list.add(new Teacher("麻子","t003"));
list.add(new Teacher("李四","t004"));
list.add(new Teacher("老六","t005"));
//加到作用域中
request.setAttribute("list", list);
%>
<x:for items="${list }" var="t">
${t.name }:${t.tid }
</x:for>
<!-- 在页面上我们是这样写 -->
<select>
<option value="1">张三</option>
<option value="2">李四</option>
<option value="3">麻子</option>
</select>
<!-- 那么我们该怎么通过写自定义标签而得到上面的内容? -->
<%-- <x:select></x:select> --%>
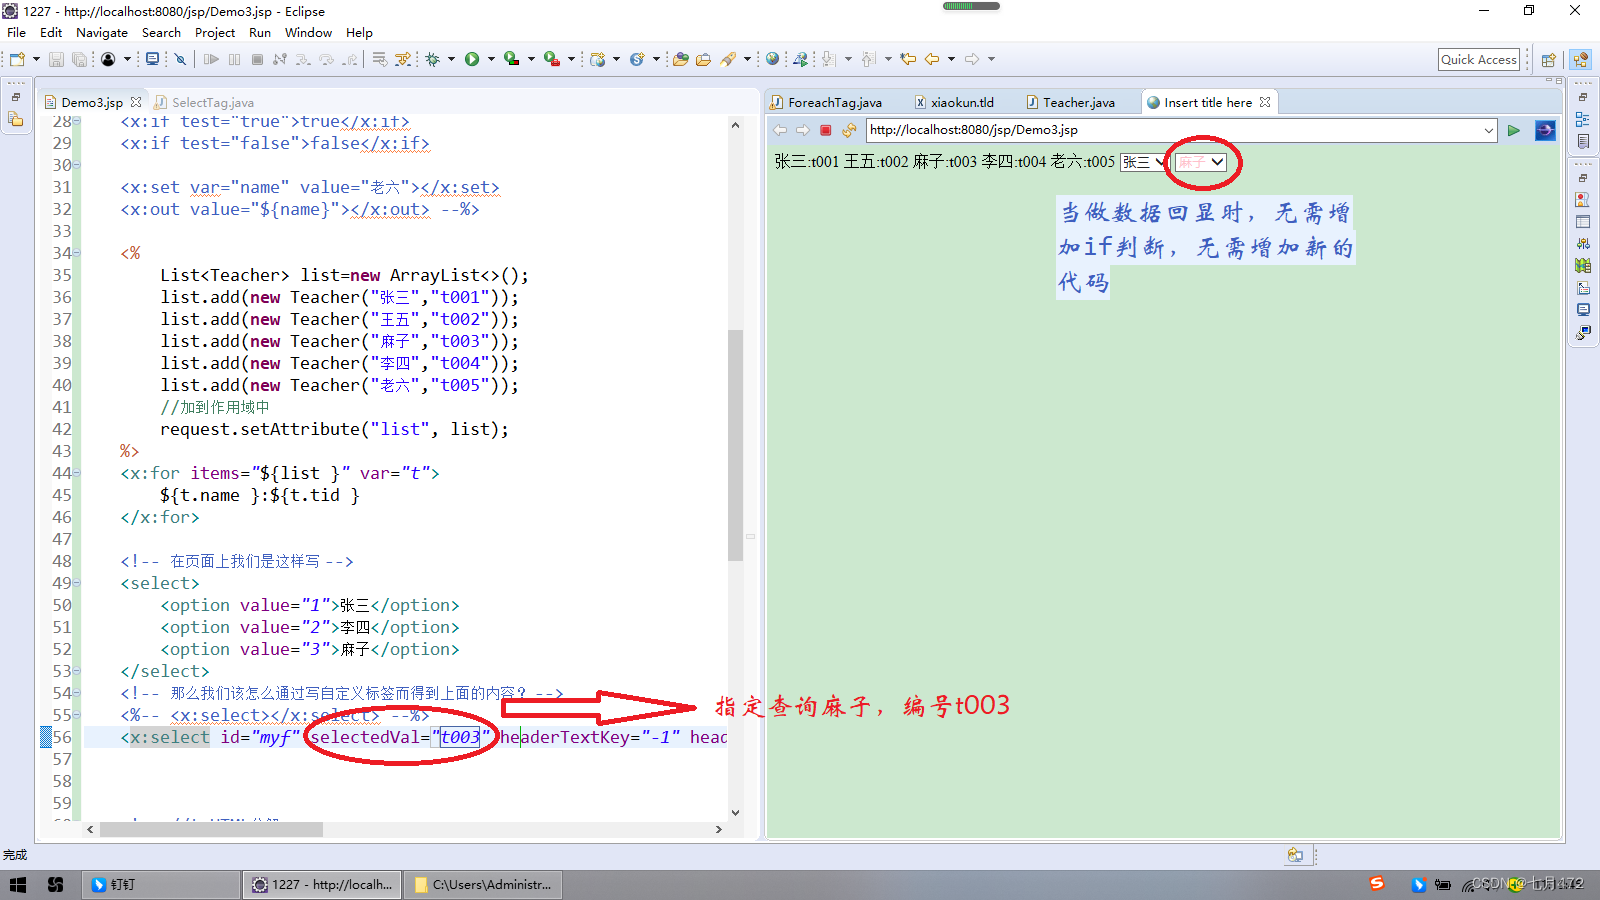
<x:select id="myf" selectedVal="t003" headerTextKey="-1" headerTextVal="==请选择==" textVal="name" items="${list }" textKey="tid"></x:select>以下为运行效果:


 405
405


 被折叠的 条评论
为什么被折叠?
被折叠的 条评论
为什么被折叠?
 到【灌水乐园】发言


