文章目录
引言:局域网主机共享单个公网IP地址接入Internet(私有IP不能在Internet中正常路由
一、SNAT
1.1 SNAT概述
SNAT 应用环境
局域网主机共享单个公网IP地址接入Internet ,私有IP不能在Internet中正常路由
SNAT原理
源地址转换
修改数据包的源地址
SNAT转换前提条件
局域网各主机已正确设置IP地址、子网掩码、默认网关地址
Linux网关开启IP路由转发
1.2 开启SNAT的命令
临时打开
echo 1 >/proc/sys/net/ipv4/ip_forward
或
sysctl -w net.ipv4.ip forward=1
永久打开
vim /etc/ sysctl. conf
net. ipv4.ip_ forward = 1				###将此行写入配置文件

sysctl -P				                ###读取修改后的配置
1.3 SNAT转换1:固定的公网IP地址
#配置SNAT策略,实现snat功能,将所有192.168.100.0这个网段的ip的源ip改为10.0.0.1
iptables -t nat -A POSTROUTING -s 192.168.100.0/24 -o ens33 -j SNAT --to 10.0.0.1
                                    可换成单独IP   出站外网网卡            外网IP
或
iptables -t nat -A POSTROUTING -s 192.168.100.0/24 -o ens33 -j SNAT --to-source 10.0.0.1-10.0.0.10
                                     内网IP   出站外网网卡                        外网IP或地址池
1.4 SNAT转换2:非固定的公网IP地址(共享动态IP地址)
iptables -t nat -A POSTROUTING -s 192.168.100.0/24 -o ens33 -j MASQUERADE
1.5 SNAT案例
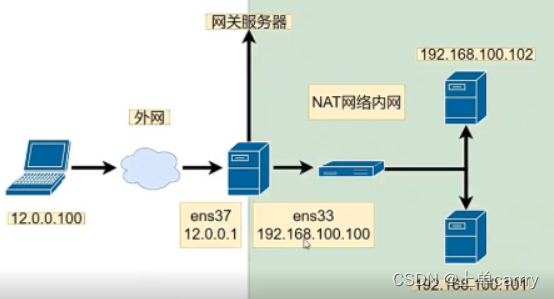
实验准备
1.web服务器ip:192.168.100.102(nat1)、关闭防火墙和selinux、开启http服务
2.网关服务器内网ip:192.168.100.100(nat1);外网ip:12.0.0.1(nat2)、关闭防火墙和selinux、开启http服务
3.win7客户端ip:12.0.0.100(nat2)
4.VMware的虚拟网络编辑器中默认nat模式网段:192.168.100.0,nat2模式网段:12.0.0.0
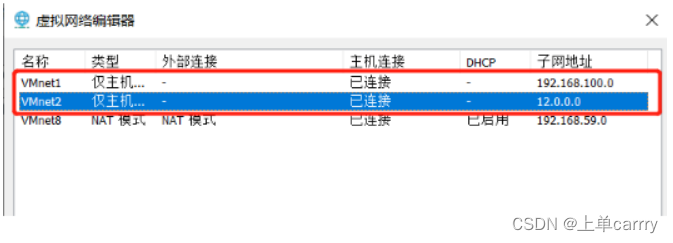
配置网关服务器(192.168.100.100/12.0.0.1)的相关配置
1.添加两块虚拟网卡,并自定义
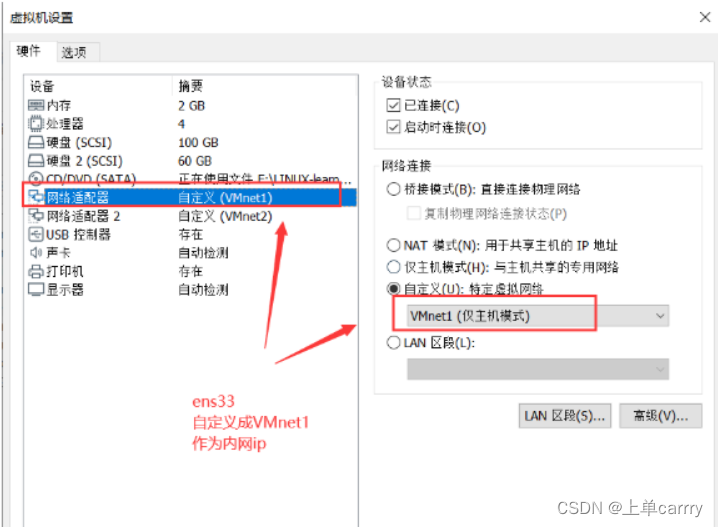
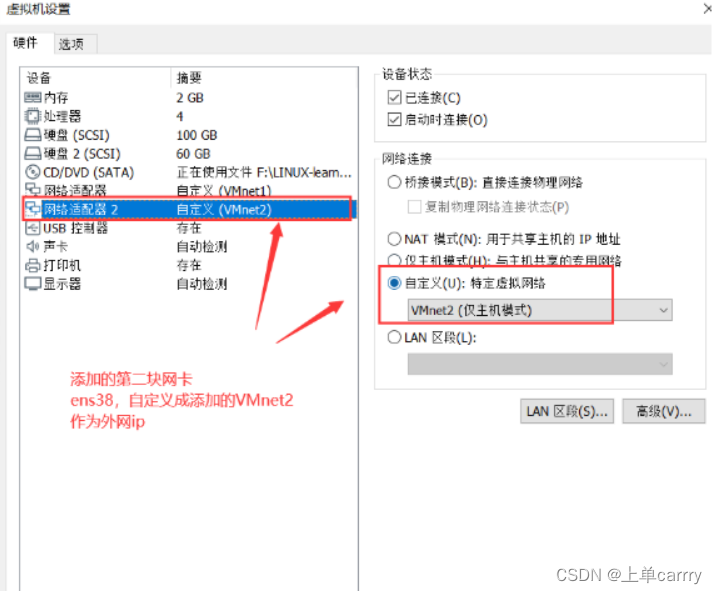
2.复制并修改ens38网卡
#切换至网卡配置文件所在目录
[root@localhost network-scripts]#cd /etc/sysconfig/network-scripts/
[root@localhost network-scripts]#cp ifcfg-ens33 ifcfg-ens38
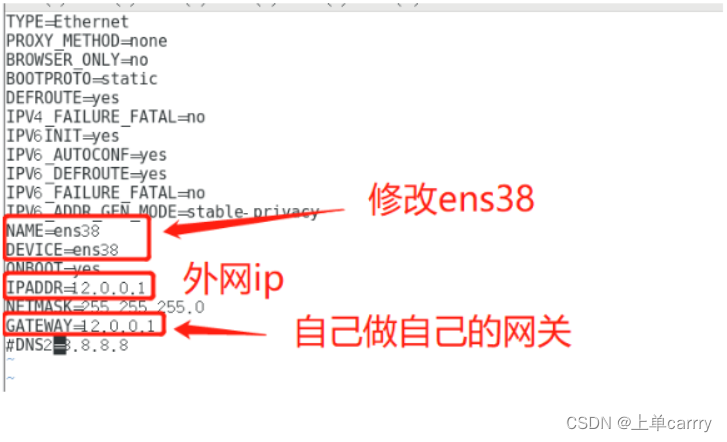
3.修改ens33网卡
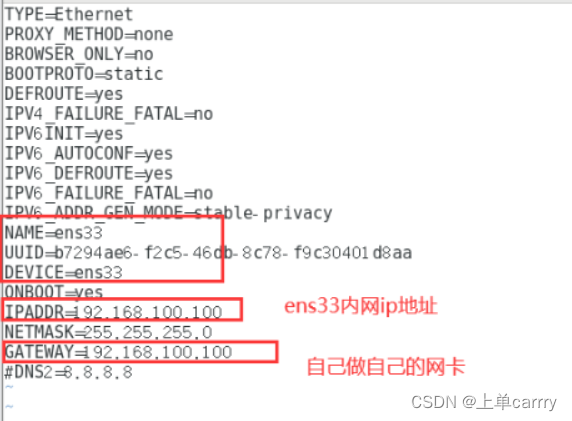
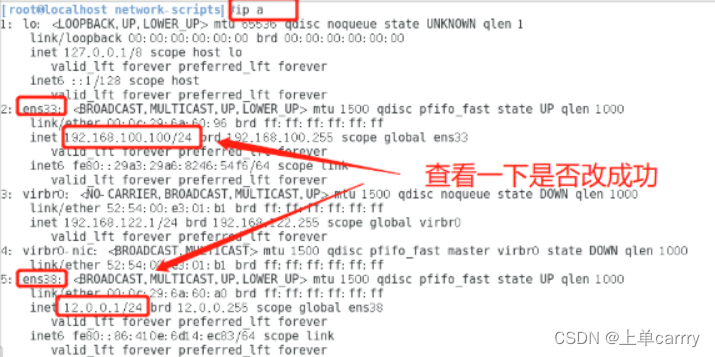
4.重启网络,查看配置
systemctl restart network
配置内网服务器(192.168.100.102)相关配置
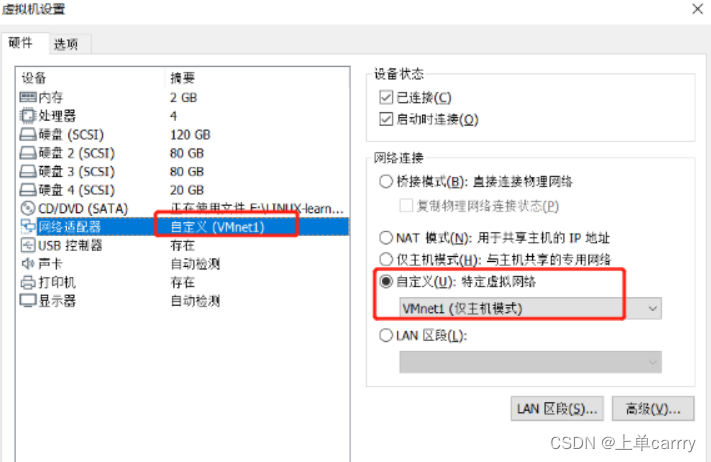
1.修改enss网卡模式为仅主机模式
2.修改ens33网卡
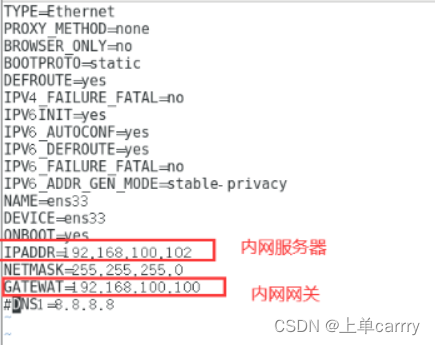
3.重启网络服务,查看配置
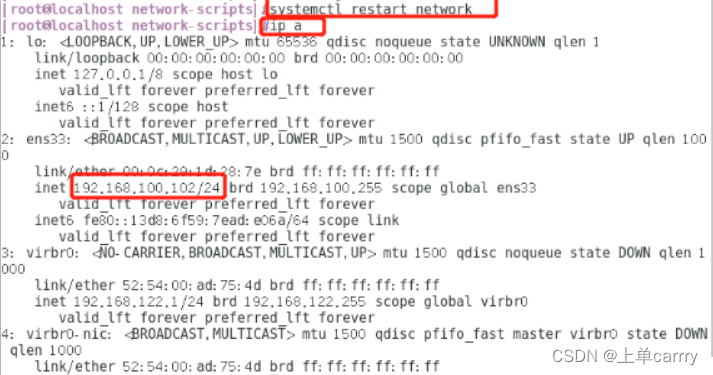
4.ping网关测试

配置外网服务器(12.0.0.100)的相关配置
1.修改enss网卡模式为仅主机模式
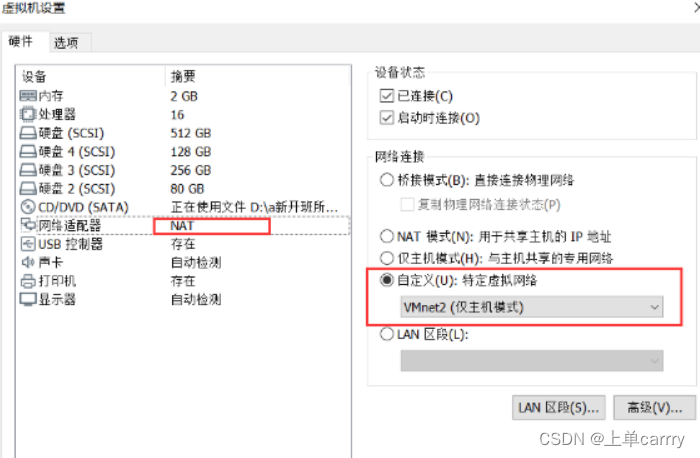
2.修改ens33网卡
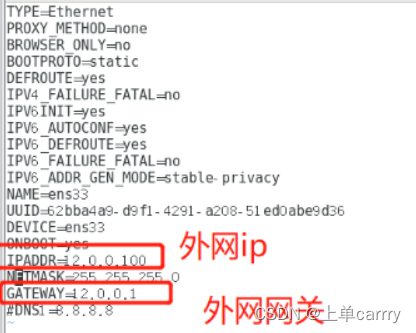
3.重启网络服务,查看配置
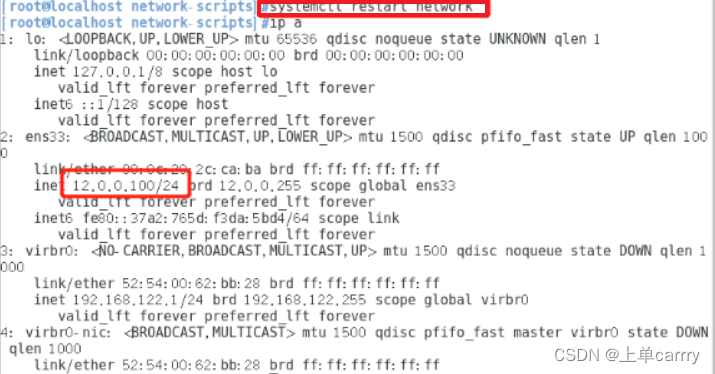
4.ping网关测试

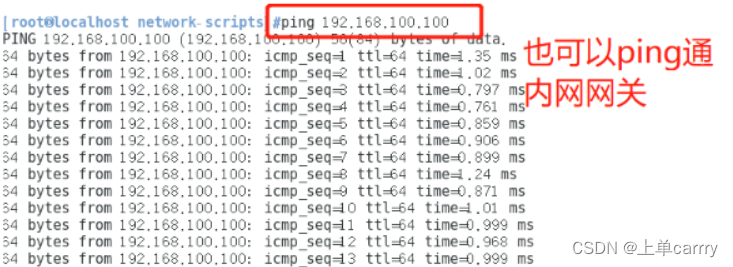
开启SNAT
[root@localhost network-scripts]#
vim /etc/ sysctl. conf
net. ipv4.ip_ forward = 1	                            ###将此行写入配置文件

[root@localhost network-scripts]#sysctl -P				###读取修改后的配置
配置网关服务器的iptables规则
1.安装iptables,关闭防火墙和selinux,开启iptables
[root@localhost network-scripts]#yum install -y iptables*
@localhost network-scripts]#systemctl stop firewalld.service
[root@localhost network-scripts]#setenforce 0
[root@localhost network-scripts]#systemctl start iptables.service
2.查看网关服务器的iptables规则并清除
iptables -nL			###查看规则
iptables -nL -t nat		###查看规则
iptables -F				###清除iptables的规则
iptables -F -t nat		###清除iptables的规则
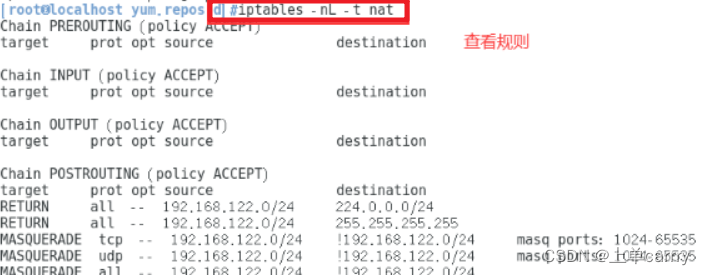
###清空规则
iptables -F

iptables -F -t nat
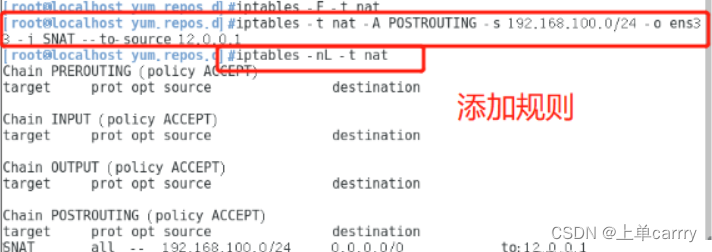
添加 SNAT转换∶固定的公网IP地址
[root@localhost yum.repos.d]#iptables -F -t nat
[root@localhost yum.repos.d]#iptables -t nat -A POSTROUTING -s 192.168.100.0/24 -o ens33 -j SNAT --to-source 12.0.0.1
[root@localhost yum.repos.d]#iptables -t nat -A POSTROUTING -s 192.168.100.0/24 -o ens38 -j SNAT --to-source 12.0.0.1
[root@localhost yum.repos.d]#iptables -nL -t nat
Chain PREROUTING (policy ACCEPT)
target     prot opt source               destination

Chain INPUT (policy ACCEPT)
target     prot opt source               destination

Chain OUTPUT (policy ACCEPT)
target     prot opt source               destination

Chain POSTROUTING (policy ACCEPT)
target     prot opt source               destination
SNAT       all  --  192.168.100.0/24     0.0.0.0/0            to:12.0.0.1

实验内外网访问
#########在外网服务器上
#安装httpd服务
[root@localhost yum.repos.d]# yum install -y httpd
#开启服务
[root@localhost yum.repos.d]# systemctl start httpd
关闭防火墙和selinux
[root@localhost yum.repos.d]# systemctl stop firewalld
[root@localhost yum.repos.d]# setenforce 0
#curl一下
[root@localhost yum.repos.d]# curl 127.0.0.1
#查看一下http访问日志
[root@localhost ~]# tail /var/log/httpd/access_log
127.0.0.1 - - [02/Nov/2021:17:31:40 +0800] "GET / HTTP/1.1" 403 4897 "-" "curl/7.29.0"

########在内网服务器上
[root@localhost network-scripts]# curl 12.0.0.100

#########在外网服务器上
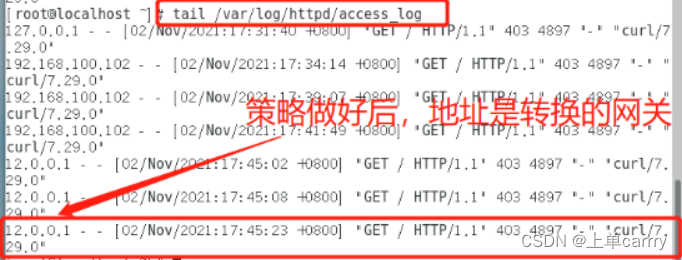
#查看访问日志,多了刚刚内网访问日志
[root@localhost ~]# tail /var/log/httpd/access_log
127.0.0.1 - - [02/Nov/2021:17:31:40 +0800] "GET / HTTP/1.1" 403 4897 "-" "curl/7.29.0"
12.0.0.1 - - [02/Nov/2021:17:34:14 +0800] "GET / HTTP/1.1" 403 4897 "-" "curl/7.29.0"
二、DNAT
2.1 DNAT应用环境
在Internet中发布位于局域网内的服务器
2.2 DNAT原理
修改数据包的目的地址
2.3 DNAT转换前提条件
1.局域网的服务器能够访问Internet
2.网关的外网地址有正确的DNS解析记录
3.Linux网关开启IP路由转发
vim /etc/sysctl.conf
net.ipv4.ip_forward = 1
sysct1 -p
2.4 DNAT转换1∶ 发布内网的Web服务
#把从ens33进来的要访问web服务的数据包目的地址转换为 192.168.100.102
iptables -t nat -A PREROUTING -i ens33 -d 12.0.0.1 -p tcp--dport 80 -j DNAT --to 192.168.100.102
或
iptables -t nat -A PREROUTING -i ens33 -d 12.0.0.1 -p tcp--dport 80-j DNAT --to-destination 192.168.100.102
					入站         外网网卡    外网ip							                内网服务器ip
2.5 NAT转换2∶ 发布时修改目标端口
#发布局域网内部的OpenSSH服务器, 外网主机需使用250端口进行连接
iptables-t nat -A PREROUTING -i ens33 -d 12.0.0.1 -p tcp--dport 250-jDNAT --to 192.168.100.102:22
2.6 在内网上配置
#在内网上安装httpd并开启服务
[root@localhost yum.repos.d]# yum install -y httpd
[root@localhost yum.repos.d]# systemctl start httpd

#关闭防火墙和selinux
[root@localhost yum.repos.d]# systemctl stop firewalld.service
[root@localhost yum.repos.d]# setenforce 0
2.7 在网关服务器添加iptables规则
#先清空规则
[root@localhost yum.repos.d]#iptables -F -t nat
#添加规则
[root@localhost yum.repos.d]#iptables -t nat -A PREROUTING -i ens38 -d 12.0.0.1 -p tcp --dport 80 -j DNAT --to 192.168.100.102

#查看规则
[root@localhost yum.repos.d]#iptables -nL -t nat
Chain PREROUTING (policy ACCEPT)
target     prot opt source               destination
DNAT       tcp  --  0.0.0.0/0            12.0.0.1             tcp dpt:80 to:192.168.100.102

Chain INPUT (policy ACCEPT)
target     prot opt source               destination

Chain OUTPUT (policy ACCEPT)
target     prot opt source               destination

Chain POSTROUTING (policy ACCEPT)
target     prot opt source               destination
2.8 测试外网是否能访问内网
#在外网服务器上
[root@localhost ~]# curl 12.0.0.1

#在内网服务器上
[root@localhost yum.repos.d]# tail /etc/httpd/logs/access_log
127.0.0.1 - - [02/Nov/2021:18:05:31 +0800] "GET / HTTP/1.1" 403 4897 "-" "curl/7.29.0"
12.0.0.100 - - [02/Nov/2021:18:19:45 +0800] "GET / HTTP/1.1" 403 4897 "-" "curl/7.29.0"

三、tcpdump—Linux抓包
tcpdump tcp-i ens33 -t -s 0 -c 100 and dst port ! 22 and src net 192.168.1.0/24 -w ./target.cap
1.tcp∶ ip icmp arp rarp 和 tcp、udp、icmp这些选项等都要放到第一个参数的位置,用来过滤数据报的类型
2.-i ens33 ∶只抓经过接口ens33的包
3.-t ∶不显示时间戳
4.-s 0 ∶ 抓取数据包时默认抓取长度为68字节。加上-s 0 后可以抓到完整的数据包
5.-c 100 ∶只抓取100个数据包
6.dst port ! 22 ∶不抓取目标端口是22的数据包
7.src net 192.168.1.0/24 ∶数据包的源网络地址为192.168.1.0/24。Net:网段,host:主机
8.-w ./target.cap ∶ 保存成cap文件,方便用ethereal (即wireshark)分析
总结
1.SNAT原理及配置方法
2.DANT原理及配置过程
3.tcpdump—Linux抓包概念


 1515
1515


 被折叠的 条评论
为什么被折叠?


