


零、前言
本文章用于研究表与表之间、对象与对象之间的一对多、多对一、多对多联系。
研究了xml文件配置和注解配置两种方式
超级全哦~
用于研究的实体有学生、老师、课程
注意:学生和老师之间应该为多对多关系,本文章中采用的是多对一,即多个学生对应一个老师,一个老师对应多个学生。学生与课程之间为多对多关系。
一、准备工作
1、创建maven工程 添加依赖
<?xml version="1.0" encoding="UTF-8"?>
<project xmlns="http://maven.apache.org/POM/4.0.0"
         xmlns:xsi="http://www.w3.org/2001/XMLSchema-instance"
         xsi:schemaLocation="http://maven.apache.org/POM/4.0.0 http://maven.apache.org/xsd/maven-4.0.0.xsd">
    <modelVersion>4.0.0</modelVersion>

    <groupId>org.example</groupId>
    <artifactId>day10-2</artifactId>
    <version>1.0-SNAPSHOT</version>

    <properties>
        <maven.compiler.source>8</maven.compiler.source>
        <maven.compiler.target>8</maven.compiler.target>
    </properties>

    <dependencies>
        <dependency>

            <groupId>mysql</groupId>
            <artifactId>mysql-connector-java</artifactId>
            <version>8.0.23</version>
        </dependency>

        <dependency>
            <groupId>org.mybatis</groupId>
            <artifactId>mybatis</artifactId>
            <version>3.5.6</version>
        </dependency>
        <dependency>
            <groupId>junit</groupId>
            <artifactId>junit</artifactId>
            <version>4.13.2</version>
            <scope>compile</scope>
        </dependency>

        <dependency>
            <groupId>org.projectlombok</groupId>
            <artifactId>lombok</artifactId>
            <version>1.18.16</version>
        </dependency>

        <!-- log4j日志 -->
        <dependency>
            <groupId>log4j</groupId>
            <artifactId>log4j</artifactId>
            <version>1.2.17</version>
        </dependency>
    </dependencies>
</project>
2、在resources文件夹下创建mybatis-config配置文件
<?xml version="1.0" encoding="UTF-8" ?>
<!DOCTYPE configuration
        PUBLIC "-//mybatis.org//DTD Config 3.0//EN"
        "http://mybatis.org/dtd/mybatis-3-config.dtd">

<configuration>
    <properties resource="jdbc.properties"/>
    <settings>
        <!--将下划线映射为驼峰 student_id - > studentId -->
        <setting name="mapUnderscoreToCamelCase" value="true"/>
        <!--开启延迟加载-->
        <setting name="lazyLoadingEnabled" value="true"/>
        <!--按需加载-->
        <setting name="aggressiveLazyLoading" value="false"/>
    </settings>

    <typeAliases>
        <package name="com.wtp.pojo"/>
    </typeAliases>


    <environments default="development">

        <environment id="development">
            <transactionManager type="JDBC"/>
            <dataSource type="POOLED">
                <property name="driver" value="${jdbc.driver}"/>
                <property name="url" value="${jdbc.url}"/>
                <property name="username" value="${jdbc.username}"/>
                <property name="password" value="${jdbc.password}"/>
            </dataSource>
        </environment>
    </environments>


    <mappers>
        <!--注意mapper接口的接口名要与mapper.xml文件的名字相同 且在同一文件夹下才可以直接导包  -->
        <package name="com.wtp.mapper"/>
    </mappers>
</configuration>
3、在resources文件夹下创建jdbc.properties,引入log4j.xml文件
jdbc.properties:
jdbc.driver=com.mysql.cj.jdbc.Driver
jdbc.url=jdbc:mysql://localhost:3306/xsgl3?serverTimezone=UTC
jdbc.username=root
jdbc.password=123456
log4j.xml:
<?xml version="1.0" encoding="UTF-8" ?>
<!DOCTYPE log4j:configuration SYSTEM "log4j.dtd">

<log4j:configuration xmlns:log4j="http://jakarta.apache.org/log4j/">

    <appender name="STDOUT" class="org.apache.log4j.ConsoleAppender">
        <param name="Encoding" value="UTF-8" />
        <layout class="org.apache.log4j.PatternLayout">
            <param name="ConversionPattern" value="%-5p %d{MM-dd HH:mm:ss,SSS} %m  (%F:%L) \n" />
        </layout>
    </appender>
    <logger name="java.sql">
        <level value="debug" />
    </logger>
    <logger name="org.apache.ibatis">
        <level value="info" />
    </logger>
    <root>
        <level value="debug" />
        <appender-ref ref="STDOUT" />
    </root>
</log4j:configuration>
4、创建t_student表、t_teacher表

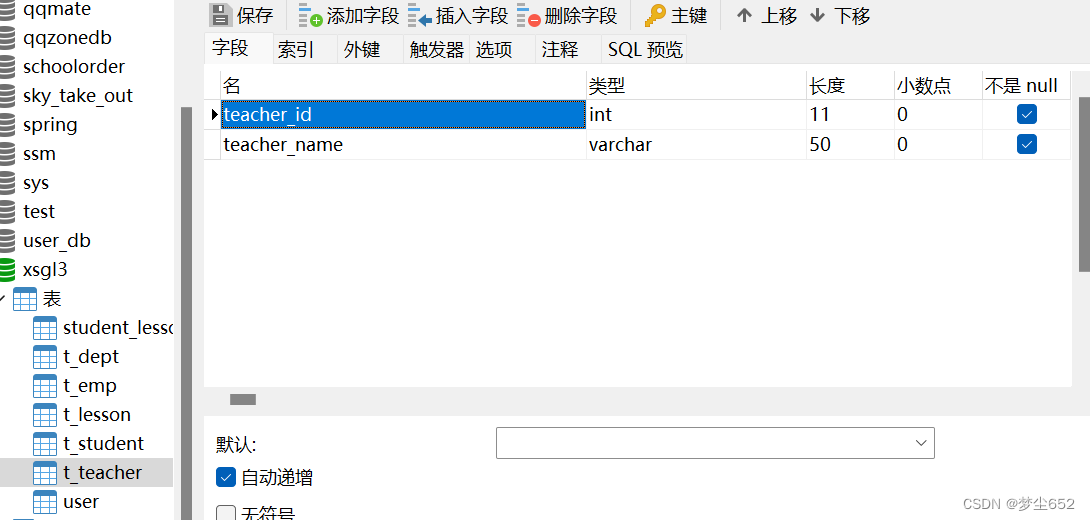
建立数据表时,对于多对一、一对多关系,应该将多方实体的主键加入到单方实体的主键中,所以建立的t_student表要有字段teacher_id作为外键连接沟通两个表
5、创建t_lesson表和student_lesson表
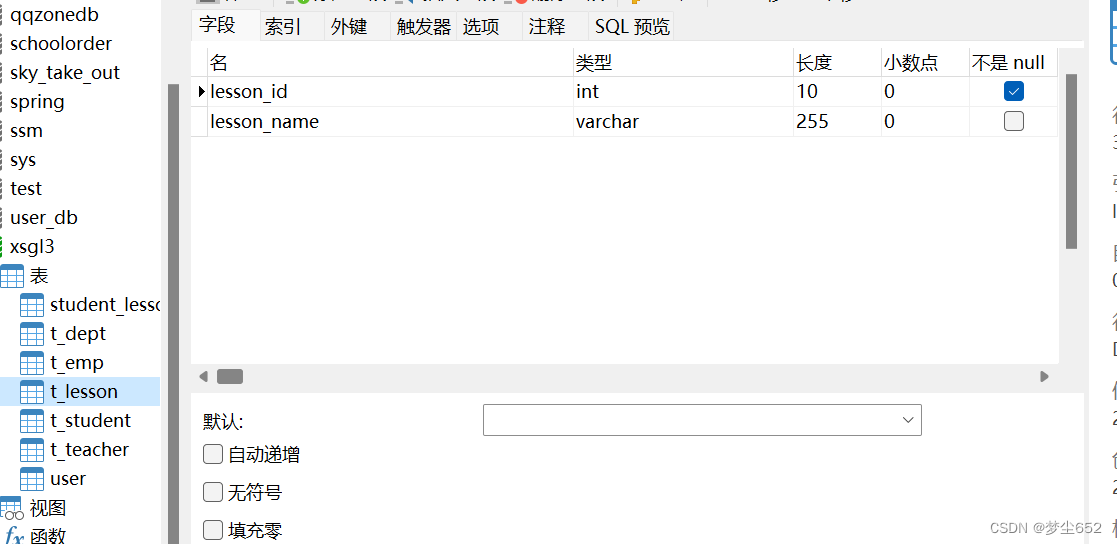

建立多对对联系时,应将两个多方实体的主键加入到中间表中,利于三表查询
6、创建实体类Student、Teacher、Lesson
package com.wtp.pojo;

import lombok.*;

import java.util.List;

@Data
@NoArgsConstructor
@AllArgsConstructor
public class Student {

    private int studentId;
    private String studentName;
    private int age;
    //多个学生对一个老师
    private Teacher teacher;

    //一个学生选多门课 一门课有多个学生
    private List<Lesson> lessons;


}
package com.wtp.pojo;

import lombok.*;

import java.util.List;


@Data
@NoArgsConstructor
@AllArgsConstructor
public class Teacher {

    private Integer  teacherId;
    private String teacherName;
    private List<Student> students;


}
package com.wtp.pojo;


import lombok.*;

import java.util.List;

@Data
@NoArgsConstructor
@AllArgsConstructor
public class Lesson {

    private Integer lessonId;
    private String lessonName;

    //一门课程被多个学生选择
    private List<Student> students;
}
7、创建StudentMapper、TeacherMapper、StudentAndLessonMapper三个接口及对应的映射文件
二、属性映射
无论是一对多、多对一、多对多,查询的实体封装成java对象都是需要映射的
看一个简单的查询:
    <!--Student getStudentById(@Param("studentId") Integer studentId);-->
    <select id="getStudentById" resultType="student">
        select * from t_student where student_id = #{studentId}
    </select>
运行结果:

可以看到查询出来的学生中的老师属性为null,为什么这个属性为null呢?
我们在学习jdbc的过程中应该了解过通过结果集获取到结果集的列数,再遍历结果集循环将查到的数据的字段名获取到 如:

在获取到了字段名之后就可以通过反射创建对象并给对象的属性赋值,如果查询到的字段名和对象的属性名一致,那么就可以获取到这个属性并给这个属性赋值,如果没有就无法赋值,值就为null
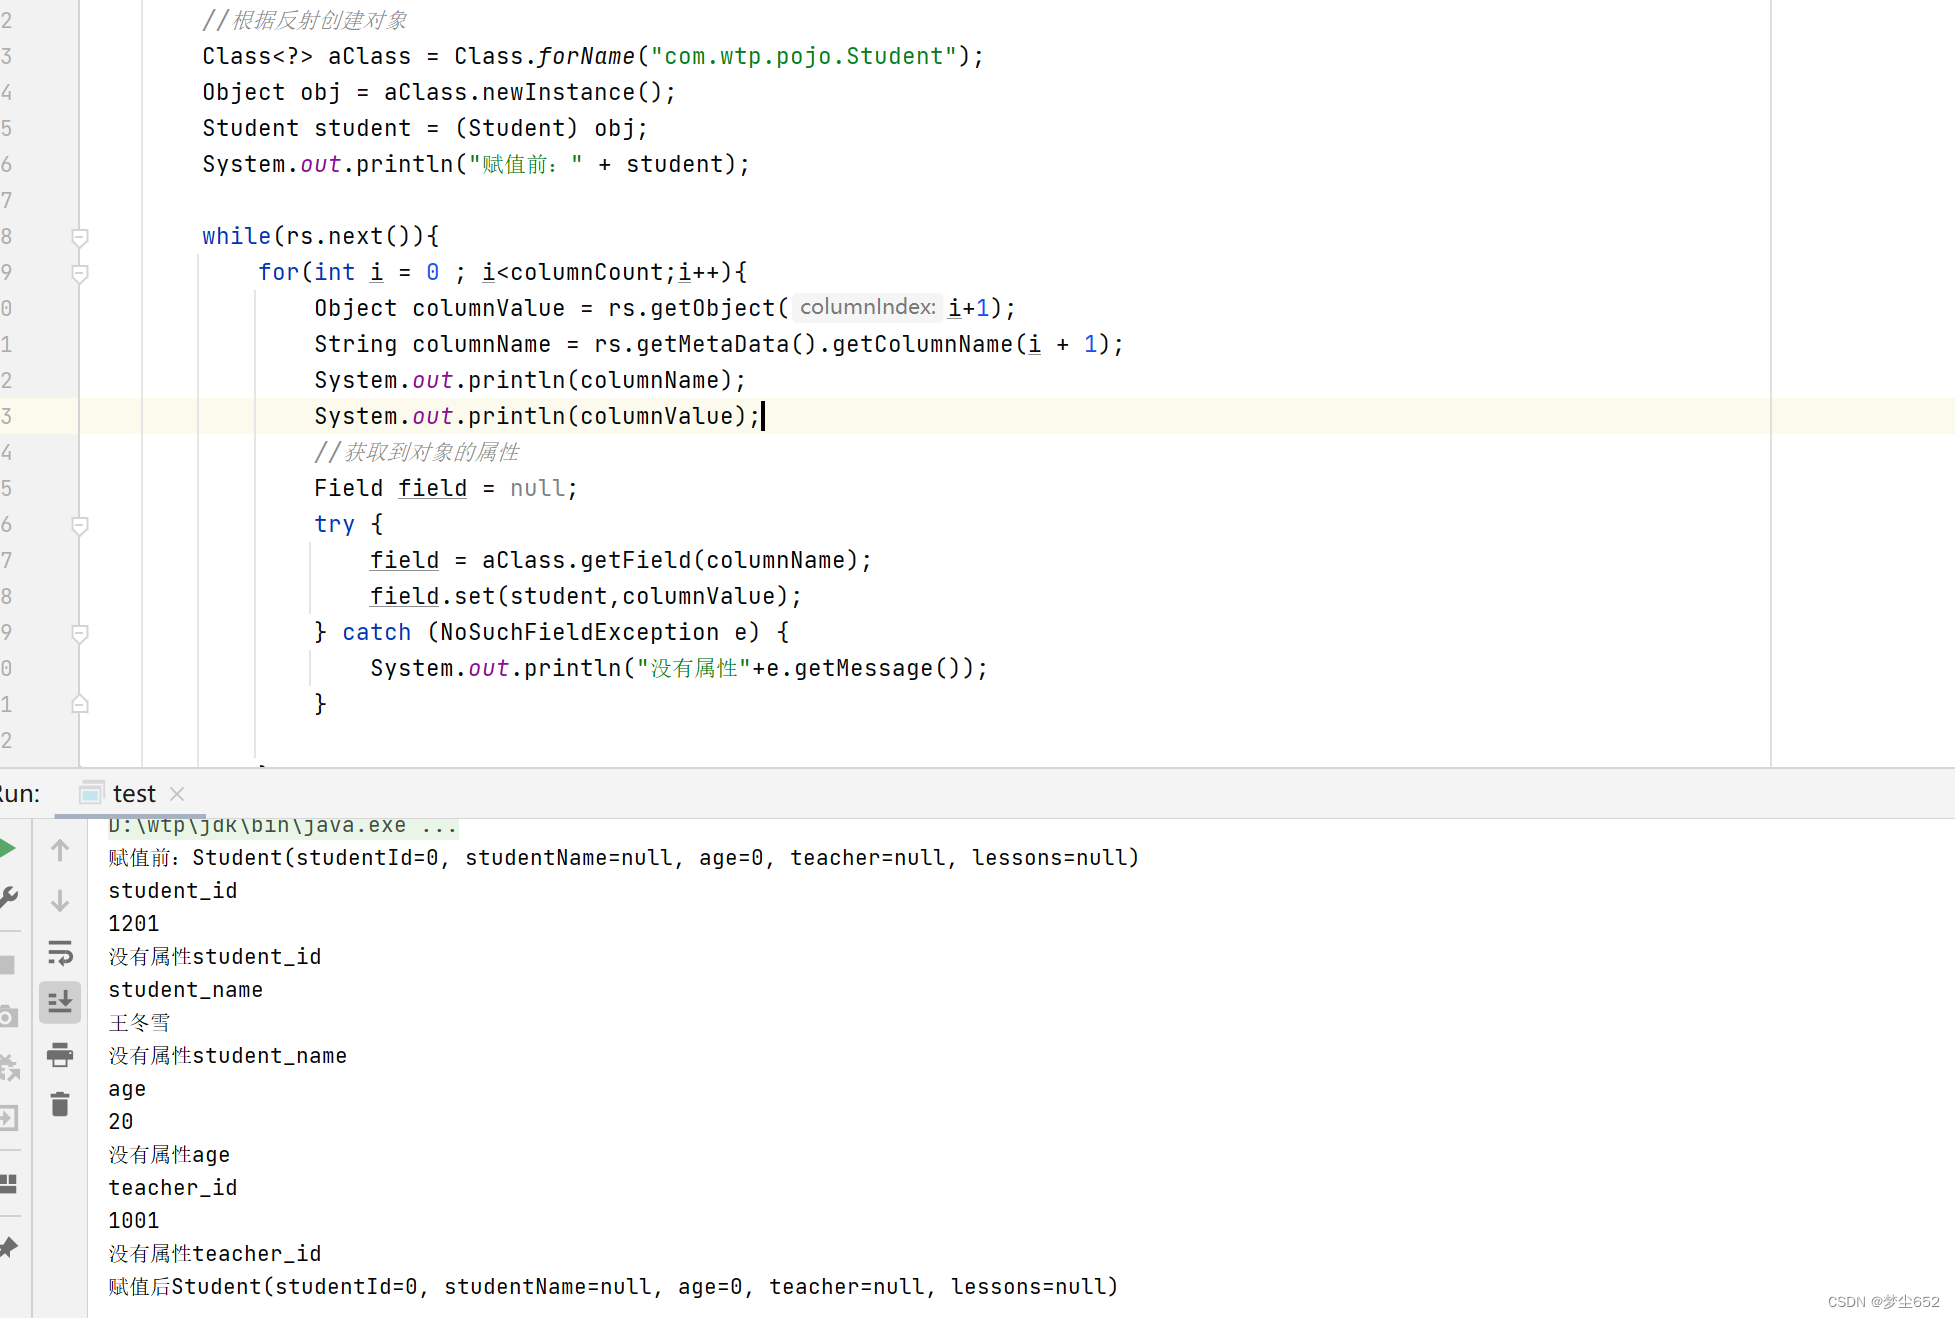
在mybatis中使用的也是通过反射获取属性赋值,所以就需要实体属性与表中字段之间的映射
在mybatis-config配置文件中有这么一句全局配置:
<!--将下划线映射为驼峰 student_id - > studentId --> <setting name="mapUnderscoreToCamelCase" value="true"/>
能够将符合数据库命名规则(中间为_)映射为对象属性命名规则(驼峰)
注意:数据表中没有teacher属性,所以学生中的teacher属性,需要自己定义映射,使用<resultMap>标签进行自定义,其中<id>标签中写数据表中的主键,<result>标签中写其他属性。<result>和<id>标签中有属性column对应为数据表中的字段,property对应对象中的属性。当使用自定义映射时,全局配置中的驼峰映射失效。
三、一对多、多对一关系研究
1、多对一
我们要根据学生id查询出学生和学生对应的老师的信息,就要对teacher属性进行映射,有三种方法:
(1)级联赋值
<!--级联赋值处理映射-->
    <resultMap id="map1" type="student">
        <id column="student_id" property="studentId"/>
        <result column="student_name" property="studentName"/>
        <result column="age" property="age"/>
        <result column="teacher_id" property="teacher.teacherId"/>
        <result column="teacher_name" property="teacher.teacherName"/>
    </resultMap>
    <!--Student getStudentAndTeacher(@Param("studentId") Integer studentId);-->
    <select id="getStudentAndTeacher1" resultMap="map1">
        select * from t_student s
        left join t_teacher t
        on s.teacher_id = t.teacher_id
        where student_id = #{studentId}
    </select>
在配置文件中自定义映射map1,返回类型为student,将查询到的数据映射到对象的属性中,给teacher属性的处理方式为,将对应的字段映射到teacher.teacherId、teacher.teacherName属性
(2)association
<!--association处理映射-->
    <resultMap id="map2" type="student">
        <id column="student_id" property="studentId"/>
        <result column="student_name" property="studentName"/>
        <result column="age" property="age"/>
        <association property="teacher" javaType="teacher" >
            <id column="teacher_id" property="teacherId" />
            <result column="teacher_name" property="teacherName" />
        </association>
    </resultMap>
    <!--Student getStudentAndTeacher2(@Param("studentId") Integer studentId);-->
    <select id="getStudentAndTeacher2" resultMap="map2">
        select * from t_student s
        left join t_teacher t
        on s.teacher_id = t.teacher_id
        where student_id = #{studentId}
    </select>
在对teacher的处理时与级联的方式不同但类似,association标签映射了teacher属性,javaType为映射的属性的类型(这里是别名)
(3)分步查询
分步查询第一步根据学生id查学生写在StudentMapper接口对应的配置文件中:
<!--分步查询-->
    <resultMap id="map3" type="student">
        <id column="student_id" property="studentId"/>
        <result column="student_name" property="studentName"/>
        <result column="age" property="age"/>

        <association property="teacher" fetchType="lazy"
                     select="com.wtp.mapper.TeacherMapper.getStudentAndTeacherStep2"
                     column="teacher_id"
        />
    </resultMap>
    <!--Student getStudentAndTeacherStep1(@Param("studentId") Integer studentId);-->
    <select id="getStudentAndTeacherStep1" resultMap="map3">
        select * from t_student where student_id = #{studentId}
    </select>
分步查询第二步根据第一步查询后的teacher_id条件查询老师,写在TeacherMapper接口对应的配置文件中:
<!--Teacher getStudentAndTeacherStep2(@Param("teacherId") Integer teacherId);-->
    <select id="getStudentAndTeacherStep2" resultType="teacher">
        select * from t_teacher where teacher_id = #{teacherId}
    </select>
分步查询也是用的association标签,利用标签中的select属性选择执行下一个sql的全类名.方法名,column为下一个sql的查询条件
分步查询将复杂的sql拆分为简单的sql分步执行,这样做有一个好处,那就是延迟加载
延迟加载
执行分步查询的sql时,如果没有用到第二步查到的数据,那么就只会执行第一步的sql,减少了内存消耗
若只用到了学生id开启前: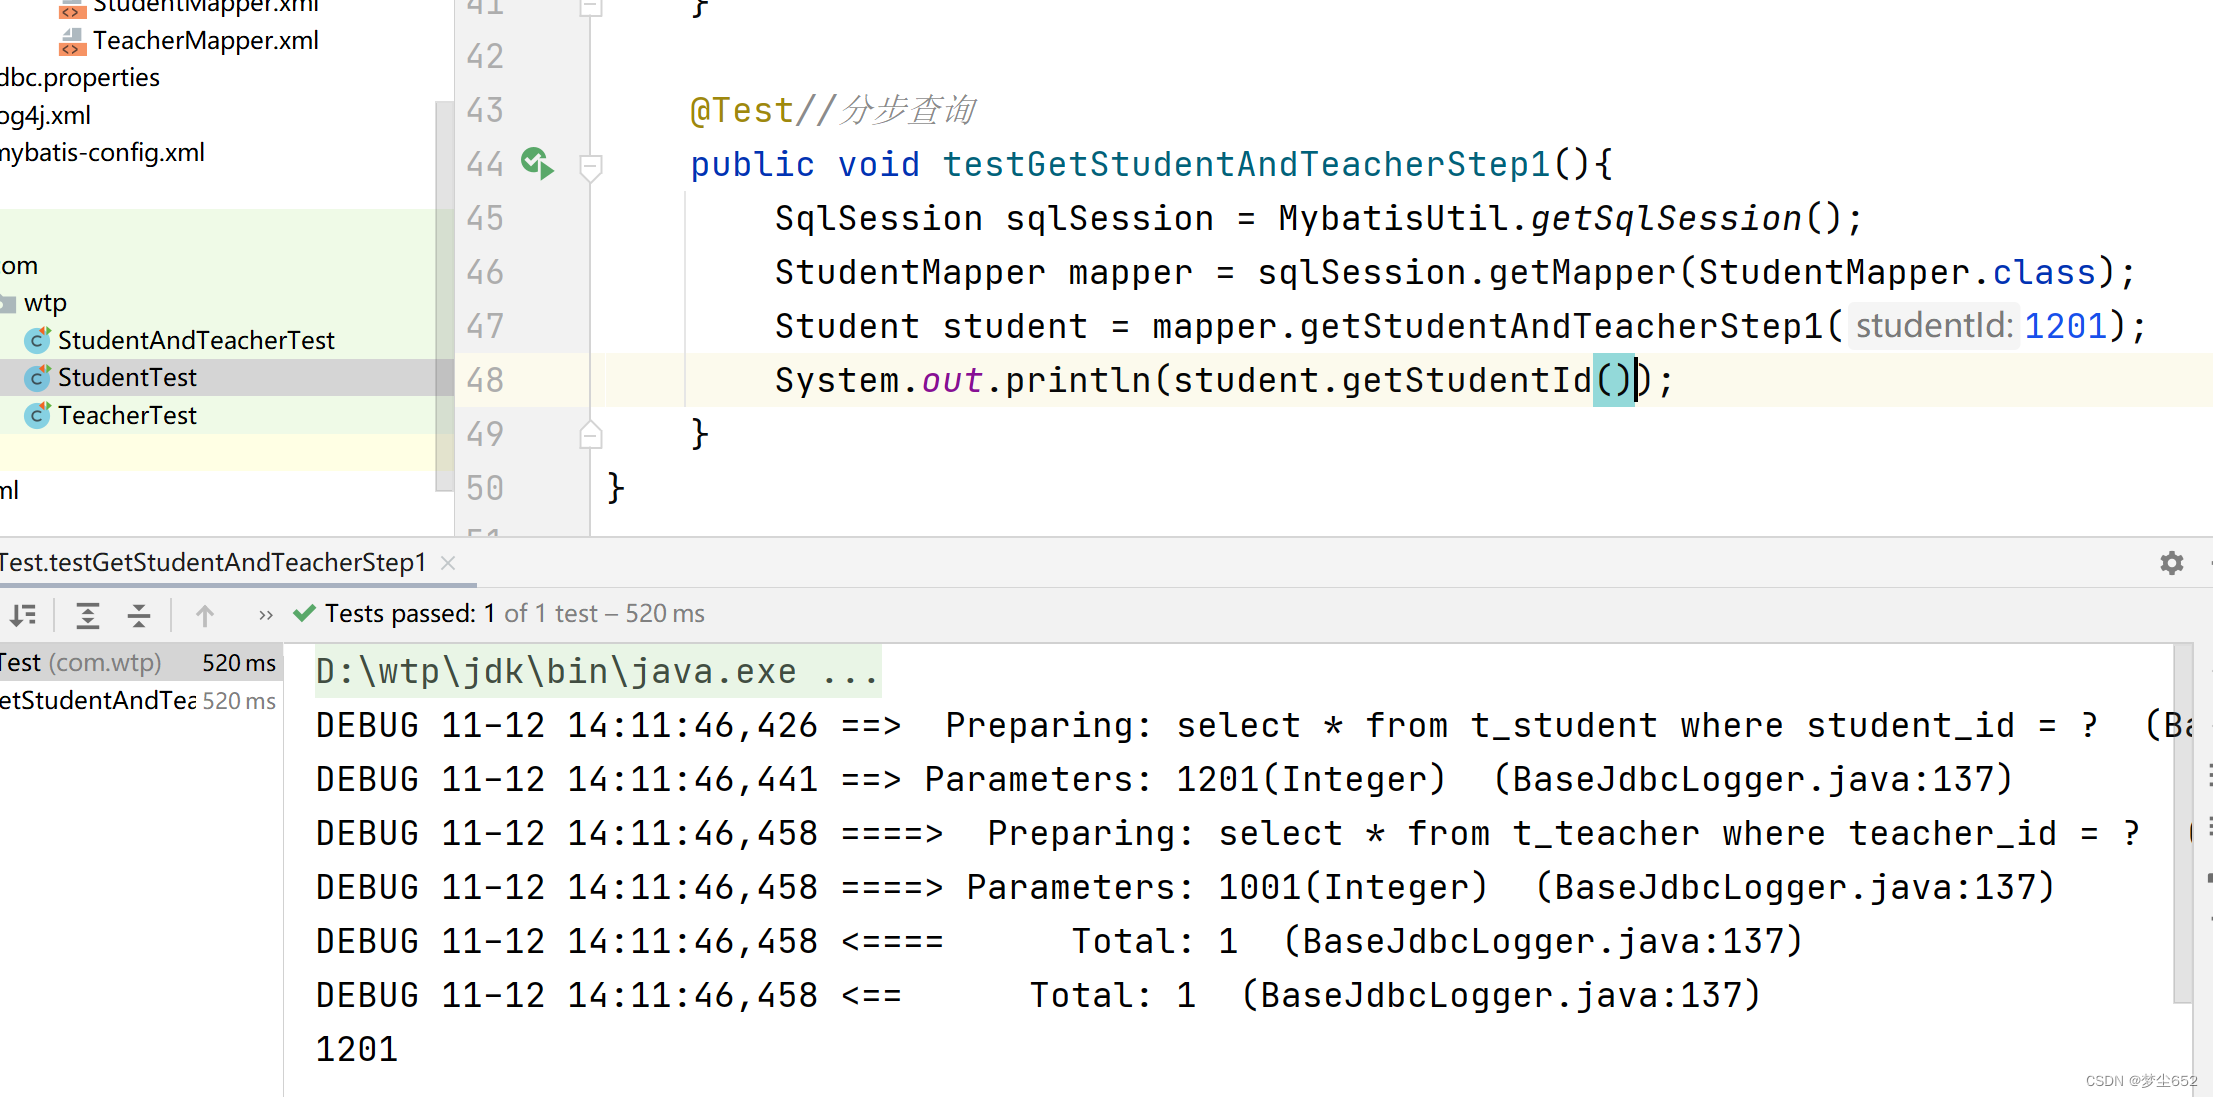
开启后: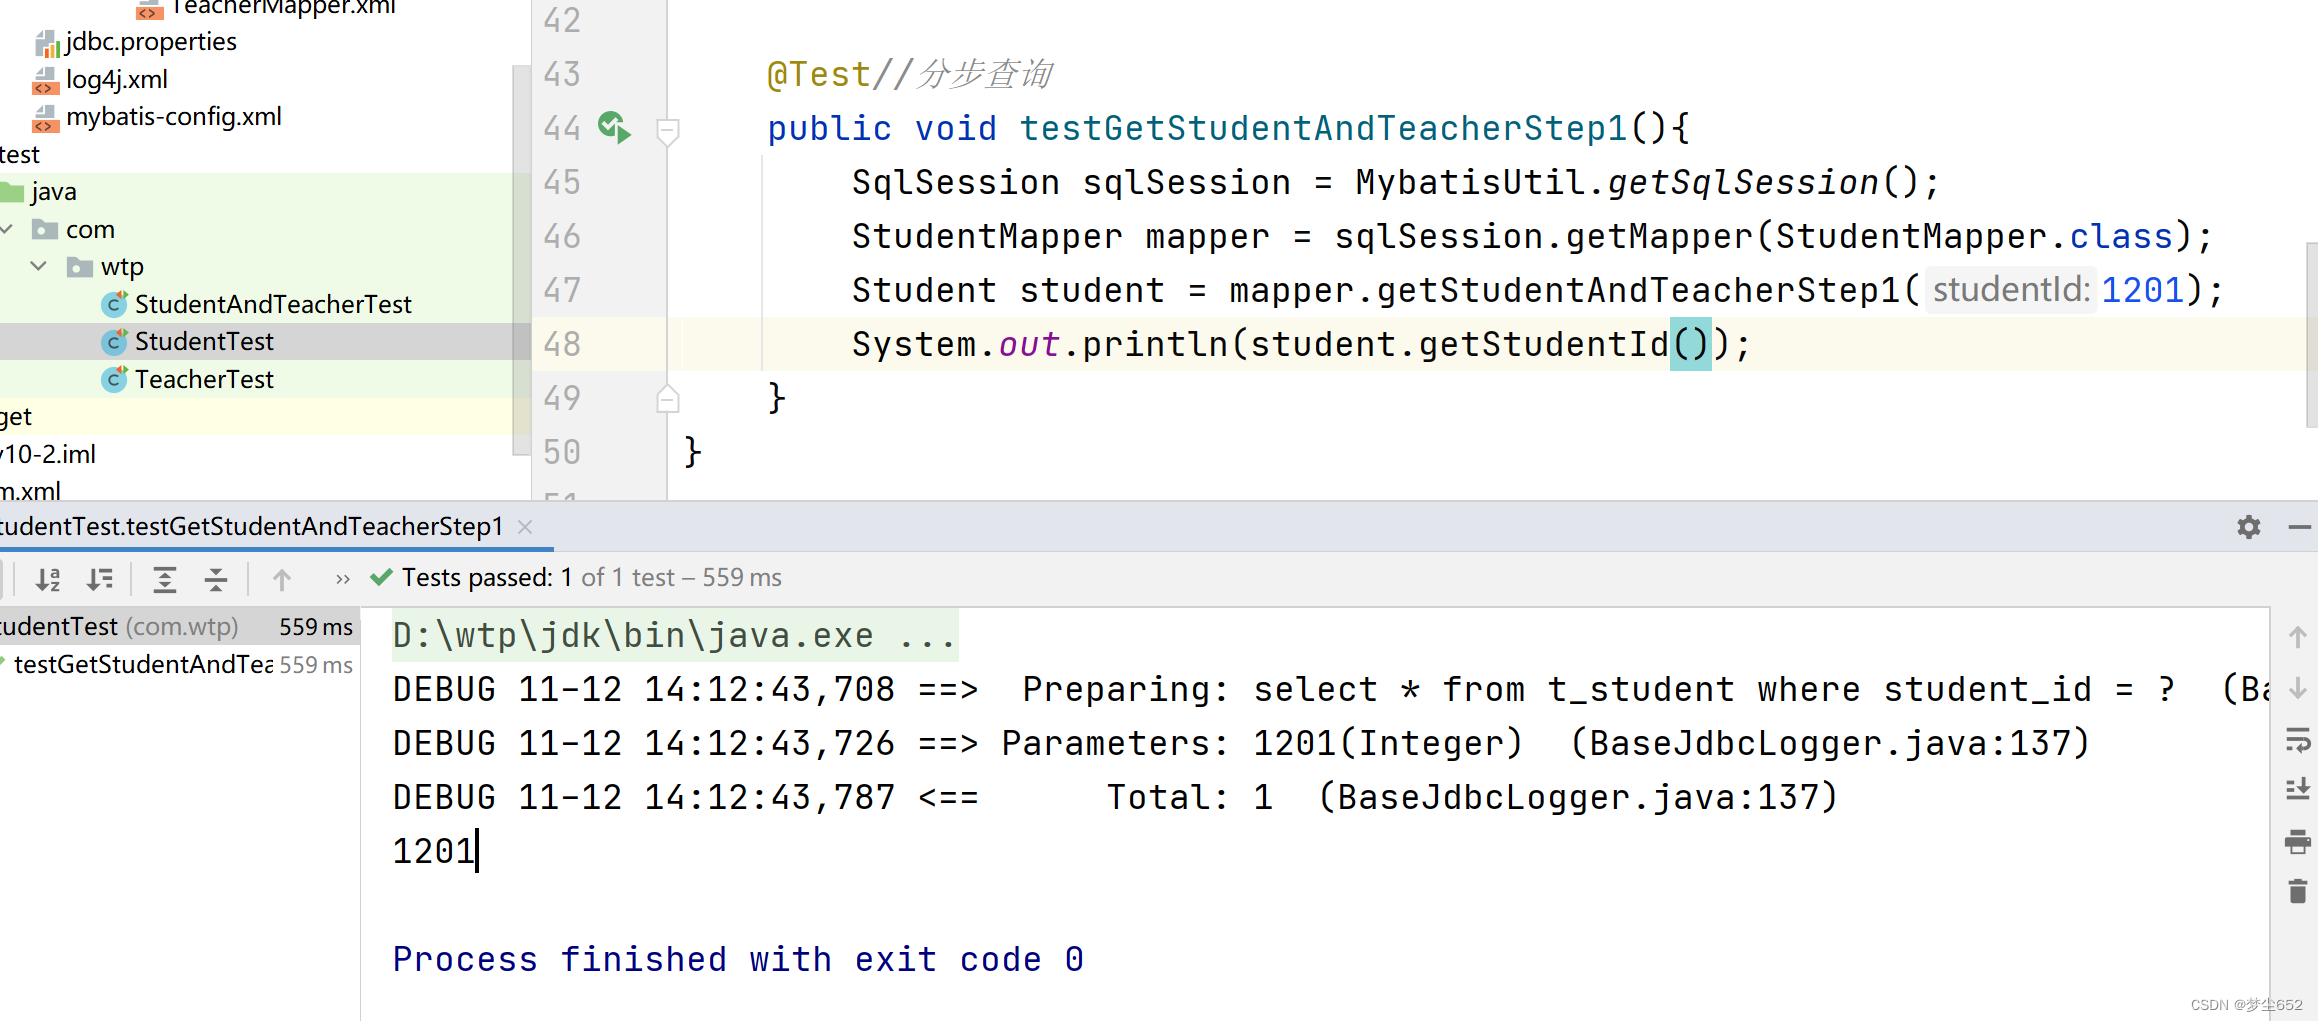
开启延迟加载后若没用到第二步查询的数据就只会执行一条sql
延迟加载开启方法
<!--开启延迟加载-->
<setting name="lazyLoadingEnabled" value="true"/>
<!--按需加载-->
<setting name="aggressiveLazyLoading" value="false"/>
1、在mybatis-config文件中全局配置:
延迟加载功能受两个属性影响, lazyLoadingEnabled、aggressiveLazyLoading
lazyLoadingEnabled设置为true代表开启延迟加载
aggressiveLazyLoading属性默认为false,设置为true时不管有没有用到第二部查询的数据都会执行两条sql语句
2、在分步标签association、collection中的fetchType属性,设置为lazy代表延迟加载,设置为eager代表立即加载
注解写法
注解也可以分为分步、非分步
非分步:
@Results(id = "studentMap",value = {
            @Result(column="student_id", property="studentId"),
            @Result(column="student_name", property="studentName"),
            @Result(column="age", property="age"),
            @Result(column="teacher_id", property="teacher.teacherId"),
            @Result(column="teacher_name", property="teacher.teacherName")

    })
    @Select("select * from t_student s\n" +
            "        left join t_teacher t\n" +
            "        on s.teacher_id = t.teacher_id\n" +
            "        where student_id = #{studentId}")
    Student getStudentAndTeacher3(@Param("studentId") Integer studentId);
分步:
@Results(id = "studentMap",value = {
            @Result(column="student_id", property="studentId"),
            @Result(column="student_name", property="studentName"),
            @Result(column="age", property="age"),
            @Result(property="teacher" ,column = "teacher_id",
                    one = @One(select = "com.wtp.mapper.TeacherMapper.getStudentAndTeacherStep2"))
    })
    @Select("select * from t_student where student_id = #{studentId}")
    //分布查询学生和老师 第一步查询学生
    Student getStudentAndTeacherStep1(@Param("studentId") Integer studentId);
//分布查询学生和老师 第二步查询学生关联的老师
@Select("select * from t_teacher where teacher_id = #{teacherId}")
Teacher getStudentAndTeacherStep2(@Param("teacherId") Integer teacherId);其中one = @One 可以换成 many=@many,这两个注解底层源码相同,作用相同标志不同,相当于@Service标识Service层,@Controller标识Controller层作用都是创建对象添加到IOC容器中。而这两个注解的作用都是指向了下一步sql
2、一对多
根据老师id查询一条老师信息,老师信息对应有学生的集合,就要给学生集合进行映射
(1)collection
<resultMap id="map1" type="Teacher">
        <id column="teacher_id" property="teacherId"/>
        <result column="teacher_name" property="teacherName"/>
        <collection property="students" ofType="student">
            <id property="studentId" column="student_id"/>
            <result property="studentName" column="student_name"/>
            <result property="age" column="age"/>
        </collection>
    </resultMap>
    <!--Teacher getTeacherAndStudentById1(@Param("teacherId") Integer teacherId);-->
    <select id="getTeacherAndStudentById1" resultMap="map1">
        select * from t_teacher t
        left join t_student s
        on t.teacher_id = s.teacher_id
        where t.teacher_id = #{teacherId}
    </select>
colloction为集合类型的父接口,这个标签能够处理集合类型的属性,其实association也能够用colloction标签代替,相当于集合中只有一个元素,但colloction标签不能用association标签代替
(2)分步查询
写在TeacherMapper接口对应的配置文件中第一步根据老师id查询老师:
 <!--分步查询-->
    <resultMap id="stepMap" type="teacher">
        <id column="teacher_id" property="teacherId"/>
        <result column="teacher_name" property="teacherName"/>
        <collection property="students"
                    select="com.wtp.mapper.StudentMapper.getTeacherAndStudentStep2"
                    column="teacher_id"
        />
    </resultMap>
    <!--Teacher getTeacherAndStudentStep1(@Param("teacherId") Integer teacherId);-->
    <select id="getTeacherAndStudentStep1" resultMap="stepMap" >
        select * from t_teacher where teacher_id = #{teacherId}
    </select>
第二步写在StudentMapper接口对应的文件中根据传过来的老师id查找对应的学生
<!--Student getTeacherAndStudentStep2(@Param("teacherId") Integer teacherId);-->
    <select id="getTeacherAndStudentStep2" resultType="student">
        select * from t_student where teacher_id = #{teacherId}
    </select>
注解
分步:TeacherMapper:
@Results(id = "teacherMap",value = {
            @Result(column="teacher_id", property="teacherId"),
            @Result(column="teacher_name", property="teacherName"),
            @Result(property="students" ,column = "teacher_id",
                    many = @Many(select = "com.wtp.mapper.StudentMapper.getTeacherAndStudentStep2"))
    })
    @Select("select * from t_teacher where teacher_id = #{teacherId}")
    //分步查询老师和学生 第一步查询老师
    Teacher getTeacherAndStudentStep1(@Param("teacherId") Integer teacherId);
StudentMapper:
@Select("select * from t_student where teacher_id = #{teacherId}")
    //分步查询老师和学生 第二步查询老师关联的学生
    Student getTeacherAndStudentStep2(@Param("teacherId") Integer teacherId);
3、多对多
从一方查询来看都是一对多,一对多查询有collection、分步查询两种方式。只有sql语句变为了三表联查
xml文件配置:
<?xml version="1.0" encoding="UTF-8" ?>
<!DOCTYPE mapper
        PUBLIC "-//mybatis.org//DTD Mapper 3.0//EN"
        "http://mybatis.org/dtd/mybatis-3-mapper.dtd">

<mapper namespace="com.wtp.mapper.StudentAndLessonMapper">

    <resultMap id="studentMap" type="student">
        <id column="student_id" property="studentId"/>
        <result column="student_name" property="studentName"/>
        <result column="age" property="age"/>
        <collection property="lessons" ofType="lesson">
            <id property="lessonId" column="lesson_id"/>
            <result property="lessonName" column="lesson_name"/>
        </collection>
    </resultMap>
    <!--根据studentId查询对应课程-->
    <!--Student getStudentById(@Param("studentId") Integer studentId);-->
    <select id="getStudentById" resultMap="studentMap">
        select * from t_student
        left join student_lesson
        on t_student.student_id = student_lesson.student_id
        left join t_lesson
        on student_lesson.lesson_id = t_lesson.lesson_id
        where t_student.student_id = #{studentId}
    </select>


    <resultMap id="lessonMap" type="lesson">
        <id column="lesson_id" property="lessonId"/>
        <result column="lesson_name" property="lessonName"/>
        <collection property="students" ofType="student">
            <id property="studentId" column="student_id"/>
            <result property="studentName" column="student_name"/>
            <result property="age" column="age"/>
        </collection>
    </resultMap>
    <!--根据lessonId查询对应学生-->
    <!--Student getLessonById(@Param("lessonId") Integer lessonId);-->
    <select id="getLessonById" resultMap="lessonMap">
        select * from t_lesson
        left join student_lesson
        on t_lesson.lesson_id = student_lesson.lesson_id
        left join t_student
        on student_lesson.student_id = t_student.student_id
        where t_lesson.lesson_id = #{lessonId}
    </select>
</mapper>
接口中的方法以及接口中的注解查询:
package com.wtp.mapper;

import com.wtp.pojo.Lesson;
import com.wtp.pojo.Student;
import org.apache.ibatis.annotations.*;

import java.util.Collection;
import java.util.List;
import java.util.Set;

public interface StudentAndLessonMapper {

    //根据studentId查询学生及课程
    Student getStudentById(@Param("studentId") Integer studentId);

    //根据lessonId查询课程及选课的学生
    Lesson getLessonById(@Param("lessonId") Integer lessonId);

    //注解方式分步查询
    @Results(id = "studentMap2",value = {
            @Result(column="student_id", property="studentId"),
            @Result(column="student_name", property="studentName"),
            @Result(column="age", property="age"),
            @Result(property="lessons" ,column = "student_id",
                    many = @Many(select = "getStudentByIdStep2"))
    })
    @Select("select * from t_student where student_id = #{studentId}")
    Student getStudentByIdStep1(@Param("studentId") Integer studentId);

    //根据学生id查中间表的课程
    @Select("select * from student_lesson sl left join t_lesson l " +
            "on sl.lesson_id = l.lesson_id " +
            " where sl.student_id = #{studentId}")
    Lesson getStudentByIdStep2(@Param("studentId") Integer studentId);

}


 1万+
1万+


 被折叠的 条评论
为什么被折叠?
被折叠的 条评论
为什么被折叠?
 到【灌水乐园】发言


