


一:微服务相关
1. feign的远程调用详解
<!--feign-api模块依赖-->
  <dependency>
    <groupId>com.hmall</groupId>
    <artifactId>feign-api</artifactId>
    <version>1.0</version>
  </dependency>

 <!--feign的starter依赖-->
  <dependency>
    <groupId>org.springframework.cloud</groupId>
    <artifactId>spring-cloud-starter-openfeign</artifactId>
  </dependency>

  <!--nacos服务注册发现依赖-->
  <dependency>
    <groupId>com.alibaba.cloud</groupId>
    <artifactId>spring-cloud-starter-alibaba-nacos-discovery</artifactId>
  </dependency>
提供服务的接口如下:
		/**
     * 分页查询
     */
	@GetMapping("/list")
  public PageDTO<Item> list(@RequestParam("page") int page,@RequestParam("size") int size) {
    return itemService.load(page, size);
}
接口:
@FeignClient(value = "itemservice")//value为item-service模块的服务名
public interface IItemClient {
    /**
     * 分页查询
     */
    @GetMapping("/item/list")
    public PageDTO<Item> list(@RequestParam("page") int page,@RequestParam("size") int size);
}
  <!--<!--feign的starter依赖-->-->
	<dependency>
    <groupId>org.springframework.cloud</groupId>
    <artifactId>spring-cloud-starter-openfeign</artifactId>
  </dependency>
-
search-service模块远程调用的消费者,调用item-service 模块的服务,
-
启动类上需要写@EnableFeignClients(basePackages = “com.hmall.common.cilent”),为feign-api模块中远程调用服务类的全路径,需要导入feign-api的模块依赖,nacos服务注册发现依赖,feign
的starter依赖,在需要远程调用的地方,自动注入feign-api模块中的接口类名即可
启动类如下:
@Slf4j
@SpringBootApplication
//@EnableFeignClients(clients = {IItemClient.class})
@EnableFeignClients(basePackages = "com.hmall.common.cilent")
public class SearchApplication {
    public static void main(String[] args) {
        SpringApplication.run(SearchApplication.class, args);
        log.info("search-service  启动成功");
    }
application.yaml文件如下:
server:
  port: 8082
spring:
  application:
    name: searchservice
  cloud:
    nacos:
      server-addr: localhost:8848 # nacos地址
logging:
  level:
    com.hmall: debug
  pattern:
    dateformat: HH:mm:ss:SSS
<!--feign-api模块依赖-->
  <dependency>
    <groupId>com.hmall</groupId>
    <artifactId>feign-api</artifactId>
    <version>1.0</version>
  </dependency>

 <!--feign的starter依赖-->
  <dependency>
    <groupId>org.springframework.cloud</groupId>
    <artifactId>spring-cloud-starter-openfeign</artifactId>
  </dependency>

  <!--nacos服务注册发现依赖-->
  <dependency>
    <groupId>com.alibaba.cloud</groupId>
    <artifactId>spring-cloud-starter-alibaba-nacos-discovery</artifactId>
  </dependency>
2. 网关的通用配置:
server:
  port: 10010 # 网关端口
spring:
  application:
    name: gateway # 服务名称
  cloud:
    nacos:
      server-addr: localhost:8848 # nacos地址
    gateway:
      globalcors:
        add-to-simple-url-handler-mapping: true
        corsConfigurations:
          '[/**]':
            allowedOrigins:
              - "http://localhost:9001"
              - "http://localhost:9002"
              - "http://127.0.0.1:9001"
              - "http://127.0.0.1:9002"
            allowedMethods: # 允许的跨域ajax的请求方式
              - "GET"
              - "POST"
              - "DELETE"
              - "PUT"
              - "OPTIONS"
            allowedHeaders: "*" # 允许在请求中携带的头信息
            allowCredentials: true # 是否允许携带cookie
            maxAge: 360000 # 这次跨域检测的有效期

      routes: # 网关路由配置
        - id: item-service # 路由id,自定义,只要唯一即可
          # uri: http://127.0.0.1:8081 # 路由的目标地址 http就是固定地址
          uri: lb://itemservice # 路由的目标地址 lb就是负载均衡,后面跟服务名称
          predicates: # 路由断言,也就是判断请求是否符合路由规则的条件
            - Path=/item/** # 这个是按照路径匹配,只要以/user/开头就符合要求
        - id: user-service
          uri: lb://userservice
          predicates:
            - Path=/user/**,/address/**
        - id: order-service
          uri: lb://orderservice
          predicates:
            - Path=/order/**,/pay/**
        - id: search-service
          uri: lb://searchservice
          predicates:
            - Path=/search/**
2. springboot 网关 过滤器 添加请求头
routes: # 网关路由配置
        - id: item-service # 路由id,自定义,只要唯一即可
          # uri: http://127.0.0.1:8081 # 路由的目标地址 http就是固定地址
          uri: lb://itemservice # 路由的目标地址 lb就是负载均衡,后面跟服务名称
          predicates: # 路由断言,也就是判断请求是否符合路由规则的条件
            - Path=/item/** # 这个是按照路径匹配,只要以/user/开头就符合要求
          filters: # 过滤器
            - AddRequestHeader=authorization,2
3. 拦截器拦截校验
- 书写拦截器
@Slf4j
@Component
public class ItemInterceptor implements HandlerInterceptor {
    //原始方法调用前执行的内容
    @Override
    public boolean preHandle(HttpServletRequest request, HttpServletResponse response, Object handler) throws Exception {
        String userId = request.getHeader("authorization");
        if (StringUtils.isBlank(userId)) {
            log.warn("非法用户访问!请求路径:{}",request.getRequestURI());
            throw new RuntimeException("用户未登录");
        }

        //将userId保存到ThreadLocal
        BaseContext.setCurrentId(Long.valueOf(userId));
        return true;
    }

    //原始方法调用后执行的内容
    @Override
    public void postHandle(HttpServletRequest request, HttpServletResponse response, Object handler, ModelAndView modelAndView) throws Exception {
        HandlerInterceptor.super.postHandle(request, response, handler, modelAndView);
    }

    //原始方法调用完成后执行的内容
    @Override
    public void afterCompletion(HttpServletRequest request, HttpServletResponse response, Object handler, Exception ex) throws Exception {
        //从线程中删除用户id
        BaseContext.removeCurrentId();
    }
}
- 将拦截器添加到WebMvcConfigurer(否则不会生效)
@Component
public class Interceptor implements WebMvcConfigurer {
    @Override
    //将拦截器添加到WebMvcConfigurer(否则不会生效)
    public void addInterceptors(InterceptorRegistry registry) {
        registry.addInterceptor(new ItemInterceptor()).addPathPatterns("/**");
    }
}
4. feign远程调用 ———— 添加请求头
原因:feign远程调用服务,不会经过网关,所以网关的添加请求头不会生效
//添加请求头的方法
@Slf4j
public class MyFeignInterceptor implements RequestInterceptor {
    @Override
    public void apply(RequestTemplate template) {
        log.info("===request: {}", template.url());
        template.header("authorization", "2");
    }
}
//使feign添加请求头的方法生效
@Configuration
public class FeignConfig {
    @Bean
    public RequestInterceptor requestInterceptor() {
        return new MyFeignInterceptor();
    }
}
//具体的远程调用方法		使用configuration = FeignConfig.class  ,让spring扫描到FeignConfig
@FeignClient(value = "userservice",configuration = FeignConfig.class)
public interface IUserCilent {
    /**
     * 根据addressId查询地址
     */
    @GetMapping("/address/{id}")
    public Address findAddressById(@PathVariable("id") Long id);
}
5. 自动装配
描述:创建的类,没被spring扫描到,不会加载到容器,不生效
解决1:在启动类上添加: @ComponentScan(value = “类的路径”),让spring扫描到,就能加载到容器
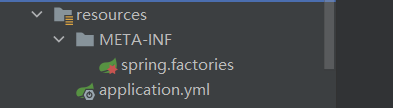
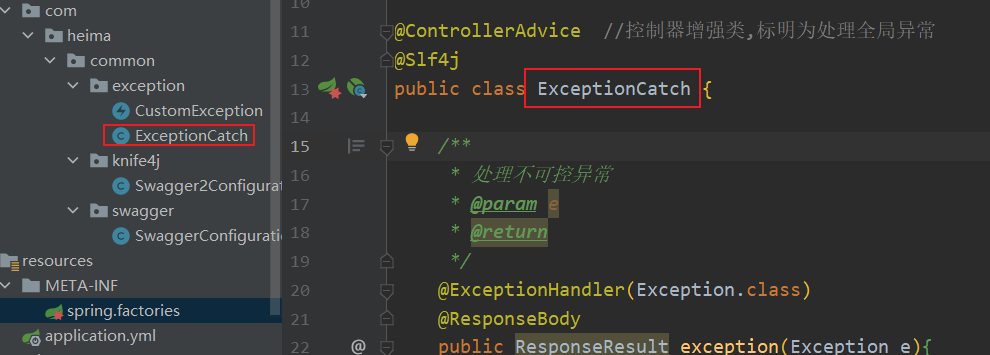
解决2:resources配置下面添加 META-INF —— spring.factories配置文件,在里面添加类的全路径,这样spring的自动装配 就会把这个类加载到容器
org.springframework.boot.autoconfigure.EnableAutoConfiguration=\
  com.heima.common.exception.ExceptionCatch,\
  com.heima.common.swagger.SwaggerConfiguration,\
  com.heima.common.knife4j.Swagger2Configuration


6. mybatis 的分页插件
    @Bean
    public MybatisPlusInterceptor mybatisPlusInterceptor() {
        MybatisPlusInterceptor interceptor = new MybatisPlusInterceptor();
        interceptor.addInnerInterceptor(new PaginationInnerInterceptor(DbType.MYSQL));
        return interceptor;
    }
7. 全局过滤器与拦截器实现登录鉴权
1.全局过滤器在请求头中添加用户id信息(写在网关服务里)
@Component
@Slf4j
public class AuthorizeFilter implements Ordered, GlobalFilter {
    @Override
    public Mono<Void> filter(ServerWebExchange exchange, GatewayFilterChain chain) {
        //1.获取request和response对象
        ServerHttpRequest request = exchange.getRequest();
        ServerHttpResponse response = exchange.getResponse();
          //2.判断是否是登录
        if(request.getURI().getPath().contains("/login")){
            //放行
            return chain.filter(exchange);
        }
             //在header中添加用户id信息
            ServerHttpRequest httpRequest = request.mutate().headers(new Consumer<HttpHeaders>() {
                @Override
                public void accept(HttpHeaders httpHeaders) {
                    httpHeaders.add("userId", id.toString());
                }
            }).build();
         //将新的request替换掉旧的,写上build才会生效
            exchange.mutate().request(httpRequest).build();

        //6.放行
        return chain.filter(exchange);
    }
2.自媒体微服务使用拦截器获取到header中的的用户信息,并放入到threadlocal中
@Slf4j
public class WmTokenInterceptor implements HandlerInterceptor {
    /**
     * 前置处理    获取用户信息,存入线程中
     */
    @Override
    public boolean preHandle(HttpServletRequest request, HttpServletResponse response, Object handler) throws Exception {
        //从请求头中获取登录用户的id
        String userId = request.getHeader("userId");
        //排除登录请求
        String path = request.getRequestURI().toString();
        if (path.contains("/in")) {
            return true;
        }

        //判断userId是否存在
        if (StringUtils.isBlank(userId)) {
            log.error("当前用户没有登录,请求被禁止");
            return false;
        }

        //userId不为空
        WmUser wmUser = new WmUser();
        wmUser.setId(Integer.parseInt(userId));
        //将用户id设置到线程中
        WmThreadLocalUtil.setUser(wmUser);
        return true;
    }

    /**
     * 后置处理,清理threadlocal中的数据,防止内存溢出
     */
    @Override
    public void postHandle(HttpServletRequest request, HttpServletResponse response, Object handler, ModelAndView modelAndView) throws Exception {
        WmThreadLocalUtil.delete();
    }
}
3.注册拦截器,使拦截器生效
@Configuration
public class WebMvcConfig implements WebMvcConfigurer {
    @Override
    public void addInterceptors(InterceptorRegistry registry) {
        registry.addInterceptor(new WmTokenInterceptor()).addPathPatterns("/**");
    }
}
4.ThreadLocalUtil 工具类设置用户id到线程中
public class WmThreadLocalUtil {
    private final static ThreadLocal<WmUser> WM_USER_THREAD_LOCAL = new ThreadLocal<>();

    /**
     * 添加到线程
     */
    public static void setUser(WmUser wmUser) {
        WM_USER_THREAD_LOCAL.set(wmUser);
    }


    /**
     * 从线程中获取
     */
    public static WmUser getUser() {
        return WM_USER_THREAD_LOCAL.get();
    }

    /**
     * 从线程中清理
     */
    public static  void  delete() {
        WM_USER_THREAD_LOCAL.remove();
    }
}
二:MQ相关
1.交换机、队列、key
1.交换机、队列、key常量
public class MqConstants {
    /**
     * 交换机
     */
    public final static String HOTEL_EXCHANGE = "item.topic";
    /**
     * 监听新增和修改的队列
     */
    public final static String HOTEL_INSERT_QUEUE = "item.insert.queue";
    /**
     * 监听删除的队列
     */
    public final static String HOTEL_DELETE_QUEUE = "item.delete.queue";
    /**
     * 新增或修改的RoutingKey
     */
    public final static String HOTEL_INSERT_KEY = "item.insert";
    /**
     * 删除的RoutingKey
     */
    public final static String HOTEL_DELETE_KEY = "item.delete";
}
2.声明交换机、队列、key,以及关系绑定
@Configuration
public class MqConfig {
    @Bean
    public TopicExchange topicExchange(){
        return new TopicExchange(MqConstants.HOTEL_EXCHANGE, true, false);
    }

    /**
     * 新增或者修改的队列
     */
    @Bean
    public Queue insertQueue(){
        return new Queue(MqConstants.HOTEL_INSERT_QUEUE, true);
    }

    /**
     * 删除的队列
     */
    @Bean
    public Queue deleteQueue(){
        return new Queue(MqConstants.HOTEL_DELETE_QUEUE, true);
    }

    /**
     * 新增
     */
    @Bean
    public Binding insertQueueBinding(){
        return BindingBuilder.bind(insertQueue()).to(topicExchange()).with(MqConstants.HOTEL_INSERT_KEY);
    }

    /**
     * 删除
     */
    @Bean
    public Binding deleteQueueBinding(){
        return BindingBuilder.bind(deleteQueue()).to(topicExchange()).with(MqConstants.HOTEL_DELETE_KEY);
    }
}
3.监听mq信息,实现es与数据库的数据同步
@Component
public class ItemListener {

    @Autowired
    private SearchService searchService;

    /**
     * 监听商品上架的信息——新增到es
     */
    @RabbitListener(queues = MqConstants.HOTEL_INSERT_QUEUE)
    public void listenHotelInsertOrUpdate(Long id) {
        searchService.updateHotel(id);
    }

    /**
     * 监听商品下架的信息——删除某条数据
     */
    @RabbitListener(queues = MqConstants.HOTEL_DELETE_QUEUE)
    public void listenHotelDelete(Long id) {
        searchService.deleteHotelById(id);
    }
}


    /**
     * 全量更新
     */
    @Override
    public void updateHotel(Long id) {
        try {
            Item item = iItemClient.getById(id);

            ItemDoc itemDoc = new ItemDoc(item);

            //准备request
            IndexRequest request = new IndexRequest("item").id(itemDoc.getId().toString());

            request.source(JSON.toJSONString(itemDoc), XContentType.JSON);

            client.index(request, RequestOptions.DEFAULT);
        } catch (IOException e) {
            throw new RuntimeException(e);
        }
    }


    /**
     * 文档删除
     */
    @Override
    public void deleteHotelById(Long id) {
        try {
            DeleteRequest request = new DeleteRequest("item", id.toString());
            client.delete(request, RequestOptions.DEFAULT);
        } catch (IOException e) {
            throw new RuntimeException(e);
        }
    }
2.java操作ES
1.操作索引库、文档
1.创建索引库
    @Test
    void testCreateIndex() throws IOException {
        //创建request对象
        CreateIndexRequest request = new CreateIndexRequest("item");
        //准备参数
        request.source(MAPPING_TEMPLATE, XContentType.JSON);
        //发送请求
        client.indices().create(request, RequestOptions.DEFAULT);
    }
2.删除索引库
    @Test
    void testDeleteIndex() throws IOException {
        //创建request对象
        DeleteIndexRequest request = new DeleteIndexRequest("itcast");
        //发送请求
        client.indices().delete(request, RequestOptions.DEFAULT);
    }
3.添加文档
    @Test
    void testAddDocument() throws IOException {
        //从数据库查询单个数据
        Hotel hotel = service.getById(56852L);
        //进行文档类型转换
        HotelDoc hotelDoc = new HotelDoc(hotel);
        //准备request对象
        IndexRequest request = new IndexRequest("itcast").id(hotelDoc.getId().toString());
        //准备文档数据
        request.source(JSON.toJSONString(hotelDoc), XContentType.JSON);
        //发送请求
        client.index(request, RequestOptions.DEFAULT);
    }
4.根据id查询文档
    @Test
    void testGetDocument() throws IOException {
        //准备request
        GetRequest request = new GetRequest("itcast").id("56852");
        //发送请求
        GetResponse response = client.get(request, RequestOptions.DEFAULT);
        //解析结果
        HotelDoc hotelDoc = JSON.parseObject(response.getSourceAsString(), HotelDoc.class);
        System.out.println(hotelDoc);
    }
5.根据id修改文档
    @Test
    void testUpdateDocument() throws IOException {
        //准备request
        UpdateRequest request = new UpdateRequest("itcast", "56852");
        //准备参数
        request.doc(
                "name", "魔都",
                "price", "10000"
        );
        //发送请求
        client.update(request, RequestOptions.DEFAULT);
    }
6.根据id删除文档
    @Test
    void testDeleteDocument() throws IOException {
        //准备request
        DeleteRequest request = new DeleteRequest("itcast", "56852");
        //发送请求
        client.delete(request, RequestOptions.DEFAULT);
    }
7.批量添加文档1
    @Test
    void testBulk() throws IOException {
        //批量查询数据
        List<Hotel> hotels = service.list();
        //准备request
        BulkRequest request = new BulkRequest();

        //文档类型转换
        for (Hotel hotel : hotels) {
            HotelDoc hotelDoc = new HotelDoc(hotel);
            //准备参数
            request.add(new IndexRequest("itcast")
                    .id(hotelDoc.getId().toString())
                    .source(JSON.toJSONString(hotelDoc), XContentType.JSON));
        }
        //发送请求
        client.bulk(request, RequestOptions.DEFAULT);
    }
8.批量添加文档2
    @Test
    void testSaveAllDocument() throws IOException {
        int page = 1;

        while (true) {
            BulkRequest request = new BulkRequest();
            PageDTO<Item> list = iItemClient.list(page, 500);
            List<Item> itemList = list.getList();

            if (itemList.size() <= 0) {
                break;
            }

            for (Item item : itemList) {
                //如果商品为下架状态,则不添加到es,跳过
                if (item.getStatus() == 2) {
                    continue;
                }
                //类型转换
                ItemDoc itemDoc = new ItemDoc(item);
                //批量添加
                request.add(new IndexRequest("item")
                        .id(itemDoc.getId().toString())
                        .source(MAPPER.writeValueAsString(itemDoc), XContentType.JSON));
            }
            //发送请求
            client.bulk(request, RequestOptions.DEFAULT);
            page++;
        }
    }
2.ES查询相关
package cn.itcast.hotel;

/**
 * 查询文档
 */
@SpringBootTest
public class HotelSearchTest {
    @Autowired
    private IHotelService hotelService;

    private RestHighLevelClient client;

    //初始化RestHighLevelClient
    @BeforeEach
    void setUp() {
        this.client = new RestHighLevelClient(RestClient.builder(
                HttpHost.create("http://192.168.145.100:9200")
        ));
    }

    //关闭RestHighLevelClient
    @AfterEach
    void tearDown() throws IOException {
        this.client.close();
    }

    //查询文档快速入门:查询全部
    @SneakyThrows
    @Test
    void testMatchAll() {
        //准备request
        SearchRequest request = new SearchRequest("hotel");
        //准备DSL
        request.source().query(QueryBuilders.matchAllQuery());
        //发送请求
        SearchResponse response = client.search(request, RequestOptions.DEFAULT);
        handleResponse(response);
    }

    /**
     * 解析查询出的结果为java对象
     */
    private void handleResponse(SearchResponse response) {
        //解析结果
        SearchHits searchHits = response.getHits();
        //获取总条数
        long total = searchHits.getTotalHits().value;
        System.out.println("查询到总条数为:" + total);

        //获取结果数组
        SearchHit[] hits = searchHits.getHits();
        for (SearchHit hit : hits) {
            //获取source
            String json = hit.getSourceAsString();
            //转换为java对象
            HotelDoc hotelDoc = JSON.parseObject(json, HotelDoc.class);

            //获取高亮结果
            Map<String, HighlightField> highlightFields = hit.getHighlightFields();
            if (!CollectionUtils.isEmpty(highlightFields)) {
                //根据字段名获取高亮结果
                HighlightField highlightField = highlightFields.get("name");
                if (highlightField != null) {
                    //获取高亮值
                    String name = highlightField.getFragments()[0].string();
                    //覆盖非高亮结果
                    hotelDoc.setName(name);
                }
            }
            System.out.println(hotelDoc);
        }
    }

    //查询文档:单字段
    @SneakyThrows
    @Test
    void testMatch() {
        //准备request
        SearchRequest request = new SearchRequest("hotel");
        //准备DSL
        request.source().query(QueryBuilders.matchQuery("all", "如家"));

        //发送请求
        SearchResponse response = client.search(request, RequestOptions.DEFAULT);
        handleResponse(response);
    }

    //查询文档:按条件查询-->bool
    @SneakyThrows
    @Test
    void testBool() {
        //准备request
        SearchRequest request = new SearchRequest("hotel");
        //准备DSL
        //准备boolQuery
        BoolQueryBuilder boolQuery = QueryBuilders.boolQuery();
        //添加term条件
//        boolQuery.must(QueryBuilders.termQuery("city", "杭州"));
        //添加range过滤条件
        boolQuery.filter(QueryBuilders.rangeQuery("price").lte(250));
        request.source().query(boolQuery);

        //响应
        SearchResponse response = client.search(request, RequestOptions.DEFAULT);
        handleResponse(response);
    }

    //分页和排序
    @SneakyThrows
    @Test
    void testPageAndSort() {
        //模拟前端传递的页码参数
        int page = 1, size = 5;
        //准备request
        SearchRequest request = new SearchRequest("hotel");
        //准备DSL
        request.source().query(QueryBuilders.matchAllQuery());
        //添加排序条件
        request.source().sort("price", SortOrder.ASC);
        //添加分页条件
        request.source().from((page - 1) * size).size(5);
        //发送请求
        SearchResponse response = client.search(request, RequestOptions.DEFAULT);
        handleResponse(response);
    }

    //高亮
    @Test
    void testHighlight() throws IOException {
        //准备request
        SearchRequest request = new SearchRequest("hotel");
        //准备DSL
        //query
        request.source().query(QueryBuilders.matchQuery("all", "如家"));
        //高亮
        request.source().highlighter(new HighlightBuilder().field("name").requireFieldMatch(false));
        //发送请求
        SearchResponse response = client.search(request, RequestOptions.DEFAULT);
        //解析响应
        handleResponse(response);
    }
}
三:MQ高级
1.消息可靠性
1.生产者消息确认
作用:确保消息投递到RabbitMQ的队列中
1.application.yml配置
logging:
  pattern:
    dateformat: HH:mm:ss:SSS
  level:
    cn.itcast: debug
spring:
  rabbitmq:
    host: 192.168.200.129 # rabbitMQ的ip地址
    port: 5672 # 端口
    username: qincun
    password: 123456
    virtual-host: /
    publisher-confirm-type: correlated        #异步回调,定义ConfirmCallback
    publisher-returns: true     #定义ReturnCallback
    template:
      mandatory: true     #true,则调用ReturnCallback;false:则直接丢弃消息
2.消息发送者配置
package cn.itcast.mq.config;

/**
 * 消息发送者
 * 每个RabbitTemplate只能配置一个ReturnCallback,因此需要在项目加载时配置
 * 异步回调,定义ConfirmCallback,MQ返回结果时会回调这个ConfirmCallback
 */
@Slf4j
@Configuration
public class CommonConfig implements ApplicationContextAware {
    @Override
    public void setApplicationContext(ApplicationContext applicationContext) throws BeansException {
        // 获取RabbitTemplate
        RabbitTemplate rabbitTemplate = applicationContext.getBean(RabbitTemplate.class);
        // 设置ReturnCallback			new   ReturnCallback
        rabbitTemplate.setReturnCallback((message, replyCode, replyText, exchange, routingKey) -> {
            // 投递失败,记录日志
            log.info("消息发送失败,应答码{},原因{},交换机{},路由键{},消息{}",
                    replyCode, replyText, exchange, routingKey, message.toString());
            // 如果有业务需要,可以重发消息
        });
    }
}
消息发送的格式:
 		@Autowired
    private RabbitTemplate rabbitTemplate;

    /**
     * 生产者消息确认
     * 发送消息时
     * 定义ConfirmCallback
     */
    @Test
    public void testSendMessage2SimpleQueue1() throws InterruptedException {
        String exchange = "simple.direct";
        String queue = "simple.queue";
        String key = "simple";
        String message = "hello, yyyy 永远的神!";
        CorrelationData correlationData = new CorrelationData(UUID.randomUUID().toString());
        // 3.添加callback
        correlationData.getFuture().addCallback(new SuccessCallback<CorrelationData.Confirm>() {
            @Override
            public void onSuccess(CorrelationData.Confirm confirm) {
                if (confirm.isAck()) {
                    //消息成功
                    log.debug("消息发送成功, ID:{}", correlationData.getId());
                } else {
                    //消息失败
                    log.error("消息发送失败, ID:{}, 原因{}", correlationData.getId(), confirm.getReason());
                }
            }
        }, new FailureCallback() {
            @Override
            public void onFailure(Throwable throwable) {
                log.error("消息发送异常, ID:{}, 原因{}", correlationData.getId(), throwable.getMessage());
            }
        });
        //发送消息
        rabbitTemplate.convertAndSend(exchange, key, message, correlationData);

        // 休眠一会儿,等待ack回执
        Thread.sleep(2000);
    }
2.消息持久化
1.交换机持久化
- 事实上,默认情况下,由SpringAMQP声明的交换机都是持久化的。照常声明就行
2.队列持久化
- 事实上,默认情况下,由SpringAMQP声明的队列都是持久化的。
    /**
     * 队列持久化
     */
    @Test
    public void testSendMessage2SimpleQueue2() throws InterruptedException {
        //发送消息
        String message = "滴滴滴";
        rabbitTemplate.convertAndSend("simple.direct", message);
    }
3.消息持久化
- 默认情况下,SpringAMQP发出的任何消息都是持久化的,不用特意指定。
    /**
     * 消息持久化
     */
    @Test
    public void testMessage2() throws InterruptedException {
        //消息持久化
        Message message = MessageBuilder.withBody("ddd".getBytes(StandardCharsets.UTF_8))
                .setDeliveryMode(MessageDeliveryMode.PERSISTENT)
                .build();
        //消息id,需要封装到
        CorrelationData correlationData = new CorrelationData(UUID.randomUUID().toString());

        rabbitTemplate.convertAndSend("error.direct", message,correlationData);
        log.debug("发送消息成功");
    }
3.消费者消息确认
作用:通过消费者回执来确认消费者是否成功处理消息的:消费者获取消息后,应该向RabbitMQ发送ACK回执,表明自己已经处理消息。
SpringAMQP配置确认模式:
- auto:自动ack,由spring监测listener代码是否出现异常,没有异常则返回ack;抛出异常则返回nack
1.application.yml配置
logging:
  pattern:
    dateformat: HH:mm:ss:SSS
  level:
    cn.itcast: debug
spring:
  rabbitmq:
    host: 192.168.200.129 # rabbitMQ的ip地址
    port: 5672 # 端口
    username: qincun
    password: 123456
    virtual-host: /
    listener:
      simple:
        prefetch: 1
        acknowledge-mode: auto  #关闭ack
        retry:
          enabled: true #开启消费者重试
          initial-interval: 1000    # 初始的失败等待时长为1秒
          multiplier: 1   # 失败的等待时长倍数,下次等待时长 = multiplier * last-interval
          max-attempts: 3     # 最大重试次数
          stateless: true     # true无状态;false有状态。如果业务中包含事务,这里改为false
4.消费失败重试机制
1.本地重试
利用Spring的retry机制,在消费者出现异常时利用本地重试,而不是无限制的requeue到mq队列。
spring:
  rabbitmq:
    listener:
      simple:
        retry:
          enabled: true # 开启消费者失败重试
          initial-interval: 1000 # 初识的失败等待时长为1秒
          multiplier: 1 # 失败的等待时长倍数,下次等待时长 = multiplier * last-interval
          max-attempts: 3 # 最大重试次数
          stateless: true # true无状态;false有状态。如果业务中包含事务,这里改为false
结论:
- 开启本地重试时,消息处理过程中抛出异常,不会requeue到队列,而是在消费者本地重试
- 重试达到最大次数后,Spring会返回ack,消息会被丢弃
2.失败策略
建议策略为:RepublishMessageRecoverer:重试耗尽后,将失败消息投递到指定的交换机
package cn.itcast.mq.config;
/**
 * 消费者
 */
@Configuration
public class ErrorMessageConfig {
  	//在 消费者服务中 定义处理失败消息的交换机和队列
    @Bean
    public DirectExchange errorMessageExchange(){
        return new DirectExchange("error.direct");
    }
    @Bean
    public Queue errorQueue(){
        return new Queue("error.queue", true);
    }
    @Bean
    public Binding errorBinding(Queue errorQueue, DirectExchange errorMessageExchange){
        return BindingBuilder.bind(errorQueue).to(errorMessageExchange).with("error");
    }

  	//定义一个RepublishMessageRecoverer,关联队列和交换机
    @Bean
    public MessageRecoverer republishMessageRecoverer(RabbitTemplate rabbitTemplate){
        return new RepublishMessageRecoverer(rabbitTemplate, "error.direct", "error");
    }
}
总结
如何确保RabbitMQ消息的可靠性?
- 开启生产者确认机制,确保生产者的消息能到达队列
- 开启持久化功能,确保消息未消费前在队列中不会丢失
- 开启消费者确认机制为auto,由spring确认消息处理成功后完成ack
- 开启消费者失败重试机制,并设置MessageRecoverer,多次重试失败后将消息投递到异常交换机,交由人工处理
2.死信交换机
1.死信交换机
1.含义
当一个队列中的消息满足下列情况之一时,可以成为死信(dead letter):
- 消费者使用basic.reject或 basic.nack声明消费失败,并且消息的requeue参数设置为false
- 消息是一个过期消息,超时无人消费
- 要投递的队列消息满了,无法投递
2.处理
队列将死信投递给死信交换机时,必须知道两个信息:
- 死信交换机名称
- 死信交换机与死信队列绑定的RoutingKey
这样才能确保投递的消息能到达死信交换机,并且正确的路由到死信队列。
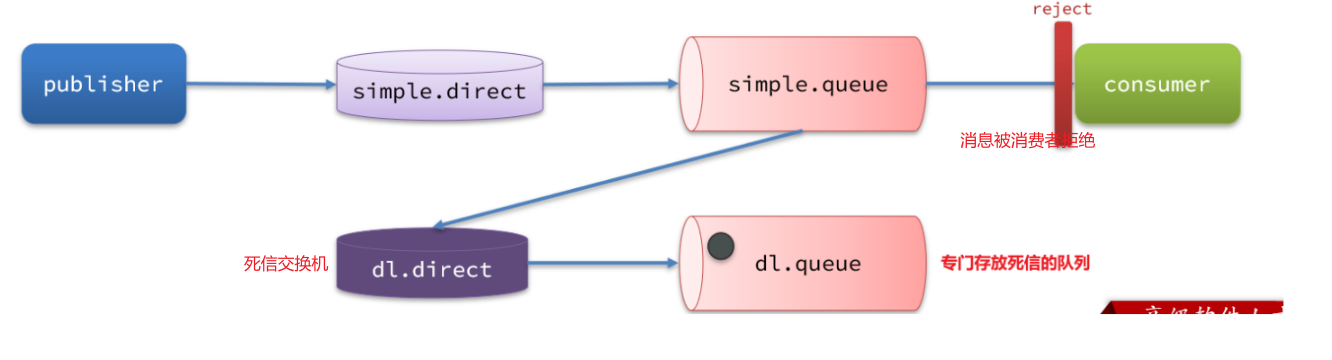

3.利用死信交换机接收死信(拓展)
在消费者服务中,定义一组死信交换机、死信队列:
// 声明普通的 simple.queue队列,并且为其指定死信交换机:dl.direct
@Bean
public Queue simpleQueue2(){
    return QueueBuilder.durable("simple.queue") // 指定队列名称,并持久化
        .deadLetterExchange("dl.direct") // 指定死信交换机
        .build();
}
// 声明死信交换机 dl.direct
@Bean
public DirectExchange dlExchange(){
    return new DirectExchange("dl.direct", true, false);
}
// 声明存储死信的队列 dl.queue
@Bean
public Queue dlQueue(){
    return new Queue("dl.queue", true);
}
// 将死信队列 与 死信交换机绑定
@Bean
public Binding dlBinding(){
    return BindingBuilder.bind(dlQueue()).to(dlExchange()).with("simple");
}
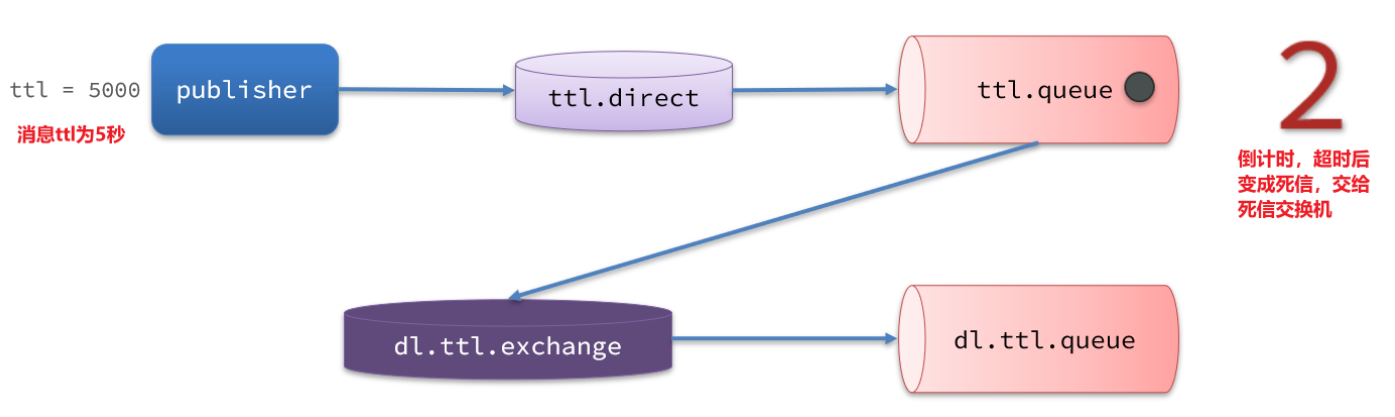
2.TTL
一个队列中的消息如果超时未消费,则会变为死信,超时分为两种情况:
- 消息所在的队列设置了超时时间
- 消息本身设置了超时时间
2.1.接收超时死信的死信交换机
在消费者服务的SpringRabbitListener中,定义一个新的消费者,并且声明 死信交换机、死信队列:
@RabbitListener(bindings = @QueueBinding(
    value = @Queue(name = "dl.ttl.queue", durable = "true"),
    exchange = @Exchange(name = "dl.ttl.direct"),
    key = "ttl"
))
public void listenDlQueue(String msg){
    log.info("接收到 dl.ttl.queue的延迟消息:{}", msg);
}
2.2.声明一个队列,并且指定TTL
要给队列设置超时时间,需要在声明队列时配置x-message-ttl属性:
@Bean
public Queue ttlQueue(){
    return QueueBuilder.durable("ttl.queue") // 指定队列名称,并持久化
        .ttl(10000) // 设置队列的超时时间,10秒
        .deadLetterExchange("dl.ttl.direct") // 指定死信交换机
        .build();
}
注意,这个队列设定了死信交换机为dl.ttl.direct
声明交换机,将ttl与交换机绑定:
@Bean
public DirectExchange ttlExchange(){
    return new DirectExchange("ttl.direct");
}
@Bean
public Binding ttlBinding(){
    return BindingBuilder.bind(ttlQueue()).to(ttlExchange()).with("ttl");
}
发送消息,但是不要指定TTL:
@Test
public void testTTLQueue() {
    // 创建消息
    String message = "hello, ttl queue";
    // 消息ID,需要封装到CorrelationData中
    CorrelationData correlationData = new CorrelationData(UUID.randomUUID().toString());
    // 发送消息
    rabbitTemplate.convertAndSend("ttl.direct", "ttl", message, correlationData);
    // 记录日志
    log.debug("发送消息成功");
}
2.3.发送消息时,设定TTL
在发送消息时,也可以指定TTL:
@Test
public void testTTLMsg() {
    // 创建消息
    Message message = MessageBuilder
        .withBody("hello, ttl message".getBytes(StandardCharsets.UTF_8))
        .setExpiration("5000")
        .build();
    // 消息ID,需要封装到CorrelationData中
    CorrelationData correlationData = new CorrelationData(UUID.randomUUID().toString());
    // 发送消息
    rabbitTemplate.convertAndSend("ttl.direct", "ttl", message, correlationData);
    log.debug("发送消息成功");
}
2.4.总结
消息超时的两种方式是?
- 给队列设置ttl属性,进入队列后超过ttl时间的消息变为死信
- 给消息设置ttl属性,队列接收到消息超过ttl时间后变为死信
如何实现发送一个消息20秒后消费者才收到消息?
- 给消息的目标队列指定死信交换机
- 将消费者监听的队列绑定到死信交换机
- 发送消息时给消息设置超时时间为20秒
3.延迟交换机(官方插件)
1. DelayExchange原理
DelayExchange需要将一个交换机声明为delayed类型。当我们发送消息到delayExchange时,流程如下:
- 接收消息
- 判断消息是否具备x-delay属性
- 如果有x-delay属性,说明是延迟消息,持久化到硬盘,读取x-delay值,作为延迟时间
- 返回routing not found结果给消息发送者
- x-delay时间到期后,重新投递消息到指定队列
2. 注解方式声明 延迟交换机
    /**
     * 声明DelayExchange交换机
     */
    @RabbitListener(bindings = @QueueBinding(
            value = @Queue(name = "delay.queue", durable = "true"),
            exchange = @Exchange(name = "delay.direct", durable = "true"),
            key = "delay"
    ))
    public void listenDelayQueue(String msg) {
        log.info("接收到{}",msg);
    }
3.发送消息
    /**
     * 延迟交换机实现延迟消息
     * 发送消息时,一定要携带x-delay属性,指定延迟的时间
     */
    @Test
    void testDelayedMsg() {
        //创建消息
        Message message = MessageBuilder.withBody("逍遥青春最快乐".getBytes(StandardCharsets.UTF_8))
                .setHeader("x-delay", 10000)
                .build();
        //消息ID,需要封装到CorrelationData中
        CorrelationData correlationData = new CorrelationData(UUID.randomUUID().toString());
        //发送消息
        rabbitTemplate.convertAndSend("delay.direct", "delay", message, correlationData);
        log.info("发送消息成功");
    }
4. 总结
延迟队列插件的使用步骤包括哪些?
•声明一个交换机,添加delayed属性为true
•发送消息时,添加x-delay头,值为超时时间
3. 惰性交换机
1.消息堆积问题
当生产者发送消息的速度超过了消费者处理消息的速度,就会导致队列中的消息堆积,直到队列存储消息达到上限。之后发送的消息就会成为死信,可能会被丢弃,这就是消息堆积问题。
2.惰性队列
从RabbitMQ的3.6.0版本开始,就增加了Lazy Queues的概念,也就是惰性队列。惰性队列的特征如下:
- 接收到消息后直接存入磁盘而非内存
- 消费者要消费消息时才会从磁盘中读取并加载到内存
- 支持数百万条的消息存储
3.声明惰性队列
1.基于@Bean声明lazy-queue
    @Bean
    public Queue lazyQueue() {
        return QueueBuilder
                .durable("lazy.queue")
                .lazy()//开启x-queue-mode 为lazy
                .build();
    }
2.基于@RabbitListener声明LazyQueue
    @RabbitListener(queuesToDeclare = @Queue(
            name = "lazy.queue",
            durable = "true",
            arguments =@Argument(name = "x-queue-mode",value = "lazy")
    ))
    public void listenLazyQueue(String msg) {
        log.info("接收到{}",msg);
    }
总 结
消息堆积问题的解决方案?
- 队列上绑定多个消费者,提高消费速度
- 使用惰性队列,可以再mq中保存更多消息
惰性队列的优点有哪些?
- 基于磁盘存储,消息上限高
- 没有间歇性的page-out,性能比较稳定
惰性队列的缺点有哪些?
- 基于磁盘存储,消息时效性会降低
- 性能受限于磁盘的IO
4.MQ集群
1. Java代码创建仲裁队列:
@Bean
public Queue quorumQueue() {
    return QueueBuilder
        .durable("quorum.queue") // 持久化
        .quorum() // 仲裁队列
        .build();
}
2.SpringAMQP连接MQ集群
注意:这里用address来代替host、port方式
spring:
  rabbitmq:
    addresses: 192.168.150.105:8071, 192.168.150.105:8072, 192.168.150.105:8073
    username: itcast
    password: 123321
    virtual-host: /
超过了消费者处理消息的速度,就会导致队列中的消息堆积,直到队列存储消息达到上限。之后发送的消息就会成为死信,可能会被丢弃,这就是消息堆积问题。
2.惰性队列
从RabbitMQ的3.6.0版本开始,就增加了Lazy Queues的概念,也就是惰性队列。惰性队列的特征如下:
- 接收到消息后直接存入磁盘而非内存
- 消费者要消费消息时才会从磁盘中读取并加载到内存
- 支持数百万条的消息存储
3.声明惰性队列
1.基于@Bean声明lazy-queue
    @Bean
    public Queue lazyQueue() {
        return QueueBuilder
                .durable("lazy.queue")
                .lazy()//开启x-queue-mode 为lazy
                .build();
    }
2.基于@RabbitListener声明LazyQueue
    @RabbitListener(queuesToDeclare = @Queue(
            name = "lazy.queue",
            durable = "true",
            arguments =@Argument(name = "x-queue-mode",value = "lazy")
    ))
    public void listenLazyQueue(String msg) {
        log.info("接收到{}",msg);
    }
总 结
消息堆积问题的解决方案?
- 队列上绑定多个消费者,提高消费速度
- 使用惰性队列,可以再mq中保存更多消息
惰性队列的优点有哪些?
- 基于磁盘存储,消息上限高
- 没有间歇性的page-out,性能比较稳定
惰性队列的缺点有哪些?
- 基于磁盘存储,消息时效性会降低
- 性能受限于磁盘的IO
4.MQ集群
1. Java代码创建仲裁队列:
@Bean
public Queue quorumQueue() {
    return QueueBuilder
        .durable("quorum.queue") // 持久化
        .quorum() // 仲裁队列
        .build();
}
2.SpringAMQP连接MQ集群
注意:这里用address来代替host、port方式
spring:
  rabbitmq:
    addresses: 192.168.150.105:8071, 192.168.150.105:8072, 192.168.150.105:8073
    username: itcast
    password: 123321
    virtual-host: /


 1443
1443


 被折叠的 条评论
为什么被折叠?
被折叠的 条评论
为什么被折叠?
 到【灌水乐园】发言


