


本篇文章是学习Java EE框架整合开发入门到实战的学习笔记,如有错误请加以指正,共同进步。
1.Spring简介
Spring是一个轻量级的开发框架,是为了解决应用开发的业务逻辑和其他层的耦合问题。
2.Spring的体系结构
Spring框架现如今集成了20多个模块,模块分别分布在核心容器、数据访问/集成层、web层、AOP编程、植入模块、消息传输和测试模块等。
2.1Spring当中的核心容器
Spring的核心容器是其他模块建立的的基础,由 Spring -core、 Spring beans 、Spring context、 Spring-context-support、 Spring expression Spring 表达式语言)等模块组成。
Spring-core 模块 提供了框架的基本组成部分 包括控制反转( Inersion of Control, loC ),依赖注入( Depend nc Injection , DI )功能。 Spring-beans 模块: 提供 BeanFactory 是工厂模式的 经典实现,Spring 将管理对象 称为 Bean。Spring-context模块:建立在前两个模块的基础之上,提供一个框架式的对象访问方式,是访问定义和配置的任何对象的媒介ApplicationContext接口是Context模块的焦点。Spring-context-support模块:支持第三库Spring应用上下文,特别是高速缓存和任务调度的支持。Spring-expression模块:提供了强大的表达式语言支持运行时查询和操作对象图。
2.2AOP 和Instrumentation
Spring-aop模块:提供了一个AOP要求的面向切面的编程实现,允许定义方法拦截器和切入点,将代码进行分离。 Spring-aspects模块:提供了与Aspectj的集成功能,Aspectj是一个功能强大且成熟的aop的框架。Spring instrument 模块提供了类植入( Ins trumentation )支持和类加载器的 现, 可以在特定的应用服务器中使用。
2.3数据访问和集成
数据访问/集成由jdbc,ORM,OXM,JMS和事务模块组成。Spring-jdbc模块:提供了一个jdbc的抽象层,消除了繁琐的jdbc编码和数据库厂商特有的错误代码解析。
2.4 消息
该模块提供了对消息对传递体系结构和协议的支持。
2.5web
web层由Spring-web,Spring-webmvc,spring-websocket和Portlet模块组成。
2.6测试
Spring-test模块支持使用junit和TestNg对spring组件进行单元测试和集成测试。
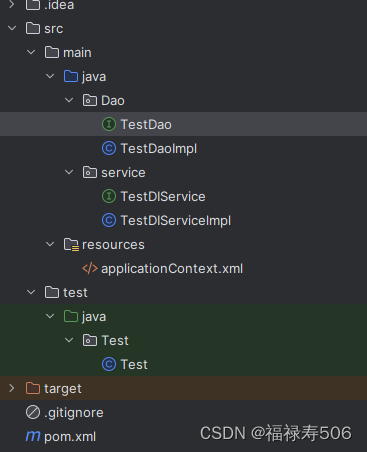
3.简单的spring入门程序
因为spring解决的是面向业务逻辑层和其他层的分离耦合问题,因此需要将面向接口编程的思想运用彻底。创建一个Dao层:
package Dao;

public interface TestDao {
    public void sayHello();

}
再创建一个dao层的实现类:
package Dao;

public class TestDaoImpl implements TestDao
{

    public void sayHello() {
        System.out.println("hello,springIoc");
    }
}
接着配置文件使用maven下载包,配置pom.xml代码如下:
<?xml version="1.0" encoding="UTF-8"?>
<project xmlns="http://maven.apache.org/POM/4.0.0"
         xmlns:xsi="http://www.w3.org/2001/XMLSchema-instance"
         xsi:schemaLocation="http://maven.apache.org/POM/4.0.0 http://maven.apache.org/xsd/maven-4.0.0.xsd">
    <modelVersion>4.0.0</modelVersion>

    <groupId>org.example</groupId>
    <artifactId>ssm2</artifactId>
    <version>1.0-SNAPSHOT</version>
    <dependencies>
        <dependency>
            <groupId>org.springframework</groupId>
            <artifactId>spring-context</artifactId>
            <version>4.3.11.RELEASE</version>
        </dependency>
    </dependencies>


</project>
在资源目录resources当中配置applicationContext文件:
<?xml version="1.0" encoding="UTF-8" ?>
<beans xmlns:xsi="http://www.w3.org/2001/XMLSchema-instance"
       xmlns="http://www.springframework.org/schema/beans"
       xsi:schemaLocation="http://www.springframework.org/schema/beans http://www.springframework.org/schema/beans/spring-beans.xsd" default-autowire="byName">

    <bean id="Test" class="Dao.TestDaoImpl"/>
</beans>
id表示的是这个对象的唯一标识,class表示的是实现类。
最后编写测试类运行:
package Test;
import  Dao.TestDao;
import org.springframework.context.ApplicationContext;
import org.springframework.context.support.ClassPathXmlApplicationContext;
import service.TestDIService;

public class Test {
    public static void main(String [] args){
        ApplicationContext appcon = new ClassPathXmlApplicationContext("applicationContext.xml");
        TestDao tt=(TestDao}appCon . getBean (”test” ) ;
        tt.sayHello();
    }
}
4.Spring Ioc
控制反转 (Iveion of Control, Io )是一个 较抽象的概念,是 Spring 框架的核心 ,用来消减计算机程序的耦合性。控制反转还有一种说法,叫做依赖注入。实现控制反转的是spring当中的ioc容器,其实方法是依赖注入。根据书上和自己的理解来就是,传统的面向对象编程,每次有一个对象就需要new出来,对于后期的修改增添了很多麻烦,因此委托容器进行配置,就像小明喜欢吃面包,但是为了省去每次想要吃面包都要自己去做的麻烦,可以委托面包店来制作各种各样的面包,只需要面包店根据配方来制作就行。
Spring ioc容器主要有两个核心一个是BeanFactory和ApplicationContext两个接口。
4.1BeanFactory
BeanFactory主要负责管理初始化各种Bean,该类会根据xml当中的配置来管理bean,如果使用则代码设置xml文件的路径要更改为绝对路径:
public static void main(String[] args) {
        BeanFactory beanFac=new XmlBeanFactory (
                new FileSystemResource ("D: \eclipse- workspace\chl\src\
            applicationContext . xml " );

TestDao tt=(TestDao)beanFac .getBean (”test” );
tt . sayHello ();

}
4.2ApplicationContext
Application是BeanFactory的子接口,也被叫做应用上下文,使ClassPathXmlApplicationContext创建,例如2.6当中就是这样创建的。另外一种则是通过FileSystemXmlApplicationContext创建的。代码改写如下:
package Test;
import  Dao.TestDao;
import org.springframework.context.ApplicationContext;
import org.springframework.context.support.ClassPathXmlApplicationContext;
import service.TestDIService;

public class Test {
    public static void main(String [] args){
        ApplicationContext appcon = new FileSystemXmlApplicationContext("applicationContext.xml");
        TestDao tt=(TestDao}appCon . getBean (”test” ) ;
        tt.sayHello();
    }
}
4.3通过web服务器实例化
此方法通过配置web.xml来进行配置,这里主要介绍前两种。
4.4依赖注入
依赖注入的主要作用是将对象和bean组件绑定在一起,spring框架的依赖注入通常由两种方式:构造方法注入,使用属性setter方法注入。
4.4.1构造方法注入
构造注入的实现方法,首先创建dao层,然后创建service层,在service当中使用构造方法,将dao层注入到service当中,然后通过修改xml文件,将service层和bean绑定在一起,具体实现如下:
在上src下创建一个service包,编写TestService接口,具体代码如下:
package service;

public interface TestDIService {
    public void sayHello();
}
实现类如下:
package service;
import Dao.TestDao;
public class TestDIServicelmpl implements TestDIService{
        private TestDao testDao;
        public TestDIServicelmpl (TestDao testDao){
            super( );
            this.testDao = testDao;
        }
        public void sayHello(){
            testDao.sayHello();
        }
}
application.xml代码如下:
<?xml version="1.0" encoding="UTF-8" ?>
<beans xmlns:xsi="http://www.w3.org/2001/XMLSchema-instance"
       xmlns="http://www.springframework.org/schema/beans"
       xsi:schemaLocation="http://www.springframework.org/schema/beans http://www.springframework.org/schema/beans/spring-beans.xsd" default-autowire="byName">

    <bean id="Test" class="Dao.TestDaoImpl"/>
    <bean id="testDIService" class="service.TestDIServicelmpl">
       <constructor-arg index="0" ref="Test"/>
    </bean>
</beans>
测试类如下:
package Test;
import  Dao.TestDao;
import org.springframework.context.ApplicationContext;
import org.springframework.context.support.ClassPathXmlApplicationContext;
import service.TestDIService;

public class Test {
    public static void main(String [] args){
        ApplicationContext context = new ClassPathXmlApplicationContext("applicationContext.xml");
        TestDIService ts =(TestDIService) context.getBean("testDIService");
        ts.sayHello();
    }
}
4.4.2setter注入方法
setter注入方法主要是修改service当中的代码,在实现类当中用setter方法,和修改配置文件当中的代码,具体如下:
    package service;
    import Dao.TestDao;
    public class TestDIServicelmpl implements TestDIService{
            private TestDao testDao;
            public void setTestDao(TestDao testDao){

                this.testDao = testDao;
            }
            public void sayHello(){
                testDao.sayHello();
                System.out.println("TestDIService setter 已经成功注入");
            }
    }
<?xml version="1.0" encoding="UTF-8" ?>
<beans xmlns:xsi="http://www.w3.org/2001/XMLSchema-instance"
       xmlns="http://www.springframework.org/schema/beans"
       xsi:schemaLocation="http://www.springframework.org/schema/beans http://www.springframework.org/schema/beans/spring-beans.xsd" default-autowire="byName">

    <bean id="Test" class="Dao.TestDaoImpl"/>
    <bean id="testDIService" class="service.TestDIServicelmpl">
        <property name="testDao" ref="Test"/>
    </bean>
</beans>
测试代码如下:
public class Test {
    public static void main(String [] args){
        ApplicationContext con=new ClassPathXmlApplicationContext("applicationContext.xml");
        service service= (service) con.getBean("testDIService");
        service.sayHello();

    }
}
5.Spring Bean
5.1 Bean的配置
Spring可以看做一个工厂,用于生产和管理bean,如果要使用这个工厂管理和使用bean,需要将bean放在bean的配置文件里面,Spirng框架支持xml和Properties两种格式的配置文件。
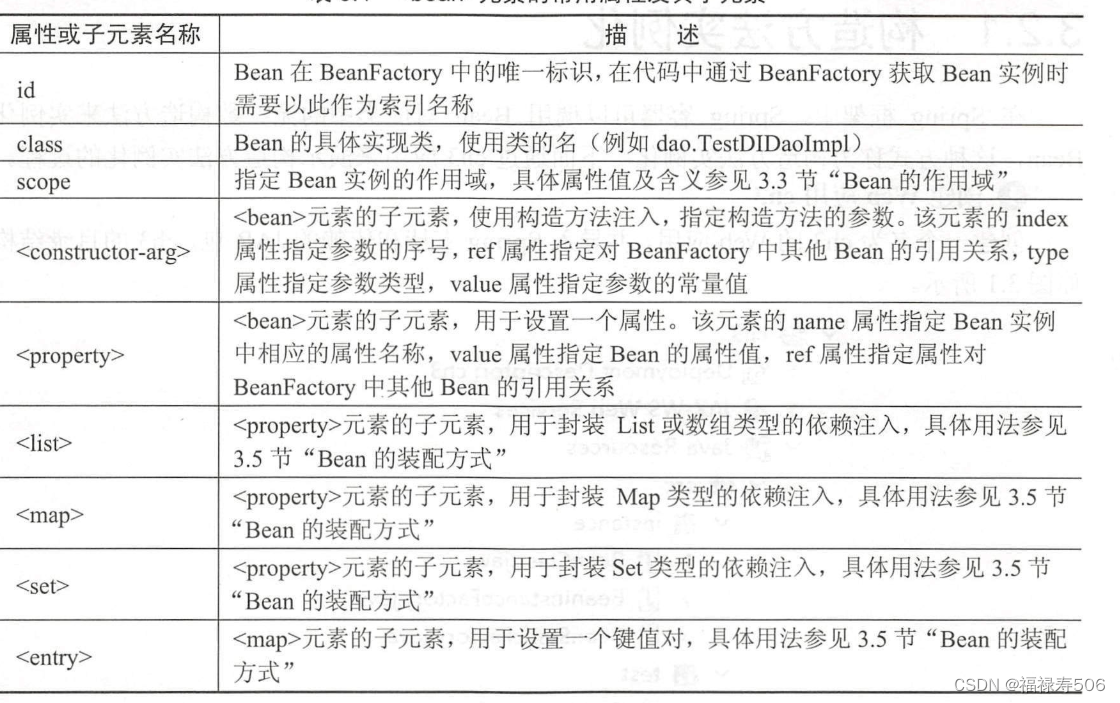
xml配置文件的根元素是<beans>,一个<beans>下面有多个bean,bean的常用元素以及子特性如下:
5.2 Bean的实例化
java当中的对象需要实例化之后才能使用,同样bean也需要实例化,目前的三种方法,构造方法实例化,静态工厂实例化,实例工厂实例化。其中最常用的就是构造方法实例化。
构造方法的实例化代码如下:
public class BeanClass {
    public String message;
    public BeanClass(){
        message="构造方法实例化message";
    }
    public BeanClass(String s) {
        message=s;
    }
}
静态工厂实例化:
public class BeanStaticFactory {
    private static BeanClass beanInstance=new BeanClass("调用静态工厂方法实例化Bean");

    public static BeanClass createBeanClass() {
        return beanInstance;
    }
}
实例工厂实例化:
public class BeanInstanceFactory {
    public BeanClass createBeanInstance()
    {
        return new BeanClass("调用实例化工厂实例化bean");
    }
}
xml配置文件:factory-method指定使用哪个方法实例化bean,factory-bean指定使用哪个工厂配置
<?xml version="1.0" encoding="UTF-8" ?>
<beans xmlns:xsi="http://www.w3.org/2001/XMLSchema-instance"
       xmlns="http://www.springframework.org/schema/beans"
       xsi:schemaLocation="http://www.springframework.org/schema/beans http://www.springframework.org/schema/beans/spring-beans.xsd" default-autowire="byName">
    <bean id="myfactory" class="org.example.instance.BeanInstanceFactory"/>
    <bean id="dao" class="org.example.Dao.DaoImpl"/>
    <bean id="serviceImpl" class="org.example.Service.serviveImpl">
        <constructor-arg index="0" ref="dao"/>
    </bean>

    <bean id="beanClass" class="org.example.instance.BeanClass"/>
    <bean id="beanStaticFactor" class="org.example.instance.BeanStaticFactory" factory-method="createBeanClass"/>
    <bean id="beanInstanceFactory" class="org.example.instance.BeanInstanceFactory" factory-bean="myfactory" factory-method="createBeanInstance"/>
</beans>
测试用例:
package Test;

import org.example.instance.BeanClass;
import org.springframework.context.ApplicationContext;
import org.springframework.context.support.ClassPathXmlApplicationContext;

public class Test1 {
    public static void main(String [] args){
        ApplicationContext context=new ClassPathXmlApplicationContext("applicationContext.xml");
        BeanClass b1=(BeanClass)context.getBean("beanClass");
        System.out.println(b1+b1.message);
        BeanClass b2=(BeanClass)context.getBean("beanStaticFactor");
        System.out.println(b2+b2.message);
        BeanClass b3=(BeanClass)context.getBean("beanInstanceFactory");
        System.out.println(b3+b3.message);
    }
}
运行结果如下图所示:

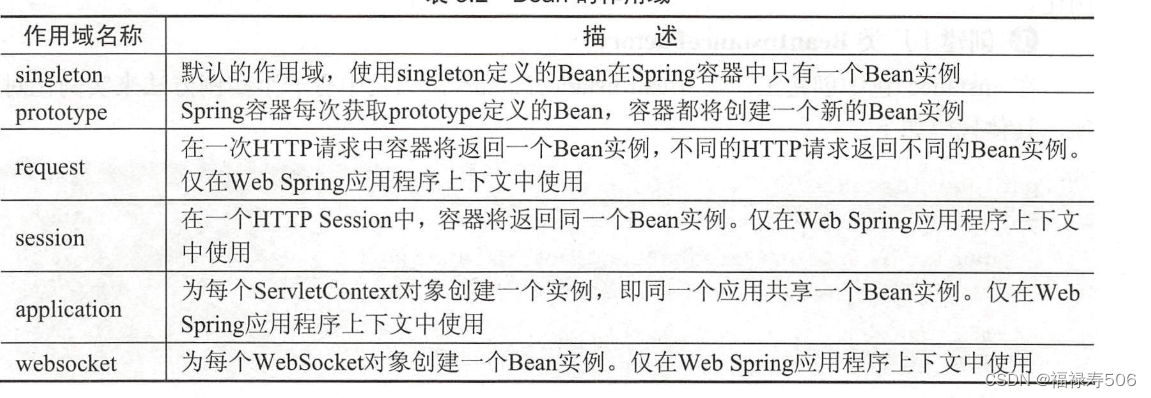
5.3 Bean的作用域
Spring当中不仅可以将bean实例化还可以指定他的作用域:
 5.4 Bean的生命周期
自己对生命周期的理解比较简单,概括以下结果流程:1、通过配置实例化bean;2、经过构造方法注入bean;3、bean通过启动类的方法实现了或者说是使用了bean;4、如果bean不在使用时就将其销毁,如果自己配置的有销毁方法,按照配置的方法进行销毁。
5.5 Bean的装配方式
bean的装配就是将bean依赖注入到Spring容器当中,装配的方式就是依赖注入的方式,有基于xml配置和注解配置,常用的是注解配置。
基于xml配置的代码如下:
package org.example.assemble;
import  java.util.*;
public class ComplexUser {
    private String uname;
    private List<String> list;
    private Map<String,String> map;
    private Set<String> set;
    /* 构造方法注入  */
    public ComplexUser(String uname, List<String> list, Map<String, String> map, Set<String> set) {

        this.uname=uname;
        this.list = list;
        this.map = map;
        this.set = set;

    }
    public ComplexUser()
    {
        super();
    }
    // setter注入
    public void setUname(String uname)
        {
            this.uname=uname;
        }
    public void setList(List<String> list) {
        this.list = list;
    }
    public void setMap(Map<String, String> map) {
        this.map = map;
    }

    public void setSet(Set<String> set) {
        this.set = set;
    }

    public String toString(){
    return "uname:"+uname+"list:"+list+"map:"+map+"set:"+set;}
}
xml
文件配置如下:
<?xml version="1.0" encoding="UTF-8" ?>
<beans xmlns:xsi="http://www.w3.org/2001/XMLSchema-instance"
       xmlns="http://www.springframework.org/schema/beans"
       xsi:schemaLocation="http://www.springframework.org/schema/beans http://www.springframework.org/schema/beans/spring-beans.xsd" default-autowire="byName">

    <!-- 引入属性文件 -->
    <bean id="user1" class="org.example.assemble.ComplexUser">
        <constructor-arg index="0" value="chenheng"/>
        <constructor-arg index="1">
            <list>
                <value>1</value>
                <value>2</value>
                <value>3</value>
            </list>
        </constructor-arg>
        <constructor-arg index="2">
            <map>
                <entry key="1" value="1"/>
                <entry key="2" value="2"/>
                <entry key="3" value="3"/>
            </map>
        </constructor-arg>
        <constructor-arg index="3">
            <set>
                <value>1</value>
                <value>2</value>
                <value>3</value>
            </set>
        </constructor-arg>
    </bean>

    <bean id="user2" class="org.example.assemble.ComplexUser">
            <property name="uname" value="chenheng2"/>
        <property name="list">
            <list>
                <value>1</value>
                <value>2</value>
                <value>3</value>
            </list>
        </property>
        <property name="map">
            <map>
                <entry key="1" value="1"/>
                <entry key="2" value="2"/>
                <entry key="3" value="3"/>
            </map>
        </property>
        <property name="set">
            <set>
                <value>1</value>
                <value>2</value>
                <value>3</value>
            </set>
        </property>
    </bean>

</beans>
xml配置虽然简单,但是当需要大量的bean的时候,配置文件会过于庞大,所以需要更推荐注解的方式来进行更新和维护。
注解配置代码如下:
package org.example.annotation;

import org.springframework.beans.factory.annotation.Value;
import org.springframework.stereotype.Component;

import java.util.List;
import java.util.Map;
import java.util.Set;
@Component()
public class AnnotationUser {


        @Value("chenhang")
        private String uname;
        private List<String> list;
        private Map<String,String> map;
        private Set<String> set;

        public void setUname(String uname)
        {
            this.uname=uname;
        }
        public void setList(List<String> list) {
            this.list = list;
        }
        public void setMap(Map<String, String> map) {
            this.map = map;
        }

        public void setSet(Set<String> set) {
            this.set = set;
        }

        public String toString(){
            return "uname:"+uname+"list:"+list+"map:"+map+"set:"+set;}


}
配置文件:
<?xml version="1.0" encoding="UTF-8"?>
<beans xmlns="http://www.springframework.org/schema/beans"
       xmlns:xsi="http://www.w3.org/2001/XMLSchema-instance"
       xmlns:context="http://www.springframework.org/schema/context"
       xsi:schemaLocation="http://www.springframework.org/schema/beans
                           http://www.springframework.org/schema/beans/spring-beans.xsd
                           http://www.springframework.org/schema/context
                           http://www.springframework.org/schema/context/spring-context.xsd">
    <context:component-scan base-package="org.example.annotation" />

 </beans>
测试代码:
public class Testannotation {
    public static void main(String [] args){
        ApplicationContext appCon=new ClassPathXmlApplicationContext("annotationContext.xml");
        AnnotationUser anno= (AnnotationUser) appCon.getBean("annotationUser");
        anno.setUname("张三");
        System.out.println(anno);
    }
}
在Spring4.0以上的版本,配置注解指定包中的注解进行扫描前需要事先导入 SpringAOP JAR spring aop 5.0.2.RELEASE.jar。
1.@Component :该注解是一个泛化的概念,仅仅表示一个组件对象(Bean),可以作用在任何一个层次上。
2.@Repository:该注解用于数据访问层(DAO)的类标识为Bean,和注解数据访问层Bean,其功能与@Component相同。
3.@Service:该注解用于标注一个业务逻辑层组件(Service层),其功能与Component相同。
4.@Controller:该注解用于标注业务逻辑层(Spring MVC当中的controller),与Component相同。
5.@Autowired:该注解可以对类成员变量、方法以及构造方法进行标注,完成自动装配的工作。通过使用@Autowired来消除setter和getter方法,默认按照Bean的类型进行装配。
6.@Resource:该注解与@Auto wired的功能一样,区别在于该注解默认是按照名称来装配的,只有的当找不到名称匹配的Bean时才会按照类型来装配注入;
7.@Qualifier:该注解和@Autowried注解配合使用,当@Autowired注解需要按照名称来装配注入时需要和该注解一起使用。
6.Spring AOP的基本概念
通过自己的学习,感觉这章比较难,aop(面向切面编程)和oop相辅相成,传统的oop无法处理日志产生的数据,通过横向抽取机制,利用aop可以很大的改善处理数据的性能。通过这位作者这篇博文可以更加理解一点aop:细说Spring——AOP详解(AOP概览)-CSDN博客![]() https://blog.csdn.net/q982151756/article/details/80513340?spm=1001.2014.3001.5506
https://blog.csdn.net/q982151756/article/details/80513340?spm=1001.2014.3001.5506
6.1 jdk动态代理
jdk动态代理是java.lang.reflect.*包提供的方式,它必须借助一个接口才能实现代理类,所以业务接口类的代码,默认使用jdk代理进行配置。下面举一个jdk代理实现的例子演示:
建立TestDao类:
package dynamic.jdk;

import org.springframework.stereotype.Repository;

@Repository("testDao")
public interface TestDao {
    public void save();
    public void modify();
    public void delete();

}
建立实现类:
package dynamic.jdk;

import org.springframework.stereotype.Repository;

@Repository("testDao")
public class TestDaoImpl implements TestDao{
    public void save()
    {
        System.out.println("保存");
    }
    public void modify()
    {
        System.out.println("修改");
    }
    public void delete(){
        System.out.println("删除");
    }
}
定义切面类:
package aspect;

public class MyAspect {
    public void check() {
        System.out.println("模拟权限控制");
    }
    public void except(){
        System.out.println("模拟异常处理");
    }
    public void log() {
        System.out.println("模拟日志记录");
    }
    public void  monitor(){
        System.out.println("模拟性能监控");
    }
}
创建代理类:
package dynamic.jdk;

import aspect.MyAspect;

import java.lang.reflect.InvocationHandler;
import java.lang.reflect.Method;
import java.lang.reflect.Proxy;

public class JDKDynamicProxy implements InvocationHandler {
    private TestDao testDao;
    public Object createProxy(TestDao testDao){
        this.testDao = testDao;
        ClassLoader cld =JDKDynamicProxy.class.getClassLoader();
        Class[] clazz = testDao.getClass().getInterfaces();
        return Proxy.newProxyInstance(cld,clazz,this);
    }

    @Override
    public Object invoke(Object proxy, Method method, Object[] args) throws Throwable {
        MyAspect myAspect = new MyAspect();
        Object obj=method.invoke(testDao,args);
        myAspect.check();
        myAspect.log();
        myAspect.monitor();
        return obj;
    }
}
这部分的代码是最重要的,通过cld创建类加载器,clazz为真实对象的所有代理接口数组,通过返回return Proxy.newProxyInstance(),里面的三个参数分别为类加载器,真实对象的接口数组,实现了InvocationHandler的方法,这里使用this说明已经实现了这个类的方法,就是下面那个invoke类,obj主要获取真实对象产生的方法。
创建测试类:
package dynamic.jdk;

public class JDKynamicProxyTest {
    public static void main (String[] args){
        JDKDynamicProxy jdkProxy = new JDKDynamicProxy();
        TestDao testDao = new TestDaoImpl();
        TestDao testDaoAdvice = (TestDao)jdkProxy.createProxy(testDao);
        testDaoAdvice.save();
        System.out.println("------------");
        testDaoAdvice.modify();
        System.out.println("------------");
        testDaoAdvice.delete();
    }


}
这里面最重要的是创建切面类,从而创建一个代理对象。创建切面类最重要的是实现InvocationHandler类,然后通过反射机制,调用method的invoke方法。
运行结果如图:
6.2 CGLB动态代理
对于jdk代理必须提供接口,而对于没有接口的代码,只能采用CGLB代理,CGLB代理是一个高性能开源的代码生成包,对指定的目标类生成一个子类,并对子类进行增强。在Spring Core当中已经集成了包,不需要额外导入。测试代码如下:
创建一个TestDao类:
public class testDao {
    public void save(){
        System.out.println("保存");
    }
    public void modify(){
        System.out.println("修改");
    }
    public void delete(){
        System.out.println("删除");
    }
}
创建代理类:
package dynamic.jdk.cglib;

import aspect.MyAspect;
import org.springframework.cglib.proxy.Enhancer;
import org.springframework.cglib.proxy.MethodInterceptor;
import org.springframework.cglib.proxy.MethodProxy;

import java.lang.reflect.Method;

public class CglibDynamicProxy implements MethodInterceptor {
    public Object createProxy(Object target)
    {
        Enhancer enhancer = new Enhancer();
        enhancer.setSuperclass(target.getClass());
        enhancer.setCallback(this);
        return  enhancer.create();
    }
    public Object intercept(Object proxy, Method method, Object[] args, MethodProxy methodProxy) throws Throwable
    {
        MyAspect myAspect = new MyAspect();
        myAspect.check();
        myAspect.except();
        Object obj = methodProxy.invokeSuper(proxy,args);
        myAspect.log();
        myAspect.monitor();
        return obj;
    }
}
测试类:
package dynamic.jdk.cglib;

import dynamic.jdk.TestDao;

public class TestCglib {
    public static void main(String [] args){
        CglibDynamicProxy cdp=new CglibDynamicProxy();
        testDao test=new testDao();
        TestDao testAdivce=(TestDao)cdp.createProxy(test);
        testAdivce.save();
        System.out.println("------");
        testAdivce.modify();
        System.out.println("------");
        testAdivce.delete();
        System.out.println("------");
    }
}
运行结果和之前是一样的,只不过对于java8以上的可能会出错。
6.3 基于代理类的AOP实现
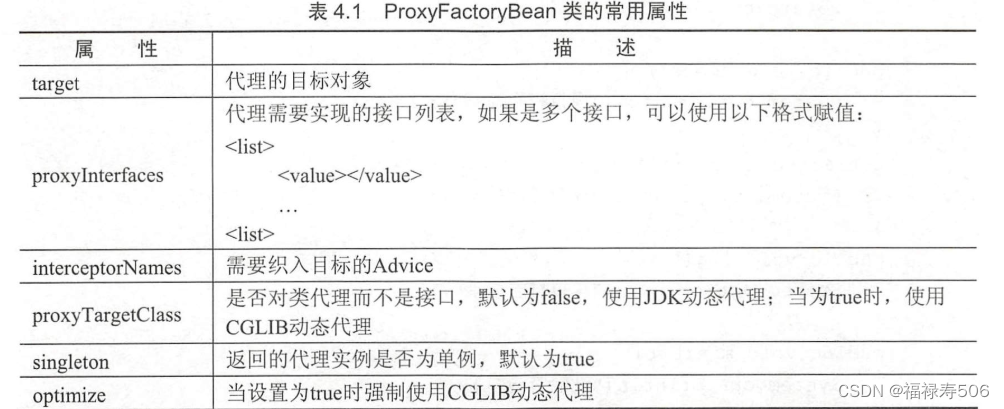
Spring当中默认基于jdk代理实现AOP编程,使用org.springframework.aop.framework.ProxyFactroyBean创建代理是Spring Aop实现的最基本方式。ProxyFactoryBean当中有六种通知类型,通知位于连接点的位置。
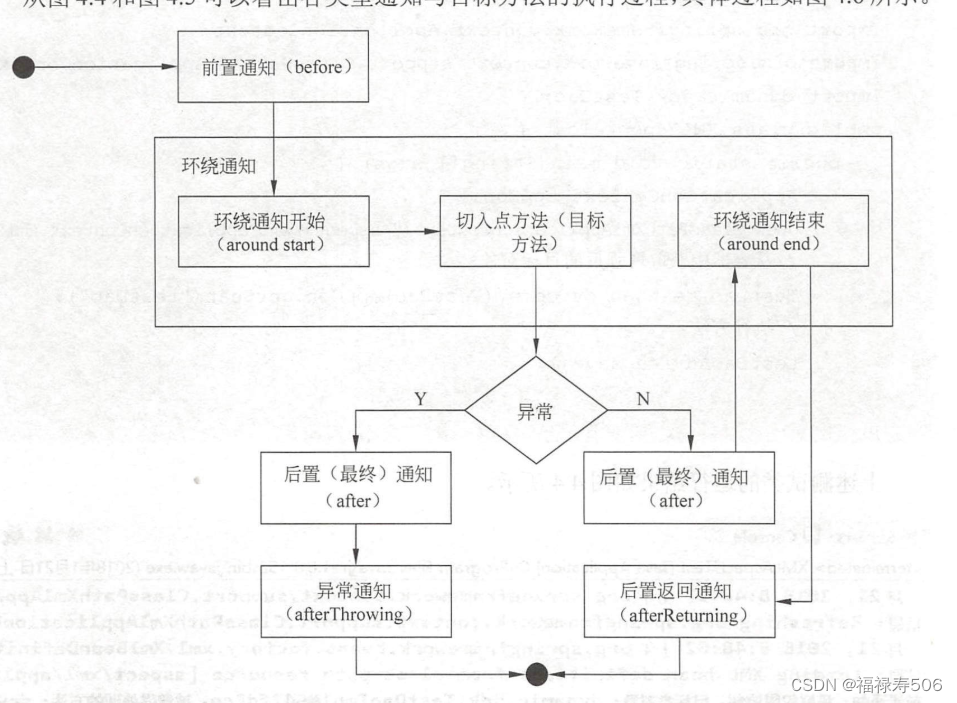
1.环绕通知:环绕通知是在目标方法执行前执行后实现增强,可以用来实现日志记录;2.前置通知:目标方法执行前实施增强;3,后置返回通知:目标方法成功执行后,实施增强;4,后置通知:不管目标方法是否执行成功,都要实施增强;5:异常通知:是在目标方法抛出异常之后,实施增强;6:引入通知:在目标当中添加一些新的方法。FactroyBean负责实例化一个bean,而ProxyFactroyBean负责为bean创建代理实例。
ProxyFactoryBean的常用属性如图:
 测试代码如下:
package proxyfactorybean;

import org.aopalliance.intercept.MethodInterceptor;
import org.aopalliance.intercept.MethodInvocation;

public class MyAspect implements MethodInterceptor {
    public Object invoke(MethodInvocation arg0) throws Throwable {
        check();
        expect();
        Object obj=arg0.proceed();
        log();
        monitor();
        return obj;
    }
    public void check(){
        System.out.println("检查权限");
    }
    public void expect(){
        System.out.println("检查期望");
    }
    public void log(){
        System.out.println("记录日志");
    }
    public void  monitor(){
        System.out.println("监控");
    }

}
配置文件:
<?xml version="1.0" encoding="UTF-8"?>
<!-- 定义Spring配置文件的版本和编码 -->
<beans xmlns="http://www.springframework.org/schema/beans"
       xmlns:xsi="http://www.w3.org/2001/XMLSchema-instance"
       xmlns:context="http://www.springframework.org/schema/context"
       xsi:schemaLocation="http://www.springframework.org/schema/beans
                           http://www.springframework.org/schema/beans/spring-beans.xsd
                           http://www.springframework.org/schema/context
                           http://www.springframework.org/schema/context/spring-context.xsd">

    <!-- 定义一个bean,id为testDao,类为dynamic.jdk.TestDaoImpl -->
    <bean id="testDao" class="dynamic.jdk.TestDaoImpl"/>

    <!-- 定义一个bean,id为myAspect,类为proxyfactorybean.MyAspect,用于切面编程 -->
    <bean id="myAspect" class="proxyfactorybean.MyAspect"/>

    <!-- 定义一个代理bean,id为testDaoproxy,使用org.springframework.aop.framework.ProxyFactoryBean类 -->
    <!-- 该代理用于对testDao bean进行切面编程增强,实现动态代理 -->
    <bean id="testDaoproxy" class="org.springframework.aop.framework.ProxyFactoryBean">
        <!-- 指定代理需要实现的接口,这里指定了dynamic.jdk.TestDao接口 -->
        <property name="proxyInterfaces" value="dynamic.jdk.TestDao"/>
        <!-- 指定代理的目标对象,即testDao bean -->
        <property name="target" ref="testDao"/>
        <!-- 指定使用的拦截器,即myAspect bean -->
        <property name="interceptorNames" value="myAspect"/>
        <!-- 指定是否使用CGLIB代理,这里设置为false,即使用JDK动态代理 -->
        <property name="proxyTargetClass" value="false"/>
    </bean>
测试代码如下:
package proxyfactorybean;

import dynamic.jdk.TestDao;
import org.springframework.context.ApplicationContext;
import org.springframework.context.support.ClassPathXmlApplicationContext;

public class Testa {
    public static void main(String [] args){
        ApplicationContext context = new ClassPathXmlApplicationContext("applicationContext.xml");
        TestDao testDao = (TestDao) context.getBean("testDaoproxy");
        testDao.save();
        System.out.println("--------");
        testDao.modify();
        System.out.println("--------");
        testDao.delete();
    }
}
6.4 基于XML配置开发Aspectj
Aspectj是一个基于java语言的AOP框架,使用Aspectj实现Spring的方法有两种,一是基于xml配置开发,一种是基于注解开发。
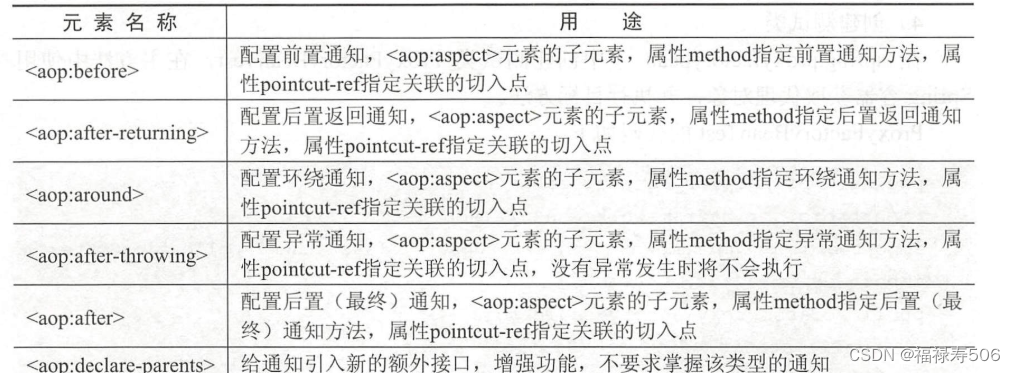
基于xml配置开发指的是,通过在xml当中配置定义切面,切入点以及通知,所有这些定义都必须在<aop:config>元素内,各个性质如图:

 创建切面类:
package aspectj.xml;

import org.aspectj.lang.JoinPoint;
import org.aspectj.lang.ProceedingJoinPoint;

public class MyAspect {
    public void before(JoinPoint jp){
        System.out.println("前置通知:模拟权限控制");
        System.out.println(",目标类对象:"+jp.getTarget()+",被增强处理的方法:"+jp
                .getSignature().getName());
    }
    public void afterReturning(JoinPoint jp){
        System.out.println("后置通知:模拟记录日志");
        System.out.println(",目标类对象:"+jp.getTarget()+",被增强处理的方法:"+jp
                .getSignature().getName());
    }
    public Object around(ProceedingJoinPoint pjp) throws Throwable{
        System.out.println("环绕开始:执行目标前,模拟开始事务");
        Object obj = pjp.proceed();
        System.out.println("环绕结束:执行目标后,模拟关闭事务");
        return obj;
}
public void except(Throwable e){
        System.out.println("异常通知:模拟记录异常日志");
        System.out.println(",异常信息:"+e.getMessage());
}
public void after(){
        System.out.println("最终通知:模拟释放资源");
}
}
编写配置文件:
<?xml version="1.0" encoding="UTF-8" ?>
<beans xmlns="http://www.springframework.org/schema/beans"
       xmlns:xsi="http://www.w3.org/2001/XMLSchema-instance"
       xmlns:aop="http://www.springframework.org/schema/aop"
       xsi:schemaLocation="http://www.springframework.org/schema/beans
        http://www.springframework.org/schema/beans/spring-beans.xsd
        http://www.springframework.org/schema/aop
        http://www.springframework.org/schema/aop/spring-aop.xsd">

    <bean id="testDao" class="aspectj.xml.TestDaoImpl"/>
    <bean id="myAspect" class="aspectj.xml.MyAspect"/>

    <aop:config>
        <!-- 修改切点表达式以更精确地匹配TestDaoImpl中的方法 -->
        <aop:pointcut expression="execution(* aspectj.xml.TestDaoImpl.*(..))" id="myPointCut"/>

        <aop:aspect ref="myAspect">
            <aop:before method="before" pointcut-ref="myPointCut"/>

            <!-- 环绕通知现在期望一个ProceedingJoinPoint参数 -->
            <aop:around method="around" pointcut-ref="myPointCut"/>

            <aop:after-returning method="afterReturning" pointcut-ref="myPointCut"/>

            <!-- 假设except方法能够处理Exception类型 -->
            <aop:after-throwing method="except" pointcut-ref="myPointCut" throwing="e"/>

            <aop:after method="after" pointcut-ref="myPointCut"/>
        </aop:aspect>
    </aop:config>
</beans>
编写测试类:
package aspectj.xml;

import org.springframework.context.ApplicationContext;
import org.springframework.context.support.ClassPathXmlApplicationContext;

public class XMLAspectJTest {
    public static void main(String[] args){
        ApplicationContext appCon=new ClassPathXmlApplicationContext("anntionContext.xml");
        TestDao testDao=(TestDao)appCon.getBean("testDao");
        testDao.save();
    }
}
运行结果: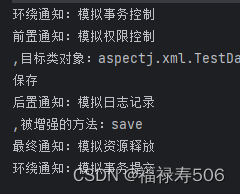
具体执行过程如图所示:
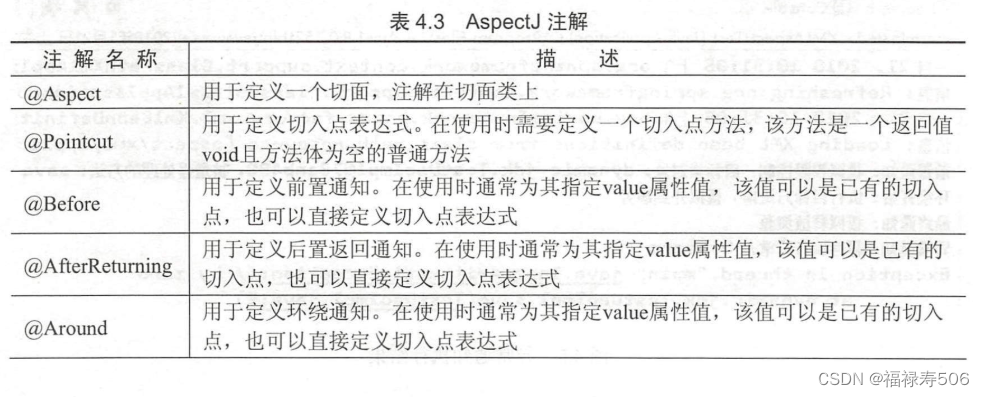
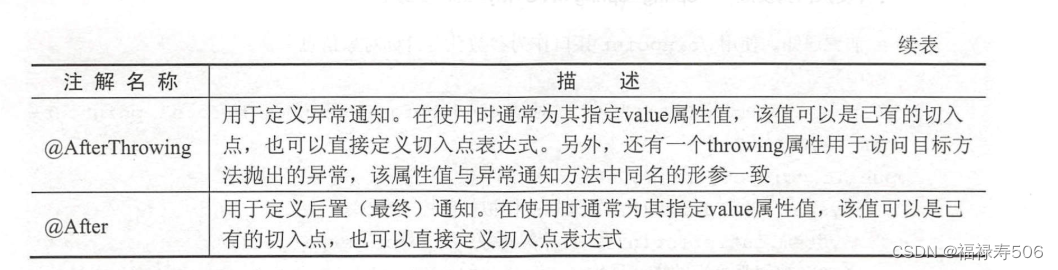
6.5 基于注解开发Aspectj
注解开发比xml配置简单的多,更加方便快捷。
创建注解切面类:
package aspectj.annotation;

import org.aspectj.lang.JoinPoint;
import org.aspectj.lang.ProceedingJoinPoint;
import org.aspectj.lang.annotation.*;
import org.springframework.stereotype.Component;

@Aspect
@Component
public class MyAspect {
    @Pointcut("execution(* aspectj.xml.TestDaoImpl.*(..))")
    private void myPointcut(){

    }
    @Before("myPointcut()")
    public void before(JoinPoint jp){
        System.out.println("前置通知:模拟权限控制");
        System.out.println(",目标类对象:"+jp.getTarget()
                +",代理对象:"+jp.getThis()+jp.getSignature().getName());
    }
    @AfterReturning("myPointcut()")
    public void afterReturning(JoinPoint jp){
        System.out.println("后置通知:模拟日志记录");
        System.out.println((",被增强的方法:"+jp.getSignature().getName()));
    }
    @Around("myPointcut()")
    public Object around(ProceedingJoinPoint pjp) throws Throwable{
        System.out.println("环绕通知:模拟事务控制");
        Object result = pjp.proceed();
        System.out.println("环绕通知:模拟事务提交");
        return result;
    }
    @AfterThrowing(value ="myPointcut()",throwing = "e")
    public void except(Throwable e){
        System.out.println("异常通知:模拟事务回滚");
    }
    @After("myPointcut()")
    public void after (){
        System.out.println("最终通知:模拟资源释放");
    }
}
配置文件:
<?xml version="1.0" encoding="UTF-8"?>

<beans xmlns="http://www.springframework.org/schema/beans"
       xmlns:xsi="http://www.w3.org/2001/XMLSchema-instance"
       xmlns:context="http://www.springframework.org/schema/context"
       xmlns:aop="http://www.springframework.org/schema/aop"
       xsi:schemaLocation="
       http://www.springframework.org/schema/beans
       http://www.springframework.org/schema/beans/spring-beans.xsd
       http://www.springframework.org/schema/context
       http://www.springframework.org/schema/context/spring-context.xsd
       http://www.springframework.org/schema/aop
       http://www.springframework.org/schema/aop/spring-aop.xsd">
    <context:component-scan base-package="aspectj.annotation"/>
    <context:component-scan base-package="aspectj.xml"/>
    <aop:aspectj-autoproxy/>
</beans>
测试与xml配置运行结果相同。
7.Spring的事务管理
7.1数据库编程
Spring数据库编程主要使用Spring jdbc模块的core和dataSource包,core是jdbc的核心包,包括常用的jdbc的核心包,jdbcTemplate类,dataSource包是访问数据源的工具类包,如果要使用Spring jdbc操作数据库,需要对其进行配置。Spring jdbcTemplate的常用方法有update和query两类,update可以对数据表进行增加、修改、删除等操作,query主要对数据表进行查询操作。下面演示一个Spring jdbc的使用过程:
在src下面创建配置文件application.xml,在该文件当中配置数据源和jdbc模块,配置jdbc模块时需要将dataSource注入到jdbcTemplate,而在数据访问层(DAO类)需要jdbcTemplate时也需要将jdbcTemplate注入到对应的Bean当中
<?xml version="1.0" encoding="UTF-8" ?>
<beans xmlns="http://www.springframework.org/schema/beans"
       xmlns:xsi="http://www.w3.org/2001/XMLSchema-instance"
       xmlns:context="http://www.springframework.org/schema/context"
       xsi:schemaLocation="http://www.springframework.org/schema/beans
       http://www.springframework.org/schema/beans/spring-beans.xsd
       http://www.springframework.org/schema/context
       http://www.springframework.org/schema/context/spring-context.xsd">
    <context:component-scan base-package="com.h5"/>
    <bean id="dataSource" class="org.springframework.jdbc.datasource.DriverManagerDataSource">
        <property name="driverClassName" value="com.mysql.cj.jdbc.Driver"/>
        <property name="url" value="jdbc:mysql://localhost:3306/csdnsql?characterEncoding=utf8"/>
        <property name="username" value="root"/>
        <property name="password" value="123456"/>
    </bean>
    <bean id="jdbcTemplate" class="org.springframework.jdbc.core.JdbcTemplate">
        <property name="dataSource" ref="dataSource"/>
    </bean>

</beans>
创建实体类:
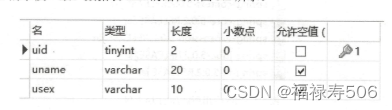
package com.h5;

public class MyUser {
    private Integer uid;
    private String uname;
    private String usex;
    public Integer getUid() {
        return uid;
    }
    public void setUid(Integer uid) {
        this.uid = uid;
    }
    public String getUname() {
        return uname;
    }
    public void setUname(String uname) {
        this.uname = uname;
    }
    public String getUsex() {
        return usex;
    }
    public void setUsex(String usex) {
        this.usex = usex;
    }
    @Override
    public String toString() {
        return "MyUser [uid=" + uid + ", uname=" + uname + ", usex=" + usex + "]";
    }
}
创建数据访问层Dao,创建TestDao接口和TestDaoImpl实现类 :在实现类TestDaoImo当中使用
jdbcTemplate访问数据库,并将该类注解为@Respository(“testdao”),需要使注解生效,需要再配置文件当中扫描。
package com.h5;

import java.util.List;

public interface TestDao {
    public int update(String sql,Object[] params);
    public List<MyUser> query(String sql, Object[] params);


}
package com.h5;

import org.springframework.beans.factory.annotation.Autowired;
import org.springframework.jdbc.core.BeanPropertyRowMapper;
import org.springframework.jdbc.core.JdbcTemplate;
import org.springframework.jdbc.core.RowMapper;
import org.springframework.stereotype.Repository;

import java.util.List;

@Repository("testDao")
public class TestDaoImpl implements TestDao{
    @Autowired

    private JdbcTemplate jdbcTemplate;
    @Override
    public int update(String sql,Object[] param){
        return jdbcTemplate.update(sql,param);
    }

    @Override
    public List<MyUser> query(String sql, Object[] param){
        RowMapper mapper=new BeanPropertyRowMapper<MyUser>(MyUser.class);
        return jdbcTemplate.query(sql,mapper,param);
    }
}
创建测试类:
package com.h5;

import org.springframework.context.ApplicationContext;
import org.springframework.context.support.ClassPathXmlApplicationContext;

import java.util.List;

public class TestSpringTest {
    public static void main(String [] args){
        ApplicationContext con=new ClassPathXmlApplicationContext("applicationContext.xml");
        TestDao td=(TestDao)con.getBean("testDao");
        String insertSql="insert into springtest values(null,?,?)";
        Object param1 []={"chenhang1","男"};
        Object param2 []={"chenhang2","男"};
        Object param3 []={"chenhang3","男"};
        td.update(insertSql,param1);
        td.update(insertSql,param2);
        td.update(insertSql,param3);
        String selectSql ="select*from springtest";
        List<MyUser> list=td.query(selectSql,null);
        for(MyUser u:list){
            System.out.println(u.getUid()+" "+u.getUname()+" "+u.getUsex());
        }
    }
}
7.2编程式事务管理
在代码当中显示调用beginTransaction、commit、rollback等与事务相关的方法。这就是编程式事务管理,只有当只有少数事务操作的时候,编程事务管理才比较合适。
7.2.1 基于底层API的编程式事务管理
基于底层的API的编程式事务管理就是根据几个核心的接口,通过编程的方式进行事务处理。
给数据配置事务管理器在applicationContext.xml当中
<bean id="txManager"
          class="org.springframework.jdbc.datasource.DataSourceTransactionManager">
          <property name="dataSource" ref="dataSource"/>
    </bean>
在dao层当中创建CodeTransaction,并添加数据访问层注解@Repository,代码如下:
package com.h5;

import org.springframework.beans.factory.annotation.Autowired;
import org.springframework.jdbc.core.JdbcTemplate;
import org.springframework.jdbc.datasource.DataSourceTransactionManager;
import org.springframework.stereotype.Repository;
import org.springframework.transaction.TransactionDefinition;
import org.springframework.transaction.TransactionStatus;
import org.springframework.transaction.support.DefaultTransactionDefinition;

@Repository("codeTransaction")
public class CodeTransaction {
    @Autowired
    private JdbcTemplate jdbcTemplate;
    @Autowired
    private DataSourceTransactionManager txManager;

    public String test(){
        TransactionDefinition tf=new DefaultTransactionDefinition();
        TransactionStatus ts=txManager.getTransaction(tf);
        String  message="执行成功,没有事务回滚";
        try{
            String sql="delete from springtest";
            String sql1="insert into springtest values(?,?,?)";
            Object param[]={1,"陈恒","男"};
            jdbcTemplate.update(sql);
            jdbcTemplate.update(sql1,param);
            jdbcTemplate.update(sql1, param);
            txManager.commit(ts);
        }catch(Exception e){
            txManager.rollback(ts);
            message="执行失败,事务回滚";
            e.printStackTrace();
        };
        return message;
    }
}
创建测试类:
package com.h5;

import org.springframework.context.ApplicationContext;
import org.springframework.context.support.ClassPathXmlApplicationContext;

public class TestCode {
    public static void main(String [] args){
        ApplicationContext con=new ClassPathXmlApplicationContext("applicationContext.xml");
        TranTest ct=(TranTest) con.getBean("tranTest");
        String result = ct.test();
        System.out.println(result);
    }
}
7.2.2基于TransactionTemplate的编程事务管理
事务处理的代码散落在业务代码中,破坏了原有代码的条理性,每个业务方法都包含了类似的启动事务、提交以及回滚事务的样板代码。TransactionTemplate的execute方法有一个TransactionCallback接口,并在当中定义了一个doInTtransaction方法,通常以匿名内部类的方式实现TransactionCallback接口,并在doInTtransaction方法当中书写业务逻辑代码。在这里可以使用默认的事务提交和回滚规则,在业务代码中不需要显示调用任何事物处理的API。根据默认规则,如果在执行回调方法的过程当中抛出了未检查异常,或者显示调用了setRollbackOnly方法,则回滚事务,如果事务执行完成或者抛出checked类型异常,则提交事务。具体步骤如下:
在applicationContexet当中添加事务模版:
 <bean id="transactionTemplate" class="org.springframework.transaction.support.TransactionTemplate">
        <property name="transactionManager" ref="txManager"/>
    </bean>
创建数据访问类,并添加注解:
package com.h5;

import org.springframework.beans.factory.annotation.Autowired;
import org.springframework.jdbc.core.JdbcTemplate;
import org.springframework.stereotype.Repository;
import org.springframework.transaction.TransactionStatus;
import org.springframework.transaction.support.TransactionCallback;
import org.springframework.transaction.support.TransactionTemplate;

@Repository("tranTest")
public class TranTest {
    @Autowired
    private JdbcTemplate jdbcTemplate;
    @Autowired
    private TransactionTemplate transactionTemplate;
    String message = "";

    public String test() {
        transactionTemplate.execute(new TransactionCallback<Object>() {
            @Override
            public Object doInTransaction(TransactionStatus arg0) {
                String sql = "delete from springtest";
                String sql1 = "insert into user vlaus(?,?,?)";
                Object params[] = {"1", "陈恒", "男"};

                try {
                    jdbcTemplate.update(sql, params);
                    jdbcTemplate.update(sql1, params);
                    jdbcTemplate.update(sql1, params);
                    message = "执行成功,没有事务回滚";
                } catch (Exception e) {
                    message = "主键重复,事务回滚";
                    e.printStackTrace();
                }
                return message;
            }
        });
        return message;
    }
}
测试类同之前一样。
7.3声明式事务管理
Spring的声明事务管理是通过AOP技术实现的事务管理,其本质是对方法前后进行拦截,然后在目标开始之前创建或者加入一个事务,在执行完目标方法之后根据执行情况提交或者回滚是事务。声明式事务管理最大的优点是不需要通过编程的方式管理事务,所以不需要在业务逻辑代码当中掺杂事务处理的代码,只需要相关的的事务规则声明便可以将事务规则应用到业务逻辑当中,通常情况下使用声明事务管理主要是为了防止业务代码被污染,声明式事务管理通过两种方式来实现,一种是基于xml配置,一种是基于注解的方式进行配置。
7.3.1 基于xml方式的声明式事务管理
是通过配置文件当中配置事务规则的相关声明来实现的,Spring框架提供了tx命名空间来配置事务, 提供<tx:advice>来配置事务得到通知。
创建dao层:
package com.statement.dao;

public interface TestDao {
    public int save(String sql,Object param[]);
    public int delete(String sql, Object param[]);
}
package com.statement.dao;

import org.springframework.beans.factory.annotation.Autowired;
import org.springframework.jdbc.core.JdbcTemplate;
import org.springframework.stereotype.Repository;

@Repository("testDao")
public class TestDaoImpl  implements TestDao{
    @Autowired
    private JdbcTemplate jdbcTemplate;
    @Override
    public int save(String sql,Object[] param){
        return jdbcTemplate.update(sql,param);
    }
    @Override
    public int delete(String sql, Object[] param) {
        return jdbcTemplate.update(sql, param);
    }
}
创建service层
package com.statement.service;

public interface TestService {
    public int save(String sql,Object param []);
    public int delete(String sql,Object param []);

}
package com.statement.service;
import com.statement.dao.TestDao;
import org.springframework.beans.factory.annotation.Autowired;
import org.springframework.stereotype.Repository;
import org.springframework.stereotype.Service;

//@Repository("testService")
@Service("testService")
public class TestServiceImpl implements  TestService{
    @Autowired
    private TestDao testDao;
    @Override
    public int save(String sql, Object[] param) {
        return testDao.save(sql, param);
    }
    @Override
    public int delete(String sql,Object[] param) {
        return testDao.delete(sql, param);
    }
}
创建Controller层:
package com.statement.Controller;

import com.statement.service.TestService;
import org.springframework.beans.factory.annotation.Autowired;
import org.springframework.stereotype.Controller;

@Controller("statementController")
public class StatementController {
    @Autowired
    private TestService testService;
    public String test(){
        String message ="";
        String deleteSql = "delete from springtest";
        String saveSql="insert into springtest values(?,?,?)";
        Object param[] ={1,"chenheng","男"};
        try {
            testService.delete(deleteSql,param);
            testService.save(saveSql,param);
            testService.save(saveSql,param);
        }catch(Exception e){
            message="主键重复,事务回滚";
            e.printStackTrace();
        }
        return message;
    }
}
编写配置文件:
<?xml version="1.0" encoding="utf-8" ?>
<beans xmlns="http://www.springframework.org/schema/beans"
       xmlns:xsi="http://www.w3.org/2001/XMLSchema-instance"
       xmlns:aop="http://www.springframework.org/schema/aop"
       xmlns:tx="http://www.springframework.org/schema/tx"
       xmlns:context="http://www.springframework.org/schema/context"
       xsi:schemaLocation="http://www.springframework.org/schema/beans
       http://www.springframework.org/schema/beans/spring-beans.xsd
       http://www.springframework.org/schema/context
       http://www.springframework.org/schema/context/spring-context.xsd
       http://www.springframework.org/schema/aop
       http://www.springframework.org/schema/aop/spring-aop.xsd
       http://www.springframework.org/schema/tx
       http://www.springframework.org/schema/tx/spring-tx.xsd">
    <context:component-scan base-package="com.statement"/>
    <bean id="dataSource" class="org.springframework.jdbc.datasource.DriverManagerDataSource">
        <property name="driverClassName" value="com.mysql.cj.jdbc.Driver"/>
        <property name="url" value="jdbc:mysql://localhost:3306/csdnsql?characterEncoding=utf8"/>
        <property name="username" value="root"/>
        <property name="password" value="123456"/>
    </bean>
    <bean id="jdbcTemplate" class="org.springframework.jdbc.core.JdbcTemplate">
        <property name="dataSource" ref="dataSource"/>
    </bean>
    <bean id="txManager"
          class="org.springframework.jdbc.datasource.DataSourceTransactionManager">
        <property name="dataSource" ref="dataSource"/>
    </bean>
    <tx:advice id="myAdvice" transaction-manager="txManager">
        <tx:attributes>
            <tx:method name="*"/>
        </tx:attributes>
    </tx:advice>
    <aop:config>
        <aop:pointcut id="txPointcut" expression="execution(* com.statement.service.*.*())"/>
        <aop:advisor advice-ref="myAdvice" pointcut-ref="txPointcut"/>
    </aop:config>
</beans>
创建测试类:
package com.statement.test;

import com.statement.Controller.StatementController;
import org.springframework.context.ApplicationContext;
import org.springframework.context.support.ClassPathXmlApplicationContext;

public class XMLTest {
    public static void main(String[] args){
        ApplicationContext con=new ClassPathXmlApplicationContext("xmlment.xml");

        StatementController ct=(StatementController)con.getBean("statementController");
        String result=ct.test();
        System.out.println(result);
    }
}
7.3.2基于@Transactional注解的声明式事务管理
@Transactional注解的声明式事务管理,可以作用于接口、接口方法、类以及类的方法上,当作用在类上时,该类的所有public方法都将具有该类型的事务属性,同时也可以在方法级别使用该注解来覆盖类级别的定义,注意它只有在使用基于接口的代理时才会生效。
创建配置文件:
<?xml version="1.0" encoding="utf-8" ?>
<beans xmlns="http://www.springframework.org/schema/beans"
       xmlns:xsi="http://www.w3.org/2001/XMLSchema-instance"
       xmlns:tx="http://www.springframework.org/schema/tx"
       xmlns:context="http://www.springframework.org/schema/context"
       xsi:schemaLocation="http://www.springframework.org/schema/beans
       http://www.springframework.org/schema/beans/spring-beans.xsd
       http://www.springframework.org/schema/context
       http://www.springframework.org/schema/context/spring-context.xsd
       http://www.springframework.org/schema/tx
       http://www.springframework.org/schema/tx/spring-tx.xsd">
  <context:component-scan base-package="com.statement"/>
    <bean id="dataSource" class="org.springframework.jdbc.datasource.DriverManagerDataSource">
        <property name="driverClassName" value="com.mysql.cj.jdbc.Driver"/>
        <property name="url" value="jdbc:mysql://localhost:3306/csdnsql?characterEncoding=utf8"/>
        <property name="username" value="root"/>
        <property name="password" value="123456"/>
    </bean>
    <bean id="jdbcTemplate" class="org.springframework.jdbc.core.JdbcTemplate">
        <property name="dataSource" ref="dataSource"/>
    </bean>
    <bean id="txManager"
          class="org.springframework.jdbc.datasource.DataSourceTransactionManager">
        <property name="dataSource" ref="dataSource"/>
    </bean>
    <tx:annotation-driven transaction-manager="txManager"/>
</beans>
在service层当中添加注解
package com.statement.service;
import com.statement.dao.TestDao;
import org.springframework.beans.factory.annotation.Autowired;
import org.springframework.stereotype.Repository;
import org.springframework.stereotype.Service;


@Service("testService")
@Transactional
public class TestServiceImpl implements  TestService{
    @Autowired
    private TestDao testDao;
    @Override
    public int save(String sql, Object[] param) {
        return testDao.save(sql, param);
    }
    @Override
    public int delete(String sql,Object[] param) {
        return testDao.delete(sql, param);
    }
}
测试同上。


 3万+
3万+


 被折叠的 条评论
为什么被折叠?
被折叠的 条评论
为什么被折叠?
 到【灌水乐园】发言


