


目录
正向代理
正向代理,架设在客户机与目标主机之间,只用于代理内部网络对Internet的连接请求,客户机必须指定代理服务器,并将本来要直接发送到Web服务器上的http请求发送到代理服务器中。

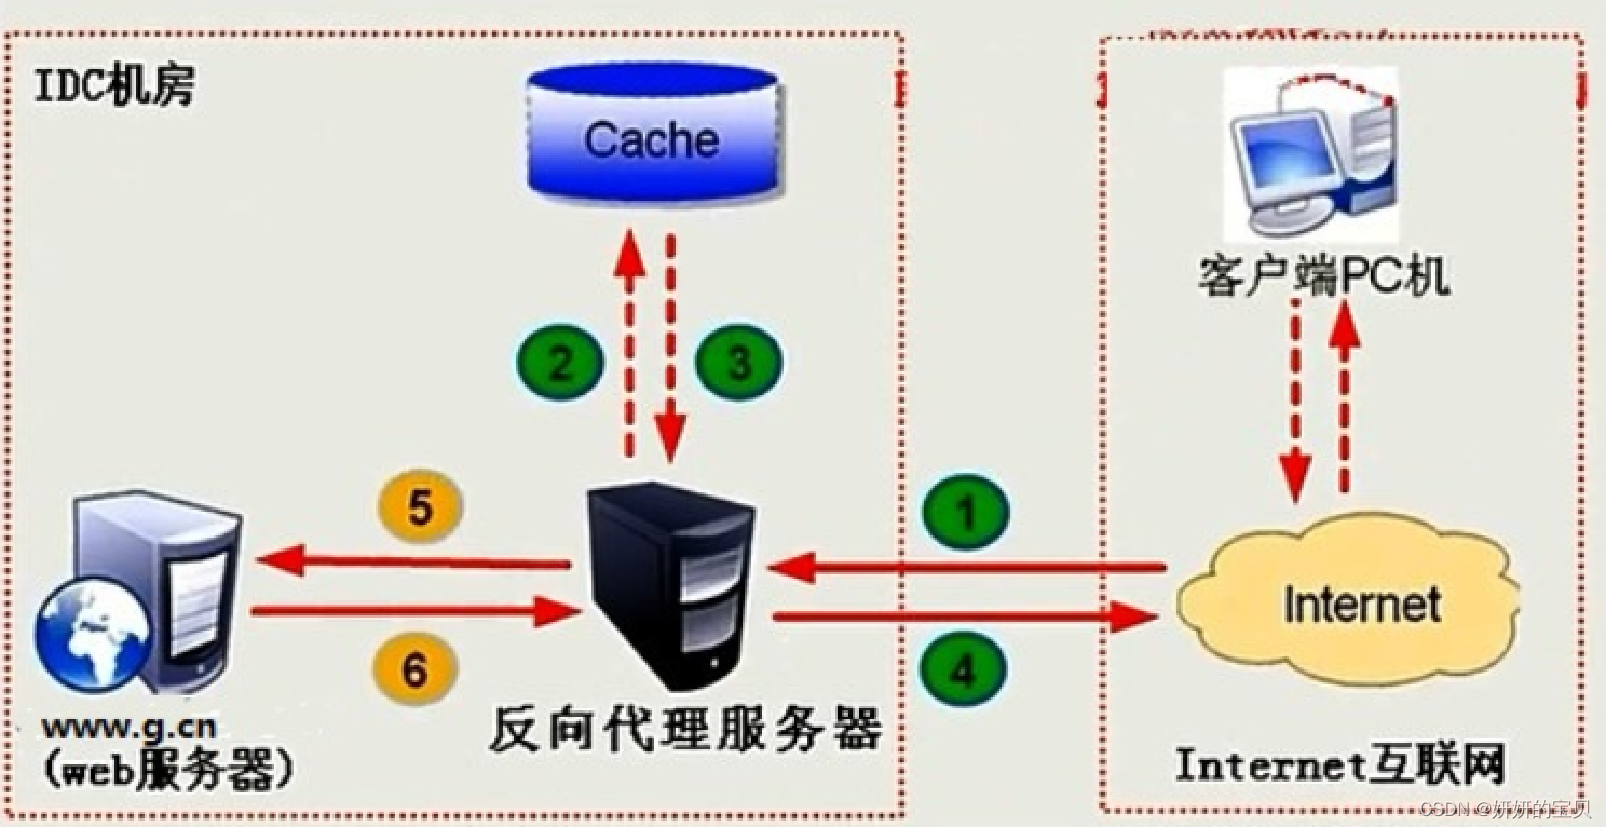
反向代理
反向代理服务器架设在服务器端,通过缓冲经常被请求的页面来缓解服务器的工作量,将客户机请求转发给内部网络上的目标服务器;并将从服务器上得到的结果返回给Internet上请求连接的客户端,此时代理服务器与目标主机一起对外表现为一个服务器。
1 正向代理
1.1 使用正向代理的作用
使用正向代理有多种目的和好处,主要包括但不限于以下几点:
-
访问控制与过滤:组织或公司可以利用正向代理作为访问互联网的唯一出口点,这样可以集中实施访问控制策略,过滤不适当的内容,或者限制对特定网站的访问,以提高网络安全和员工生产效率。
-
匿名性:正向代理可以隐藏客户端的真实IP地址,使得请求看起来像是从代理服务器发起的。这对于保护用户隐私,或者绕过基于IP的地理限制访问内容(如某些网站或服务仅对特定国家开放)非常有用。
-
缓存与加速:代理服务器可以缓存经常访问的网页或其他网络资源,当后续请求相同内容时,可以直接从缓存中快速提供,无需再次向原始服务器请求,从而加快访问速度,减少带宽消耗。
-
负载均衡与故障转移:虽然通常这是反向代理的功能,但正向代理也可以用于在多个后端服务器之间分配请求,以平衡负载,或者在某个服务器不可用时重定向请求至其他可用服务器。
-
合规性与审计:作为所有出站流量的单一出口点,正向代理可以用于记录和监控网络活动,帮助组织满足法规遵从性和审计需求。
-
突破网络限制:在存在严格网络限制的环境中(如学校、公司或某些国家),正向代理可以帮助用户访问原本被屏蔽的服务或内容。
-
节约带宽:通过压缩数据、去除重复内容等机制,正向代理有助于减少通过网络传输的数据量,特别是在带宽有限的网络环境中尤为重要。
正向代理通过提供额外的控制层、增强隐私保护、提升性能和协助遵守政策要求,为网络管理和用户访问提供了灵活性和便利性。
1.2 Nginx正向代理实战
代理服务器 192.168.239.137/24
客户端 192.168.239.155/24
nginx正向代理的功能
由于nginx正向代理的功能指令较少,只需要进行简单的配置即可
server {
    resolver 114.114.114.114;       #指定DNS服务器IP地址
    listen 8080;
    location / {
        proxy_pass http://$http_host$request_uri;     #设定代理服务器的协议和地址
    }
}
以上的配置只能访问80 端口的网站,而不能访问https443端口的网站,现在的网站基本上都是https的要解决技能访问http80端口也能访问https443端口的网站,需要置两个SERVER节点,一个处理HTTP转发,另一个处理HTTPS转发,而客户端都通过HTTP来访问代理,通过访问代理不同的端口,来区分HTTP和HTTPS请求。
由于原生 nginx 只支持 http 正向代理,为了 nginx 支持 https 正向代理,可以打 ngx_http_proxy_connect_module 补丁+ ssl 模块支持。
准备环境:
确保系统中安装了编译所需的工具和依赖,例如GCC、make、pcre-devel( pere 库 )、zlib-devel、openssl-devel(https)等。可以通过以下命令安装:
yum install gcc make pcre-devel zlib-devel openssl-devel1.2.1 下载对应版本的nginx(源码编译)
(因为需要进行源代码编译)
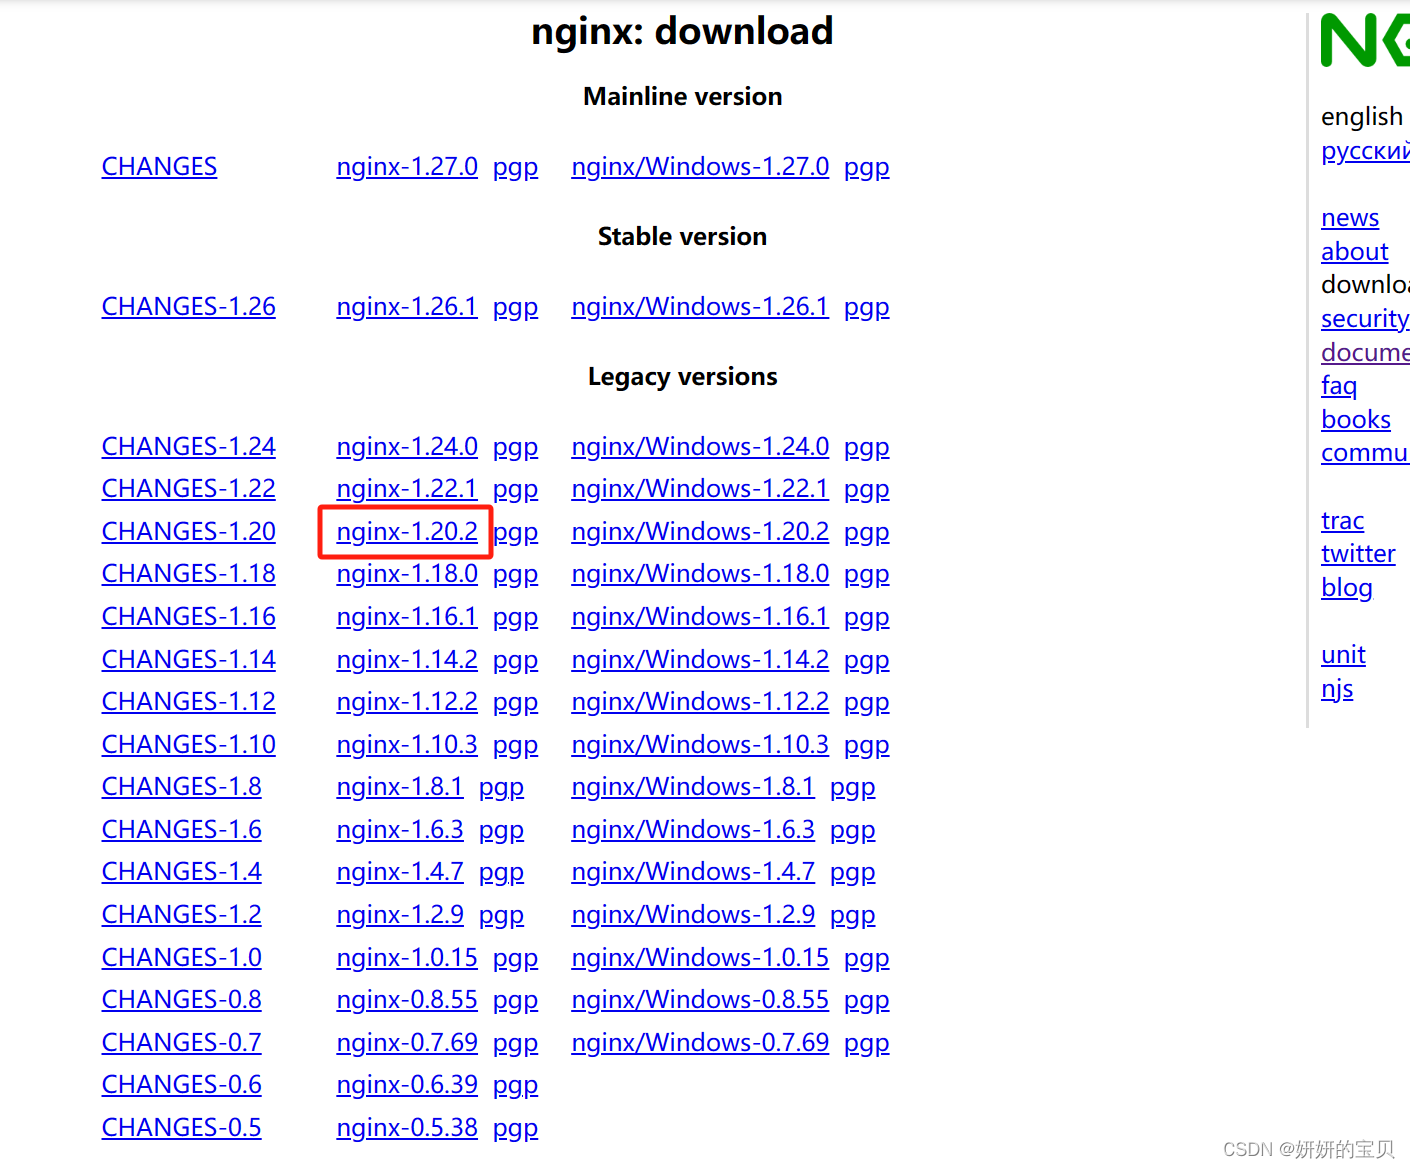
wget https://nginx.org/download/nginx-1.20.2.tar.gz
tar -zxvf nginx-1.15.12.tar.gz -C /usr/local/src
cd /usr/local/src
[root@web01 src] ls
nginx-1.20.2
[root@web01 src] cd nginx-1.20.2/
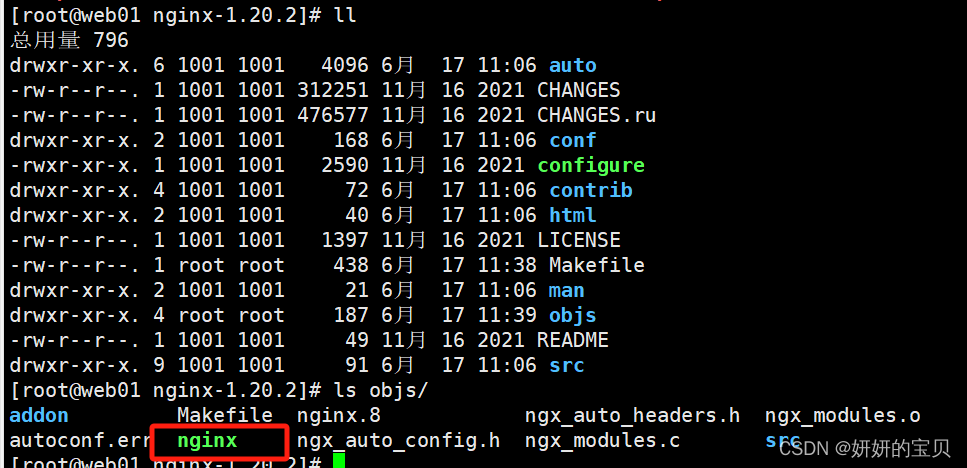
[root@web01 nginx-1.20.2] ll
总用量 796
drwxr-xr-x. 6 1001 1001 4096 6月 17 11:06 auto
-rw-r--r--. 1 1001 1001 312251 11月 16 2021 CHANGES
-rw-r--r--. 1 1001 1001 476577 11月 16 2021 CHANGES.ru
drwxr-xr-x. 2 1001 1001 168 6月 17 11:06 conf
-rwxr-xr-x. 1 1001 1001 2590 11月 16 2021 configure
drwxr-xr-x. 4 1001 1001 72 6月 17 11:06 contrib
drwxr-xr-x. 2 1001 1001 40 6月 17 11:06 html
-rw-r--r--. 1 1001 1001 1397 11月 16 2021 LICENSE
-rw-r--r--. 1 root root 438 6月 17 11:38 Makefile
drwxr-xr-x. 2 1001 1001 21 6月 17 11:06 man
drwxr-xr-x. 4 root root 187 6月 17 11:39 objs
-rw-r--r--. 1 1001 1001 49 11月 16 2021 README
drwxr-xr-x. 9 1001 1001 91 6月 17 11:06 src扩展
Nginx 的源码目录下通过 make 命令完成编译过程后,会得到一个二进制可执行文件,通常命名为 nginx。这个文件是在 objs 目录下生成的,它是 Nginx 的核心。
1.2.2 下载 https 代理模块
[root@web01 src] yum install git
[root@web01 src] git clone https://github.com/chobits/ngx_http_proxy_connect_module
[root@web01 src] cd nginx-1.20.2
[root@web01 nginx-1.20.2] ls
auto  CHANGES  CHANGES.ru  conf  configure  contrib  html  LICENSE  Makefile  man  ngx_http_proxy_connect_module  objs  README  src
[root@web01 src] ll ngx_http_proxy_connect_module/
总用量 108
-rw-r--r--. 1 root root   441 6月  17 11:05 config
-rw-r--r--. 1 root root  1499 6月  17 11:05 LICENSE
-rw-r--r--. 1 root root 64998 6月  17 11:05 ngx_http_proxy_connect_module.c
drwxr-xr-x. 2 root root  4096 6月  17 11:05 patch
-rw-r--r--. 1 root root 30373 6月  17 11:05 README.md
drwxr-xr-x. 2 root root   184 6月  17 11:05 t
当前目录ngx_http_proxy_connect_module下包含了一些文件和子目录,这些内容是与Nginx的ngx_http_proxy_connect_module第三方模块相关的。这个模块用于增强Nginx,使其支持HTTP CONNECT方法,从而能够作为正向代理处理SSL/TLS连接,尤其是对HTTPS流量的代理。
下面是列出的各文件和目录的简要说明:
config:这是配置文件,用来定义编译该模块时的一些特定配置或宏定义。LICENSE:包含该模块的许可协议信息。ngx_http_proxy_connect_module.c:核心源代码文件,实现了模块的功能。patch:这个子目录内包含了用于将该模块集成到Nginx源代码的补丁文件,README.md:自述文件,通常会包含模块的简介、安装指南、配置示例等重要信息。t:这个子目录可能包含一些测试脚本或示例,用于验证模块功能是否正常工作。
如果打算编译并安装这个模块到Nginx,一般流程包括:
- 阅读
README.md:了解详细的安装步骤、依赖关系以及任何特殊的配置要求。 - 应用补丁:根据
README.md的指导,选择合适的补丁文件,并应用到Nginx源代码中。 - 配置Nginx:在Nginx的
./configure命令中确保指定了该模块,例如,如果模块的配置文件或说明中有特定的--add-module参数,需要在配置时加入。 - 编译并安装Nginx:执行
make和make install命令完成编译和安装。 - 配置Nginx配置文件:在Nginx的配置文件(如
nginx.conf)中,根据模块的文档添加相应的配置指令以启用和配置HTTP CONNECT代理功能。
[root@web01 patch] ll /usr/local/src/ngx_http_proxy_connect_module/patch/
总用量 96
-rw-r--r--. 1 root root 9849 6月  17 11:05 proxy_connect_1014.patch
-rw-r--r--. 1 root root 9697 6月  17 11:05 proxy_connect.patch
-rw-r--r--. 1 root root 9408 6月  17 11:05 proxy_connect_rewrite_1014.patch
-rw-r--r--. 1 root root 9505 6月  17 11:05 proxy_connect_rewrite_101504.patch
-rw-r--r--. 1 root root 9496 6月  17 11:05 proxy_connect_rewrite_1015.patch
-rw-r--r--. 1 root root 9553 6月  17 11:05 proxy_connect_rewrite_1018.patch
-rw-r--r--. 1 root root 9306 6月  17 11:05 proxy_connect_rewrite_102101.patch
-rw-r--r--. 1 root root 9337 6月  17 11:05 proxy_connect_rewrite.patch
1.2.3 使用https代理模块对源代码修改
选择增加模块需要打补丁的版本

对 nginx 源码修改,这一步很重要,不然后面的 make 过不去
[root@web01 patch] patch -d /usr/local/src/nginx-1.20.2 -p 1 < /usr/local/src/ngx_http_proxy_connect_module/patch/proxy_connect_rewrite_1018.patch

patching file src/http/ngx_http_core_module.c
patching file src/http/ngx_http_parse.c
patching file src/http/ngx_http_request.c
patching file src/http/ngx_http_request.h
patching file src/http/ngx_http_variables.c

1.2.4 源码安装
指定安装的路径和关联的模块并且增加所需的模块
[root@web01 nginx-1.20.2] ./configure --prefix=/usr/local/nginx \
--with-http_stub_status_module \
--with-http_ssl_module \
--with-file-aio --with-http_realip_module \
--add-module=/usr/local/src/ngx_http_proxy_connect_module/

[root@web01 nginx-1.20.2] make

[root@web01 nginx-1.20.2] make install
查看安装情况
[root@web01 ~] tree /usr/local/nginx/
/usr/local/nginx/
├── conf
│   ├── fastcgi.conf
│   ├── fastcgi.conf.default
│   ├── fastcgi_params
│   ├── fastcgi_params.default
│   ├── koi-utf
│   ├── koi-win
│   ├── mime.types
│   ├── mime.types.default
│   ├── nginx.conf       # nginx主配置文件
│   ├── nginx.conf.default
│   ├── scgi_params
│   ├── scgi_params.default
│   ├── uwsgi_params
│   ├── uwsgi_params.default
│   └── win-utf
├── html
│   ├── 50x.html
│   └── index.html
├── logs
└── sbin
    └── nginx    #  Nginx 的二进制可执行文件,这是通过源码编译得到的 nginx 可执行程序,可以直接在这个目录下通过 ./nginx 命令启动 Nginx 服务器
安装版本信息查看
[root@web01 ~] /usr/local/nginx/sbin/nginx -V
nginx version: nginx/1.20.2
built by gcc 11.4.1 20231218 (Red Hat 11.4.1-3) (GCC)
built with OpenSSL 3.0.7 1 Nov 2022
TLS SNI support enabled
configure arguments: --prefix=/usr/local/nginx --with-http_stub_status_module
--with-http_ssl_module --with-file-aio
--with-http_realip_module --add-module=/usr/local/src/ngx_http_proxy_connect_module/
1.2.5 编写systemd 服务单元
# 创建Nginx服务单元文件
# 注意:确保你具有足够的权限来编辑系统配置文件

# 使用Vim编辑器打开或创建nginx.service文件
# 该文件位于systemd系统服务文件的目录下
# 通常,这个目录是/usr/lib/systemd/system
[root@web01 ~] vim /usr/lib/systemd/system/nginx.service

# 开始写入Nginx服务单元文件的配置
# [Unit] 部分
[Unit]
# 描述Nginx服务
Description=nginx - high performance web server
# 提供Nginx官方文档的链接
Documentation=http://nginx.org/en/docs/
# 指定Nginx应该在network.target和remote-fs.target之后启动
After=network.target remote-fs.target nss-lookup.target

# [Service] 部分
[Service]
# 服务类型为forking,这意味着主进程会在后台运行,并可能产生子进程
Type=forking
# 指定PID文件的位置,这用于追踪Nginx主进程
PIDFile=/run/nginx.pid
# 启动前预检查Nginx配置文件的正确性
ExecStartPre=/usr/local/nginx/sbin/nginx -t -c /usr/local/nginx/conf/nginx.conf
# 启动Nginx,指定配置文件的位置
ExecStart=/usr/local/nginx/sbin/nginx -c /usr/local/nginx/conf/nginx.conf
# 重新加载Nginx配置时发送HUP信号给主进程
ExecReload=/bin/kill -s HUP $MAINPID
# 停止Nginx时发送QUIT信号给主进程
ExecStop=/bin/kill -s QUIT $MAINPID
# 设置私有临时文件系统
PrivateTmp=true

# [Install] 部分
[Install]
# 当multi-user.target目标激活时,Nginx服务应启动
WantedBy=multi-user.target
[Unit]部分:
Description定义了服务的描述,这里是 "nginx - high performance web server"。Documentation提供了关于 Nginx 文档的 URL。After列出了此服务依赖的其他目标,Nginx 应该在网络服务和远程文件系统挂载完成后才开始。
[Service]部分:
Type=forking表明这是一个 forking 类型的服务,意味着主进程会在后台运行并可能产生子进程。PIDFile设置了用来跟踪主进程 PID 的文件位置。ExecStartPre在启动服务前执行预启动检查,这里使用nginx -t来测试配置文件的正确性。ExecStart定义了启动 Nginx 的命令,指定了配置文件的位置。ExecReload定义了重新加载 Nginx 配置的命令,使用HUP信号。ExecStop定义了停止 Nginx 的命令,使用QUIT信号。PrivateTmp设置了是否为服务提供私有临时文件系统。
[Install]部分:
WantedBy指定此服务应在 multi-user.target 这个目标实现时启动。
更新 systemd 的服务数据库
[root@web01 ~] systemctl daemon-reload1.2.6 修改nginx的主配置文件
[root@web01 ~] vim /usr/local/nginx/conf/nginx.conf
nginx中定义pid的路径必须与编写服务的pid对应,不然会报错
使用include参数同时读取 /usr/local/nginx/conf.d/*.conf 文件 --子配置文件12

1.2.7 定义子配置文件
[root@web01 ~] mkdir /usr/local/nginx/conf.d
[root@web01 ~] cd /usr/local/nginx/conf.d/
[root@web01 conf.d] vim aa.conf

server {
    listen       38080;

    # 解析域名

    resolver  8.8.8.8;

    # ngx_http_proxy_connect_module
    proxy_connect;
    proxy_connect_allow            443 563;
    proxy_connect_connect_timeout  10s;
    proxy_connect_read_timeout     10s;
    proxy_connect_send_timeout     10s;

    location / {
        proxy_pass $scheme://$http_host$request_uri;
    }
}
listen 38080;表示服务器监听38080端口接收请求。resolver 8.8.8.8;配置DNS解析器,使用Google的公共DNS服务器进行域名解析。proxy_connect;开启代理连接模块,通常用于处理HTTPS代理。proxy_connect_allow 443 563;允许代理连接到443(HTTPS标准端口)和563(通常用于某些加密的实时通信协议)端口。proxy_connect_connect_timeout 10s;,proxy_connect_read_timeout 10s;,proxy_connect_send_timeout 10s;分别设置了HTTPS代理连接的建立、读取和发送超时时间,均为10秒。location / { ... }匹配所有请求,并使用proxy_pass指令将请求代理到相同方案(HTTP或HTTPS)、相同主机和相同URI的地址。请注意,
proxy_pass语句中使用的变量$scheme,$http_host和$request_uri是从请求中捕获的,这样可以保持原始请求的完整性,当转发请求到后端时,这些变量将被替换为实际的请求值。
将启动nginx二进制文件创建软链接
[root@web01 sbin] ln -s /usr/local/nginx/sbin/nginx /usr/sbin/nginx
检查语法是否正确
[root@web01 ~] nginx -t
nginx: the configuration file /usr/local/nginx/conf/nginx.conf syntax is ok
nginx: configuration file /usr/local/nginx/conf/nginx.conf test is successful
重启nginx
[root@web01 ~] systemctl start nginx 或者 [root@web01 ~] nginx -s reload1.2.8 在客户端机器上做测试
代理服务器 192.168.239.137/24
客户端 192.168.239.155/24
使用
curl命令行工具加上-I选项时,请求获取的是目标网址的 HTTP 头信息,而不下载完整的页面内容。结合-v选项,curl会显示详细的交互过程,包括发送的请求和接收到的响应头信息。-x选项用于指定一个 HTTP 代理服务器,格式为IP:port。执行命令
curl -I https://www.baidu.com -v -x 192.168.239.137:38080将做以下事情:
- 发送一个 HEAD 请求到
https://www.baidu.com。- 使用位于
192.168.239.137的代理服务器,端口号为38080。- 显示详细的交互信息,包括
curl如何与代理服务器及目标服务器进行通信的细节。
HTTP
[root@LVS ~] curl -I http://www.baidu.com  -v -x 192.168.239.137:38080
*   Trying 192.168.239.137:38080...
* Connected to (nil) (192.168.239.137) port 38080 (#0)
> HEAD http://www.baidu.com/ HTTP/1.1
> Host: www.baidu.com
> User-Agent: curl/7.79.1
> Accept: */*
> Proxy-Connection: Keep-Alive
>
* Mark bundle as not supporting multiuse
< HTTP/1.1 200 OK
HTTP/1.1 200 OK
< Server: nginx/1.20.2
Server: nginx/1.20.2
< Date: Mon, 17 Jun 2024 08:47:58 GMT
Date: Mon, 17 Jun 2024 08:47:58 GMT
< Content-Type: text/html
Content-Type: text/html
< Content-Length: 277
Content-Length: 277
< Connection: keep-alive
Connection: keep-alive
< Accept-Ranges: bytes
Accept-Ranges: bytes
< Cache-Control: private, no-cache, no-store, proxy-revalidate, no-transform
Cache-Control: private, no-cache, no-store, proxy-revalidate, no-transform
< Etag: "575e1f71-115"
Etag: "575e1f71-115"
< Last-Modified: Mon, 13 Jun 2016 02:50:25 GMT
Last-Modified: Mon, 13 Jun 2016 02:50:25 GMT
< Pragma: no-cache
Pragma: no-cache

<
* Connection #0 to host (nil) left intact
HTTPS(需要增加https代理模块才能使用)
[root@LVS ~] curl -I https://www.baidu.com  -v -x 192.168.239.137:38080
*   Trying 192.168.239.137:38080...
* Connected to (nil) (192.168.239.137) port 38080 (#0)
* allocate connect buffer!
* Establish HTTP proxy tunnel to www.baidu.com:443
> CONNECT www.baidu.com:443 HTTP/1.1
> Host: www.baidu.com:443
> User-Agent: curl/7.79.1
> Proxy-Connection: Keep-Alive
>
< HTTP/1.1 200 Connection Established
HTTP/1.1 200 Connection Established
< Proxy-agent: nginx
Proxy-agent: nginx
<

* Proxy replied 200 to CONNECT request
* CONNECT phase completed!
* ALPN, offering h2
* ALPN, offering http/1.1
* successfully set certificate verify locations:
*  CAfile: /etc/pki/tls/certs/ca-bundle.crt
*  CApath: none
* TLSv1.3 (OUT), TLS handshake, Client hello (1):
* TLSv1.3 (IN), TLS handshake, Server hello (2):
* TLSv1.2 (IN), TLS handshake, Certificate (11):
* TLSv1.2 (IN), TLS handshake, Server key exchange (12):
* TLSv1.2 (IN), TLS handshake, Server finished (14):
* TLSv1.2 (OUT), TLS handshake, Client key exchange (16):
* TLSv1.2 (OUT), TLS change cipher, Change cipher spec (1):
* TLSv1.2 (OUT), TLS handshake, Finished (20):
* TLSv1.2 (IN), TLS handshake, Finished (20):
* SSL connection using TLSv1.2 / ECDHE-RSA-AES128-GCM-SHA256
* ALPN, server accepted to use http/1.1
* Server certificate:
*  subject: C=CN; ST=beijing; L=beijing; O=Beijing Baidu Netcom Science Technology Co., Ltd; CN=baidu.com
*  start date: Jul  6 01:51:06 2023 GMT
*  expire date: Aug  6 01:51:05 2024 GMT
*  subjectAltName: host "www.baidu.com" matched cert's "*.baidu.com"
*  issuer: C=BE; O=GlobalSign nv-sa; CN=GlobalSign RSA OV SSL CA 2018
*  SSL certificate verify ok.
> HEAD / HTTP/1.1
> Host: www.baidu.com
> User-Agent: curl/7.79.1
> Accept: */*
>
* Mark bundle as not supporting multiuse
< HTTP/1.1 200 OK
HTTP/1.1 200 OK
< Accept-Ranges: bytes
Accept-Ranges: bytes
< Cache-Control: private, no-cache, no-store, proxy-revalidate, no-transform
Cache-Control: private, no-cache, no-store, proxy-revalidate, no-transform
< Connection: keep-alive
Connection: keep-alive
< Content-Length: 277
Content-Length: 277
< Content-Type: text/html
Content-Type: text/html
< Date: Mon, 17 Jun 2024 08:34:49 GMT
Date: Mon, 17 Jun 2024 08:34:49 GMT
< Etag: "575e1f71-115"
Etag: "575e1f71-115"
< Last-Modified: Mon, 13 Jun 2016 02:50:25 GMT
Last-Modified: Mon, 13 Jun 2016 02:50:25 GMT
< Pragma: no-cache
Pragma: no-cache
< Server: bfe/1.0.8.18
Server: bfe/1.0.8.18

<
* Connection #0 to host (nil) left intact
为了让的系统能够通过正向代理服务器访问外网,可以按照以下步骤分别针对 yum、wget 和全局环境变量进行配置:
1.3 设置客户端指定代理服务器
1.3.1 Linux下
1. 配置 yum 使用正向代理
编辑 /etc/yum.conf 文件并添加代理信息:
vim /etc/yum.conf在文件中添加以下行:
proxy=http://192.168.239.137:38080或者,如果想同时配置 FTP 代理,可以添加:
proxy=http://192.168.239.137:38080
proxy=ftp://192.168.239.137:38080
2. 配置 wget 使用正向代理
编辑 /etc/wgetrc 文件并添加代理信息:
vim /etc/wgetrc在文件中添加以下行:
http_proxy=192.168.239.137:38080如果代理服务器同时支持 HTTPS,可以添加:
http_proxy=192.168.239.137:38080
https_proxy=192.168.239.137:38080
3. 配置全局环境变量以使用正向代理
编辑 /etc/profile 文件并添加代理环境变量:
vim /etc/profile在文件中添加以下行:
http_proxy=192.168.239.137:38080
https_proxy=192.168.239.137:38080
ftp_proxy=192.168.239.137:38080
接下来,导出这些环境变量:
export http_proxy
export https_proxy
export ftp_proxy
为了使这些更改立即生效,需要重新加载 /etc/profile 文件:
source /etc/profile1.3.2 windows下


 4981
4981


 被折叠的 条评论
为什么被折叠?
被折叠的 条评论
为什么被折叠?
 到【灌水乐园】发言


