


Flask
一 前言
Flask是一个基于Python开发并且依赖jinja2模板(模板语言)和Werkzeug WSGI服务的一个微型框架,对于Werkzeug本质是Socket服务端,其用于接收http请求并对请求进行预处理,然后触发Flask框架,开发人员基于Flask框架提供的功能对请求进行相应的处理,并返回给用户,如果要返回给用户复杂的内容时,需要借助jinja2模板来实现对模板的处理,即:将模板和数据进行渲染,将渲染后的字符串返回给用户浏览器。
“微”(micro) 并不表示你需要把整个 Web 应用塞进单个 Python 文件(虽然确实可以 ),也不意味着 Flask 在功能上有所欠缺。微框架中的“微”意味着 Flask 旨在保持核心简单而易于扩展。Flask 不会替你做出太多决策——比如使用何种数据库。而那些 Flask 所选择的——比如使用何种模板引擎——则很容易替换。除此之外的一切都由可由你掌握。如此,Flask 可以与您珠联璧合。
默认情况下,Flask 不包含数据库抽象层、表单验证,或是其它任何已有多种库可以胜任的功能。然而,Flask 支持用扩展来给应用添加这些功能,如同是 Flask 本身实现的一样。众多的扩展提供了数据库集成、表单验证、上传处理、各种各样的开放认证技术等功能。Flask 也许是“微小”的,但它已准备好在需求繁杂的生产环境中投入使用。
Flask官方文档: https://dormousehole.readthedocs.io/en/latest/
二 快速使用
安装
pip install Flask
使用
from flask import Flask  # 导入Flask类

# 实例化产生Flask对象 有了__name__ Flask才知道在哪里找到模板和静态文件
app = Flask(__name__)

# 使用route装饰器来声明路由匹配成功执行的视图函数
@app.route('/')
def hello_word():
    return 'Hello World!'


if __name__ == '__main__':
    app.run()
三 内置配置变量
在Flask类实例化app对象时将默认配置赋值给了app.config。
Flask/_init_
#: The configuration dictionary as :class:`Config`.  This behaves
#: exactly like a regular dictionary but supports additional methods
#: to load a config from files.
self.config = self.make_config(instance_relative_config))
flask/app.py
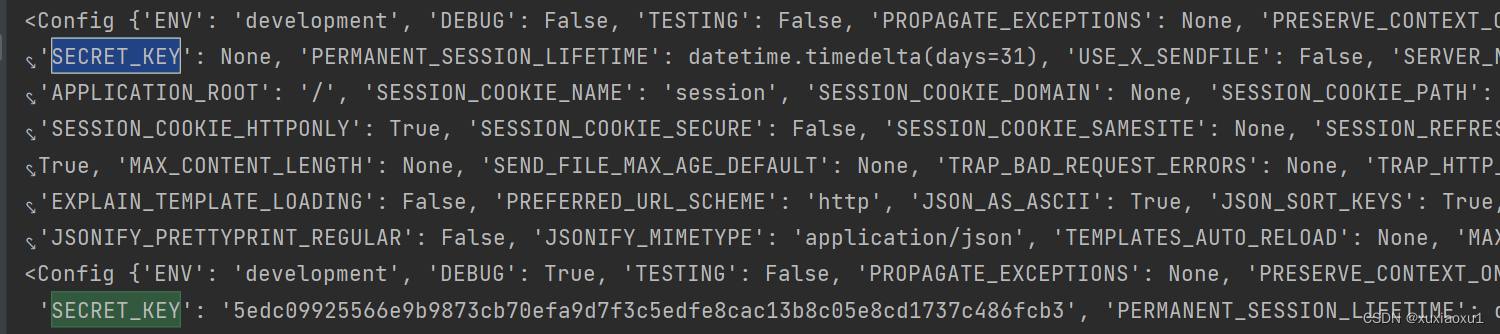
default_config = ImmutableDict(
    {
        "ENV": None,
        "DEBUG": None,
        "TESTING": False,
        "PROPAGATE_EXCEPTIONS": None,
        "PRESERVE_CONTEXT_ON_EXCEPTION": None,
        "SECRET_KEY": None,
        "PERMANENT_SESSION_LIFETIME": timedelta(days=31),
        "USE_X_SENDFILE": False,
        "SERVER_NAME": None,
        "APPLICATION_ROOT": "/",
        "SESSION_COOKIE_NAME": "session",
        "SESSION_COOKIE_DOMAIN": None,
        "SESSION_COOKIE_PATH": None,
        "SESSION_COOKIE_HTTPONLY": True,
        "SESSION_COOKIE_SECURE": False,
        "SESSION_COOKIE_SAMESITE": None,
        "SESSION_REFRESH_EACH_REQUEST": True,
        "MAX_CONTENT_LENGTH": None,
        "SEND_FILE_MAX_AGE_DEFAULT": None,
        "TRAP_BAD_REQUEST_ERRORS": None,
        "TRAP_HTTP_EXCEPTIONS": False,
        "EXPLAIN_TEMPLATE_LOADING": False,
        "PREFERRED_URL_SCHEME": "http",
        "JSON_AS_ASCII": True,
        "JSON_SORT_KEYS": True,
        "JSONIFY_PRETTYPRINT_REGULAR": False,
        "JSONIFY_MIMETYPE": "application/json",
        "TEMPLATES_AUTO_RELOAD": None,
        "MAX_COOKIE_SIZE": 4093,
    }
ENV:应用运行于什么环境。 Flask 和 扩展可以根据环境不同而行为不同,如打开或 关闭调试模式。 env 属性映射了这个配置键。本变量由 FLASK_ENV 环境变量设置。如果本变量是在代码中设置的话,可能出 现意外。在生产环境中不要使用 development 。
DEBUG:是否开启调试模式。使用 flask run 启动开发服务器时,遇到未能处理的 异常时会显示一个交互调试器,并且当代码变动后服务器会重启。 debug 属性映射了这个配置键。当 ENV 是 ‘development’ 时,本变量会启用,并且会被 FLASK_DEBUG 环境变量 重载。如果本变量是在代码中设置的话,可能会出现意外。在生产环境中不要开启调试模式。
TESTING:开启测试模式。异常会被广播而不是被应用的错误处理器处理。扩展可能也会为 了测试方便而改变它们的行为。你应当在自己的调试中开启本变量。
PROPAGATE_EXCEPTIONS:异常会重新引发而不是被应用的错误处理器处理。在没有设置本变量的情况下, 当 TESTING 或 DEBUG 开启时,本变量隐式地为真。
PRESERVE_CONTEXT_ON_EXCEPTION:当异常发生时,不要弹出请求情境。在没有设置该变量的情况下,如果 DEBUG 为真,则本变量为真。这样允许调试器错误请求数据。本变量通常不 需要直接设置。
SECRET_KEY:密钥用于会话 cookie 的安全签名,并可用于应用或者扩展的其他安全需求。 密钥应当是一个长的随机的 bytes 或者 str 。例如,复制下面的 输出到你的配置中:
import secrets

print(secrets.token_hex())
# cd607def747f7d3f0d15219cf3e89b6e5be13aafe91d163a676ed6d54bb09ecd
PERMANENT_SESSION_LIFETIME:如果 session.permanent 为真, cookie 的有效期为本变量设置的数字, 单位为秒。本变量可能是一个 datetime.timedelta 或者一个 int 。
USE_X_SENDFILE:当使用 Flask 提供文件服务时,设置 X-Sendfile 头部。有些网络服务器, 如 Apache ,识别这种头部,以利于更有效地提供数据服务。本变量只有使用这 种服务器时才有效。
SERVER_NAME:通知应用其所绑定的主机和端口。子域路由匹配需要本变量。
APPLICATION_ROOT:通知应用应用的根路径是什么。这个变量用于生成请求环境之外的 URL。
SESSION_COOKIE_NAME:会话 cookie 的名称。假如已存在同名 cookie ,本变量可改变。
SESSION_COOKIE_DOMAIN:认可会话 cookie 的域的匹配规则。如果本变量没有设置,那么 cookie 会被 SERVER_NAME 的所有子域认可。如果本变量设置为 False ,那么 cookie 域不会被设置。
SESSION_COOKIE_PATH:认可会话 cookie 的路径。如果没有设置本变量,那么路径为 APPLICATION_ROOT ,如果 APPLICATION_ROOT 也没有设置,那么会是 / 。
SESSION_COOKIE_HTTPONLY:为了安全,浏览器不会允许 JavaScript 操作标记为“ HTTP only ”的 cookie 。
SESSION_COOKIE_SECURE:如果 cookie 标记为“ secure ”,那么浏览器只会使用基于 HTTPS 的请求发 送 cookie 。应用必须使用 HTTPS 服务来启用本变量。
SESSION_COOKIE_SAMESITE:限制来自外部站点的请求如何发送 cookie 。可以被设置为 ‘Lax’ (推荐) 或者 ‘Strict’ 。
SESSION_REFRESH_EACH_REQUEST:当 session.permanent 为真时,控制是否每个响应都发送 cookie 。每次 都发送 cookie (缺省情况)可以有效地防止会话过期,但是会使用更多的带宽。 会持续会话不受影响。
MAX_CONTENT_LENGTH:在进来的请求数据中读取的最大字节数。如果本变量没有配置,并且请求没有指 定 CONTENT_LENGTH ,那么为了安全原因,不会读任何数据。
SEND_FILE_MAX_AGE_DEFAULT:当提供文件服务时,设置缓存控制最长存活期,以秒为单位。可以是一个 datetime.timedelta 或者一个 int 。在一个应用或者蓝图上 使用 get_send_file_max_age() 可以基于单个文件重载 本变量。
TRAP_BAD_REQUEST_ERRORS:尝试操作一个请求字典中不存在的键,如 args 和 form ,会返回一个 400 Bad Request error 页面。开启本变量,可以把这种错误作为一个未处理的 异常处理,这样就可以使用交互调试器了。本变量是一个特殊版本的 TRAP_HTTP_EXCEPTIONS 。如果没有设置,本变量会在调试模式下开启。
TRAP_HTTP_EXCEPTIONS:如果没有处理 HTTPException 类型异常的处理器,重新引发该异常用于被 交互调试器处理,而不是作为一个简单的错误响应来返回。
EXPLAIN_TEMPLATE_LOADING:记录模板文件如何载入的调试信息。使用本变量有助于查找为什么模板没有载入 或者载入了错误的模板的原因。
PREFERRED_URL_SCHEME:当不在请求情境内时使用些预案生成外部 URL 。
JSON_AS_ASCII:把对象序列化为 ASCII-encoded JSON 。如果禁用,那么 jsonify 返回 的 JSON 会包含 Unicode 字符。这样的话,在把 JSON 渲染到 JavaScript 时会有安全隐患。因此,通常应当开启这个变量。
JSON_SORT_KEYS:按字母排序 JSON 对象的键。这对于缓存是有用的,因为不管 Python 的哈希种 子是什么都能够保证数据以相同的方式序列化。为了以缓存为代价的性能提高可 以禁用它,虽然不推荐这样做。
JSONIFY_PRETTYPRINT_REGULAR:jsonify 响应会输出新行、空格和缩进以便于阅读。在调试模式下总是启用 的。
JSONIFY_MIMETYPE:jsonify 响应的媒体类型。
TEMPLATES_AUTO_RELOAD:当模板改变时重载它们。如果没有配置,在调试模式下会启用。
MAX_COOKIE_SIZE:当 cookie 头部大于本变量配置的字节数时发出警告。缺省值为 4093 。 更大的 cookie 会被浏览器悄悄地忽略。本变量设置为 0 时关闭警告。
四 配置文件的写法
1. 直接通过app对象添加配置
app = Flask(__name__)
print(app.config)
app.debug = True
app.secret_key = secrets.token_hex()
print(app.config)
2. 通过app.config配置
app = Flask(__name__)
print(app.config)
app.config['DEBUG'] = True
app.config['SECRET_KEY'] = secrets.token_hex()
print(app.config)
3. 通过配置文件
settings.py
import secrets

DEBUG = True
SECRET_KEY = secrets.token_hex()
app.py
app = Flask(__name__)
app.config.from_pyfile('settings.py')
print(app.config)
4. 通过类配置
setting_class.py
# 开发配置
class DevelopmentConfig:
    DEBUG = True
    SERVER_NAME = 'localhost'

# 上线配置
class ProductionConfig:
    DEBUG = False
    SERVER_NAME = '192.168.1.11'
app.py
app.config.from_object('setting_class.ProductionConfig')
print(app.config)
5. 其他
app.config.from_envvar("环境变量名称")

app.config.from_json("json文件名称")
五 路由
现代 web 应用都使用有意义的 URL ,这样有助于用户记忆,网页会更得到用户的青睐, 提高回头率。
使用 route() 装饰器来把函数绑定到 URL:
@app.route('/')
def index():
    return 'index page!'


@app.route('/login')
def login():
    return 'login page!'
但是能做的不仅仅是这些!您可以动态变化 URL 的某些部分, 还可以为一个函数指定多个规则。
通过把 URL 的一部分标记为<variable_name> 就可以在 URL 中添加变量。标记的 部分会作为关键字参数传递给函数。通过使用 <converter:variable_name> ,可以 选择性的加上一个转换器,为变量指定规则。请看下面的例子:
from flask import Flask
app = Flask(__name__)
@app.route('/user/<username>')
def show_user_profile(username):
# 显示该用户
return f'User {username}'
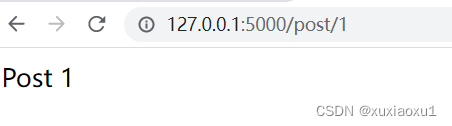
@app.route('/post/<int:post_id>')
def show_post(post_id):
# 显示id是一个数字
return f'Post {post_id}'
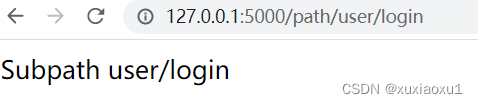
@app.route('/path/<path:subpath>')
def show_subpath(subpath):
# 显示path后的子路径
return f'Subpath {subpath}'
if __name__ == '__main__':
app.run()

route参数
- methods:列表,规定请求的方式,如果列表中没有,该请求方式不被支持。
- endpoint:路由别名,如果不写,会以被装饰的函数名作为别名。
转换器类型:
| 类型 | 描述 |
|---|---|
| string | 接受任何不包含斜杠的字符串 |
| int | 接受任意正整数 |
| float | 接受正浮点数 |
| path | 类似于string,但可以包含斜杠 |
| uuid | 接受UUID字符串 |
路由源码
@app.route('/')
def hello_word():
    return 'Hello World!'
首先执行app对象(Flask的对象)的route()方法。
# rule是路由
def route(self, rule, **options):
	# 定义decorator函数
    def decorator(f):
        endpoint = options.pop("endpoint", None)
        self.add_url_rule(rule, endpoint, f, **options)
        return f
	# 返回decorator函数
    return decorator
route()函数执行完后,视图函数就相当于下面:
@decorator
def hello_word():
    return 'Hello World!'
接着执行decorator(hello_word)
# f是视图函数(hello_word)
def decorator(f):
	# 取出别名,不传就为None
    endpoint = options.pop("endpoint", None)
    # self是app对象
    # 接着调用app对象的add_url_rule方法
    self.add_url_rule(rule, endpoint, f, **options)
    # 返回视图函数
    return f
接着调用app对象的add_url_rule方法。
def add_url_rule(self, rule, endpoint=None, view_func=None, provide_automatic_options=None, **options):
    if endpoint is None:
    	# 如果endpoint没传,就执行_endpoint_from_view_func方法
    	# _endpoint_from_view_func返回视图函数的视图名
    	# 所以不传endpoint参数,会以视图函数名作为endpoint
        endpoint = _endpoint_from_view_func(view_func)  # type: ignore
    options["endpoint"] = endpoint
    methods = options.pop("methods", None)

	# 如果没有传methods参数
    if methods is None:
    	# 就从视图函数中反射methods属性,没有的话就为一个元组("GET",)
        methods = getattr(view_func, "methods", None) or ("GET",)
    # methods不能是字符串
    if isinstance(methods, str):
        raise TypeError(
            "Allowed methods must be a list of strings, for"
            ' example: @app.route(..., methods=["POST"])'
        )
    # 这是一个集合生成式,保证集合里的元素不重复
    methods = {item.upper() for item in methods}

    # 添加必要的方法 也是一个集合
    required_methods = set(getattr(view_func, "required_methods", ()))

    # starting with Flask 0.8 the view_func object can disable and
    # force-enable the automatic options handling.
    if provide_automatic_options is None:
        provide_automatic_options = getattr(
            view_func, "provide_automatic_options", None
        )

    if provide_automatic_options is None:
        if "OPTIONS" not in methods:
            provide_automatic_options = True
            required_methods.add("OPTIONS")
        else:
            provide_automatic_options = False

    # Add the required methods now.
    # | 表示集合求并集
    methods |= required_methods

	# self.url_rule_class是Flask类实例化时设置的
	# url_rule_class = Rule
	# rule就是Rule实例化的对象
    rule = self.url_rule_class(rule, methods=methods, **options)
    rule.provide_automatic_options = provide_automatic_options  # type: ignore

	# self.url_map也是在Falsk实例化时设置的
	# self.url_map = self.url_map_class()
	 # url_map_class = Map
    self.url_map.add(rule)
    if view_func is not None:
    	# self.view_functions: t.Dict[str, t.Callable] = {} 是一个字典
        old_func = self.view_functions.get(endpoint)
        if old_func is not None and old_func != view_func:
            raise AssertionError(
                "View function mapping is overwriting an existing"
                f" endpoint function: {endpoint}"
            )
        # self.view_functions = {'别名':视图函数}
        self.view_functions[endpoint] = view_func
_endpoint_from_view_func(view_func)方法
def _endpoint_from_view_func(view_func: t.Callable) -> str:
    """Internal helper that returns the default endpoint for a given
    function.  This always is the function name.
    """
    # 断言视图函数不为空
    assert view_func is not None, "expected view func if endpoint is not provided."
    # 返回视图函数的函数名
    return view_func.__name__
总结:
路由注册其实就是调用了app对象的add_url_rule()方法,那么也可以不用装饰器的方式来注册路由。
app.add_url_rule('/user/<username>', view_func=show_user_profile)
app.route和app.add_url_rule参数:
rule:URL规则
view_func:视图函数名称
defaults = None:默认值, 当URL中无参数,函数需要参数时,使用defaults = {'k': 'v'}
endpoint = None:名称
methods = None:允许的请求方式,如:["GET", "POST"]
strict_slashes:对URL最后的 / 符号是否严格要求
        @app.route('/index', strict_slashes=False)
        #访问http://www.xx.com/index/ 或http://www.xx.com/index均可
        @app.route('/index', strict_slashes=True)
        #仅访问http://www.xx.com/index
redirect_to:重定向到指定地址
		@app.route('/index/<int:nid>', redirect_to='/home/<nid>')
使用装饰器完成登录认证
from flask import Flask, render_template, request, redirect, session, url_for

app = Flask(__name__)
app.debug = True
app.secret_key = 'sdfsdfsdfsdf'

USERS = {
    1: {'name': '张三', 'age': 18, 'gender': '男', 'text': "道路千万条"},
    2: {'name': '李四', 'age': 28, 'gender': '男', 'text': "安全第一条"},
    3: {'name': '王五', 'age': 18, 'gender': '女', 'text': "行车不规范"},
}

from functools import wraps


def auth(func):
	# 这里如果不使用wraps装饰器,func视图函数就变成了inner
	# endpoint就会重复,程序就会报错
	# 这里不加就要在route函数中指定endpoint参数
    @wraps(func)
    def inner(*args, **kwargs):
        user = session.get('user_info')
        if user:
            res = func(*args, **kwargs)
            return res
        return redirect('/login')

    return inner


@app.route('/detail/<int:nid>', methods=['GET'])
@auth
def detail(nid):
    info = USERS.get(nid)
    return render_template('detail.html', info=info)


@app.route('/index', methods=['GET'])
@auth
def index():
    return render_template('index.html', user_dict=USERS)


@app.route('/login', methods=['GET', 'POST'])
def login():
    if request.method == "GET":
        return render_template('login.html')
    else:
        # request.query_string
        user = request.form.get('user')
        pwd = request.form.get('pwd')
        if user == 'xuxiaoxu' and pwd == '123':
            session['user_info'] = user
            return redirect('/index')
        return render_template('login.html', error='用户名或密码错误')


if __name__ == '__main__':
    app.run()
六 cbv写法
6.1 快速使用
from flask import Flask
from flask.views import MethodView

app = Flask(__name__)


class Test(MethodView):

    def get(self):
        return 'get'

    def post(self):
        return 'post'


app.add_url_rule(rule='/test', view_func=Test.as_view(name='test'))

if __name__ == '__main__':
    app.run()
6.2 cbv加装饰器
View/as_view
# cls是视图类
# 如果在视图类中配置了decorators属性
if cls.decorators:
	# 将as_view传入的name参数赋值给view函数的名字
    view.__name__ = name
    view.__module__ = cls.__module__
    # 循环拿出每一个装饰器函数
    for decorator in cls.decorators:
    	# 相当于
		# @decorator
		# def view():
		#     pass
        view = decorator(view)
6.3 as_view的执行流程
View/as_view
@classmethod
# 是一个类方法
# cls是视图类,name必须传,不传会报错。
def as_view(cls, name, *class_args, **class_kwargs):
	# 定义view函数
    def view(*args, **kwargs):
        self = view.view_class(*class_args, **class_kwargs)  # type: ignore
        return current_app.ensure_sync(self.dispatch_request)(*args, **kwargs)

	# 如果有装饰器,在这里执行装饰器
    if cls.decorators:
        view.__name__ = name
        view.__module__ = cls.__module__
        for decorator in cls.decorators:
            view = decorator(view)
	# 修改和增加view函数的属性
    view.__name__ = name
    view.__doc__ = cls.__doc__
    view.__module__ = cls.__module__
    view.methods = cls.methods  # type: ignore
    view.provide_automatic_options = cls.provide_automatic_options  # type: ignore
    # 返回view函数
    return view
请求匹配成功,会执行as_view中的view
def view(*args, **kwargs):
	# view.view_class是在执行as_view赋值给view函数的,是视图类
	# 所以self就是视图类的对象
    self = view.view_class(*class_args, **class_kwargs)  # type: ignore
    # 先执行self.dispatch_request
    return current_app.ensure_sync(self.dispatch_request)(*args, **kwargs)
接着执行self.dispatch_request self是视图类的对象。
def dispatch_request(self, *args, **kwargs):
	# 从视图类对象中获取请求方式的视图函数内存地址
    meth = getattr(self, request.method.lower(), None)

    # If the request method is HEAD and we don't have a handler for it
    # retry with GET.
    if meth is None and request.method == "HEAD":
        meth = getattr(self, "get", None)

    assert meth is not None, f"Unimplemented method {request.method!r}"
    # 执行视图函数
    return current_app.ensure_sync(meth)(*args, **kwargs)
6.4 as_view的name参数
执行了as_view()函数,as_view的内层函数view的函数名就变成了name指定的值。
接着执行app.add_url_rule函数,如果没有指定endpoint参数,endpoint是view函数的函数名,就是as_view传的name参数。如果指定了endpoint参数,endpoint就是指定的endpoint参数值,和view的函数名就没有关系了。
6.5 继承View写cbv
from flask import Flask
from flask.views import View

app = Flask(__name__)


class Test(View):

    def get(self):
        return 'get'


app.add_url_rule('/test', view_func=Test.as_view(name='test'))

if __name__ == '__main__':
    app.run()
def dispatch_request(self) -> ResponseReturnValue:
    """Subclasses have to override this method to implement the
    actual view function code.  This method is called with all
    the arguments from the URL rule.
    """
    raise NotImplementedError()
在执行self.dispatch_request是或抛出NotImplementedError异常,继承View写cbv需要自己定制dispatch_request方法。
七 模板语法
7.1 渲染变量
<!DOCTYPE html>
<html lang="en">
<head>
    <meta charset="UTF-8">
    <title>Title</title>
</head>
<body>
    <h1>用户列表</h1>
    <table>
        {% for k,v in user_dict.items() %}
        <tr>
            <td>{{k}}</td>
            <td>{{v.name}}</td>
            <td>{{v['name']}}</td>
            <td>{{v.get('name')}}</td>
            <td><a href="/detail/{{k}}">查看详细</a></td>
        </tr>
        {% endfor %}
    </table>
</body>
</html>
7.2 变量的循环
<!DOCTYPE html>
<html lang="en">
<head>
    <meta charset="UTF-8">
    <title>Title</title>
</head>
<body>
    <h1>用户列表</h1>
    <table>
        {% for k,v in user_dict.items() %}
        <tr>
            <td>{{k}}</td>
            <td>{{v.name}}</td>
            <td>{{v['name']}}</td>
            <td>{{v.get('name')}}</td>
            <td><a href="/detail/{{k}}">查看详细</a></td>
        </tr>
        {% endfor %}
    </table>
</body>
</html>
7.3 逻辑判断
<!DOCTYPE html>
<html lang="en">
<head>
    <meta charset="UTF-8">
    <title>Title</title>
</head>
<body>
    <h1>用户列表</h1>
    <table>
        {% if name %}
          <h1>Hello {{ name }}!</h1>
        {% else %}
          <h1>Hello World!</h1>
        {% endif %}
    </table>
</body>
</html>
比django中多可以加括号,执行函数,传参数
# Markup等价django的mark_safe
from flask import Flask,render_template,Markup,jsonify,make_response
app = Flask(__name__)

def func1(arg):
    return Markup("<input type='text' value='%s' />" %(arg,))
@app.route('/')
def index():
    return render_template('index.html',ff = func1)

if __name__ == '__main__':
    app.run()
八 请求与响应
8.1 请求对象
官方文档:https://dormousehole.readthedocs.io/en/latest/api.html#flask.Request
request.method     # 提交的方法
request.args       # get请求提及的数据
request.form       # post请求提交的数据
request.values     # post和get提交的数据总和
request.cookies    # 客户端所带的cookie
request.headers    # 请求头
request.path       # 不带域名,请求路径
request.full_path  # 不带域名,带参数的请求路径
request.url        # 带域名带参数的请求路径
request.host_url   # 请求URL方案和主机
request.files      # 文件上传数据
request.data       # 二进制的请求数据 上传json格式
8.2 response对象
官方文档:https://dormousehole.readthedocs.io/en/latest/api.html#flask.Response
render_template  # 返回模板
redirect         # 重定向
jsonify          # 返回json格式数据
''               # 返回字符串类型
响应头中添加数据
flask.make_response(*args)
有时需要在视图中设置额外的标题。由于视图不一定要返回响应对象,但可以返回Flask本身转换为响应对象的值,因此为其添加首部变得棘手。可以调用这个函数而不是使用return,你将得到一个响应对象,你可以使用它来附加header。
from flask import Flask, make_response, render_template

app = Flask(__name__)

@app.route('/')
def index():
    response = make_response(render_template('index.html', foo=42))
    response.headers['X-Parachutes'] = 'parachutes are cool'
    return response
写入cookie
@app.route('/')
def index():
    response = make_response('ok')
    response.set_cookie('name', 'xuxiaoxu')
    return response
set_cookie()参数

key      # 要设置的cookie的键(名称)。
value    # cookie的值。
max_age  # 应该以秒为单位,或者None(默认值),如果cookie只在客户端浏览器会话期间存在。
expires  # 应该是一个datetime对象或UNIX时间戳。
path     # 将cookie限制在给定路径下,默认情况下它将跨越整个域。
domain   # 如果要设置跨域cookie。例如,domain=".example.com"将设置一个cookie,该cookie可由域名www.example.com、foo.example.com等读取。否则,cookie只能由设置它的域读取。
secure   # 如果为True, cookie只能通过HTTPS访问。
httponly # 禁止JavaScript访问cookie。
samesite # 将cookie的作用域限制为仅附加给“same-site”请求。
九 session的使用和原理
9.1 django中的session原理
下面是一个简单的例子:
views.py
from django.http import HttpResponse


def login(request):
    request.session['name'] = 'xuxiaoxu'
    return HttpResponse('ok')


def show_data(request):
    if request.session.get('name'):
        return HttpResponse('可以访问')
    return HttpResponse('不可以访问')
urls.py
urlpatterns = [
    path('login/', views.login),
    path('show_data/', views.show_data),
]
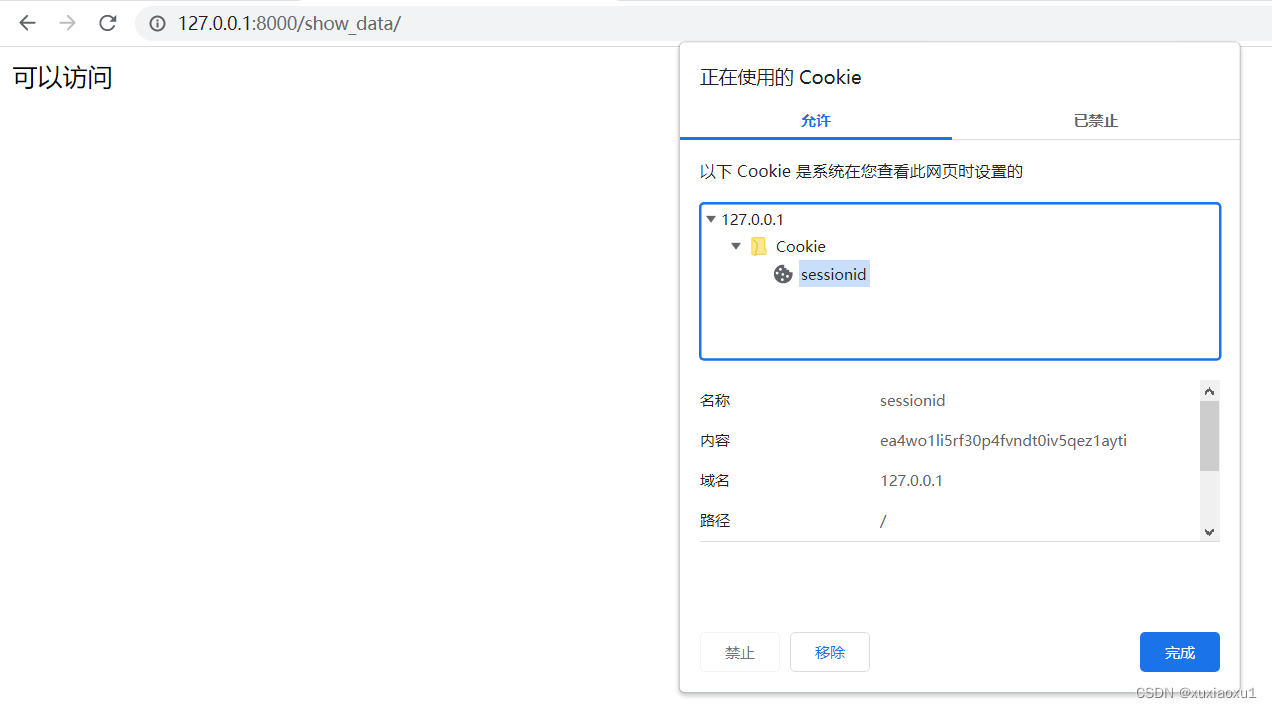
先访问show_data/因为还没有登录,没有设置session,所有会看到不可以访问。
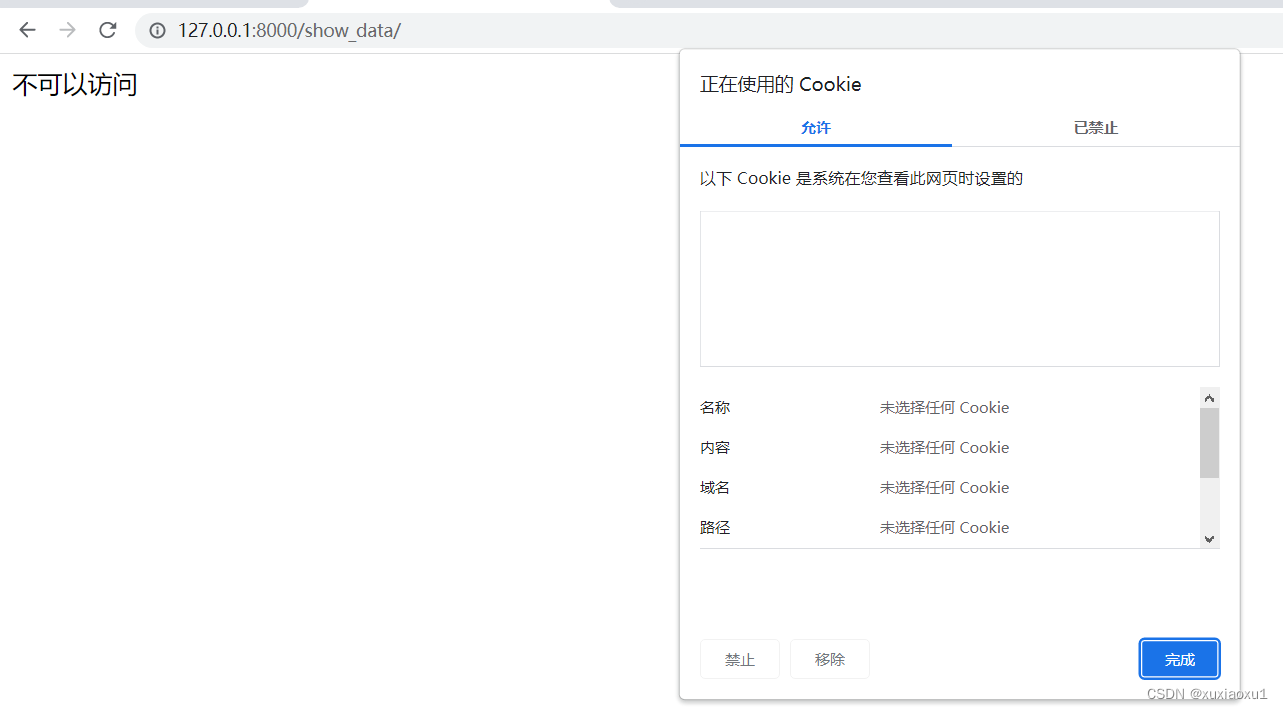
先访问login/,在访问show_data/会显示可以访问。
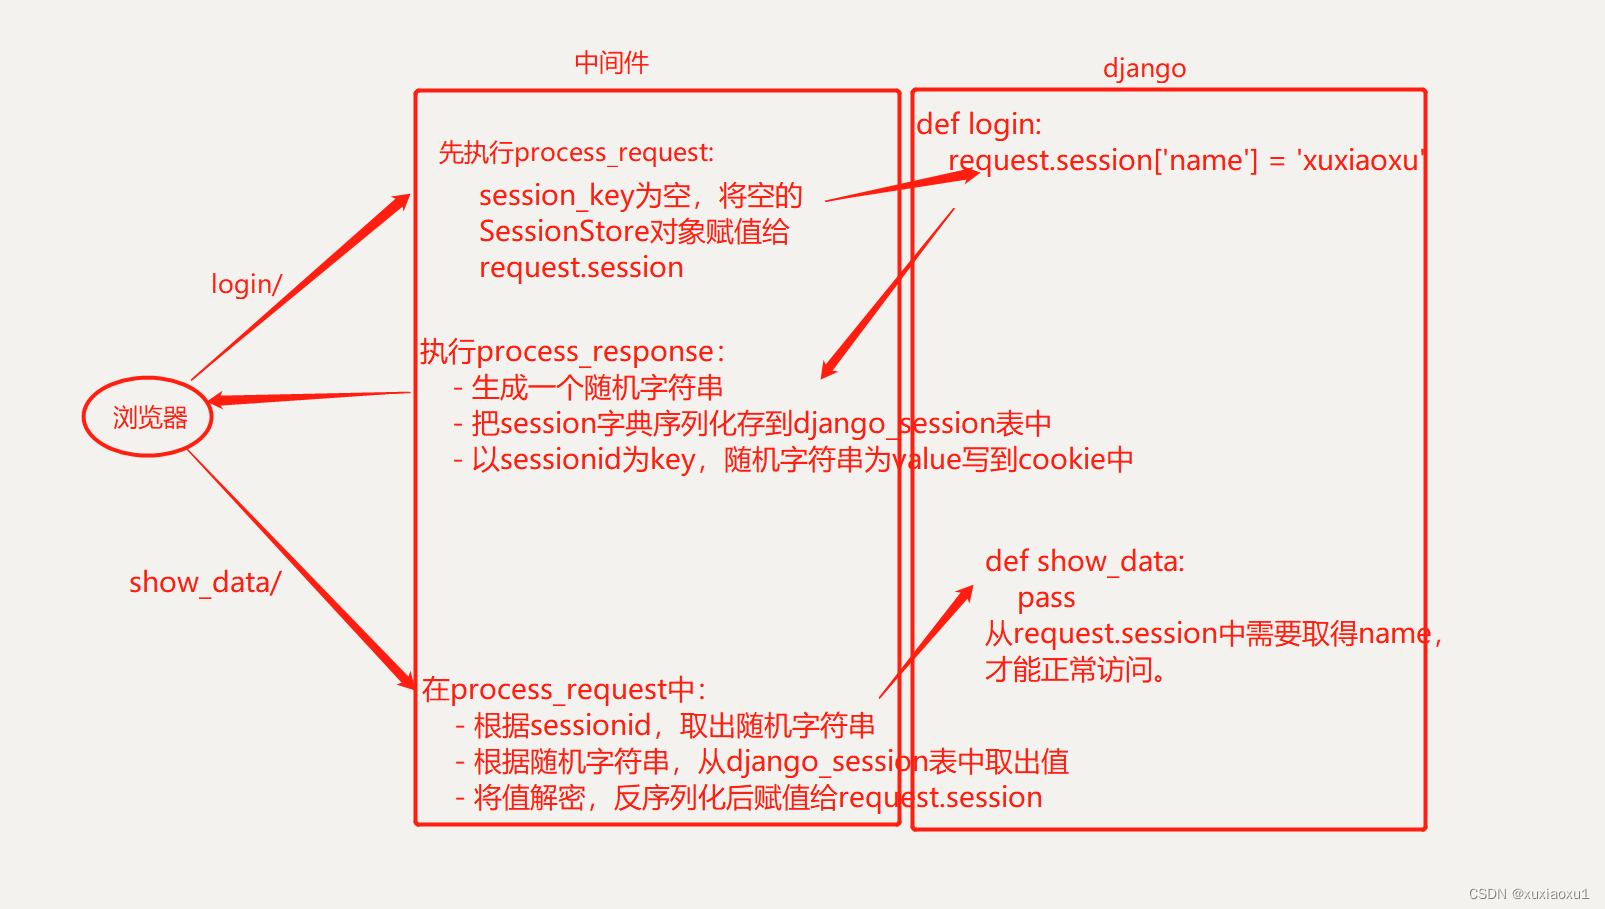
django中的session不是在视图函数中设置的,本质是在中间件中完成:
session不是原生request对象的属性,是在中间件中放进去的。django.contrib.sessions.middleware.SessionMiddleware
class SessionMiddleware(MiddlewareMixin):
    # RemovedInDjango40Warning: when the deprecation ends, replace with:
    #   def __init__(self, get_response):
    def __init__(self, get_response=None):
        super().__init__(get_response)
        engine = import_module(settings.SESSION_ENGINE)
        self.SessionStore = engine.SessionStore

    def process_request(self, request):
        session_key = request.COOKIES.get(settings.SESSION_COOKIE_NAME)
        request.session = self.SessionStore(session_key)

    def process_response(self, request, response):
        """
        If request.session was modified, or if the configuration is to save the
        session every time, save the changes and set a session cookie or delete
        the session cookie if the session has been emptied.
        """
        try:
            accessed = request.session.accessed
            modified = request.session.modified
            empty = request.session.is_empty()
        except AttributeError:
            return response
        # First check if we need to delete this cookie.
        # The session should be deleted only if the session is entirely empty.
        if settings.SESSION_COOKIE_NAME in request.COOKIES and empty:
            response.delete_cookie(
                settings.SESSION_COOKIE_NAME,
                path=settings.SESSION_COOKIE_PATH,
                domain=settings.SESSION_COOKIE_DOMAIN,
                samesite=settings.SESSION_COOKIE_SAMESITE,
            )
            patch_vary_headers(response, ('Cookie',))
        else:
            if accessed:
                patch_vary_headers(response, ('Cookie',))
            if (modified or settings.SESSION_SAVE_EVERY_REQUEST) and not empty:
                if request.session.get_expire_at_browser_close():
                    max_age = None
                    expires = None
                else:
                    max_age = request.session.get_expiry_age()
                    expires_time = time.time() + max_age
                    expires = http_date(expires_time)
                # Save the session data and refresh the client cookie.
                # Skip session save for 500 responses, refs #3881.
                if response.status_code != 500:
                    try:
                        request.session.save()
                    except UpdateError:
                        raise SessionInterrupted(
                            "The request's session was deleted before the "
                            "request completed. The user may have logged "
                            "out in a concurrent request, for example."
                        )
                    response.set_cookie(
                        settings.SESSION_COOKIE_NAME,
                        request.session.session_key, max_age=max_age,
                        expires=expires, domain=settings.SESSION_COOKIE_DOMAIN,
                        path=settings.SESSION_COOKIE_PATH,
                        secure=settings.SESSION_COOKIE_SECURE or None,
                        httponly=settings.SESSION_COOKIE_HTTPONLY or None,
                        samesite=settings.SESSION_COOKIE_SAMESITE,
                    )
        return response
比如说先访问login/,请求进视图函数之前先执行中间件的process_request。
def process_request(self, request):
	# settings.SESSION_COOKIE_NAME是django配置文件中的配置项
	# SESSION_COOKIE_NAME = 'sessionid',可以自定义SESSION_COOKIE_NAME
	# 从request.COOKIES中获取sessionid的value值,没有的话就是None
    session_key = request.COOKIES.get(settings.SESSION_COOKIE_NAME)
    # engine = import_module(settings.SESSION_ENGINE)
    # self.SessionStore = engine.SessionStore
    # SESSION_ENGINE = 'django.contrib.sessions.backends.db'
    # 将SessionStore对象赋值给request.session,视图函数中就可以使用request.session取值和修改值
    request.session = self.SessionStore(session_key)
此时的session_key是空的,在进入到request.session中是没有值的,接着在视图函数中给request.session增加值,视图函数结束,会执行process_response。
def process_response(self, request, response):
        """
        If request.session was modified, or if the configuration is to save the
        session every time, save the changes and set a session cookie or delete
        the session cookie if the session has been emptied.
        """
        try:
            accessed = request.session.accessed
            # session是否改变 是布尔值
            modified = request.session.modified
            # session是否为空 是布尔值
            empty = request.session.is_empty()
        except AttributeError:
            return response
        # First check if we need to delete this cookie.
        # The session should be deleted only if the session is entirely empty.
        # 先判断是否需要删除cookie
        if settings.SESSION_COOKIE_NAME in request.COOKIES and empty:
        	# 从响应对象中删除cookie
            response.delete_cookie(
                settings.SESSION_COOKIE_NAME,
                path=settings.SESSION_COOKIE_PATH,
                domain=settings.SESSION_COOKIE_DOMAIN,
                samesite=settings.SESSION_COOKIE_SAMESITE,
            )
            patch_vary_headers(response, ('Cookie',))
        else:
            if accessed:
                patch_vary_headers(response, ('Cookie',))
            # 判断session修改了或者配置文件中的SESSION_SAVE_EVERY_REQUEST为True
            if (modified or settings.SESSION_SAVE_EVERY_REQUEST) and not empty:
                if request.session.get_expire_at_browser_close():
                    max_age = None
                    expires = None
                else:
                    max_age = request.session.get_expiry_age()
                    expires_time = time.time() + max_age
                    expires = http_date(expires_time)
                # Save the session data and refresh the client cookie.
                # Skip session save for 500 responses, refs #3881.
                if response.status_code != 500:
                    try:
                        request.session.save()
                    except UpdateError:
                        raise SessionInterrupted(
                            "The request's session was deleted before the "
                            "request completed. The user may have logged "
                            "out in a concurrent request, for example."
                        )
                    response.set_cookie(
                        settings.SESSION_COOKIE_NAME,
                        request.session.session_key, max_age=max_age,
                        expires=expires, domain=settings.SESSION_COOKIE_DOMAIN,
                        path=settings.SESSION_COOKIE_PATH,
                        secure=settings.SESSION_COOKIE_SECURE or None,
                        httponly=settings.SESSION_COOKIE_HTTPONLY or None,
                        samesite=settings.SESSION_COOKIE_SAMESITE,
                    )
        return response
在SessionMiddleware处理响应时,如果session是空的,则清除session。否则,在response中设置Cookie,并设置Cookie值属性,如失效时间等。
django_session表:

9.2 flask的session使用
from flask import Flask, session

app = Flask(__name__)

app.debug = True
app.secret_key = 'b8a64dd1502678176d1f076052b0ecac74379c7482329815046334da747188fe'


@app.route('/login')
def login():
    # 设置值
    session['name'] = 'xuxiaoxu'
    return 'ok'


@app.route('/show')
def show():
    # 获取值
    session.get('name')
    return 'ok'


if __name__ == '__main__':
    app.run()
源码分析:
整个flask,从请求进来,到请求走的整个流程。
wsgi_app()
def wsgi_app(self, environ: dict, start_response: t.Callable) -> t.Any:
        ctx = self.request_context(environ)
        error: t.Optional[BaseException] = None
        try:
            try:
                ctx.push()
                response = self.full_dispatch_request()
            except Exception as e:
                error = e
                response = self.handle_exception(e)
            except:  # noqa: B001
                error = sys.exc_info()[1]
                raise
            return response(environ, start_response)
        finally:
            if self.should_ignore_error(error):
                error = None
            ctx.auto_pop(error)
ctx.push()
def push(self) -> None:
    if self.session is None:
         session_interface = self.app.session_interface
         self.session = session_interface.open_session(self.app, self.request)

         if self.session is None:
             self.session = session_interface.make_null_session(self.app)

     # Match the request URL after loading the session, so that the
     # session is available in custom URL converters.
     if self.url_adapter is not None:
         self.match_request()
session_interface.open_session() 请求来了执行
def open_session(
    self, app: "Flask", request: "Request"
) -> t.Optional[SecureCookieSession]:
    s = self.get_signing_serializer(app)
    if s is None:
        return None
    # val 就是取出的三段
    val = request.cookies.get(self.get_cookie_name(app))
    if not val:
        return self.session_class()
    max_age = int(app.permanent_session_lifetime.total_seconds())
    try:
        data = s.loads(val, max_age=max_age)
        return self.session_class(data)
    except BadSignature:
        return self.session_class()
save_session() 请求走了执行
def save_session(
    self, app: "Flask", session: SessionMixin, response: "Response"
) -> None:
    name = self.get_cookie_name(app)
    domain = self.get_cookie_domain(app)
    path = self.get_cookie_path(app)
    secure = self.get_cookie_secure(app)
    samesite = self.get_cookie_samesite(app)

    # If the session is modified to be empty, remove the cookie.
    # If the session is empty, return without setting the cookie.
    if not session:
        if session.modified:
            response.delete_cookie(
                name, domain=domain, path=path, secure=secure, samesite=samesite
            )

        return

    # Add a "Vary: Cookie" header if the session was accessed at all.
    if session.accessed:
        response.vary.add("Cookie")

    if not self.should_set_cookie(app, session):
        return

    httponly = self.get_cookie_httponly(app)
    expires = self.get_expiration_time(app, session)
    val = self.get_signing_serializer(app).dumps(dict(session))  # type: ignore
    response.set_cookie(
        name,
        val,  # type: ignore
        expires=expires,
        httponly=httponly,
        domain=domain,
        path=path,
        secure=secure,
        samesite=samesite,
    )
总结:
请求来的时候,会执行open_session,取出cookie,判断是否为空,如果不为空,反序列化,解密,转成字典,放到session对象中,然后视图函数就可以使用了。
请求走的时候,会执行save_session,把session转成字典,序列化并加密,放到cookie中。
十 闪现
flash
使用:
from flask import flash, Flask, get_flashed_messages

app = Flask(__name__)
app.secret_key = 'b8a64dd1502678176d1f076052b0ecac74379c7482329815046334da747188fe'


@app.route('/index')
def index():
    flash(message='闪现')
    # 还可以指定分类
    # flash(message='闪现', category='1')
    # flash(message='传送', category='1')
    # flash(message='疾跑', category='2')
    return 'index'


@app.route('/home')
def home():
    # 取出列表
    res = get_flashed_messages()
    print(res)  # ['闪现']
    # res = get_flashed_messages(category_filter=('1',))
    # ['闪现', '传送']
    return 'home'


if __name__ == '__main__':
    app.run()
十一 请求扩展
在请求进入视图函数之前和出视图函数之后执行的代码,类似与django框架的中间件。
1 before_request:在请求进视图函数之前执行
	- 有多个,从上往下依次执行。
	- 如果返回了response对象,就直接返回。
2 after_request:在请求从视图函数走之后执行
	- 有多个,从下往上依次执行。
	- 要参数和返回值
3 before_first_request:项目启动后,第一次访问会执行,以后再也不执行了
	- 项目启动后初始化
4 teardown_request:每一个请求之后绑定一个函数,即使遇到了异常,每个请求走,都会执行,记录错误日志
5 errorhandler路径不存在时404,服务器内部错误500
6 template_global 标签 ,在模板中用  {{ 标签() }}
7 template_filter过滤器  在模板中用  {{参数1 | 过滤器(参数2, 参数3)}}
十二 蓝图
blueprint:对目录进行划分,因为之前所有代码都写在一个py文件中,后期肯定要分到多个文件中。
小型项目:
flask_small_project  # 项目名
	src  # 项目源代码
		static  # 静态文件
		templates  # 模板
		views  # 视图函数存放位置
			__init__.py
			order.py  # 订单相关视图
			user.py  # 用户相关视图
		settings.py  # 配置文件
	manage.py  # 启动文件
大型项目
flask_big_project  # 项目名
	src  # 源代码
		admin  # admin相关
			static  # 静态文件
			templates  # 模板
				admin.html
			__init__.py
			model.py  # 模型相关
			views.py  # 视图函数
		user  # user相关
			static
			templates
			__init__.py
			model.py
			views.py
		__init__.py  #  实例化app,注册蓝图
	settings.py  # 配置文件
	manage.py  # 启动文件
# manage.py
from src import app

if __name__ == '__main__':
    app.run()

# admin/views.py
from flask import Blueprint, render_template

admin_bp = Blueprint('admin', __name__, template_folder='templates')


@admin_bp.route('/admin')
def admin():
    return render_template('admin.html')


# admin/templates/admin.html
<!DOCTYPE html>
<html lang="en">
<head>
    <meta charset="UTF-8">
    <title>Title</title>
</head>
<body>
<h1>admin</h1>
</body>
</html>


# user/views.py
from flask import Blueprint

user_bp = Blueprint('user', __name__, template_folder='templates')


@user_bp.route('/user')
def admin():
    return 'user'

# src/__init__.py
from flask import Flask

app = Flask(__name__)

# app.config.from_object()

from src.admin.views import admin_bp
from src.user.views import user_bp

app.register_blueprint(admin_bp, url_prefix='/admin')
app.register_blueprint(user_bp, url_prefix='/user')
总结:
- 在不同的views.py中实例化蓝图对象,使用蓝图对象注册路由。
- 在外部__init__.py文件中实例化app对象,使用app对象注册蓝图。
- 在启动文件导入app对象,执行run方法。
十三 g对象
专门用来存储用户信息的g对象,g的全称的为global,g对象在一次请求中的所有的代码的地方,都是可以使用的。
使用
from flask import Flask, g
from utils import func1, func2

app = Flask(__name__)

app.debug = True


@app.route('/')
def index():
	# 给g对象放入值
    g.username = 'xuxiaoxu'
    func1()
    func2()
    return 'ok'


if __name__ == '__main__':
    app.run()
utils.py
from flask import g


def func1():
	# 档次请求可以使用g对象中的值
    print(f'用户:{g.username}')


def func2():
    print(f'用户:{g.username}')
g对象和session的区别: session对象是可以跨request的,只要session还未失效,不同的request的请求会获取到同一个session,但是g对象不是,g对象不需要管过期时间,请求一次就g对象就改变了一次,或者重新赋值了一次。
十四 flask-session使用
作用: 将默认保存的签名cookie中的值 保存到redis,memcached,file,Mongodb,SQLAlchemy。
安装:
pip install flask-session
使用:
from flask import Flask, session
from flask_session.sessions import RedisSessionInterface
from redis import Redis

app = Flask(__name__)
# conn = Redis(host='localhost', port=6379, db=2)
# app.session_interface = RedisSessionInterface(redis=conn, key_prefix='flask-')
app.session_interface = RedisSessionInterface(redis=None, key_prefix='flask-')
app.debug = True


@app.route('/')
def index():
    session['name'] = 'xuxiaoxu'
    return 'index'


if __name__ == '__main__':
    app.run()
通用方案
from flask import Flask, session
from flask_session import Session

app = Flask(__name__)

app.config.from_pyfile('settings.py')

Session(app)


@app.route('/')
def index():
    session['username'] = 'xuxiaoxu'
    return 'index'


if __name__ == '__main__':
    app.run()
settings.py
from redis import Redis

DEBUG = True
SESSION_TYPE = 'redis'
SESSION_REDIS = Redis(db=2)
SESSION_KEY_PREFIX = 'flask-'
Session(app)就是根据配置文件,生成RedisSessionInterface对象赋值给app.session_interface。
配置session的过期时间:在配置文件中配置PERMANENT_SESSION_LIFETIME
import datetime

PERMANENT_SESSION_LIFETIME = datetime.timedelta(seconds=10)
cookie,关闭浏览器就失效,配置文件配置SESSION_PERMANENT 。
SESSION_PERMANENT = False
十五 数据库连接池
15.1 flask中集成mysql
from flask import Flask, jsonify
import pymysql

app = Flask(__name__)

app.debug = True


@app.route('/show')
def show_article():
    conn = pymysql.connect(user='root', password='', host='localhost', port=3306, db='tutorial')
    cursor = conn.cursor()
    cursor.execute('select * from article')
    res = cursor.fetchall()
    cursor.close()
    conn.close()
    print(res)
    return jsonify(res)


if __name__ == '__main__':
    app.run()
15.2 使用数据库连接池
安装:
pip install DBUtils
connpool.py
from dbutils.pooled_db import PooledDB
import pymysql

POOL = PooledDB(
    creator=pymysql,  # 连接对象或符合DB-API 2的数据库模块
    mincached=2,  # 池中的初始空闲连接数(0表示在启动时没有建立连接)
    maxcached=5,  # 池中的最大空闲连接数(0或None表示池的大小不受限制)
    maxshared=0,  # 最大共享连接数(0或None表示所有连接都是专用的)
    maxconnections=10,  # 通常允许的最大连接数(0或None表示任意数量的连接)
    blocking=True,  # 确定超过最大值时的行为(如果设置为true,则阻塞并等待,否则将报告错误)
    maxusage=None,  # 单个连接的最大复用数(0或None表示无限重用)
    setsession=[],  # 可选的用于准备的SQL命令列表
    reset=True,  # 当连接返回到池时应该如何重置(False或None回滚以begin()开始的事务,为了安全起见,总是发出回滚)
    failures=None,  # 对于需要应用连接故障转移机制的
    ping=0,  # 用ping()确定何时检查连接。(0 = None = never, 1 = default =无论何时从池中获取,2 =创建游标时,4 =执行查询时,7 =总是,以及这些值的所有其他位组合)
    host='localhost',
    port=3306,
    user='root',
    password='',
    db='tutorial',
    charset='utf8'
)
from flask import Flask, jsonify
from connpool import POOL

app = Flask(__name__)

app.debug = True


@app.route('/show')
def show_article():
	# 连接池中取一个链接
    conn = POOL.connection()
    cursor = conn.cursor()
    cursor.execute('select * from article')
    res = cursor.fetchall()
    return jsonify(res)


if __name__ == '__main__':
    app.run()
测试
import requests
from threading import Thread


def test():
    res = requests.get('http://127.0.0.1:5000/show').json()
    print(res)


if __name__ == '__main__':
    for i in range(1000):
        t = Thread(target=test)
        t.start()
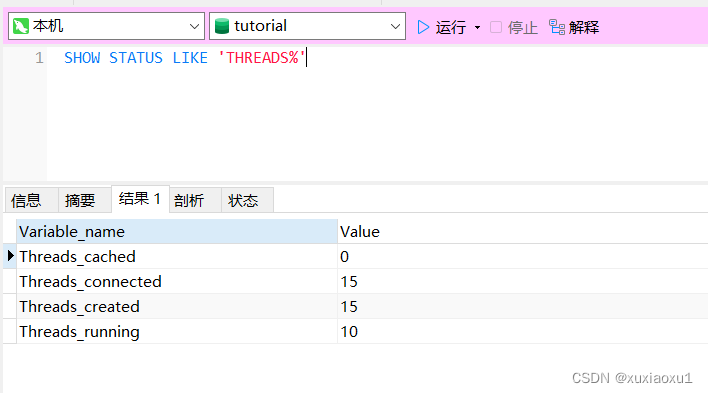
-- 查看mysql连接数
SHOW STATUS LIKE 'THREADS%'
十六 wtfroms
作用: 校验数据,渲染错误信息,渲染页面。
安装:
pip install wtforms

# 支持邮箱校验
pip install email_validator
from flask import Flask, render_template, request, redirect

from wtforms import Form
from wtforms.fields import simple
from wtforms import validators
from wtforms import widgets
from wtforms.fields import choices

app = Flask(__name__)

app.debug = True


class LoginForm(Form):
    # 字段(内部包含正则表达式)
    name = simple.StringField(
        label='用户名',
        validators=[
            validators.DataRequired(message='用户名不能为空.'),
            validators.Length(min=6, max=18, message='用户名长度必须大于%(min)d且小于%(max)d')
        ],
        widget=widgets.TextInput(),  # 页面上显示的插件
        render_kw={'class': 'form-control'}

    )
    # 字段(内部包含正则表达式)
    pwd = simple.PasswordField(
        label='密码',
        validators=[
            validators.DataRequired(message='密码不能为空.'),
            validators.Length(min=8, message='用户名长度必须大于%(min)d'),
            validators.Regexp(regex="^(?=.*[a-z])(?=.*[A-Z])(?=.*\d)(?=.*[$@$!%*?&])[A-Za-z\d$@$!%*?&]{8,}",
                              message='密码至少8个字符,至少1个大写字母,1个小写字母,1个数字和1个特殊字符')

        ],
        widget=widgets.PasswordInput(),
        render_kw={'class': 'form-control'}
    )


class RegisterForm(Form):
    name = simple.StringField(
        label='用户名',
        validators=[
            validators.DataRequired()
        ],
        widget=widgets.TextInput(),
        render_kw={'class': 'form-control'},
        default='pyy'
    )

    pwd = simple.PasswordField(
        label='密码',
        validators=[
            validators.DataRequired(message='密码不能为空.')
        ],
        widget=widgets.PasswordInput(),
        render_kw={'class': 'form-control'}
    )

    pwd_confirm = simple.PasswordField(
        label='重复密码',
        validators=[
            validators.DataRequired(message='重复密码不能为空.'),
            validators.EqualTo('pwd', message="两次密码输入不一致")
        ],
        widget=widgets.PasswordInput(),
        render_kw={'class': 'form-control'}
    )

    email = simple.EmailField(
        label='邮箱',
        validators=[
            validators.DataRequired(message='邮箱不能为空.'),
            validators.Email(message='邮箱格式错误')
        ],
        widget=widgets.TextInput(input_type='email'),
        render_kw={'class': 'form-control'}
    )

    gender = choices.RadioField(
        label='性别',
        choices=(
            (1, '男'),
            (2, '女'),
        ),
        coerce=int  # “1” “2”
    )
    city = choices.SelectField(
        label='城市',
        choices=(
            ('bj', '北京'),
            ('sh', '上海'),
        )
    )

    hobby = choices.SelectMultipleField(
        label='爱好',
        choices=(
            (1, '篮球'),
            (2, '足球'),
        ),
        coerce=int
    )

    favor = choices.SelectMultipleField(
        label='喜好',
        choices=(
            (1, '篮球'),
            (2, '足球'),
        ),
        widget=widgets.ListWidget(prefix_label=False),
        option_widget=widgets.CheckboxInput(),
        coerce=int,
        default=[1, 2]
    )

    def __init__(self, *args, **kwargs):
        super(RegisterForm, self).__init__(*args, **kwargs)
        self.favor.choices = ((1, '篮球'), (2, '足球'), (3, '羽毛球'))

    def validate_pwd_confirm(self, field):
        """
        自定义pwd_confirm字段规则,例:与pwd字段是否一致
        :param field:
        :return:
        """
        # 最开始初始化时,self.data中已经有所有的值

        if field.data != self.data['pwd']:
            # raise validators.ValidationError("密码不一致") # 继续后续验证
            raise validators.StopValidation("密码不一致")  # 不再继续后续验证


@app.route('/login', methods=['GET', 'POST'])
def login():
    if request.method == 'GET':
        form = LoginForm()
        return render_template('login.html', form=form)
    else:
        form = LoginForm(formdata=request.form)
        if form.validate():
            print('用户提交数据通过格式验证,提交的值为:', form.data)
        else:
            print(form.errors)
        return render_template('login.html', form=form)


@app.route('/register', methods=['GET', 'POST'])
def register():
    if request.method == 'GET':
        form = RegisterForm(data={'gender': 2, 'hobby': [1, ]})  # initial
        return render_template('register.html', form=form)
    else:
        form = RegisterForm(formdata=request.form)
        if form.validate():
            print('用户提交数据通过格式验证,提交的值为:', form.data)
        else:
            print(form.errors)
        return render_template('register.html', form=form)


if __name__ == '__main__':
    app.run()
login.html
<!DOCTYPE html>
<html lang="en">
<head>
    <meta charset="UTF-8">
    <title>Title</title>

<link href="https://cdn.staticfile.org/twitter-bootstrap/3.3.7/css/bootstrap.min.css" rel="stylesheet">
</head>
<body>
<h1>登录</h1>
<form method="post" novalidate>
    <p>{{form.name.label}} {{form.name}} {{form.name.errors[0] }}</p>

    <p>{{form.pwd.label}} {{form.pwd}} {{form.pwd.errors[0] }}</p>
    <input type="submit" value="提交">
</form>
</body>
</html>

</body>
</html>
register.html
<!DOCTYPE html>
<html lang="en">
<head>
    <meta charset="UTF-8">
    <title>Title</title>
    <link href="https://cdn.staticfile.org/twitter-bootstrap/3.3.7/css/bootstrap.min.css" rel="stylesheet">
</head>
<body>
<h1>用户注册</h1>
<form method="post" novalidate style="padding:0  50px">
    {% for field in form %}
    <p>{{field.label}}: {{field}} {{field.errors[0] }}</p>
    {% endfor %}
    <input type="submit" value="提交">
</form>
</body>
</html>
十七 信号
Flask框架中的信号基于blinker,其主要就是让开发者可是在flask请求过程中定制一些用户行为。
17.1 内置信号
# 请求到来前执行
request_started = _signals.signal('request-started')

# 请求结束后执行
request_finished = _signals.signal('request-finished')

# 模板渲染前执行
before_render_template = _signals.signal('before-render-template')

# 模板渲染后执行
template_rendered = _signals.signal('template-rendered')

# 请求执行出现异常时执行
got_request_exception = _signals.signal('got-request-exception')

# 请求执行完毕后自动执行(无论成功与否)
request_tearing_down = _signals.signal('request-tearing-down')

# 调用flashed在其中添加数据时,自动触发
message_flashed = _signals.signal('message-flashed')
使用
- 定义函数
- 跟内置信号绑定
- 等待信号被触发
from flask import Flask, render_template, signals

app = Flask(__name__)


def before_render(*args, **kwargs):
    print(args)
    print(kwargs)
    print('模板渲染前执行')


def rendered(*args, **kwargs):
    print(args)
    print(kwargs)
    print('模板渲染后执行')


signals.before_render_template.connect(before_render)
signals.template_rendered.connect(rendered)


@app.route('/index')
def index():
    return render_template('index.html')


if __name__ == '__main__':
    app.run()
17.2 自定义信号
- 定义一个自定义信号
- 定义一个函数
- 函数跟自定义信号绑定
- 某种情况下触发信号的执行
# 第一步:自定义信号
defined = _signals.signal('defined')

# 第二步:定义函数
def test(*args, **kwargs):
    print('tset')

# 第三步:绑定自定义的信号
defined.connect(test)

# 第四步:触发自定义的信号
十八 多app应用
Flask实例化多个app。
from flask import Flask
from werkzeug.middleware.dispatcher import DispatcherMiddleware
from werkzeug.serving import run_simple

app01 = Flask('app01')
app02 = Flask('app02')


@app01.route('/app01')
def index():
    return 'app01'


dm = DispatcherMiddleware(app01, {'/app02': app02})


@app02.route('/app02')
def home():
    return 'app02'


if __name__ == '__main__':
    run_simple('localhost', 5000, dm)
十九 flask-script
定制命令,用于实现类似于django中 python3 manage.py runserver …类似的命令。
安装
pip install flask-script
使用
from flask import Flask
from flask_script import Manager

app = Flask(__name__)

manager = Manager(app)

if __name__ == '__main__':
    manager.run()

# 启动项目
# python 项目文件  runserver
自定制命令
from flask import Flask
from flask_script import Manager

app = Flask(__name__)
manager = Manager(app)


@manager.command
def custom(arg):
    """
    自定义命令
    python 项目文件.py custom 123
    :param arg:
    :return:
    """
    print(arg)


@manager.option('-n', '--name', dest='name')
@manager.option('-u', '--url', dest='url')
def cmd(name, url):
    """
    自定义命令(-n也可以写成--name)
    执行: python 项目文件.py  cmd -n lqz -u https://www.baidu.com
    执行: python 项目文件.py  cmd --name lqz --url https://www.jd.com
    :param name:
    :param url:
    :return:
    """
    print(name, url)


if __name__ == '__main__':
    manager.run()
二十 导出项目依赖
方式一:终端输入,会把当前环境的所有库都保存下来,配合virtualenv使用较好。
pip freeze > requirements.txt
方式二:使用pipreqs模块,会自动检测项目中调用的库,然后写进requirements.txt
pip installl pipreqs

pipreqs ./

问题1:UnicodeDecodeError: 'gbk' codec can't decode byte 0xaa in position 163: illegal multibyte sequence
# Windows电脑编码问题,终端输入下面代码
pipreqs ./ --encoding=utf-8

问题2:当项目所在文件夹中已有requirement.txt时,会提示WARNING: requirements.txt already exists, use --force to overwrite it,执行下面代码
pipreqs --force ./
二十一 threading.local
多个线程操作同一个变量,如果不加锁,会出现数据错乱问题。
线程变量,意思是threading.local中填充的变量属于当前线程,该变量对其他线程而言是隔离的,也就是说该变量是当前线程独有的变量。threading.local为变量在每个线程中都创建了一个副本,那么每个线程可以访问自己内部的副本变量。
自定义local对象解决数据错乱
try:
    from greenlet import getcurrent as get_ident
except Exception as e:
    from threading import get_ident
from threading import Thread
import time


class Local(object):
    def __init__(self):
        # self.storage = {}   # 只要self.属性,就会调用 __setattr__,内部又掉了self.storage--->递归了
        # 类来调用对象的绑定方法__setattr__,这个方法就会变成函数,有几个值就要传几个值
        # 本质就是完成 self.storage = {} 要完成的事,但是不会触发递归调用
        object.__setattr__(self, 'storage', {})
        # setattr(self,'storage', {})  # 反射的方式设置值,也会触发递归

    def __setattr__(self, k, v):
        ident = get_ident()
        if ident in self.storage:
            self.storage[ident][k] = v
        else:
            self.storage[ident] = {k: v}

    def __getattr__(self, k):
        ident = get_ident()  # 在协程中,gevent中是获取协程id号,如果在线程中,获取的是线程id号
        return self.storage[ident][k]


obj = Local()  # 每个local对象,用自己的字典


def task(arg):
    obj.val = arg
    v = obj.val
    time.sleep(0.01)
    print(v)


for i in range(10):
    t = Thread(target=task, args=(i,))
    t.start()
flask 自定义的local,支持线程和协程
werkzeug/local.py
class Local(object):

    def __init__(self):
        object.__setattr__(self, "__storage__", {})
        object.__setattr__(self, "__ident_func__", get_ident)


    def __getattr__(self, name):
        try:
            return self.__storage__[self.__ident_func__()][name]
        except KeyError:
            raise AttributeError(name)

    def __setattr__(self, name, value):
        ident = self.__ident_func__()
        storage = self.__storage__
        try:
            storage[ident][name] = value
        except KeyError:
            storage[ident] = {name: value}
二十二 flask请求上下文分析
flask==1.1.1
请求来执行app(),就是执行Flask类的__call__方法。
# self是app对象
def __call__(self, environ, start_response):
    return self.wsgi_app(environ, start_response)
接着执行self.wsgi_app(environ, start_response)
def wsgi_app(self, environ, start_response):
		# 执行self.request_context(environ)
		# 返回的是RequestContext类的对象
        ctx = self.request_context(environ)
        error = None
        try:
            try:
                ctx.push()
                response = self.full_dispatch_request()
            except Exception as e:
                error = e
                response = self.handle_exception(e)
            except:  # noqa: B001
                error = sys.exc_info()[1]
                raise
            return response(environ, start_response)
        finally:
            if self.should_ignore_error(error):
                error = None
            ctx.auto_pop(error)
分析self.request_context(environ)做了什么
def request_context(self, environ):
    return RequestContext(self, environ)
ctx是RequestContext类的对象
class RequestContext:
	def __init__(self, app, environ, request=None, session=None):
	    self.app = app
	    if request is None:
	    	#app.request_class就是flask/wrappers里的Request
	        request = app.request_class(environ)
	    self.request = request
	    self.url_adapter = None
	    try:
	        self.url_adapter = app.create_url_adapter(self.request)
	    except HTTPException as e:
	        self.request.routing_exception = e
	    self.flashes = None
	    self.session = session
分析ctx.push()做了什么
# `ctx`是`RequestContext`类的对象,所以去RequestContext类中找push方法
def push(self):
	...
    _request_ctx_stack.push(self)
_request_ctx_stack是什么?
# 是在flask/globals下导入的
from .globals import _request_ctx_stack
去flask/globals下找_request_ctx_stack
_request_ctx_stack = LocalStack()
_request_ctx_stack是LocalStack类的对象
class LocalStack(object):
	def __init__(self):
		# self._local又是Local类的对象
	    self._local = Local()
class Local(object):
    def __init__(self):
        object.__setattr__(self, "__storage__", {})
        object.__setattr__(self, "__ident_func__", get_ident)
执行_request_ctx_stack.push(self)
# _request_ctx_stack是LocalStack类的对象,找LocalStack类的push方法

def push(self, obj):
	# 这句话会执行Local类的__getattr__方法
	# 现在取是没有的,所以rv 是None
    rv = getattr(self._local, "stack", None)
    if rv is None:
    	# 这句话会执行Local类的__setattr__方法
        self._local.stack = rv = []
    # obj是RequestContext的对象ctx
    rv.append(obj)
    # 这里Local对象的__storage__就变成了
    # {线程id:{'stack'}:[RequestContext的对象ctx]}
    # {5656: {'stack': [<RequestContext 'http://127.0.0.1:5000/' [GET] of 07 上下文管理>]}}
    return rv
Local类的__getattr__方法
def __getattr__(self, name):
    try:
    	# 根据线程id取stack属性
        return self.__storage__[self.__ident_func__()][name]
    except KeyError:
        raise AttributeError(name)
Local类的__setattr__方法
def __setattr__(self, name, value):
	# 获取线程id
    ident = self.__ident_func__()
    # 获取存储字典,现在是一个空字典
    storage = self.__storage__
    try:
    	# 线程存在就修改
        storage[ident][name] = value
    except KeyError:
    	# 线程不存在就新增
    	# storage = {线程id:{'stack':[]}}
        storage[ident] = {name: value}
上部分的代码主要的目的就是将请求信息,push到类似栈结构中。
存储模式是:
{
	线程ID1:{'stack':[RequestContext()]},
	线程ID2:{'stack':[RequestContext()]},
	。
	。
	。
	线程IDn:{'stack':[RequestContext()]},
}
接下来使用请求参数
from flask import Flask, request

app = Flask(__name__)


@app.route('/')
def index():
    print(request.method)
    return 'index'


if __name__ == '__main__':
    app.run()
先找到request
# partial是偏函数,提前传值,使用的时候就可以不用传值
request = LocalProxy(partial(_lookup_req_object, "request"))
找_lookup_req_object函数
def _lookup_req_object(name):
	# top就是RequestContext的对象
    top = _request_ctx_stack.top
    if top is None:
        raise RuntimeError(_request_ctx_err_msg)
    # name就是request
    # 这里返回了RequestContext对象的request
    return getattr(top, name)
_request_ctx_stack.top执行了什么?
@property
def top(self):
    try:
    	# self._local.stack执行Local类中的__getattr__
    	# 返回当前线程的stack的值[RequestContext的对象ctx]
        return self._local.stack[-1]
    except (AttributeError, IndexError):
        return None
进入LocalProxy类中
def __init__(self, local, name=None):
	# local就是当前线程的request对象
    object.__setattr__(self, "_LocalProxy__local", local)
    object.__setattr__(self, "__name__", name)
    if callable(local) and not hasattr(local, "__release_local__"):
        # "local" is a callable that is not an instance of Local or
        # LocalManager: mark it as a wrapped function.
        object.__setattr__(self, "__wrapped__", local)
request.method执行的是LocalProxy的__getattr__方法
# name是'method'
def __getattr__(self, name):
    if name == "__members__":
        return dir(self._get_current_object())
    # 从当次请求的request对象中获取method属性
    return getattr(self._get_current_object(), name)
执行self._get_current_object()
def _get_current_object(self):
    if not hasattr(self.__local, "__release_local__"):
    	# self.__local()就是当次请求的request
        return self.__local()
    try:
        return getattr(self.__local, self.__name__)
    except AttributeError:
        raise RuntimeError("no object bound to %s" % self.__name__)


 1674
1674


 被折叠的 条评论
为什么被折叠?
被折叠的 条评论
为什么被折叠?
 到【灌水乐园】发言


