


一、什么是Security?
Security的核心功能
| 1,身份认证(Authentication) | Spring Security提供了多种身份验证机制,包括基于表单、基于HTTP基本认证、基于LDAP等。它允许开发人员通过配置来定义身份验证规则,并且支持自定义身份验证逻辑。 |
| 2.授权(Authorization) | Spring Security支持细粒度的授权控制,可以基于用户、角色或其他自定义规则来限制访问资源。开发人员可以使用注解或配置来定义授权规则,并且可以通过Spring表达式语言实现更复杂的授权逻辑。 |
| 3,攻击防护(Attack Protection) | Spring Security提供了一系列的机制来防止常见的Web应用程序攻击,例如跨站点请求伪造(CSRF)、跨站点脚本攻击(XSS)等。它通过内置的过滤器和安全头部等功能来增强应用程序的安全性。 |
| 4,会话管理(Session Management) | Spring Security可以管理用户的会话,并提供了多种会话管理策略,例如基于cookie的会话,基于URL重写的会话等。 它还支持集群环境下的会话复制和无状态会话。 |
| 5,记住我(Remember Me)功能 | Spring Security提供了"记住我"功能,允许用户在一段时间内保持登录状态,而无需重新输入凭证。这对于那些频繁访问应用程序的用户来说非常方便。 |
Spring Security是一个Java框架,用于保护应用程序的安全性。它提供了一套全面的安全解决方案,包括身份验证、授权、防止攻击等功能。Spring Security基于过滤器链的概念,可以轻松地集成到任何基于Spring的应用程序中。它支持多种身份验证选项和授权策略,开发人员可以根据需要选择适合的方式。此外,Spring Security还提供了一些附加功能,如集成第三方身份验证提供商和单点登录,以及会话管理和密码编码等。总之,Spring Security是一个强大且易于使用的框架,可以帮助开发人员提高应用程序的安全性和可靠性。
二、为什么要使用Security?
安全框架顾名思义,就是解决系统安全问题的框架。任何应用开发的计划阶段都应该确定一组特定的安全需求,如身份验证、授权和加密方式。不使用安全框架之前,我们需要手动处理每个资源的访问控制,针对不同的项目都需要做不同的处理,此时就会显得非常麻烦,并且低效率引起的额外开销会延缓开发周期。使用安全框架,使开发团队能够选择最适合这些需求的框架,可以通过配置的方式实现对资源的访问限制,使得开发更加的高效。
三、引入Security
第一步:先引入依赖
        <dependency>
            <groupId>org.springframework.boot</groupId>
            <artifactId>spring-boot-starter-security</artifactId>
        </dependency>
当我们在项目中加入该依赖后,控制台会打印出一个他默认的password
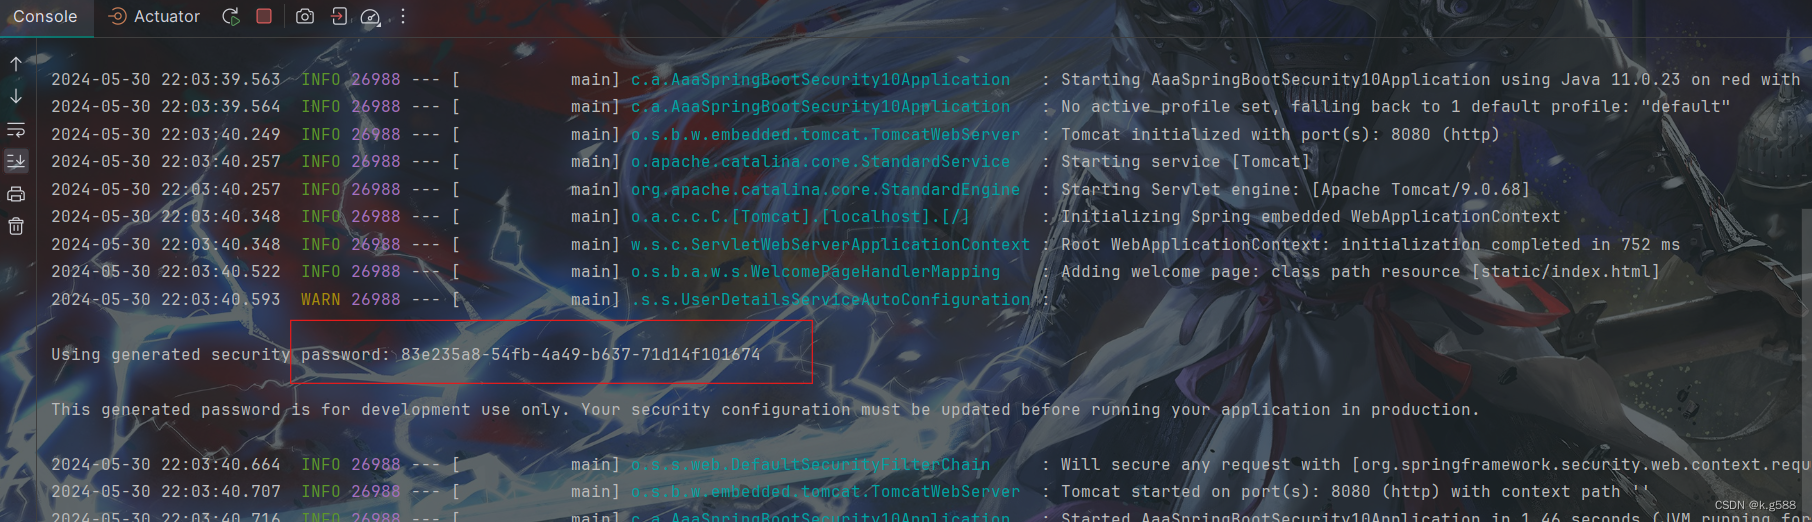
紧接着当我们去浏览器访问我们的项目的时候,Security里面有内置的过滤连、拦截器他会判断我们是否授权登录没,并将我们拦截住,之后他会默认跳转到login这个路径中,这个登录页面是Security自带的这时候由于我们没有定义自己的账号密码,只能使用Security默认的账号密码,username:user,password:就是上方控制台打印出来的那一串。

我们可以在application.yml或properties文件核心配置文件中配置自己的Security账号密码,这时候再次运行项目他就不会在打印他那个默认的password了如下代码,我这里是yml文件
  security:
    user:
      name: kg
      password: 123456
第二步:
毕竟到项目中也不可能使用人家自带的默认页面,现在 咱就来定义一个自己的登录页面替换掉Security的登录页面
<!DOCTYPE html>
<html lang="en" xmlns:th="http://www.w3.org/1999/xhtml">
<head>
    <meta charset="UTF-8">
    <title>Title</title>
</head>
<body>
<form action="/outlogin" method="post">
    <input name="username">
    <input name="password">
    <input type="checkbox" name="remember">记住我
    <button type="submit">login</button>
</form>
</body>
</html>
然后再Controller里定义一个返回自定义登录页面的路径方法,这里Mylogin就是我们自定义的那个登录页面
  @RequestMapping("/outlogin")
    public String login(){
        return "Mylogin";
    }
第三步:配置咱们自己的MySecurityConfig java配置文件
这里会用到两个注解
@Configuration注解表示该类是一个配置类,可以定义Bean等配置信息。
@EnableWebSecurity注解则启用了Spring Security的Web安全功能,使得我们可以自定义安全规则,例如认证、授权等。
首先创建好Java配置文件后,我们要继承一个类WebSecurityConfigurerAdapter,我们要重写里面的一些方法对这个类里的几个方法进行 覆盖
第一个要覆盖的方法
默认的父类代码默认任何request都需要认证,使用默认的login page基于表单认证,使用HTTP基本认证。
     @Override
    protected void configure(HttpSecurity http) throws Exception {
        super.configure(http);
    }
重写后:
.antMatchers("/").permitAll():该方法指定对根路径("/")的HTTP请求允许所有用户访问,即不进行权限验证。permitAll()表示允许所有用户访问该资源。
.antMatchers("/vip1").hasRole("vip1"):是Spring Security框架中的一种权限控制表达式,用于配置访问路径为"/vip1"的资源需要具有"vip1"角色的用户才能访问。如下类推
http.formLogin() :配置表单登录相关设置。
.loginPage("/outlogin"): 设置登录页面的URL为"/outlogin",这也就是我们自定义的登录页面路由路径
.passwordParameter("username") :设置登录表单中用户名参数的名称为"username"。
.passwordParameter("password"): 设置登录表单中密码参数的名称为"password"。
http.csrf().disable() :配置跨站请求伪造(CSRF)保护,将其禁用。
通常情况下,禁用CSRF保护是为了简化开发或测试环境中的特定场景,而不是在生产环境中推荐的做法。CSRF保护是Web应用安全的一个重要方面,它防止恶意第三方在用户已登录的情况下,利用用户的浏览器发起非预期的操作。
 @Override
    protected void configure(HttpSecurity http) throws Exception {
        http.authorizeRequests()
                .antMatchers("/").permitAll()
                .antMatchers("/outlogin").permitAll()
                .antMatchers("/vip1").hasRole("vip1")
                .antMatchers("/vip2").hasRole("vip2")
                .antMatchers("/vip3").hasRole("vip3");
        http.formLogin().loginPage("/outlogin").passwordParameter("username").passwordParameter("password");
        http.csrf().disable();
    }
第二个要覆盖的方法
  @Override
    protected void configure(AuthenticationManagerBuilder auth) throws Exception {
        super.configure(auth);
    }
重写后:
该函数用于配置Spring Security的认证管理器Builder,使用内存中的认证信息进行配置。它通过inMemoryAuthentication()方法指定使用内存中的认证信息,然后通过withUser()方法指定每个用户的用户名、密码和角色。其中,密码使用BCryptPasswordEncoder进行加密编码。该函数配置了三个用户,分别是"admin"、"user"和"guest",它们的密码都是"123456",分别拥有"vip1"、"vip2"和"vip3"的角色。
这些肯定最终都是要使用数据库中的真实角色,只不过现在用来模拟一下用户
@Override
    protected void configure(AuthenticationManagerBuilder auth) throws Exception {
        // 使用inMemoryAuthentication进行内存中的认证配置
        auth.inMemoryAuthentication()
                // 设置密码编码器为BCryptPasswordEncoder
                .passwordEncoder(new BCryptPasswordEncoder())
                // 配置一个名为"admin"的用户,密码为"123456"的加密版本,角色为"vip1"
                .withUser("admin").password(new BCryptPasswordEncoder().encode("123456")).roles("vip1")

                .and()
                .withUser("user").password(new BCryptPasswordEncoder().encode("123456")).roles("vip2")
                .and()
                .withUser("guest").password(new BCryptPasswordEncoder().encode("123456")).roles("vip3");
    }
完整代码:
Java配置
package com.aaa.config;

import org.springframework.context.annotation.Configuration;
import org.springframework.security.config.annotation.authentication.builders.AuthenticationManagerBuilder;
import org.springframework.security.config.annotation.web.builders.HttpSecurity;
import org.springframework.security.config.annotation.web.configuration.EnableWebSecurity;
import org.springframework.security.config.annotation.web.configuration.WebSecurityConfigurerAdapter;
import org.springframework.security.crypto.bcrypt.BCryptPasswordEncoder;


@SuppressWarnings("all")
@Configuration // 表示这是一个配置类
@EnableWebSecurity // 启用Spring Web安全功能
public class MySecurityConfig extends WebSecurityConfigurerAdapter {

    /**
     * 配置认证信息,即用户登录信息。
     * @param auth 认证管理器构建器,用于配置认证逻辑。
     */
    @Override
    protected void configure(AuthenticationManagerBuilder auth) throws Exception {
        // 使用内存中的认证方式进行配置
        auth.inMemoryAuthentication()
                // 设置密码编码器为BCryptPasswordEncoder
                .passwordEncoder(new BCryptPasswordEncoder())
                // 配置一个名为"admin"的用户,密码为"123456"的加密版本,角色为"vip1"
                .withUser("admin").password(new BCryptPasswordEncoder().encode("123456")).roles("vip1")

                .and()
                .withUser("user").password(new BCryptPasswordEncoder().encode("123456")).roles("vip2")
                .and()
                .withUser("guest").password(new BCryptPasswordEncoder().encode("123456")).roles("vip3");
    }

    /**
     * 配置请求的安全规则,即哪些请求需要认证,哪些请求有权限访问等。
     * @param http 用于配置HTTP安全设置的对象。
     */
    @Override
    protected void configure(HttpSecurity http) throws Exception {
        http.authorizeRequests()
                // 配置根路径和登出路径对所有用户开放
                .antMatchers("/").permitAll()
                .antMatchers("/outlogin").permitAll()
                // 配置不同角色对不同资源的访问权限
                .antMatchers("/vip1").hasRole("vip1")
                .antMatchers("/vip2").hasRole("vip2")
                .antMatchers("/vip3").hasRole("vip3");
        // 配置登录页面和登录相关的参数
        http.formLogin().loginPage("/outlogin").passwordParameter("username").passwordParameter("password");
        // 禁用跨站请求伪造(CSRF)保护
        http.csrf().disable();
    }
}
Controller路由路径
@Controller
public class MyController {
@RequestMapping("/outlogin")
public String login(){
return "Mylogin";
}
@RequestMapping("/vip1")
public String VipTest1(){
return "vip1";
}
@RequestMapping("/vip2")
public String VipTest2(){
return "vip2";
}
@RequestMapping("/vip3")
public String VipTest3(){
return "vip3";
}
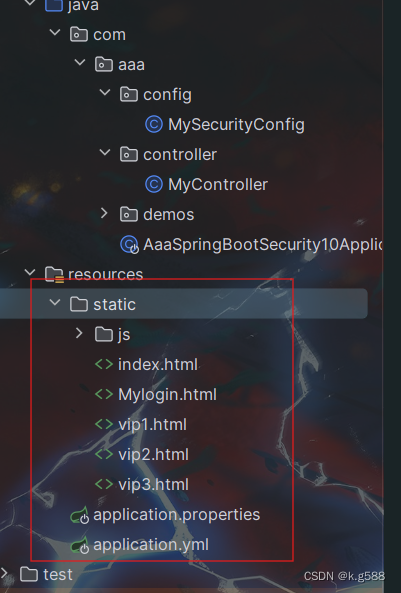
}html代码结构
除了当时自定义的Mylogin.html动过以外,其他的页面没有任何配置以及代码,只不过是测试用的
配置完成之后当你浏览器访问项目路径时,除了/根目录可以访问之外其他的VIp页面都需要登录认证相对应的账号


 2万+
2万+

 被折叠的 条评论
为什么被折叠?
被折叠的 条评论
为什么被折叠?
 到【灌水乐园】发言


