


Spring Cloud Gateway官网:Spring Cloud Gateway
局域网中就有网关这个概念,局域网接收数据或发送数据都要通过网关,比如使用VMware虚拟机软件搭建虚拟机集群的时候,往往我们需要选择IP段中的⼀个IP作为网关地址,网关可以对请求进行控制,提升我们系统的安全性
Spring Cloud Gateway是Spring Cloud的一个全新项目,目标是取代Netflix公司的Zuul网关,它基于 Spring 5 + SpringBoot2.0 + WebFlux(等同于Spring MVC) (基于高性能的Reactor模式响应式通信框架Netty,异步非阻塞模型)等技术构建,性能高于Zuul网关,官方测试Gateway是Zuul性能的1.6倍,旨在为微服务架构提供一种简单有效的统一的API路由管理方式。
Spring Cloud Gateway不仅提供统一的路由方式(反向代理)并且基于Filter(定义过滤器对请求过滤,完成一些功能)链的方式提供了网关基本的功能。例如:鉴权、流量控制、熔断、路径重写、日志监控等
Gateway核心概念
底层是基于Reactor模型(同步非阻塞的I/O多路复用机制),一个请求到达网关后,可以设置条件,来控制请求是否能通过,也可以进行一些比较具体的控制(限流,日志,黑白名单)
路由(route):在vue中路由决定了请求的去向,在网关中每一个路由有一个ID,一个目标地址(URL),也可以有Predicates断言(匹配条件判断)和Filter过滤器(精细化控制)
断言(predicates):匹配判断条件
过滤器(filter),一个标准的Spring Web Filter,使用过滤器可以在请求之前或者之后执行业务逻辑
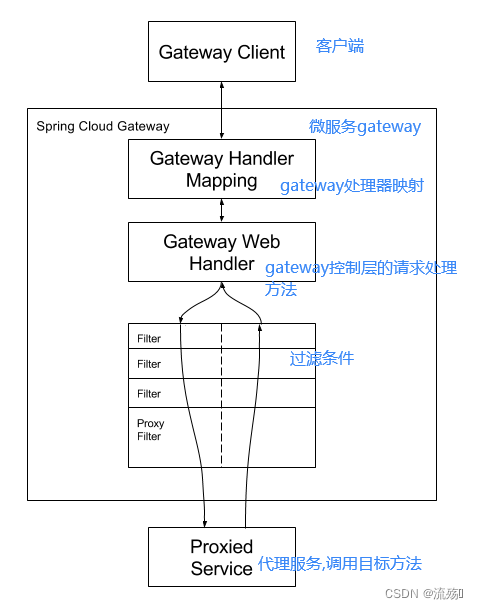
工作流程图(可以到官网查看)
客户端向Spring Cloud Gateway发出请求,然后在Gateway Handler Mapping中找到与请求相匹配的路由,将其发送到Gateway Web Handler;Handler再通过指定的过滤器链来将请求发送到我们实际的服务执行业务逻辑然后返回。过滤器之间用虚线分开是因为过滤器可能会在发送代理请求之前(pre)或者之后(post)执行业务逻辑。
Filter在"pre"类型过滤器中可以做参数校验、权限校验、流量监控、日志输出、协议转换等,在"post"类型的过滤器中可以做响应内容、响应头的修改、日志的输出、流量监控等。
在Spring Cloud整合Gateway
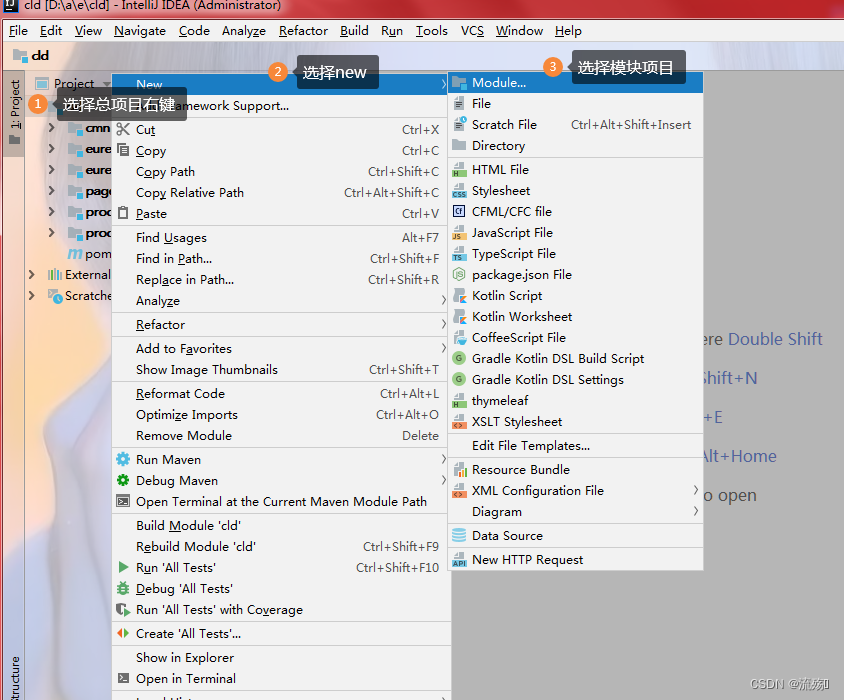
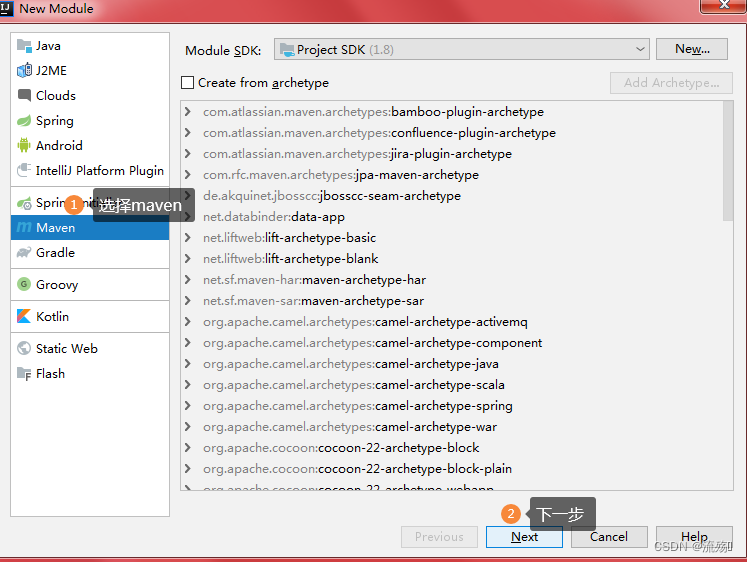
1.创建cloud的微服务项目
2..引入yom文件
 <!-- Spring Boot父启动器依赖 -->
    <parent>
        <groupId>org.springframework.boot</groupId>
        <artifactId>spring-boot-starter-parent</artifactId>
        <version>2.1.6.RELEASE</version>
        <relativePath/>
    </parent>

    <dependencies>
        <dependency>
            <groupId>org.springframework.cloud</groupId>
            <artifactId>spring-cloud-commons</artifactId>
        </dependency>
        <dependency>
            <groupId>org.springframework.cloud</groupId>
            <artifactId>spring-cloud-starter-netflix-eureka-client</artifactId>
        </dependency>
        <!-- 1Gateway网关 -->
        <dependency>
            <groupId>org.springframework.cloud</groupId>
            <artifactId>spring-cloud-starter-gateway</artifactId>
        </dependency>
        <!-- 2引入WebFlux -->
        <dependency>
            <groupId>org.springframework.boot</groupId>
            <artifactId>spring-boot-starter-webflux</artifactId>
        </dependency>
        <!-- 日志依赖 -->
        <dependency>
            <groupId>org.springframework.boot</groupId>
            <artifactId>spring-boot-starter-logging</artifactId>
        </dependency>
        <!-- 测试依赖 -->
        <dependency>
            <groupId>org.springframework.boot</groupId>
            <artifactId>spring-boot-starter-test</artifactId>
            <scope>test</scope>
        </dependency>
        <!-- Lombok工具 -->
        <dependency>
            <groupId>org.projectlombok</groupId>
            <artifactId>lombok</artifactId>
            <version>1.18.4</version>
            <scope>provided</scope>
        </dependency>
        <!-- 引入Jaxb开始 -->
        <dependency>
            <groupId>com.sun.xml.bind</groupId>
            <artifactId>jaxb-core</artifactId>
            <version>2.2.11</version>
        </dependency>
        <dependency>
            <groupId>javax.xml.bind</groupId>
            <artifactId>jaxb-api</artifactId>
        </dependency>
        <dependency>
            <groupId>com.sun.xml.bind</groupId>
            <artifactId>jaxb-impl</artifactId>
            <version>2.2.11</version>
        </dependency>
        <dependency>
            <groupId>org.glassfish.jaxb</groupId>
            <artifactId>jaxb-runtime</artifactId>
            <version>2.2.10-b140310.1920</version>
        </dependency>
        <dependency>
            <groupId>javax.activation</groupId>
            <artifactId>activation</artifactId>
            <version>1.1.1</version>
        </dependency>
        <!-- 引入Jaxb结束 -->
        <!-- Actuator可以帮助你监控和管理Spring Boot应用 -->
        <dependency>
            <groupId>org.springframework.boot</groupId>
            <artifactId>spring-boot-starter-actuator</artifactId>
        </dependency>
        <!-- 热部署 -->
        <dependency>
            <groupId>org.springframework.boot</groupId>
            <artifactId>spring-boot-devtools</artifactId>
            <optional>true</optional>
        </dependency>
        <!-- 链路追踪 -->
        <dependency>
            <groupId>org.springframework.cloud</groupId>
            <artifactId>spring-cloud-starter-sleuth</artifactId>
        </dependency>
        <dependency>
            <groupId>org.springframework.cloud</groupId>
            <artifactId>spring-cloud-starter-zipkin</artifactId>
        </dependency>
    </dependencies>

    <dependencyManagement>
        <!-- Spring Cloud依赖版本管理 -->
        <dependencies>
            <dependency>
                <groupId>org.springframework.cloud</groupId>
                <artifactId>spring-cloud-dependencies</artifactId>
                <version>Greenwich.RELEASE</version>
                <type>pom</type>
                <scope>import</scope>
            </dependency>
        </dependencies>
    </dependencyManagement>

    <build>
        <plugins>
            <!-- 编译插件 -->
            <plugin>
                <groupId>org.apache.maven.plugins</groupId>
                <artifactId>maven-compiler-plugin</artifactId>
                <configuration>
                    <source>1.8</source>
                    <target>1.8</target>
                    <encoding>utf-8</encoding>
                </configuration>
            </plugin>
            <!-- 打包插件 -->
            <plugin>
                <groupId>org.springframework.boot</groupId>
                <artifactId>spring-boot-maven-plugin</artifactId>
            </plugin>
        </plugins>
    </build>
3.创建项目启动类
import org.springframework.boot.SpringApplication;
import org.springframework.boot.autoconfigure.SpringBootApplication;
import org.springframework.cloud.client.discovery.EnableDiscoveryClient;

@EnableDiscoveryClient
@SpringBootApplication
public class CloudApplilcation9300 {
    public static void main(String[] args) {
        SpringApplication.run(CloudApplilcation9300.class,args);
    }
}
4.编写配置文件
application.properties
server.port=9300
eureka.client.service-url.defaultZone= http://LEQCloudEurekaServerA:9200/eureka,http://LEQCloudEurekaServerB:9201/eureka
eureka.instance.prefer-ip-address=true
eureka.instance.instance-id=${spring.cloud.client.ipaddress}:${spring.application.name}:${server.port}:@project.version@


spring.application.name=leq-cloud-gateway
application.yml
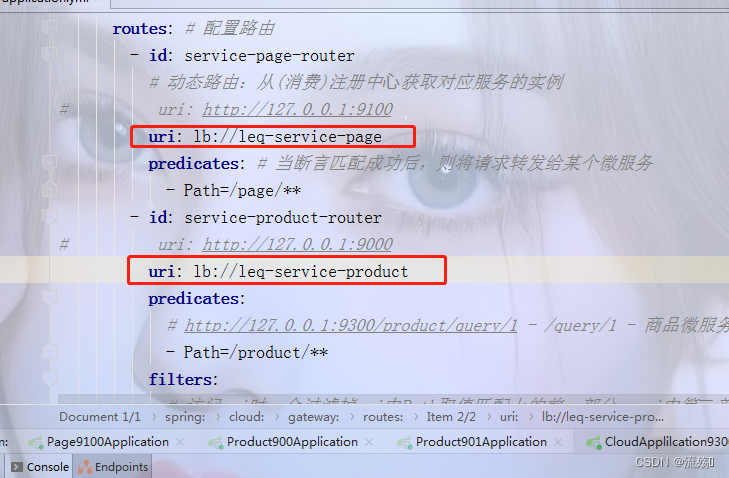
spring:
  cloud:
    gateway:   # gateway网关配置
      routes: # 配置路由
        - id: service-page-router
          # 动态路由:从(消费)注册中⼼获取对应服务的实例
          uri: http://127.0.0.1:9100
          predicates: # 当断言匹配成功后,则将请求转发给某个微服务
            - Path=/page/**
        - id: service-product-router
          uri: http://127.0.0.1:9000
          predicates:
            # http://127.0.0.1:9300/product/query/1 - /query/1 - 商品微服务
            - Path=/product/**
          filters:
            # 访问uri时,会过滤掉uri中Path取值匹配上的前一部分,uri中第二部分才是目标访问路径
            - StripPrefix=1
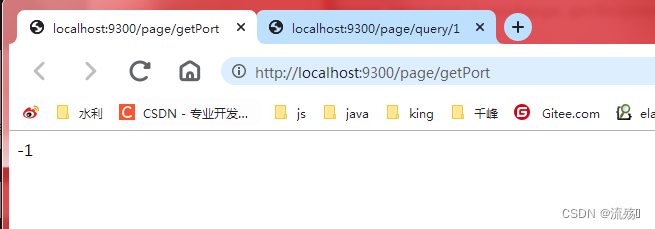
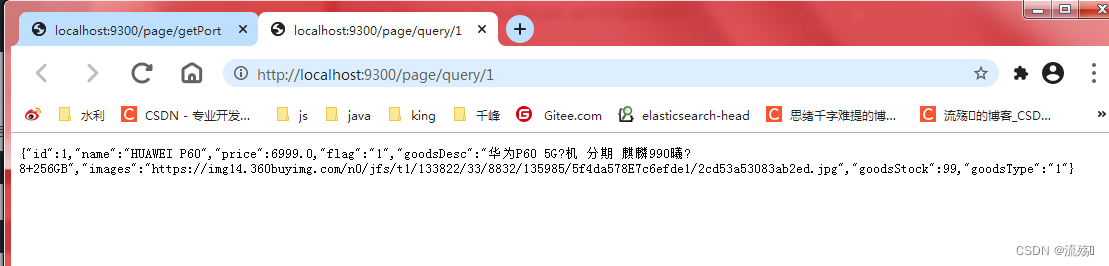
5.重启整个微服务的项目,先启动两个服务注册中心,剩下的在服务中心之后即可,访问生产者的端口需要我们多加一个路径,因为我们配置了会将path路径的上一部分过滤掉
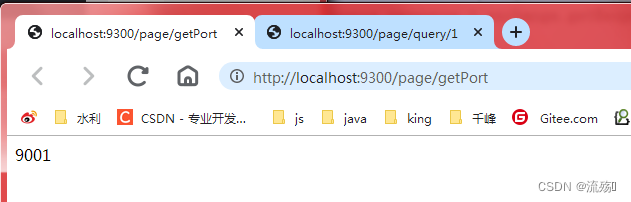
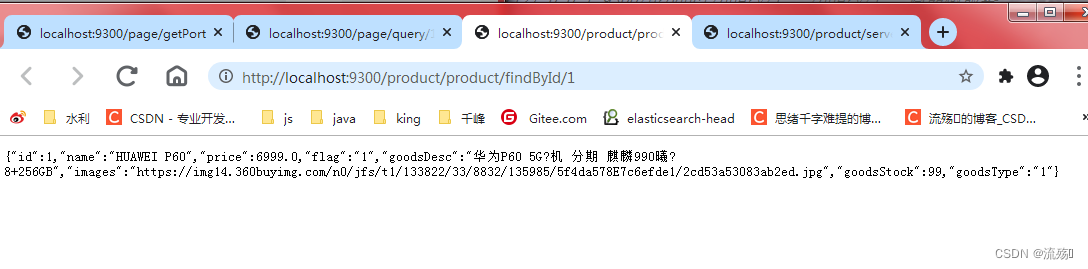
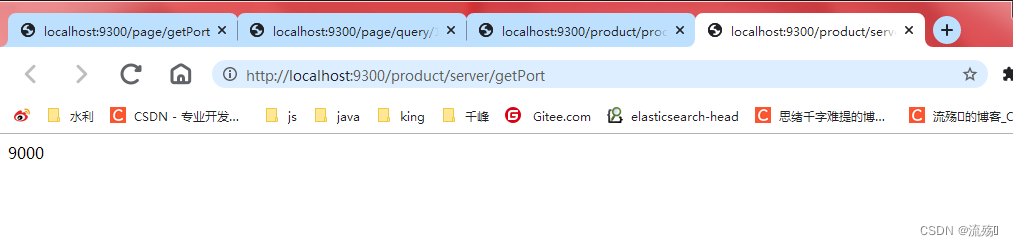
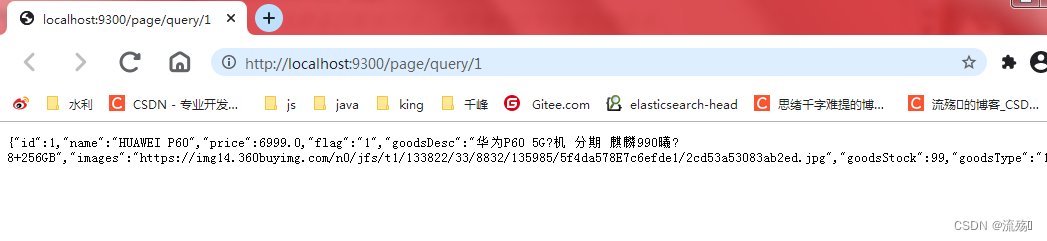
http://localhost:9300/page/getPorthttp://localhost:9300/page/query/1http://localhost:9300/product/product/findById/1http://localhost:9300/product/server/getPort
6.动态路由(从注册中心获取对应服务的实例)
lb://+注册中心服务名
uri: lb://leq-service-page
重启cloud服务我们刚刚的接口都还可以正常访问
过滤器
生命周期
pre:这种过滤器在请求被路由之前调用。我们可利用这种过滤器实现身份验证、在集群中选择请求的微服务、记录调试信息等
post:这种过滤器在路由到微服务以后执行。这种过滤器可用来为响应添加标准的HTTP Header、收集统计信息和指标、将响应从微服务发送给客户端等
类型
GatewayFilter:应用到单个路由上
GlobalFilter:应用到所有的路由上
过滤器的使用:1.创建filter的配置类,来拦截消息并判断是否放行
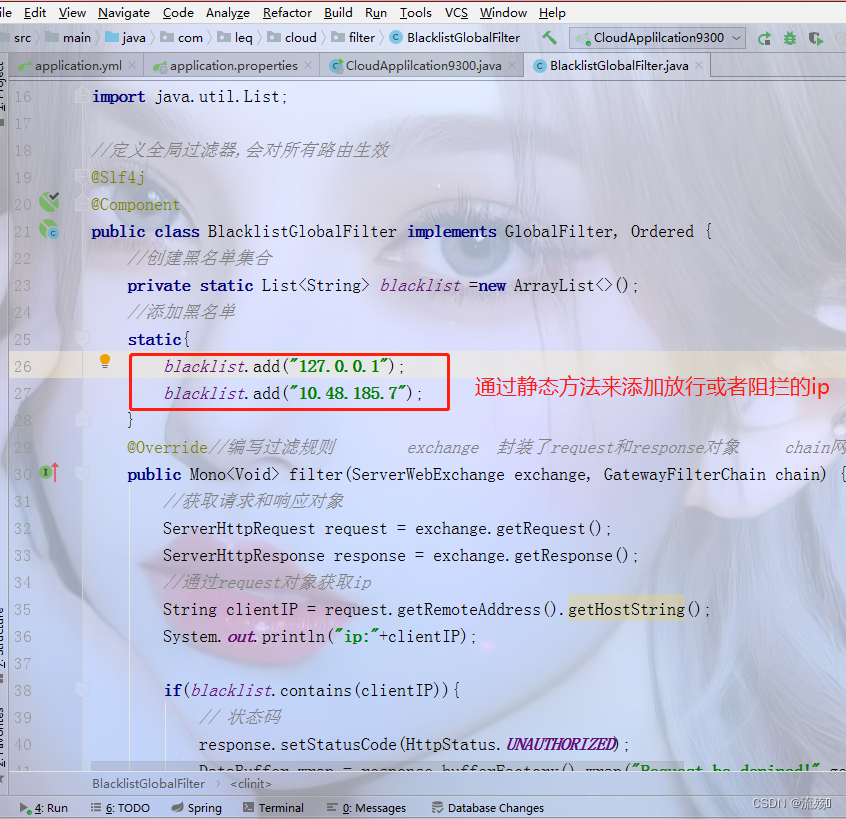
import lombok.extern.slf4j.Slf4j;
import org.springframework.cloud.gateway.filter.GatewayFilterChain;
import org.springframework.cloud.gateway.filter.GlobalFilter;
import org.springframework.core.Ordered;
import org.springframework.core.io.buffer.DataBuffer;
import org.springframework.http.HttpStatus;
import org.springframework.http.server.reactive.ServerHttpRequest;
import org.springframework.http.server.reactive.ServerHttpResponse;
import org.springframework.stereotype.Component;
import org.springframework.web.server.ServerWebExchange;
import reactor.core.publisher.Mono;

import java.util.ArrayList;
import java.util.List;

//定义全局过滤器,会对所有路由生效
@Slf4j
@Component
public class BlacklistGlobalFilter implements GlobalFilter, Ordered {
    //创建黑名单集合
    private static List<String> blacklist =new ArrayList<>();
    //添加黑名单
    static{
        blacklist.add("127.0.0.1");
        blacklist.add("10.48.185.7");
    }
    @Override//编写过滤规则        exchange  封装了request和response对象     chain网关过滤器链(全局过滤器,单路由过滤器)  Mono对象
    public Mono<Void> filter(ServerWebExchange exchange, GatewayFilterChain chain) {
        //获取请求和响应对象
        ServerHttpRequest request = exchange.getRequest();
        ServerHttpResponse response = exchange.getResponse();
        //通过request对象获取ip
        String clientIP = request.getRemoteAddress().getHostString();
        System.out.println("ip:"+clientIP);

        if(blacklist.contains(clientIP)){
            // 状态码
            response.setStatusCode(HttpStatus.UNAUTHORIZED);
            DataBuffer wrap = response.bufferFactory().wrap("Request be denined!".getBytes());
            //拒绝访问,返回执行的结果数据
            return  response.writeWith(Mono.just(wrap));
        }
        //合法请求放行
        return chain.filter(exchange);
    }

    @Override//返回值表示当前过滤器过滤的顺序,数字越小越靠前
    public int getOrder() {
        return 0;
    }
}
2.重启cloud服务器
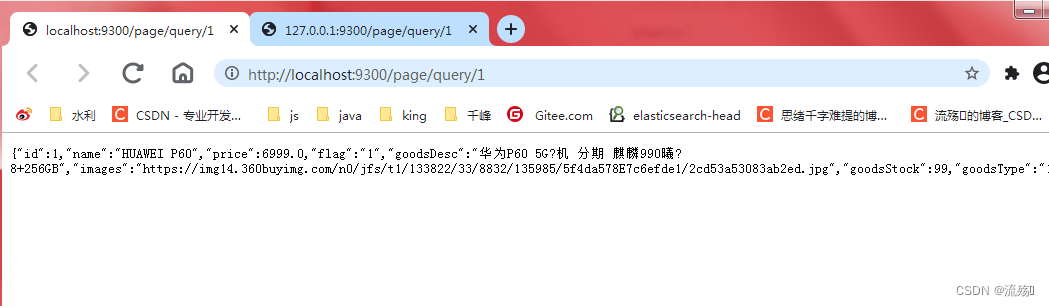
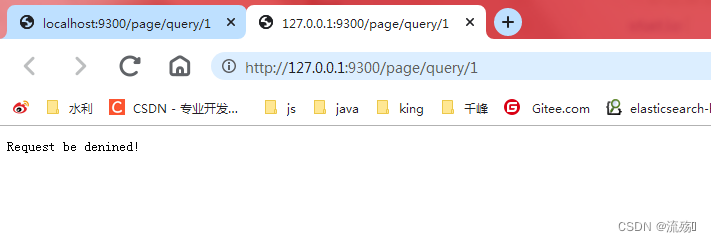
可以看到我们配置放心的可以正常访问,被拦截的就返回的是我们自定义的返回值
高可用
配置多个Gateway实例
upstream gateway {
     server 127.0.0.1:9300;
     server 127.0.0.1:9301;
}
location / { proxy_pass http://gateway; }启动多个Gateway实例来实现高可用,在Gateway的上游使用Nginx等负载均衡设
备进行负载转发以达到高可用的目的


 1813
1813


 被折叠的 条评论
为什么被折叠?
被折叠的 条评论
为什么被折叠?
 到【灌水乐园】发言


