


2.IOC
1)IOC基本思想
IOC:反转控制
反转控制方式获取资源:反转了资源的获取方向——改由容器主动的将资源推送给需要的组件,开发人员不需要指定容器是如何创建资源对象的,只需要提供接受资源的方式即可,极大的降低了学习成本,提高了开发的效率,这种行为也称为查找的被动方式。
DI(Dependency injection):依赖注入
DI是IOC的另一种表达方式,即组件以一些预先定义好的方式(如:setter方法)接受来自于容器的资源注入,相对于IOC而言,这种表达更直接。
2)IOC容器在Spring中的实现
Spring的IOC容器是IOC思想的一个落地的产品实现。IOC容器中管理的组件也叫bean,在创建bean之前,首先需要创建IOC容器,Spring提供了IOC容器的两种实现方式:
-
BeanFactory
这是IOC容器的基本实现,是Spring内部使用的接口,面向Spring本身,不提供给开发人员使用。
-
ApplicationContext
BeanFactory的子接口,提供了更多高级特性,面向Spring的使用者,几乎所有的场合都使用ApplictionContext,而不是底层的BeanFactory
ApplicationContext的具体实现类
(双击shift可打开搜索框,ctrl+h可以看类之间的关系)
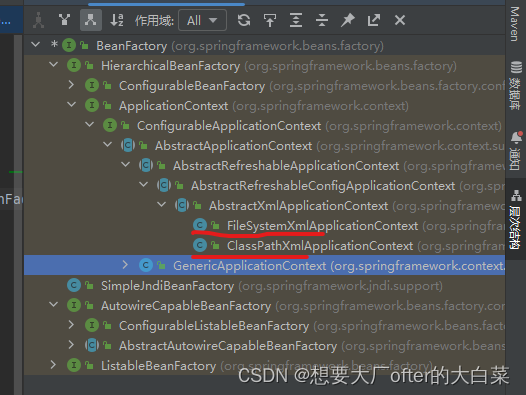
| 类型名 | 简介 |
|---|---|
| ClassPathXmlApplicationContext | 通过读取类路径下的XML格式的配置文件创建IOC容器对象 |
| FileSystemXmlApplicationContext | 通过文件系统路径读取XML格式的配置文件创建IOC容器对象 |
| ConfigurableApplicationContext | ApplicationContext的子接口,包含一些扩展方法refresh()和close(),让ApplicationContext具有启动,关闭和刷新上下文的能力 |
| WebApplicationContext | 专门为Web应用准备,基于Web环境创建IOC容器对象,并将对象引入存入ServletContext域中。 |
3)基于XML管理bean
1>入门案例
-
创建Maven Module
-
引入依赖
<dependencies> <dependency> <groupId>junit</groupId> <artifactId>junit</artifactId> <version>4.12</version> <scope>test</scope> </dependency> <dependency> <groupId>org.springframework</groupId> <artifactId>spring-context</artifactId> <version>5.3.1</version> </dependency> </dependencies> -
创建类hello
public class hello { public void sayHello(){ System.out.println("hello"); } } -
创建Spring配置文件(一般命名:applicationContext)
-
在Spring的配置文件中配置bean
bean:配置一个bean对象,将对象交给IOC容器
属性:
id:bean的唯一标识,不能重复
class:设置bean对象所对应的类型
<?xml version="1.0" encoding="UTF-8"?> <beans xmlns="http://www.springframework.org/schema/beans" xmlns:xsi="http://www.w3.org/2001/XMLSchema-instance" xsi:schemaLocation="http://www.springframework.org/schema/beans http://www.springframework.org/schema/beans/spring-beans.xsd"> <bean id="hello" class="org.example.pojo.hello"> </bean> </beans> -
测试
    @Test
    public void test(){
//        获取IOC容器
        ApplicationContext ioc = new ClassPathXmlApplicationContext("appilcationContext.xml");
//        获取IOC容器中的bean
        hello hello = (org.example.pojo.hello)ioc.getBean("hello");
        hello.sayHello();
    }
2>获取bean
三种方式:
-
通过bean名获取
hello hello = (org.example.pojo.hello)ioc.getBean("hello") -
通过bean的类型获取,注意:此时要求IOc容器中有且只有一个于类型相匹配的类型
Student student = ioc.getBean(Student.class) -
通过bean的id和类型来获取
Student student = ioc.getBean("student",Student.class)
-
如果组件类实现了接口,根据接口类型可以获取bean,但前提是bean是唯一的
-
如果一个接口有多个实现类,这些实现类都配置了bean,根据接口类型就不能获取bean了,因为bean不唯一
-
即通过bean的类型,bean所继承的类的类型,bean所实现的接口的类型都可以获取bean
如:
测试:
  @Test
    public void test(){
//        获取IOC容器
        ApplicationContext ioc = new ClassPathXmlApplicationContext("appilcationContext.xml");
//        获取IOC容器中的bean
        person person = ioc.getBean(org.example.pojo.person.class);

        System.out.println(person);
    }
3>依赖注入之setter
setter注入就是通过stetter方法为bean属性赋值
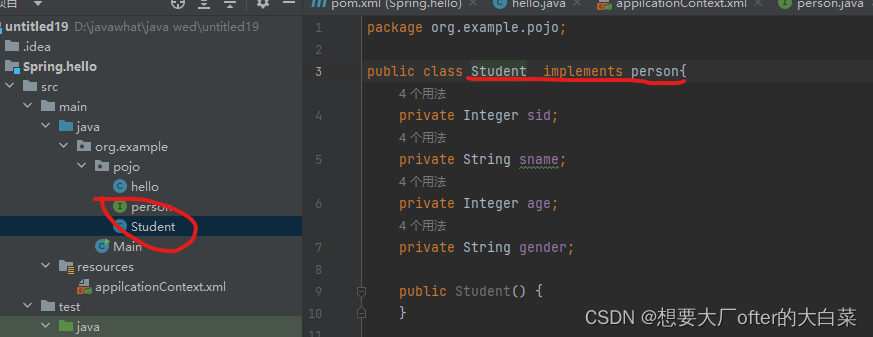
1)创建Student类:
public class Student {
    private Integer sid;
    private String sname;
    private Integer age;
    private String gender;

    public Student() {
    }

    public Student(Integer sid, String sname, Integer age, String gender) {
        this.sid = sid;
        this.sname = sname;
        this.age = age;
        this.gender = gender;
    }

    public Integer getSid() {
        return sid;
    }

    public void setSid(Integer sid) {
        this.sid = sid;
    }

    public String getSname() {
        return sname;
    }

    public void setSname(String sname) {
        this.sname = sname;
    }

    public Integer getAge() {
        return age;
    }

    public void setAge(Integer age) {
        this.age = age;
    }

    public String getGender() {
        return gender;
    }

    public void setGender(String gender) {
        this.gender = gender;
    }

    @Override
    public String toString() {
        return "Student{" +
                "sid=" + sid +
                ", sname='" + sname + '\'' +
                ", age=" + age +
                ", gender='" + gender + '\'' +
                '}';
    }
}
2)配置bean时为属性赋值
property标签:通过组件的setXxx()方法为组件对象设置属性
name属性:指定属性名(这个属性名是getXxx(),setXxx()方法定义的,于成员变量无关)
value属性:指定属性值
<bean id="StudentOne" class="org.example.pojo.Student">
    <property name="sid" value="12345"/>
    <property name="sname" value="张三"/>
</bean>
3)测试
    @Test
    public void test(){
//        获取IOC容器
        ApplicationContext ioc = new ClassPathXmlApplicationContext("appilcationContext.xml");
//        获取IOC容器中的bean
        Student student = ioc.getBean("student",Student.class);

        System.out.println(student.toString());
    }
4>依赖注入之构造器注入:
就是通过bean的构造方法来为bean赋值,用法于setter是一样的
5>特殊值处理:
- null值:
<bean id="student" class="org.example.pojo.Student">
    <property name="sid" value="12345"/>
    <property name="sname" value="张三"/>
    <property name="gender"><null></null></property>
</bean>
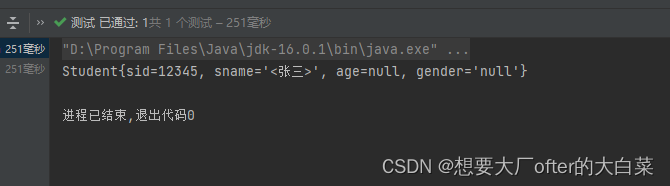
- xml实体:
小于号在xml文档中用来定义标签的开始,不能随意使用
解决方法一:用xml实体来代替
<property name="sname" value="<张三>"/>

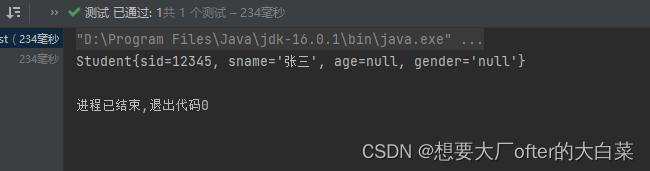
解决方法二:CDATA节
其中的内容会原样解析
<![CDATA[]]>是xml中的一个特殊的标签,因此不能写在一个属性中<bean id="student" class="org.example.pojo.Student">
<property name="sid" value="12345"/>
<property name="sname" >
<value><![CDATA[<张三>]]></value>
</property>
<property name="gender"><null></null></property>
</bean>
6>为类类型属性赋值:
-
引用外部bean
<bean id="clazzOne" class="org.example.pojo.Clazz"> <property name="cid" value="123"/> <property name="cname" value="7班"/> </bean> <bean id="studentOne" class="org.example.pojo.Student"> <property name="sid" value="12345"/> <property name="sname" value="王五"/> <property name="age" value="18"/> <property name="gender" value="男"/> <!-- ref:引用IOC容器中的某个bean的id--> <property name="clazz" ref="clazzOne"/> </bean> -
级联的方式(但要保证提前为属性类赋值或者实例化,所有不常用)
<bean id="studentOne" class="org.example.pojo.Student"> <property name="sid" value="12345"/> <property name="sname" value="王五"/> <property name="age" value="18"/> <property name="gender" value="男"/> <property name="clazz.cid" value="123"/> <property name="clazz.cname" value="1班"/> </bean> -
内部bean
但要注意内部bean无法通过IOC容器直接获取
<bean id="studentOne" class="org.example.pojo.Student">
    <property name="sid" value="12345"/>
    <property name="sname" value="王五"/>
    <property name="age" value="18"/>
    <property name="gender" value="男"/>
    <property name="clazz">
        <bean id="clazzInner" class="org.example.pojo.Clazz">
            <property name="cid" value="111"/>
            <property name="cname" value="we12"/>
        </bean>
    </property>
</bean>
7>为数组类型属性赋值
为String hobby[]数组赋值
<bean id="student" class="org.example.pojo.Student">
    <property name="sid" value="12345"/>
    <property name="sname" >
        <value><![CDATA[<张三>]]></value>
    </property>
    <property name="gender"><null></null></property>
    <property name="hobby">
        <array>
            <value>看电影</value>
            <value>读书</value>
            <value>打篮球</value>
        </array>
    </property>
</bean>
8>为list集合类型赋值
在班级Clazz中添加学生集合list list;
方法一:使用List标签
为list赋值(student,studentOne是以创建好的bean):
<bean id="clazzOne" class="org.example.pojo.Clazz">
    <property name="cid" value="123"/>
    <property name="cname" value="7班"/>
    <property name="list">
        <list>
            <ref bean="studentOne"/>
            <ref bean="student"/>
        </list>
    </property>
</bean>
方法二:配置一个集合类型的bean,需要使用util的约束
<bean id="clazzOne" class="org.example.pojo.Clazz">
    <property name="cid" value="123"/>
    <property name="cname" value="7班"/>
    <property name="list" ref="studentList"/>
</bean>


<util:list id="studentList">
    <ref bean="student"></ref>
    <ref bean="studentOne"/>
</util:list>
9>为map集合属性赋值
创建一个新类teacher
方法一:与 2.3)8>的方法一相同
<bean id="student" class="org.example.pojo.Student">
    <property name="sid" value="12345"/>
    <property name="sname" >
        <value><![CDATA[<张三>]]></value>
    </property>
    <property name="gender"><null></null></property>
    <property name="hobby">
        <array>
            <value>看电影</value>
            <value>读书</value>
            <value>打篮球</value>
        </array>
    </property>

    <property name="teacherMap">
        <map>
            <entry key="10011" value-ref="teacherOne"/>
            <entry key="10012" value-ref="teacherTow"/>
        </map>
    </property>
</bean>


<bean id="teacherOne" class="org.example.pojo.Teacher">
    <property name="tid" value="10011"/>
    <property name="tname" value="阿瓦达"/>
</bean>

<bean id="teacherTow" class="org.example.pojo.Teacher">
    <property name="tid" value="10012"/>
    <property name="tname" value="服务瑟夫"/>
</bean>
方法二:与 2.3)8>的方法二相同,用util约束
<bean id="student" class="org.example.pojo.Student">
    <property name="sid" value="12345"/>
    <property name="sname" >
        <value><![CDATA[<张三>]]></value>
    </property>
    <property name="gender"><null></null></property>
    <property name="hobby">
        <array>
            <value>看电影</value>
            <value>读书</value>
            <value>打篮球</value>
        </array>
    </property>

    <property name="teacherMap" ref="teacherMap"/>

</bean>


<util:map id="teacherMap">
    <entry key="10011" value-ref="teacherOne"/>
    <entry key="10012" value-ref="teacherTow"/>
</util:map>
10>p命名空间
就是用属性来赋值,使用p命名空间时一定要有p命名空间的约束
<bean id="student" class="org.example.pojo.Student"
p:sid="34142" p:sname="小米" p:teacherMap-ref="teacherMap">
</bean>
11>引入外部属性文件管理数据源
引入依赖:
        <dependency>
            <groupId>mysql</groupId>
            <artifactId>mysql-connector-java</artifactId>
            <version>8.0.33</version>
        </dependency>

<!--        数据源-->
        <dependency>
            <groupId>com.alibaba</groupId>
            <artifactId>druid</artifactId>
            <version>1.0.31</version>
        </dependency>
在spring配置文件中创建数据源bean
其中,用外部引入文件来引入数据库的相关属性值以方便维护
<!--    引入jdbc.properties-->
    <context:property-placeholder location="jdbc.properties"/>

    <bean id="dataSource" class="com.alibaba.druid.pool.DruidDataSource">
        <property name="driverClassName" value="${jdbc.driver}"/>
        <property name="url" value="${jdbc.url}"/>
        <property name="username" value="${jdbc.username}"/>
        <property name="password" value="${jdbc.password}"/>

    </bean>
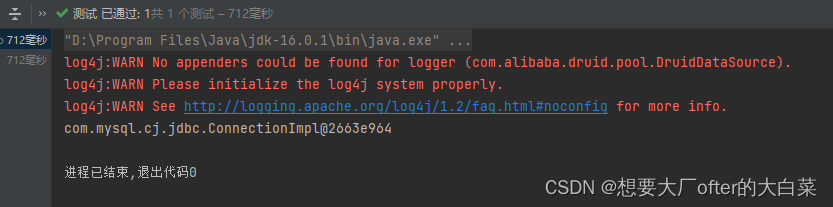
测试:
@Test
public void test() throws SQLException {

    ApplicationContext applicationContext = new ClassPathXmlApplicationContext("spring-datasoures.xml");
    DruidDataSource druidDataSource = applicationContext.getBean(DruidDataSource.class);
    System.out.println(druidDataSource.getConnection());

}
结果:由于没有配置log4j,所有御用jog4j的相关警告
12>bean的作用域
在Spring中可以通过配置bean标签的scope属性来指定bean的作用域范围,各取值含义参数如下表
| 取值 | 含义 | 创建对象的时机 |
|---|---|---|
| singleton(默认) | 在IOC容器中,这个bean的对象始终为单实例 | IOC初始化时 |
| prototype | 这个bean在IOC容器中有多个实例 | 获取bean时 |
如果在WebApplicationContext环境下还会有另两个作用域:
| 取值 | 含义 |
|---|---|
| request | 在一个请求范围内有效 |
| session | 在一个会话范围内有效 |
13>bean的生命周期
具体的生命周期过程
-
bean对象创建(调用无参构造器)
-
给bean对象设置属性
-
bean对象初始化之前的操作(由bean的后置处理器负责)
-
bean对象初始化(需在配置bean时指定初始化方法)
-
bean对象初始化之后的操作(由bean的后置处理器负责)
-
bean对象就绪可以使用
-
bean对象销毁(需在配置bean时指定销毁方法)
-
IOC容器关闭
14>FactoryBean
简介:
FactoryBean是Spring提供的一种整合第三方架构的常用机制,和普通的bean不同,配置一个FactoryBean类型的bean,在获取bean的时候,得到的并不是class属性中的配置的这个类对象,而是getObject()方法的的返回值,通过这种机制,Spring可以帮助我们把复杂组件创建的详细过程和繁琐细节都屏蔽起来,只把最简洁的使用界面展示给我们。
将来我们整合MyBatis时,Spring就是通过FactoryBean机制来帮我们创建SQlSessionFactory对象的
FactoryBean是一个接口,需要创建一个类实现该接口
其中由三个方法:
getObject():通过一个对象交给IOC容器管理
getObjectType():设置索取提供的对象的类型
isSingleton():所提供的对象是否单例
当把FactoryBean的实现类配置为bean时,会将当前类中的getObject()所返回的对象交给IOC容器管理


 1114
1114


 被折叠的 条评论
为什么被折叠?
被折叠的 条评论
为什么被折叠?
 到【灌水乐园】发言


