


 该文章介绍了如何使用ApachePOI库在Java中创建一个简单的Excel文件。首先,可以通过Maven添加POI依赖,然后创建一个实体类`Member`来表示数据。接着,通过`CreateSimpleExcelToDisk`类,构建Excel文件,包括设置表头和填充数据。最后,可以将文件保存到指定位置或实现下载功能。
1.首先下载poi-3.6-20091214.jar,下载地址如下:
http://download.csdn.net/detail/evangel_z/3895051
或者使用Maven仓库管理,在pom文件添加坐标
        <dependency>
            <groupId>org.apache.poi</groupId>
            <artifactId>poi</artifactId>
            <version>3.15</version>
        </dependency>
2.MergeCell.java 创建一个实体对象
package com.example.entity;

import lombok.AllArgsConstructor;
import lombok.Data;
import lombok.NoArgsConstructor;

@Data
@NoArgsConstructor
@AllArgsConstructor
public class MergeCell {
    /** 合并开始行 */
    private Integer firstRow;
    /** 合并结束行 */
    private Integer lastRow;
    /** 合并开始列 */
    private Integer firstCol;
    /** 合并结束列 */
    private Integer lastCol;
}
3.访问接口类
package com.example.controller;


import lombok.extern.slf4j.Slf4j;
import org.apache.poi.hssf.usermodel.*;
import org.apache.poi.ss.usermodel.HorizontalAlignment;
import org.apache.poi.ss.usermodel.IndexedColors;
import org.apache.poi.ss.usermodel.VerticalAlignment;
import org.apache.poi.ss.util.CellRangeAddress;
import org.springframework.web.bind.annotation.PostMapping;
import org.springframework.web.bind.annotation.RequestMapping;
import org.springframework.web.bind.annotation.RestController;

import javax.servlet.http.HttpServletResponse;
import java.io.FileOutputStream;
import java.util.*;

@RestController
@RequestMapping("order/")
@Slf4j
public class OneController {
    @PostMapping("/bb")
    public void createExcel(HttpServletResponse response) {
        // 第一步,创建一个webbook,对应一个Excel文件
        HSSFWorkbook wb = new HSSFWorkbook();
        //获取数据
        HashMap<String, List<HashMap<String, String>>> map = getMemberList();
        int index = 0;
        for (Map.Entry<String, List<HashMap<String, String>>> stringListEntry : map.entrySet()) {
            // 第二步,在webbook中添加一个sheet,对应Excel文件中的sheet
            HSSFSheet sheet = null;
            if (0 == index) {
                sheet = wb.createSheet("学生表");
            }
            if (1 == index) {
                sheet = wb.createSheet("城市表");
            }
            //第三步.设置格式
            //设置表头格式
            HSSFCellStyle style = wb.createCellStyle();
            style.setAlignment(HorizontalAlignment.CENTER);// 创建一个垂直居中格式
            style.setVerticalAlignment(VerticalAlignment.CENTER);// 创建一个垂直居中格式
            //设置表头背景颜色
            style.setFillForegroundColor(IndexedColors.GREY_25_PERCENT.index);//设置背景颜色为中灰色
            style.setFillPattern(HSSFCellStyle.SOLID_FOREGROUND);//设置填充格式为实心填充.
            //设置表头黑体 字体大小26
            HSSFFont font = wb.createFont();
            font.setFontName("黑体");
            font.setFontHeightInPoints((short) 15);
            style.setFont(font);
            //设置边框
            style.setBorderBottom(HSSFCellStyle.BORDER_THIN); //下边框
            style.setBorderLeft(HSSFCellStyle.BORDER_THIN);//左边框
            style.setBorderTop(HSSFCellStyle.BORDER_THIN);//上边框
            style.setBorderRight(HSSFCellStyle.BORDER_THIN);//右边框
            //设置表格内容格式
            HSSFCellStyle style1 = wb.createCellStyle();
            style1.setAlignment(HorizontalAlignment.CENTER);// 创建一个垂直居中格式
            style1.setVerticalAlignment(VerticalAlignment.CENTER);// 创建一个垂直居中格式
            //设置边框
            style1.setBorderBottom(HSSFCellStyle.BORDER_THIN); //下边框
            style1.setBorderLeft(HSSFCellStyle.BORDER_THIN);//左边框
            style1.setBorderTop(HSSFCellStyle.BORDER_THIN);//上边框
            style1.setBorderRight(HSSFCellStyle.BORDER_THIN);//右边框
            // 第四步,创建行row,在sheet中添加表头第0行,注意老版本poi对Excel的行数列数有限制short
            HSSFRow row = sheet.createRow((int) 0);
            //第五步,创建单元格
            HSSFCell cell = row.createCell((short) 0);
            if (index == 0) {
                cell.setCellValue("学号");
                cell.setCellStyle(style);
                cell = row.createCell((short) 1);
                cell.setCellValue("姓名");
                cell.setCellStyle(style);
                cell = row.createCell((short) 2);
                cell.setCellValue("年龄");
                cell.setCellStyle(style);
                cell = row.createCell((short) 3);
                cell.setCellValue("生日");
                cell.setCellStyle(style);
                // 第六步,得到数据,将数据赋值给每个单元格
                List<HashMap<String, String>> list1 = map.get("list1");
                for (int i = 0; i < list1.size(); i++) {
                    row = sheet.createRow((int) i + 1);
                    HashMap<String, String> map111 = list1.get(i);
                    // 创建单元格,并设置值
                    cell = row.createCell((short) 0);
                    cell.setCellValue(map111.get("code"));
                    cell.setCellStyle(style1);
                    cell = row.createCell((short) 1);
                    cell.setCellValue(map111.get("name"));
                    cell.setCellStyle(style1);
                    cell = row.createCell((short) 2);
                    cell.setCellValue(map111.get("age"));
                    cell.setCellStyle(style1);
                    cell = row.createCell((short) 3);
                    cell.setCellValue(map111.get("birth"));
                    cell.setCellStyle(style1);
                }
                //合并单元格,将相同列的相同的数据合并单元格,  你想要哪几列有合并效果,就传哪几列.
                List<String> zdList = Arrays.asList("code", "name", "age");
                ArrayList<MergeCell> mergeCellList = new ArrayList<>();
                for (int j = 0; j < zdList.size(); j++) { // 一个字段
                    String a = null; //上一个的名字
                    Integer aNum = 1; //上一个合并单元格的最后位置
                    for (int i = 0; i < list1.size(); i++) { //一行数据
                        if (i == 0) {
                            a = list1.get(i).get(zdList.get(j));
                            continue;
                        }
                        if (!list1.get(i).get(zdList.get(j)).equals(a)) {
                            //记录合并坐标
                            mergeCellList.add(new MergeCell(aNum, i, j, j));
                            //记录上一个坐标最后的最后行当做下一个坐标的首行
                            aNum = i + 1;
                            a = list1.get(i).get(zdList.get(j));
                        }
                        if (i == list1.size() - 1) {
                            //如果是最后一行,就把最后一行和上一个坐标,连起来形成一个最后一个合并单元格
                            mergeCellList.add(new MergeCell(aNum, i + 1, j, j));
                        }
                    }
                }
                //开始合并单元格 合并要求至少有两个单元格一起, 只有一个单元格的话会合并报错.
                for (MergeCell mergeCell : mergeCellList) {
                    if (!String.valueOf(mergeCell.getFirstRow()).equals(String.valueOf(mergeCell.getLastRow()))) {
                        //依次合并单元格
                        sheet.addMergedRegion(new CellRangeAddress(mergeCell.getFirstRow(), mergeCell.getLastRow(), mergeCell.getFirstCol(), mergeCell.getLastCol()));
                    }
                }
                //自动调整列宽
                for (int i = 0; i < list1.get(0).size(); i++) {
                    sheet.autoSizeColumn(i);
                }
            }
            if (index == 1) {
                cell.setCellValue("序号");
                cell.setCellStyle(style);
                cell = row.createCell((short) 1);
                cell.setCellValue("首都");
                cell.setCellStyle(style);
                cell = row.createCell((short) 2);
                cell.setCellValue("国家");
                cell.setCellStyle(style);
                // 第六步,得到数据,将数据赋值给每个单元格
                List<HashMap<String, String>> list2 = map.get("list2");
                for (int i = 0; i < list2.size(); i++) {
                    row = sheet.createRow((int) i + 1);
                    HashMap<String, String> map222 = list2.get(i);
                    // 创建单元格,并设置值
                    cell = row.createCell((short) 0);
                    cell.setCellValue(map222.get("xh"));
                    cell.setCellStyle(style1);
                    cell = row.createCell((short) 1);
                    cell.setCellValue(map222.get("address"));
                    cell.setCellStyle(style1);
                    cell = row.createCell((short) 2);
                    cell.setCellValue(map222.get("guojia"));
                    cell.setCellStyle(style1);
                }
                //自动调整列宽
                for (int i = 0; i < list2.get(0).size(); i++) {
                    sheet.autoSizeColumn(i);
                }
            }
            index++;
        }
        // 最后一步,将文件存到指定位置
        try {
            FileOutputStream fout = new FileOutputStream("F:\\Desktop\\Members.xls");
            wb.write(fout);
            fout.close();
        } catch (Exception e) {
            e.printStackTrace();
        }
    }


    private static HashMap<String, List<HashMap<String, String>>> getMemberList() {
        //sheet1数据
        HashMap<String, String> hashMap1 = new HashMap<>();
        hashMap1.put("code", "1");
        hashMap1.put("name", "熊大");
        hashMap1.put("age", "45");
        hashMap1.put("birth", "1993-08-28");
        HashMap<String, String> hashMap2 = new HashMap<>();
        hashMap2.put("code", "2");
        hashMap2.put("name", "熊大");
        hashMap2.put("age", "54");
        hashMap2.put("birth", "1994-08-19");
        HashMap<String, String> hashMap3 = new HashMap<>();
        hashMap3.put("code", "3");
        hashMap3.put("name", "熊二");
        hashMap3.put("age", "54");
        hashMap3.put("birth", "1983-11-22");
        HashMap<String, String> hashMap4 = new HashMap<>();
        hashMap4.put("code", "4");
        hashMap4.put("name", "熊熊");
        hashMap4.put("age", "24");
        hashMap4.put("birth", "1983-11-22");
        List<HashMap<String, String>> list1 = Arrays.asList(hashMap1, hashMap2, hashMap3, hashMap4);

        HashMap<String, String> hashMap21 = new HashMap<>();
        hashMap21.put("xh", "1");
        hashMap21.put("address", "北京");
        hashMap21.put("guojia", "中国");
        HashMap<String, String> hashMap22 = new HashMap<>();
        hashMap22.put("xh", "2");
        hashMap22.put("address", "华盛顿");
        hashMap22.put("guojia", "美国");
        HashMap<String, String> hashMap23 = new HashMap<>();
        hashMap23.put("xh", "3");
        hashMap23.put("address", "首尔");
        hashMap23.put("guojia", "韩国");
        List<HashMap<String, String>> list2 = Arrays.asList(hashMap21, hashMap22, hashMap23);
        HashMap<String, List<HashMap<String, String>>> map = new HashMap<>();
        map.put("list1", list1);
        map.put("list2", list2);
        return map;
    }

}
excel表格就被保存到指定位置了。
替换最后一步可实现浏览器下载
// 最后一步,返回浏览器下载excel

        OutputStream out = null;
        try {
            out = response.getOutputStream();
            String fileName = "enroll.xls";// 文件名
            response.setContentType("application/x-msdownload");
            response.setHeader("Content-Disposition", "attachment; filename="
                                                    + URLEncoder.encode(fileName, "UTF-8"));
            wb.write(out);
        } catch (Exception e) {
            e.printStackTrace();
        }
下面是导出的excel表格的样式.
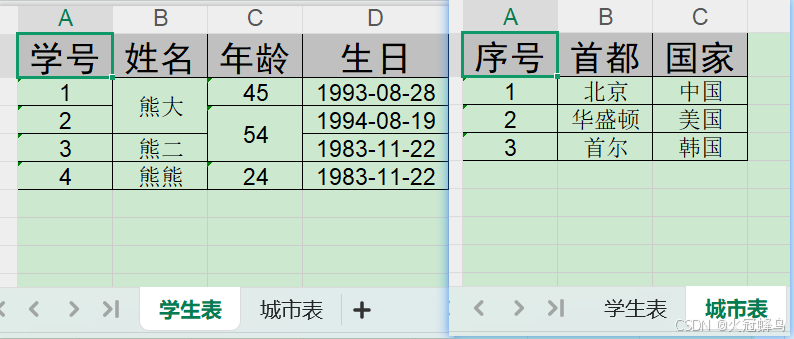
至此结束.


 3142
3142

 被折叠的 条评论
为什么被折叠?
被折叠的 条评论
为什么被折叠?
 到【灌水乐园】发言


