


目录
一、PS的安装
ps安装后,默认单位是厘米,我们应修改为像素
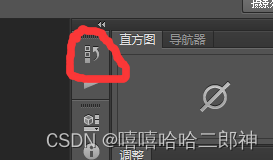
右击图中位置,选择”界面选项“ —— 单位与标尺—— 把单位改为像素
ctrl + R 可以将标尺显示出来,同时可以直接拖动标尺做辅助线 ,还可以直接拖回去
PS切图
PS有很多的切图方式:图层切图、切片切图、PS插件切图
ctrl + E 合并图层
二、背景(background-color、background-image、 background-repeat、background-position、background-clip、background-origin、background-size、background-attachment)
background-color 设置背景颜色
background-image 设置背景图片
使用 url( 绝对地址或相对地址指定背景图像) 指定图片路径,路径可以用引号引起来
- 可以同时设置背景图片和背景颜色,这样背景颜色将会成为图片的背景色
- 如果背景图片小于元素,则背景图片会自动在元素中平铺将元素铺满
如果背景图片大于元素,将会有一部分背景无法显示
如果背景图片和元素一样大,则会直接正常显示
background-repeat 用来设置背景的重复/平铺方式
可选值:
repeat 默认值,背景会沿着x轴 y轴双方向重复
repeat-x 沿着x轴方向重复
repeat-y 沿着y轴方向重复
no-repeat 背景图片不重复
background-position 用来设置背景图片的位置
设置方式:
通过 top right bottom left center 几个表示方位的词来设置元素图片的位置
使用方位词时必须要同时指定两个值,如果只有一个值,第二个值默认为center
通过偏移量来指定背景图片的位置
水平方向的偏移量 垂直方向的偏移量
background-clip 设置背景的范围
可选值:
border-box 默认值, 背景会出现在边框的下边
padding-box 背景不会出现在边框,只出现在内容区和内边距
content-box 背景只会出现在内容区
background-origin 背景图片的偏移量的计算的原点
padding-box 默认值 background-position从内边距处开始计算
content-box 背景图片的偏移量从内容区处计算
border-box 背景图片的偏移量从边框处开始计算
background-size 设置背景图片的大小
第一个值表示宽度
第二个值表示高度
如果只写一个,则第二个值默认为 auto
cover 图片的比例不变,将元素铺满
contain 图片的比例不变,将图片在元素中完整显示
background-attachment 背景图片是否跟元素移动,后期可以制作视差滚动的效果。
可选值:
scroll 默认值 背景图片会跟随元素移动
fixed 背景图片会固定在页面中,不会随元素移动·
<!DOCTYPE html>
<html lang="en">
<head>
    <meta charset="UTF-8">
    <title>Document</title>
    <style>
       .box1{
        width: 500px;
        height: 500px;
        /* 边框下也有背景 */
        border:10px red double ;
        background-color: #bfa;
        /* background-image: url(./exercise/练习的截图/网易新闻.webp); */
        background-image: url(./exercise/JS143练习的图片/蓝色4.jpg);

        background-repeat:no-repeat;
        /* background-position:-10px 100px; */
        /* background-clip: content-box; */
        padding: 10px;
        /* background-origin:border-box ; */
        background-size:contain;
        overflow:scroll;
       }
       .box2{
        width: 300px;
        height: 1000px;
        background-color: orange;
        background-image: url(./exercise/练习的截图/京东上.png.webp);
        background-repeat: no-repeat;
        background-attachment: scroll;
       }

    </style>
</head>
<body>
    <div class="box1">
        <div class="box2"></div>
    </div>
</body>
</html>
background 背景相关的简写属性,所有背景相关的样式都可以通过该样式来设置,且该样式没有顺序要求,也没有哪个属性是必须要写的
注意:
1. background-size 要写到background-position后面,且需要用斜杠隔起来
如:center center/contain,必须要写在background-position 的后面
2. background-origin 和 background-clip 两个样式的属性值相同,它俩有顺序要求,background-origin 要写在前面,background-clip写在后面
背景颜色半透明
background: rgba(0,0,0,0.3) 最后一个参数是alpha透明度,取值范围在0~1之间
习惯性把0.3 的0省略掉,即写为background: rgba(0,0,0,.3)
三、背景练习(背景重复—导航条的背景颜色是渐变的)
导航条从上到下是渐变的,可以从导航条上取一个像素大小的块,把这一个像素在元素直接进行水平方向的重复
在ps中使用矩形选择工具选择一个宽为1像素高为导航条高度的块,然后点击”图像“——”裁剪“,保存到桌面,得到一个像素大小的块
将该图片放到项目中,使用background-image导入,并设置元素的background-repeat为repeat-x
<!DOCTYPE html>
<html lang="en">
<head>
    <meta charset="UTF-8">
    <title>Document</title>
    <style>
        .box1{
            width: 990px;
            height: 32px;
            /* background-image: url(./练习的截图/pg.png);
            background-repeat: repeat-x; */
            background:url(./练习的截图/pg.png) repeat-x;
            margin: 0 auto;
        }
    </style>
</head>
<body>
    <div class="box1"></div>
</body>
</html>
四、背景练习(按钮练习)
ctrl + f5 强制清除缓存刷新
注意:
图片属于网页中的外部资源,外部资源都需要浏览器单独发送请求加载
浏览器加载外部资源时是按需加载的,用则加载,不用则不加载
像我们上边的练习link会首先加载,而hover和active会在指定状态触发时才会加载
这样会使在每次指定状态第一次触发(由于浏览器的缓存机制,第一次触发后不会再在加载)时,加载页面可能会出现闪烁
<!DOCTYPE html>
<html lang="en">
<head>
    <meta charset="UTF-8">
    <title>Document</title>
    <style>
        a:link{
            display: block;
            width: 93px;
            height: 29px;
            background-image: url(./练习的截图/link.png);
        }
        a:hover{
            background-image: url(./练习的截图/hover.png);
        }
        a:active{
            background-image: url(./练习的截图/active.png);
        }
    </style>
</head>
<body>
    <a href="javascript:;"></a>
</body>
</html>
五、雪碧图/精灵图
精灵技术的目的:为了有效地减少服务器接收和发送请求的次数,提高网页的加载速度。
解决图片闪烁问题:
可以将多个小图片保存到一个大图片中,然后通过调整background-position来显示图片
这样图片就会同时加载到网页中,就可以有效的避免出现闪烁的问题
这个技术在网页中应用十分广泛,被称为CSS-Sprite,这种图我们称为雪碧图/精灵图
使用精灵图核心:
1. 精灵技术主要针对于背景图片使用,就是把多个小背景图片整合到一张大图片中。
2. 这个大图片也称为 sprites 精灵图或者 雪碧图
3. 移动背景图片位置,此时可以使用 background-position
<!DOCTYPE html>
<html lang="en">
<head>
    <meta charset="UTF-8">
    <title>Document</title>
    <style>
        a:link{
            display: block;
            width: 93px;
            height: 29px;
            background-image: url(./练习的截图/btn.png);
        }
        a:hover{
            background-position: -93px;
        }
        a:active{
            background-position: -186px;
        }
    </style>
</head>
<body>
    <a href="javascript:;"></a>
</body>
</html>
雪碧图的使用步骤:
1. 先确定要使用的图标
2. 测量图标的大小
3. 根据测量结果创建一个元素
4. 将雪碧图设置为元素的背景图片
5. 设置一个偏移量以显示正确的图片(因为一般都是往上往左移动,所以数值是负值)
千万注意网页中的坐标:x轴右边走是正值,左边走是负值,y轴同理
雪碧图的特点:
一次性将多个图片加载进页面,降低请求次数,加快访问速度,提升用户的体验
局限:只适用于背景图片,若是img则不可以
六、线性渐变
通过渐变可以设置一些复杂的背景颜色,可以实现从一个颜色向其他颜色过渡的效果
!!渐变是图片,需要通过background-image来设置
linear-gradient() 线性渐变,颜色沿着一条直线发生变化,可以写多个颜色
linear-gradient(red,yellow) 红色在开头,黄色在结尾,中间是过渡区域,注意两个颜色间加逗号,
- 线性渐变的开头,我们可以指定一个渐变的方向
to left
to right
to bottom 默认值
to top
xxxdeg deg表示度数
xxxturn turn表示圈
如 linear-gradient(to left,red,yellow),用逗号隔开
linear-gradient(180deg,red,yellow)
- 渐变可以同时指定多个颜色,多个颜色默认情况下平均分布
也可以手动指定渐变的分布情况,在颜色后面写,与颜色无需逗号隔开
linear-gradient(180deg,red 50px,yellow 100px) 表示红色最浓的区域从50px开始,之前的也是红色最浓的
repeating-linear-gradient() 可以平铺的线性渐变
如repeating-linear-gradient(red 50px,yellow 100px)表示50-100为渐变,然后别的位置进行重复
background-repeat: no-repeat 不会对其产生影响
<!DOCTYPE html>
<html lang="en">
<head>
    <meta charset="UTF-8">
    <title>Document</title>
    <style>
        .box1{
            width: 200px;
            height: 200px;
            /* background-color: #bfa; */
            background-image: linear-gradient(to left,red,yellow);
            background-image: linear-gradient(180deg,red 50px,yellow 100px);
            background-image: repeating-linear-gradient(red 50px,yellow 100px);
            background-repeat: no-repeat;
        }
    </style>
</head>
<body>
    <div class="box1"></div>
</body>
</html>
七、径向渐变
radial-gradient( ) 径向渐变(放射性的效果)
默认情况下,径向渐变的形状根据元素的形状来计算的
正方形 --> 圆形
长方形 --> 椭圆形
- 我们可以手动指定径向渐变的大小 如radial-gradient(100px 100px,red, yellow)
repeating-radial-gradient(100px 100px,red, yellow)
circle 圆形 radial-gradient(circle,red, yellow)
ellipse 椭圆
- 也可以指定渐变的位置,用at 如radial-gradient(100px 100px at 100px 100px,red, yellow)
- 语法:
radial-gradient(大小 at 位置,颜色 位置,颜色 位置)
大小:
circle 圆形
ellipse 椭圆
closest-side 近边
closest-corner 近角
farthest-side 远边
farthest-corner 远角
自己指定像素值
位置:
top right left center bottom 自己指定像素值
<!DOCTYPE html>
<html lang="en">
<head>
    <meta charset="UTF-8">
    <title>Document</title>
    <style>
        .box1{
            width: 300px;
            height: 300px;
            background-image: radial-gradient(closest-side at 100px 100px,red, yellow);
        }
    </style>
</head>
<body>
    <div class="box1"></div>
</body>
</html>
八、电影卡片练习
<!DOCTYPE html>
<html lang="en">
<head>
    <meta charset="UTF-8">
    <meta http-equiv="X-UA-Compatible" content="IE=edge">
    <meta name="viewport" content="width=device-width, initial-scale=1.0">
    <title>Document</title>
    <link rel="stylesheet" href="./css/reset.css">
    <link rel="stylesheet" href="./fontawesome/css/all.css">
    <style>
        .outer{
            width: 240px;
            /* 设置阴影 */
            box-shadow: 0 0 10px rgba(0,0,0,.3);
        }
        /* .img-wrapper{
            border: 1px solid red;
        } */
        /* 设置图片 */
        .img-wrapper img{
            width: 100%;
            /* 图片与元素有间隙,基线要去掉 */
            vertical-align: top;
        }
        .info{
            padding: 0 18px;
            color: #acaaaa;
            font-size: 14px;
        }
        /* 设置标题 */
        .info .title{
            font-size: 18px;
            color: #717171;
            margin: 13px 0 15px 0;
        }
        .info .category i{
            margin-left: 4px;
            margin-right: 7px;
        }
        /* 设置简介样式 */
        .info .intro{
            /* margin-left: 4px;
            margin-top: 18px;
            margin-bottom: 18px; */
            margin: 18px 4px;
            line-height: 20px;
        }
        /*设置下边的内容  */
        .star-wrapper{
            height: 46px;
            border-top: 1px solid #e9e9e9;
            line-height: 46px;
            color: #ddd;
            padding: 0 16px;
        }
        /* 设置星星样式 */
        .star{
            float: left;

        }
        .star-wrapper .light{
            color: #b9cb41;
        }
        .star-wrapper .weibo{
            float: right;
        }
    </style>
</head>
<body>
    <!-- 创建一个外层容器 -->
    <div class="outer">
        <!-- 创建图片容器 -->
        <div class="img-wrapper">
            <!-- 设置图片 -->
            <img src="./exercise/练习的截图/movie.png" alt="">
        </div>
        <!-- 创建内容区容器 -->
        <div class="info">
            <h2 class="title">
                动画电影
            </h2>
            <h3 class="category">
                <i class="fas fa-map-marker-alt"></i>
                动画
            </h3>
            <p class="intro">
                这是一部迪士尼的动画电影,非常非常的好看
            </p>
        </div>
        <!-- 创建评分的容器 -->
        <div class="star-wrapper">
            <!-- 创建星星 -->
            <ul class="star">
                <li class="fas fa-star light"></li>
                <li class="fas fa-star light"></li>
                <li class="fas fa-star"></li>
                <li class="fas fa-star"></li>
            </ul>
            <!-- 创建 -->
            <ul class="weibo">
                <li class="fab fa-weibo"></li>
            </ul>
        </div>
    </div>
</body>
</html>


 495
495


 被折叠的 条评论
为什么被折叠?
被折叠的 条评论
为什么被折叠?
 到【灌水乐园】发言


