


一.find命令
1.find命令作用
主要进行文件搜索
2.基本语法
find [文件路径] [选项 选项的值]
-name *
-type f|d
常见的选项
-name 根据文件的名称搜索文件,支持通配符*
-type f代表普通文件,d代表目录
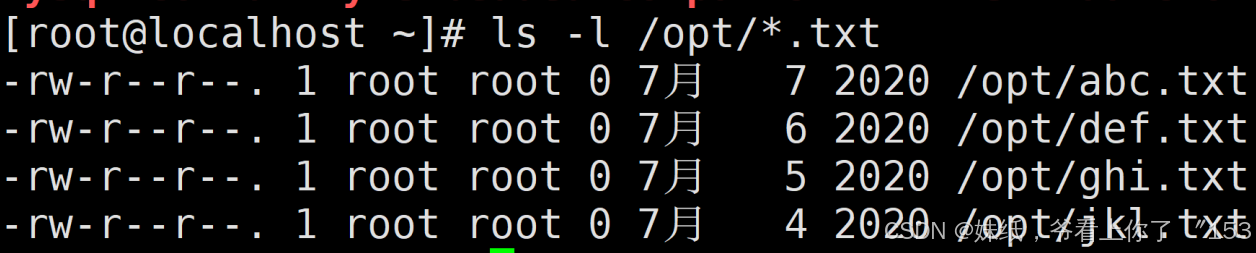
案例,找到httpd.conf文件
[root@localhost ~]# find / -name "httpd.conf" -type f
# 无法找到,发现是没有安装httpd服务
[root@localhost ~]# yum install -y httpd
# 安装htppd服务
[root@localhost ~]# find / -name "httpd.conf" -type f
# 下面就是查找出的文件
/etc/httpd/conf/httpd.conf
/usr/lib/tmpfiles.d/httpd.conf
# 将/范围换成/etc/目录范围,这样查找更快,更加节省计算自资源
[root@localhost ~]# find /etc/ -name "httpd.conf" -type f
/etc/httpd/conf/httpd.conf3.*通配符
在linux 系统中,如果要查找的文件的名称不清晰,可以使用部分文件名+*搜索
案例 获取/etc/中以.conf结尾的文件
[root@localhost ~]# find /etc/ -name "*.conf" -type f
/etc/resolv.conf
/etc/libaudit.conf
/etc/depmod.d/dist.conf
/etc/dracut.conf
/etc/prelink.conf.d/nss-softokn-prelink.conf
/etc/prelink.conf.d/fipscheck.conf
/etc/prelink.conf.d/grub2.conf
/etc/modprobe.d/tuned.conf
/etc/modprobe.d/firewalld-sysctls.conf
/etc/modprobe.d/dccp-blacklist.conf
/etc/rsyslog.d/listen.conf
/etc/systemd/bootchart.conf
/etc/systemd/coredump.conf
/etc/systemd/journald.conf
/etc/systemd/logind.conf
/etc/systemd/system.conf
/etc/systemd/user.conf
/etc/host.conf
/etc/dbus-1/system.d/org.freedesktop.hostname1.conf
/etc/dbus-1/system.d/org.freedesktop.import1.conf
/etc/dbus-1/system.d/org.freedesktop.locale1.conf
/etc/dbus-1/system.d/org.freedesktop.login1.conf
/etc/dbus-1/system.d/org.freedesktop.machine1.conf
/etc/dbus-1/system.d/org.freedesktop.systemd1.conf
/etc/dbus-1/system.d/org.freedesktop.timedate1.conf
/etc/dbus-1/system.d/org.freedesktop.PolicyKit1.conf
/etc/dbus-1/system.d/wpa_supplicant.conf
/etc/dbus-1/system.d/nm-dispatcher.conf
/etc/dbus-1/system.d/nm-ifcfg-rh.conf
/etc/dbus-1/system.d/org.freedesktop.NetworkManager.conf
/etc/dbus-1/system.d/teamd.conf
/etc/dbus-1/system.d/com.redhat.tuned.conf
/etc/dbus-1/system.d/FirewallD.conf
/etc/dbus-1/session.conf
/etc/dbus-1/system.conf
/etc/udev/udev.conf
/etc/lvm/lvm.conf
/etc/lvm/lvmlocal.conf
/etc/NetworkManager/NetworkManager.conf
/etc/X11/xorg.conf.d/00-keyboard.conf
/etc/pki/ca-trust/ca-legacy.conf
/etc/ld.so.conf
/etc/ld.so.conf.d/mariadb-x86_64.conf
/etc/ld.so.conf.d/kernel-3.10.0-862.el7.x86_64.conf
/etc/ld.so.conf.d/bind-export-x86_64.conf
/etc/ld.so.conf.d/kernel-3.10.0-1160.119.1.el7.x86_64.conf
/etc/nsswitch.conf
/etc/sestatus.conf
/etc/yum/protected.d/systemd.conf
/etc/yum/pluginconf.d/fastestmirror.conf
/etc/yum/pluginconf.d/langpacks.conf
/etc/yum/version-groups.conf
/etc/krb5.conf
/etc/sysctl.conf
/etc/security/access.conf
/etc/security/chroot.conf
/etc/security/group.conf
/etc/security/limits.conf
/etc/security/limits.d/20-nproc.conf
/etc/security/namespace.conf
/etc/security/pam_env.conf
/etc/security/sepermit.conf
/etc/security/time.conf
/etc/security/pwquality.conf
/etc/sasl2/smtpd.conf
/etc/fuse.conf
/etc/GeoIP.conf
/etc/logrotate.conf
/etc/asound.conf
/etc/openldap/ldap.conf
/etc/libuser.conf
/etc/selinux/semanage.conf
/etc/selinux/targeted/setrans.conf
/etc/wpa_supplicant/wpa_supplicant.conf
/etc/plymouth/plymouthd.conf
/etc/yum.conf
/etc/tuned/tuned-main.conf
/etc/vmware-tools/vgauth.conf
/etc/man_db.conf
/etc/rsyslog.conf
/etc/firewalld/firewalld.conf
/etc/kdump.conf
/etc/audisp/audispd.conf
/etc/audisp/plugins.d/af_unix.conf
/etc/audisp/plugins.d/syslog.conf
/etc/audit/auditd.conf
/etc/chrony.conf
/etc/e2fsck.conf
/etc/mke2fs.conf
/etc/sudo-ldap.conf
/etc/sudo.conf
/etc/vconsole.conf
/etc/locale.conf
/etc/httpd/conf/httpd.conf
/etc/httpd/conf.d/autoindex.conf
/etc/httpd/conf.d/userdir.conf
/etc/httpd/conf.d/welcome.conf
/etc/httpd/conf.modules.d/00-base.conf
/etc/httpd/conf.modules.d/00-dav.conf
/etc/httpd/conf.modules.d/00-lua.conf
/etc/httpd/conf.modules.d/00-mpm.conf
/etc/httpd/conf.modules.d/00-proxy.conf
/etc/httpd/conf.modules.d/00-systemd.conf
/etc/httpd/conf.modules.d/01-cgi.conf
案例 搜索以http开头的文件
[root@localhost ~]# find /etc/ -name "http*" -type f
/etc/sysconfig/httpd
/etc/logrotate.d/httpd
/etc/httpd/conf/httpd.conf
二.创建文件并修改时间
1.文件的时间的概念
window中的时间
1>.创建时间
2>.修改时间
3>.访问时间
使用stat命令获取文件的时间信息
语法 stat 文件
[root@localhost ~]# stat /opt/test.conf
 文件:"/opt/test.conf"
 大小:23 块:8 IO 块:4096 普通文件
设备:fd00h/64768d Inode:34362655 硬链接:1
权限:(0644/-rw-r--r--) Uid:( 0/ root) Gid:( 0/ root)
环境:unconfined_u:object_r:usr_t:s0
最近访问:2024-07-14 13:28:50.938662360 +0800
最近更改:2024-07-14 13:28:50.938662360 +0800
最近改动:2024-07-14 13:28:50.976662431 +080
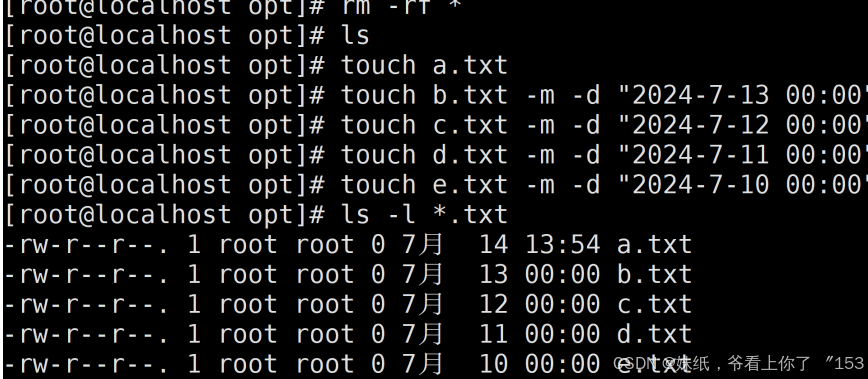
案例创建文件,并p配置文件的修改时间
语法 touch -m -d 日期时间格式 文件名称
文件不存在就创建并修改时间
文件存在只配置最后修改时间
# 修改或者创建文件,并设置最后修改时间
[root@localhost ~]# touch -m -d "2020-7-7 00:00" /opt/abc.txt
[root@localhost ~]# ll /opt/
总用量 44
-rw-r--r--. 1 root root 17992 6月 17 13:58 1.png
-rw-r--r--. 1 root root 17503 6月 17 14:02 2.png
-rw-r--r--. 1 root root 0 7月 7 2020 abc.txt
-rw-r--r--. 1 root root 23 7月 14 13:28 test.conf
[root@localhost ~]# stat /opt/abc.txt
 文件:"/opt/abc.txt"
 大小:0 块:0 IO 块:4096 普通空文件
设备:fd00h/64768d Inode:33680845 硬链接:1
权限:(0644/-rw-r--r--) Uid:( 0/ root) Gid:( 0/ root)
环境:unconfined_u:object_r:usr_t:s0
最近访问:2024-07-14 13:36:38.418740506 +0800
最近更改:2020-07-07 00:00:00.000000000 +0800
最近改动:2024-07-14 13:36:38.418740506 +0800
创建时间:-
创建第三个文件


查看四个文件
三.通过文件的最后修改时间搜索文件
语法
find 文件路径 -mtime +days/-days
-mtime 根据文件最后修改时间搜索文件
+号 搜索几天之前的文件信息
-号 搜索几天之内的文件信息
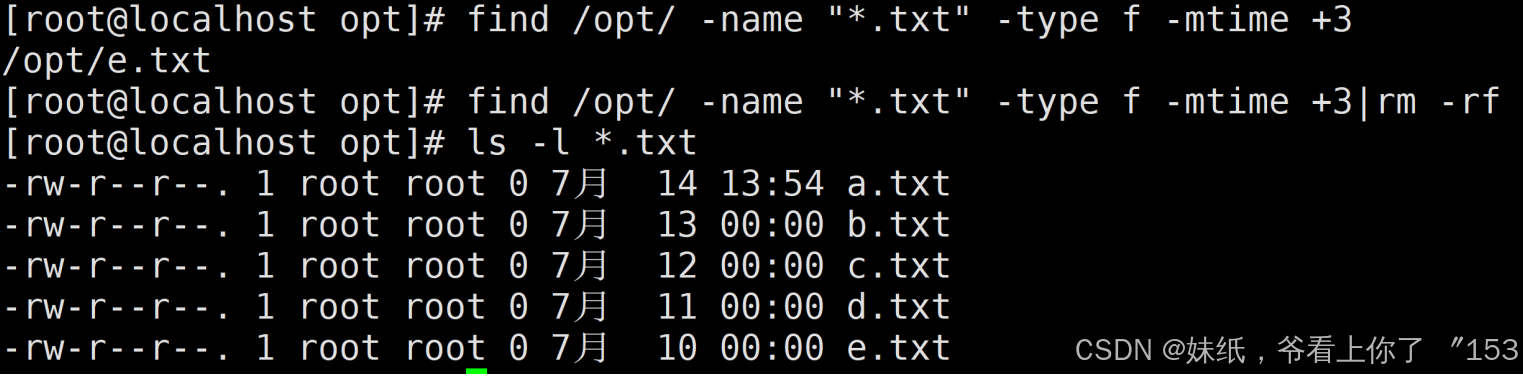
案例 搜索3天以前的信息,不包含第三个的,而且只搜txt文件

搜索三天以内的文件 .txt,包含今天

四.find的exec选项
案例:删除系统/var/log/ 10天之前的日志,格式都是.log文件
方法1 报错,rm不支持这种写法、

方法2 rm和ls不支持管道
方法3 使用xargs 将查询结果交给rm,可行

方法4 使用find执行 -exec
语法 find 文件路径
#查看目录中的txt文件
[root@localhost opt]# ls -l *.txt
#没有e.txt文件,在前面被删除了
-rw-r--r--. 1 root root 0 7月 14 13:54 a.txt
-rw-r--r--. 1 root root 0 7月 13 00:00 b.txt
-rw-r--r--. 1 root root 0 7月 12 00:00 c.txt
-rw-r--r--. 1 root root 0 7月 11 00:00 d.txt
# 创建文件并且指定文件修改日期
[root@localhost opt]# touch -m -d "2024-7-10 00:00" e.txt
[root@localhost opt]# ls -l
总用量 0
-rw-r--r--. 1 root root 0 7月 14 13:54 a.txt
-rw-r--r--. 1 root root 0 7月 13 00:00 b.txt
-rw-r--r--. 1 root root 0 7月 12 00:00 c.txt
-rw-r--r--. 1 root root 0 7月 11 00:00 d.txt
-rw-r--r--. 1 root root 0 7月 10 00:00 e.txt
# 查找三天以前的文件
[root@localhost opt]# find /opt/ -name "*.txt" -type f -mtime +3
/opt/e.txt
# 使用-exec 文件调用rm函数 {}表示前面find查到的内容 \;表示标识符
# 这里在{}后面没有打空格报错了,在{}后应该打空格
[root@localhost opt]# find /opt/ -name "*.txt" -type f -mtime +3 -exec rm -
rf {}\;
find: 遗漏“-exec”的参数
[root@localhost opt]# find /opt/ -name "*.txt" -type f -mtime +3 -exec rm -
rf {} \;
总用量 0
-rw-r--r--. 1 root root 0 7月 14 13:54 a.txt
-rw-r--r--. 1 root root 0 7月 13 00:00 b.txt
-rw-r--r--. 1 root root 0 7月 12 00:00 c.txt
-rw-r--r--. 1 root root 0 7月 11 00:00 d.txt
五.快速生成指定大小的文件
根据文件size大小搜索文件
find 路径
-size
文件大小
[
常用单位 k M G]
size值 搜索等于
size的文件
-size值 【
0
,
size
值)
+size值 (
size值,正无穷)
扩展命令 dd
使用dd创建扩展命令
生成指定大小的测试文件
语法
dd if=/dev/zero of=文件名称 bs=1M count=1
if表示输入文件
of表示输出文件
bs代表字节为单位的块大小
count代表被复制的块
其中/dev/zore
是一个字符设备,会不断地返回
0字节的文件
案例创建一个1m的文件
#查看文件
[root@localhost opt]# ls
a.txt b.txt c.txt d.txt
# 删除文件
[root@localhost opt]# rm -rf *
# 创建名称为a.txt,大小为1m的文件
[root@localhost opt]# dd if=/dev/zero of=a.txt bs=1M count=1
记录了1+0 的读入
记录了1+0 的写出
1048576字节(1.0 MB)已复制,0.0027841 秒,377 MB/秒
# 查看文件信息,使用单位字节
[root@localhost opt]# ls -l
总用量 1024
-rw-r--r--. 1 root root 1048576 7月 14 14:37 a.txt
# 查看文件信息,使用文件大小单位 默认m
[root@localhost opt]# ls -lh
总用量 1.0M
-rw-r--r--. 1 root root 1.0M 7月 14 14:37 a.txt
生成其他大小的文件
[root@localhost opt]# dd if=/dev/zero of=b.txt bs=5M count=1
记录了1+0 的读入
记录了1+0 的写出
5242880字节(5.2 MB)已复制,0.0111468 秒,470 MB/秒
[root@localhost opt]# dd if=/dev/zero of=c.txt bs=10M count=1
记录了1+0 的读入
记录了1+0 的写出
10485760字节(10 MB)已复制,0.0476839 秒,220 MB/秒
[root@localhost opt]# ls -l
总用量 16384
-rw-r--r--. 1 root root 1048576 7月 14 14:37 a.txt
-rw-r--r--. 1 root root 5242880 7月 14 14:42 b.txt
-rw-r--r--. 1 root root 10485760 7月 14 14:42 c.txt
[root@localhost opt]# ls -lh
总用量 16M
-rw-r--r--. 1 root root 1.0M 7月 14 14:37 a.txt
-rw-r--r--. 1 root root 5.0M 7月 14 14:42 b.txt
-rw-r--r--. 1 root root 10M 7月 14 14:42 c.txt
六.根据文件大小搜索文件
基本语法
find 文件路径
-size size
值(单位
k M G)
size值 搜索等于
size大小的文件
-size值
[0,size
值)
+size值 (
size
值
,无穷大)
# 普通单位查看文件信息
[root@localhost opt]# ls -lh
总用量 16M
-rw-r--r--. 1 root root 1.0M 7月 14 14:37 a.txt
-rw-r--r--. 1 root root 5.0M 7月 14 14:42 b.txt
-rw-r--r--. 1 root root 10M 7月 14 14:42 c.txt
# 搜索文件大小为5M的文件
[root@localhost opt]# find ./ -size 5M
./b.txt
# 搜索文件大小小于10M的文件
[root@localhost opt]# find ./ -size 10M
./c.txt
#搜索小于1m的文件,隐藏文件也找出来了
[root@localhost opt]# find ./ -size 1M
./
./a.txt
# 搜索文件大小大于1m的文件
[root@localhost opt]# find ./ -size +1M
./b.txt
./c.txt
[root@localhost opt]# find ./ -size -1M
案例 搜索系统大于100M的文件
[root@localhost opt]# find / -size +100M
/proc/kcore
find: ‘/proc/9352/task/9352/fd/6’: 没有那个文件或目录
find: ‘/proc/9352/task/9352/fdinfo/6’: 没有那个文件或目录
find: ‘/proc/9352/fd/5’: 没有那个文件或目录
find: ‘/proc/9352/fdinfo/5’: 没有那个文件或目录
/sys/devices/pci0000:00/0000:00:0f.0/resource1_wc
/sys/devices/pci0000:00/0000:00:0f.0/resource1
/root/mysql-8.4.1-1.el7.aarch64.rpm-bundle.tar
/root/mysql-community-debuginfo-8.4.1-1.el7.aarch64.rpm
/root/mysql-community-test-8.4.1-1.el7.aarch64.rpm
/var/cache/yum/x86_64/7/updates/gen/primary_db.sqlite
/usr/lib/locale/locale-archive
删除root目录下文件大大于100m的文件
[root@localhost opt]# find /root/ -size +100M -exec rm -rf {} \;
[root@localhost opt]# find / -size +100M
/proc/kcore
find: ‘/proc/9440/task/9440/fd/6’: 没有那个文件或目录
find: ‘/proc/9440/task/9440/fdinfo/6’: 没有那个文件或目录
find: ‘/proc/9440/fd/5’: 没有那个文件或目录
find: ‘/proc/9440/fdinfo/5’: 没有那个文件或目录
/sys/devices/pci0000:00/0000:00:0f.0/resource1_wc
/sys/devices/pci0000:00/0000:00:0f.0/resource1
/var/cache/yum/x86_64/7/updates/gen/primary_db.sqlite
/usr/lib/locale/locale-archive
七.tree指令
创建文件列表,将文件名称以树的形式展示
需要使用yum指令进行安装
yum -y install tree
[root@localhost opt]# tree
-bash: tree: 未找到命令
[root@localhost opt]# yum -y install tree
已加载插件:fastestmirror
Loading mirror speeds from cached hostfile
* base: mirrors.ustc.edu.cn
* extras: mirrors.163.com
* updates: mirrors.163.com
正在解决依赖关系
--> 正在检查事务
---> 软件包 tree.x86_64.0.1.6.0-10.el7 将被 安装
--> 解决依赖关系完成
依赖关系解决
============================================================================
====================================
Package 架构 版本
源 大小
============================================================================
====================================
正在安装:
tree x86_64 1.6.0-10.el7
base 46 k
事务概要
============================================================================
====================================
安装 1 软件包
总下载量:46 k
安装大小:87 k
Downloading packages:
tree-1.6.0-10.el7.x86_64.rpm
| 46 kB 00:00:00
Running transaction check
Running transaction test
Transaction test succeeded
Running transaction
 正在安装 : tree-1.6.0-10.el7.x86_64
1/1
 验证中 : tree-1.6.0-10.el7.x86_64
1/1
已安装:
 tree.x86_64 0:1.6.0-10.el7
完毕!
[root@localhost opt]#
案例
以树状结构显示/var/log目录中的文件
[root@localhost opt]# tree /var/log/
/var/log/
├── anaconda
│   ├── anaconda.log
│   ├── ifcfg.log
│   ├── journal.log
│   ├── ks-script-foxDg3.log
│   ├── ks-script-xoNdUE.log
│   ├── packaging.log
│   ├── program.log
│   ├── storage.log
│   ├── syslog
│   └── X.log
├── audit
│   └── audit.log
├── boot.log
├── boot.log-20240617
├── boot.log-20240711
├── boot.log-20240714
├── btmp
├── btmp-20240711
├── chrony
├── cron
├── cron-20240711
├── cron-20240714
├── dmesg
├── dmesg.old
├── firewalld
├── grubby
├── grubby_prune_debug
├── httpd
├── lastlog
├── maillog
├── maillog-20240711
├── maillog-20240714
├── messages
├── messages-20240711
├── messages-20240714
├── rhsm
├── secure
├── secure-20240711
├── secure-20240714
├── spooler
├── spooler-20240711
├── spooler-20240714
├── tallylog
├── tuned
│   └── tuned.log
├── vmware-network.1.log
├── vmware-network.2.log
├── vmware-network.3.log
├── vmware-network.4.log
├── vmware-network.5.log
├── vmware-network.6.log
├── vmware-network.log
├── vmware-vgauthsvc.log.0
├── vmware-vmsvc.log
├── vmware-vmsvc-root.log
├── vmware-vmtoolsd-root.log
├── wtmp
└── yum.log
八.计算机克隆操作
scp实现linux系统和linux之间的克隆操作
实现linux和linux之间的文件传输
需要两个linux
克隆操作 使用克隆快速生成
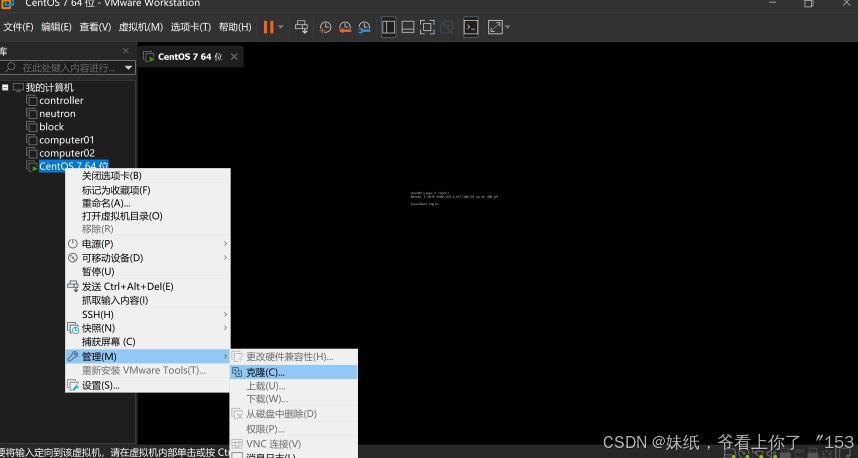
要求关机后操作
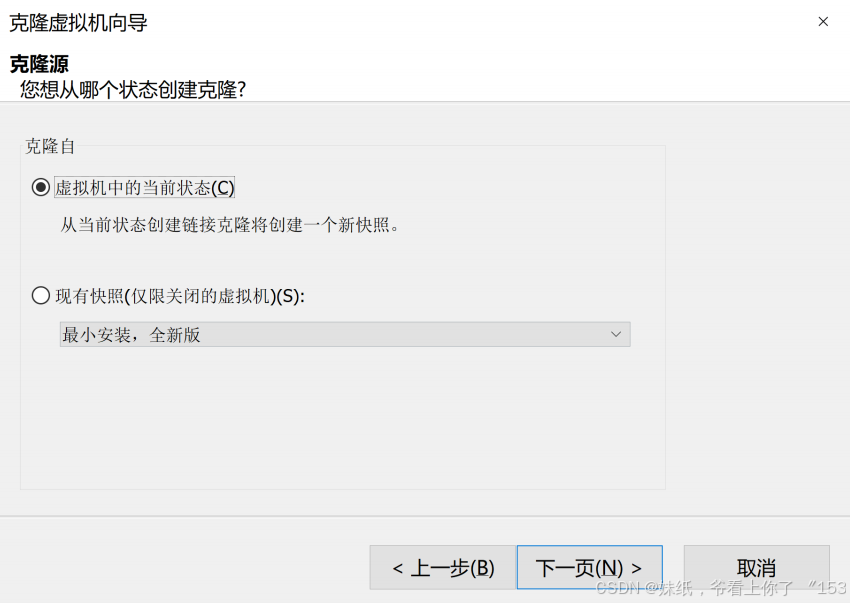
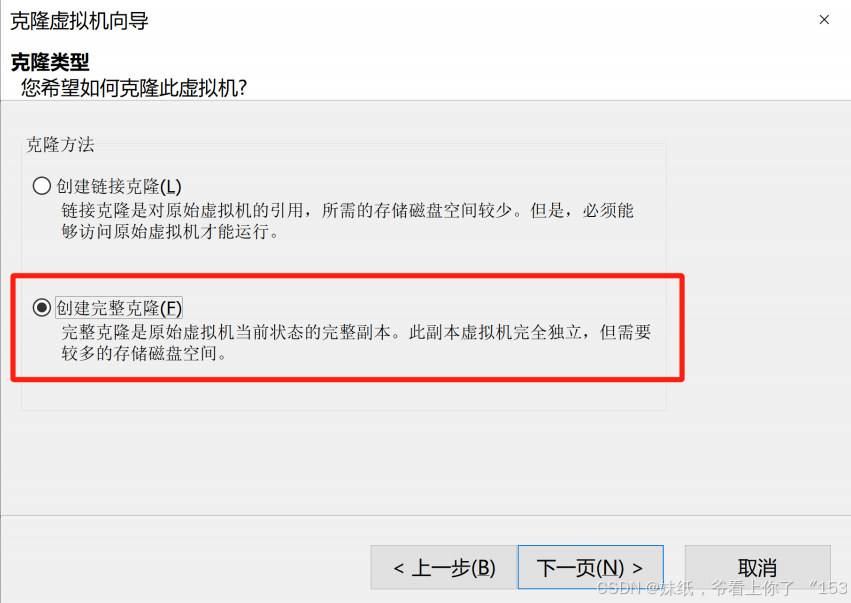
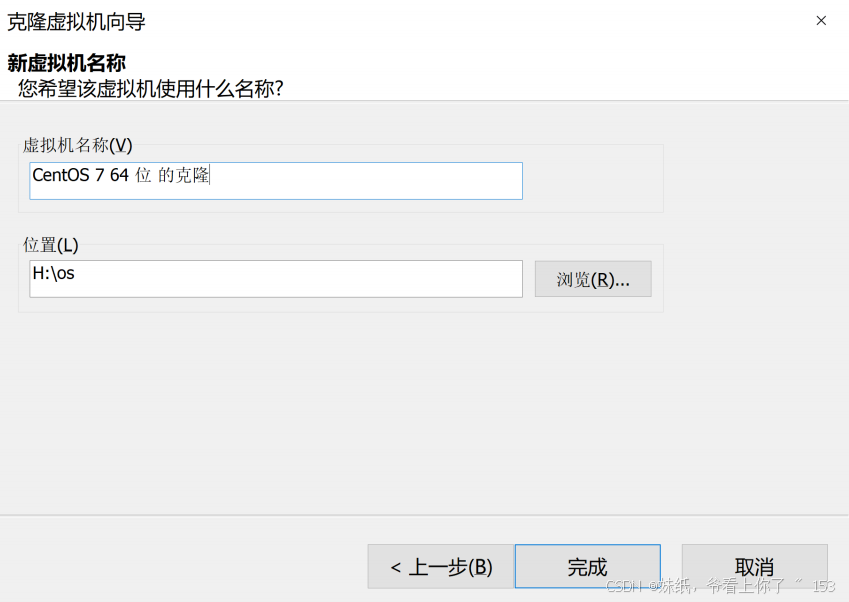
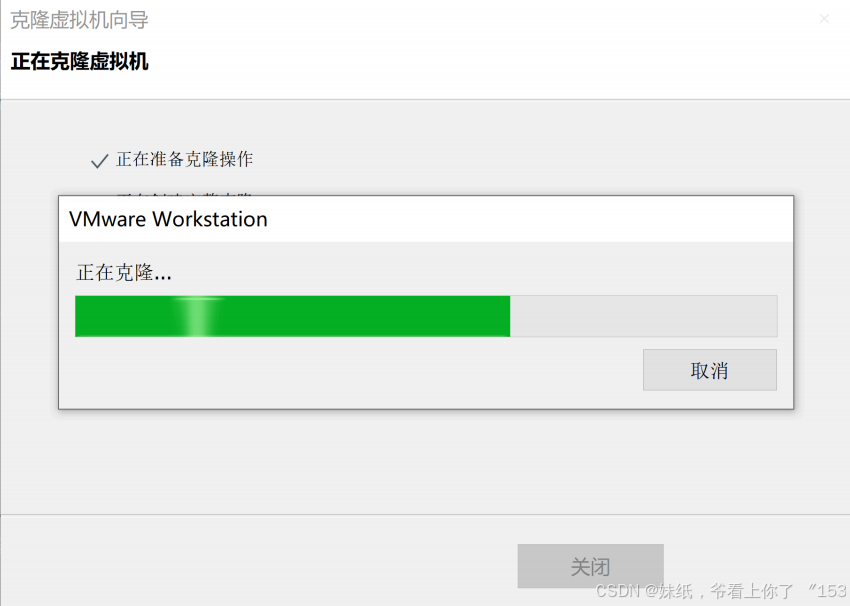

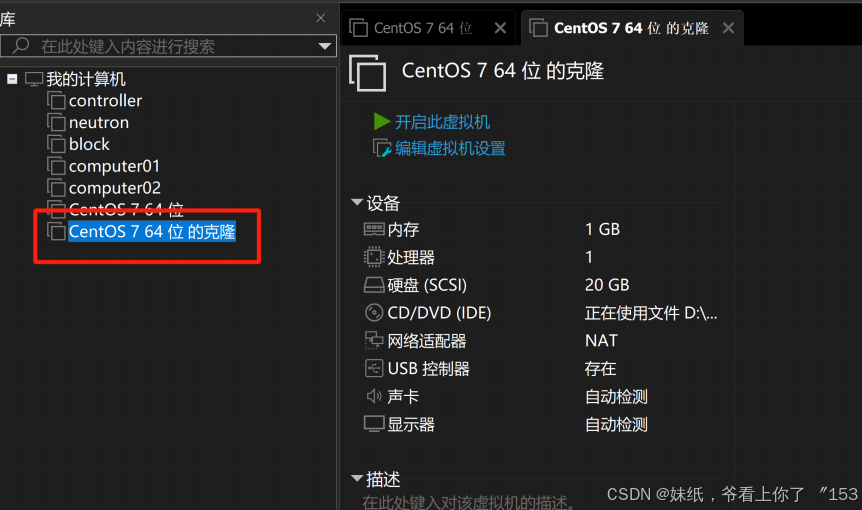
克隆完成
九.scp
scp要求两台主机的系统都是linux系统
1.使用scp下载文件和目录
语法
scp [选项] 用户名@linux主机地址:/资源路径 linux本地文件路径
2.复制文件
1>查看克隆机的ip地址,并且清空opt目录中的文件
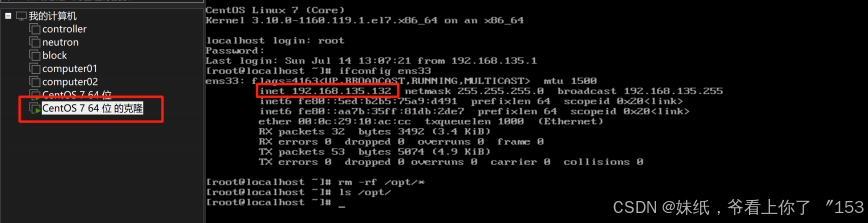
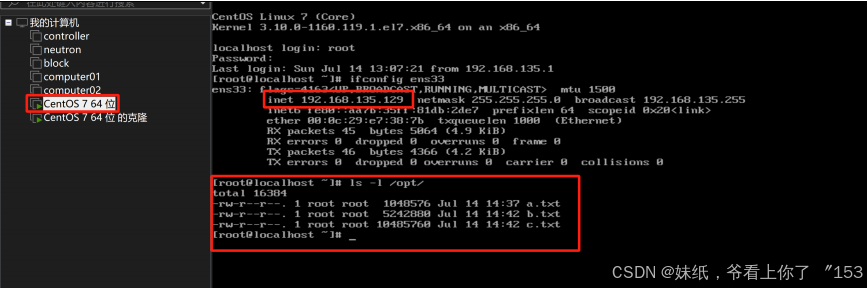
2>查看原主机的ip地址,并且查看opt目录中的数据
3>从原主机上下载/opt/a.txt到克隆机上的/opt目录,注意如果有询问,输入yes

再输入密码即可
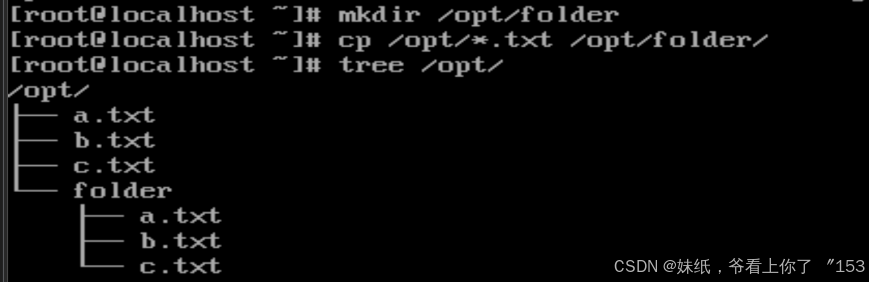
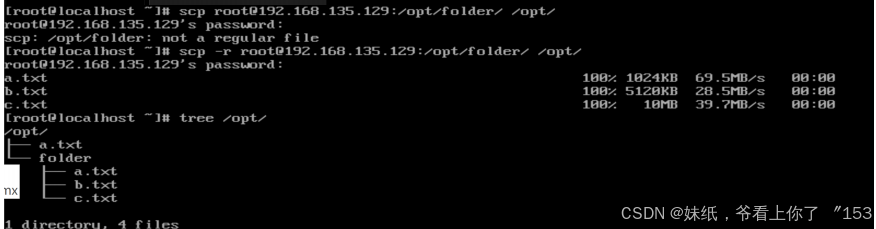
3.复制目录
1>源主机opt目录下创建目录,并且将a.txt b.txt c.txt复制一份在新目录中
2>在克隆机上使用scp指令复制目录到本地opt目录,需要添加-r选项,无法执行
第二次连接主机,不需要再次输入yes
-r 代表递归,主要作用文件夹
十.scp上传文件
语法 scp [选项] 本地主机资源路径 {远程主机}用户名@主机ip:放置路
上传文件,将克隆机中的a.txt文件上传到源主机中
# 以下操作都是在原主机192.168.135.129中执行的
# 清空opt目录中的文件
[root@localhost ~]# rm -rf /opt/*
[root@localhost ~]# ls /opt/
#ssh管理克隆机
[root@localhost ~]# ssh -lroot -p22 192.168.135.132
The authenticity of host '192.168.135.132 (192.168.135.132)' can't be
established.
ECDSA key fingerprint is SHA256:CkKRXsYIVPxBU2aCwVy42OZPQpcOnsPp4lK0qesv0is.
ECDSA key fingerprint is
MD5:cb:e1:2c:97:ca:f1:54:7a:e6:c2:d1:22:32:41:04:c8.
# 第一次连接需要确认输入yes
Are you sure you want to continue connecting (yes/no)? yes
Warning: Permanently added '192.168.135.132' (ECDSA) to the list of known
hosts.
#输入密码
root@192.168.135.132's password:
Last login: Sun Jul 14 15:58:47 2024
#---------------------------------------------------------------
#现在是用源主机登录克隆机进行操作
#查看ip地址
[root@localhost ~]# ifconfig ens33
ens33: flags=4163<UP,BROADCAST,RUNNING,MULTICAST> mtu 1500
 inet 192.168.135.132 netmask 255.255.255.0 broadcast
192.168.135.255
 inet6 fe80::5ed:b2b5:75a9:d491 prefixlen 64 scopeid 0x20<link>
 inet6 fe80::aa7b:35ff:81db:2de7 prefixlen 64 scopeid 0x20<link>
 ether 00:0c:29:10:ac:cc txqueuelen 1000 (Ethernet)
 RX packets 14518 bytes 20940364 (19.9 MiB)
 RX errors 0 dropped 0 overruns 0 frame 0
 TX packets 1346 bytes 123880 (120.9 KiB)
 TX errors 0 dropped 0 overruns 0 carrier 0 collisions 0
# 将克隆机上的a.txt 上传到 源主机上
[root@localhost ~]# scp /opt/a.txt root@192.168.135.129:/opt/
root@192.168.135.129's password:
a.txt
100% 1024KB 16.1MB/s 00:00
# 退出ssh连接
[root@localhost ~]# exit
登出
# --------------------------------------------------------
Connection to 192.168.135.132 closed.
# 查看源主机中是否已经存在a.txt文件
[root@localhost ~]# ls /opt/
a.txt #上传成功
[root@localhost ~]#
上传目录,把克隆机中的folder目录上传到源主机的opt目录
# 再次使用ssh管理克隆机
[root@localhost ~]# ssh -lroot -p22 192.168.135.132
root@192.168.135.132's password:
Last login: Sun Jul 14 16:23:48 2024 from 192.168.135.129
# 使用scp上传目录到源主机上,第二次连接直接输入密码,不需要输入账号
[root@localhost ~]# scp -r /opt/folder/ root@192.168.135.129:/opt/
root@192.168.135.129's password:
a.txt
100% 1024KB 12.9MB/s 00:00
b.txt
100% 5120KB 30.0MB/s 00:00
c.txt
100% 10MB 70.8MB/s 00:00
#退出ssh连接
[root@localhost ~]# exit
登出
Connection to 192.168.135.132 closed.
# 查看上传结果
[root@localhost ~]# ls /opt/
a.txt folder
要求必须启用ssh服务
systemctl start sshd
systemctl stop sshd
十一.计划任务和与tar结合实现文件备份
1.计划任务
crontab [选项]
-l list查看当前用户的计划任务信息
-e edit编写计划任务
[root@localhost ~]# crontab -l
no crontab for root #没有计划任务
编写计划任务
crontab 分时日月周 要使用的完整路径 which命令

0和7都表示星期日
[root@localhost ~]# whereis tar
tar: /usr/bin/tar /usr/include/tar.h /usr/share/man/man1/tar.1.gz
[root@localhost ~]# which tar
/usr/bin/tar
案例 每分钟将/etc目录下的文件打包保存在tmp目录中
1.找到tar指令的which位置
[root@localhost /]# which tar
/usr/bin/tar
2.编辑计划任务
[root@localhost /]# crontab -e
*/1 * * * * /usr/bin/tar -zcvf /tmp/etc.tar.gz /etc/
3.以上的任务会覆盖前面的文件,需要在指令中添加时间因素
*/1 * * * * /usr/bin/tar -zcvf /tmp/etc-$(date "+%Y%m%d%H%M%S").tar.gz /etc
4.在脚本中出现%,必须使用转义符\
*/1 * * * * /usr/bin/tar -zcvf /tmp/etc-$(date "+\%Y\%m\%d\%H\%M\%S").tar.gz
/etc
5.查看备份文件
显示
[root@localhost /]# ls -l /tmp/
总用量 116560
-rw-r--r--. 1 root root 11933315 7月 14 17:49 etc-20240714174901.tar.gz
-rw-r--r--. 1 root root 11933315 7月 14 17:50 etc-20240714175001.tar.gz
-rw-r--r--. 1 root root 11933315 7月 14 17:51 etc-20240714175101.tar.gz
-rw-r--r--. 1 root root 11933315 7月 14 17:52 etc-20240714175201.tar.gz
-rw-r--r--. 1 root root 11933315 7月 14 17:53 etc-20240714175301.tar.gz
-rw-r--r--. 1 root root 11933315 7月 14 17:54 etc-20240714175401.tar.gz
-rw-r--r--. 1 root root 11933315 7月 14 17:55 etc-20240714175501.tar.gz
-rw-r--r--. 1 root root 11933315 7月 14 17:56 etc-20240714175601.tar.gz
-rw-r--r--. 1 root root 11933315 7月 14 17:57 etc-20240714175701.tar.gz
-rw-r--r--. 1 root root 11933315 7月 14 17:58 etc-20240714175801.tar.gz
2.时间
# 输出时间
[root@localhost ~]# date "+%T"
17:24:56
#输出日期和时间
[root@localhost ~]# date "+%F%T"
2024-07-1417:25:03
#在日期和时间中添加间隔
[root@localhost ~]# date "+%F-%T"
2024-07-14-17:25:11
[root@localhost ~]# date "+%F %T"
2024-07-14 17:25:15
[root@localhost ~]# date "+%F_%T"
2024-07-14_17:25:29
# 输出年
[root@localhost ~]# date "+%Y"
2024
# 输出年月日
[root@localhost ~]# date "+%Y%m%d"
20240714
# 输出年月日时分秒
[root@localhost ~]# date "+%Y%m%d%H%M%S"
20240714172653
[root@localhost ~]#


 2108
2108

 被折叠的 条评论
为什么被折叠?
被折叠的 条评论
为什么被折叠?
 到【灌水乐园】发言


